
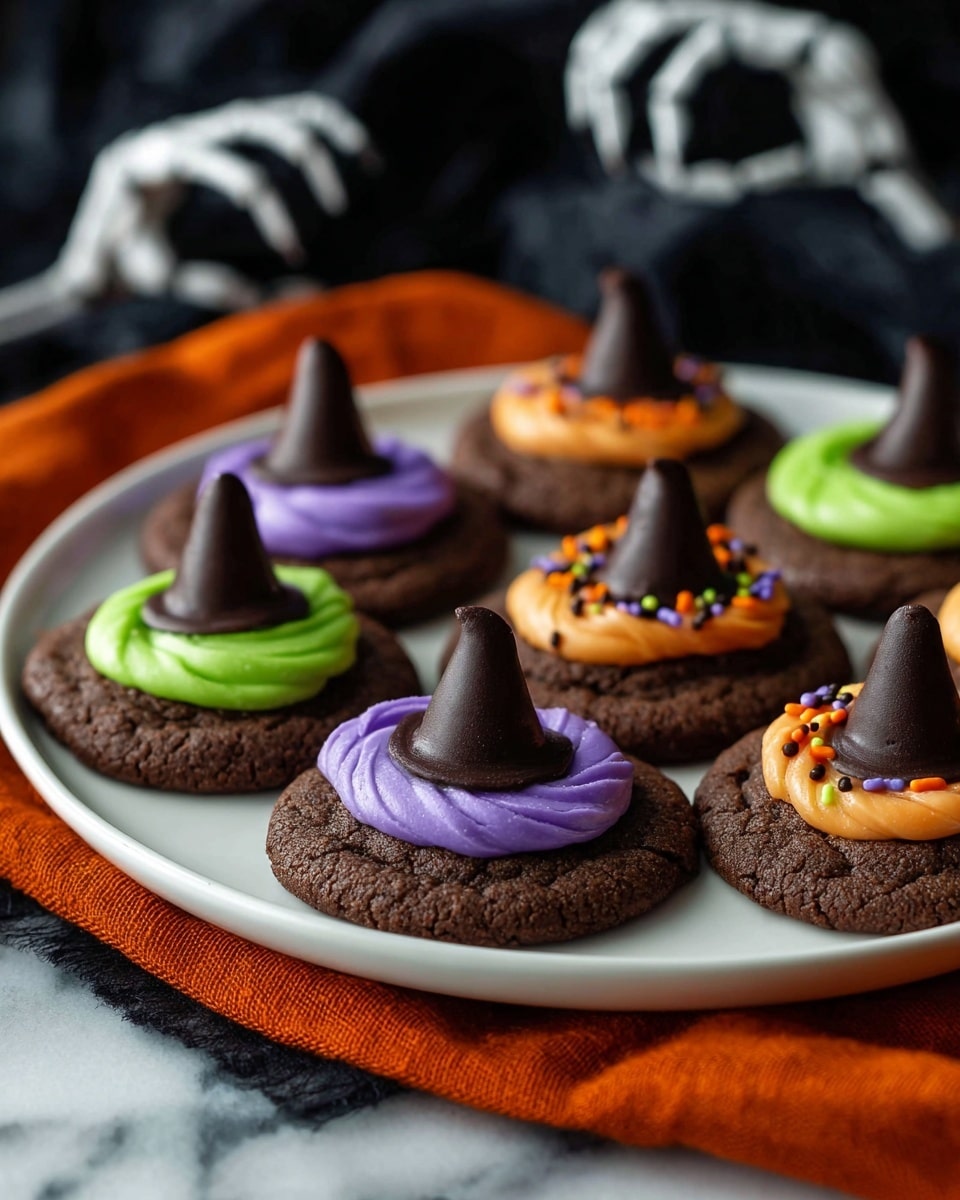
Witch Hat Cookies Recipe
If you’re on the hunt for a festive and fun treat this Halloween, you’re going to adore this Witch Hat Cookies Recipe. These charming cookies are not just adorable to look at, but they also hit that perfect balance of chocolatey richness and sweet frosting that melts in your mouth. Trust me, once you try these, they’ll become your go-to for every spooky celebration — and I’ll share everything you need to make them a smashing success!
Why This Recipe Works
- Perfect Texture: The combination of cocoa and softened butter gives a tender yet sturdy cookie base that holds the frosting and Kiss beautifully.
- Simple Yet Impressive: Minimal ingredients deliver maximum flavor and a super cute Halloween presentation that impresses without stress.
- Customizable Frosting: You can easily tint the frosting any color you want — I love bright purples and greens to really bring out the witchy vibes!
- Fun for All Ages: From kids to adults, these cookies are a hit at parties and bake sales alike — a guaranteed crowd-pleaser.

Ingredients & Why They Work
This Witch Hat Cookies Recipe uses straightforward, pantry-friendly ingredients that blend into a cookie dough perfectly rich in chocolate flavor and tender crumb. Choosing quality cocoa powder and fresh butter really makes a difference here, and the sugar roll technique gives a subtle sparkle that’s just irresistible.
- All Purpose Flour: Provides the structure you need for a soft yet sturdy cookie.
- Natural Unsweetened Cocoa Powder: Adds deep chocolate flavor with a slightly earthy tone to balance the sweetness.
- Baking Soda: Helps the cookies rise gently for softness without flattening.
- Salt: Enhances all the other flavors and keeps the chocolate from tasting flat.
- Unsalted Butter: Ensures you control the salt level and gives a rich, creamy base.
- Granulated Sugar & Brown Sugar: Brown sugar adds moisture and chewiness while granulated sugar adds crunch and sweetness.
- Egg: Binds everything together and adds a tender crumb.
- Vanilla Extract: Just a hint to lift all the flavors and round out the chocolate.
- Granulated Sugar (for rolling): Creates a delicate texture contrast and a pretty finish on the cookies.
- Powdered Sugar (for frosting): Produces silky smooth frosting making it easy to pipe and hold the Hershey’s Kiss in place.
- Gel Food Coloring: The best way to get intense, vibrant donut colors without thinning your frosting.
- Hershey’s Kisses: The signature “witch hat” topper that adds charm and extra chocolatey goodness.
- Halloween Sprinkles: Optional but delightful for adding a festive crunch and color.
Tweak to Your Taste
I’m a big fan of adding my own little touches to this Witch Hat Cookies Recipe. Whether it’s adjusting the food coloring shade or trying different frosting flavors, I encourage you to get creative — it’s half the fun! For instance, I once swapped vanilla frosting for a peppermint one to surprise guests and it was a hit!
- Frosting Flavor Swap: Add a dash of peppermint or cinnamon extract to your frosting for seasonal twists.
- Chocolate Variations: Use dark cocoa powder for a richer, more intense cookie or milk cocoa for a sweeter bite.
- Dietary Adjustments: Try using a vegan butter substitute and your favorite egg replacer for a dairy-free, egg-free version.
- Sprinkle Mix: Use glow-in-the-dark sprinkles or edible glitter for an extra magical effect during Halloween parties.
Step-by-Step: How I Make Witch Hat Cookies Recipe
Step 1: Mix Your Dry Ingredients
Start by preheating your oven to 350ºF. Then, in a medium-sized bowl, whisk together the all-purpose flour, cocoa powder, baking soda, and salt. This step ensures your cocoa and leavening agents are evenly distributed so each cookie bakes perfectly. I usually sift the cocoa powder to avoid any clumps — it makes the dough smoother and neater!
Step 2: Cream Your Butter and Sugars
In a separate bowl, cream together softened unsalted butter with granulated sugar and brown sugar using a mixer on low speed. It’s important to start slow or you’ll get sugar everywhere — trust me, I’ve learned the hard way! Once creamy and combined, add the egg and vanilla extract, mixing again gently. This blend creates the rich, flavorful base for your cookies.
Step 3: Combine Dry and Wet Ingredients
Gently fold the dry mixture into your wet batter, using low speed or a wooden spoon — overmixing here makes tough cookies. What you want is just enough to bring everything together into a soft dough that’s easy to scoop. It’ll be slightly sticky but manageable.
Step 4: Roll and Sugar Coat Your Cookie Dough
Using a small cookie scoop or tablespoon, drop dough balls onto a clean surface and roll them gently between your palms to get uniform shapes. Then roll each ball in granulated sugar for a sparkling finish — this little detail adds subtle crunch and shine that’s so charming! Place them spaced 2-3 inches apart on a silicone mat-lined or parchment-lined baking sheet.
Step 5: Bake to Perfection
Bake your cookies for 8 to 11 minutes at 350ºF. The sweet spot is when they look set but still slightly soft in the center — they’ll firm up as they cool. Let them rest on the baking sheet for 10 minutes before transferring to a cooling rack. This helps them keep their structure and prevents breakage. Bake one sheet at a time to control temperature and timing perfectly.
Step 6: Whip Up the Frosting
While the cookies cool, beat together softened butter, powdered sugar, and vanilla extract until fluffy with an electric mixer. Divide the frosting into a few bowls and stir in your favorite gel food coloring — I like a mix of green and purple for that witchy charm! Gel coloring keeps frosting thick, so it holds up well on the cookies.
Step 7: Assemble Your Witch Hats
Transfer the colored frosting to a piping bag or a sandwich bag with a small cut in one corner. Pipe a generous dollop right in the center of each cookie, then gently press a Hershey’s Kiss on top, pushing down just enough so some frosting peeks out from the sides. If you love a bit of sparkle, sprinkle with Halloween-themed sprinkles immediately. Repeat until all your witch hats are gloriously adorned!
Pro Tips for Making Witch Hat Cookies Recipe
- Softened Butter is Key: Make sure your butter is truly softened (not melted!) for easy creaming and perfect cookie texture.
- Don’t Skip the Sugar Coat: Rolling dough balls in sugar before baking adds that delightful sparkle and a crisp edge.
- Pipe Frosting While Cookies Are Cool: Frosting warm cookies can cause it to melt and slide off, so patience pays off here.
- Press Hershey’s Kiss Gently: Too much force squashes out all the frosting and breaks cookies — press just enough to stick.
How to Serve Witch Hat Cookies Recipe
Garnishes
I usually skip extra garnishes because the Hershey’s Kiss and sprinkles do all the talking, but a light dusting of edible glitter or a few mini candy eyes can add such a playful touch. When serving to kids, they love little bowls of extra sprinkles so they can “decorate” their own witch hats before eating.
Side Dishes
These cookies pair wonderfully with a mug of warm apple cider or pumpkin spice latte. For parties, I like setting up a dessert table with other Halloween treats like caramel popcorn and candy corn for a festive vibe that your guests will remember.
Creative Ways to Present
One of my favorite presentation ideas is to place the witch hat cookies standing on a tiered cake stand surrounded by faux fall leaves and mini pumpkins. Another fun trick is using black lace doilies underneath each cookie for an elegant but spooky effect. For kid-friendly events, I’ve made little “witch hat” bags using paper cones and added a cookie on top as a cute party favor.
Make Ahead and Storage
Storing Leftovers
I store any leftover witch hat cookies in an airtight container at room temperature — they usually last up to 5 days, but honestly, they rarely sit that long in my house! Keeping the frosting-side up helps avoid smudging, so consider layering with parchment paper if stacking.
Freezing
Yes, you can freeze these beautifully! I recommend freezing the plain baked cookies (without frosting) in a single layer on a tray first, then transferring them to a freezer-safe bag. When ready, thaw completely before frosting and assembling for best results.
Reheating
Since these are cookies, you don’t need to reheat them, but if you prefer warmed cookies, pop one in the microwave for about 10 seconds — just enough to soften it without melting the frosting. Perfect for that cozy, fresh-baked feel!
FAQs
-
Can I make the cookie dough ahead of time?
Absolutely! You can prepare the dough up to 24 hours in advance and keep it tightly wrapped in the fridge. This actually helps the flavors meld and can lead to even tastier cookies.
-
What if I can’t find Hershey’s Kisses?
No worries! Mini chocolate chips or small chocolate candies work fine as tops — just make sure they’re large enough to act as the pointed “hat” shape.
-
Can I use regular food coloring instead of gel?
You can, but gel food coloring is better because it won’t thin out the frosting and gives a more vibrant color. Regular food coloring might make it runnier.
-
What’s the best way to get even-sized cookies?
I highly recommend using a small cookie scoop or a tablespoon measure to portion dough consistently — this helps the cookies bake evenly and look uniform when finished.
Final Thoughts
This Witch Hat Cookies Recipe has been such a joy for me to make year after year. It’s the kind of recipe that brings out smiles, sparks creativity with decorating, and tastes so good you’ll want to stash away a few for yourself! Whether you’re baking with kids, for a party, or just a cozy night in, these cookies have a way of making everything feel a little more magical. I can’t wait for you to try them and see how much fun you have bringing this spooky treat to life.
Print
Witch Hat Cookies Recipe
- Prep Time: 15 minutes
- Cook Time: 11 minutes
- Total Time: 26 minutes
- Yield: 16 cookies
- Category: Dessert
- Method: Baking
- Cuisine: American
Description
These Witch Hat Cookies are a festive Halloween treat featuring rich cocoa cookies rolled in sugar, topped with colorful frosting, a Hershey’s Kiss, and fun sprinkles. Crispy on the edges and soft in the center, they are perfect for parties or seasonal celebrations.
Ingredients
For the Cookies
- 1 ½ cups (180g) all purpose flour
- ¼ cup (21g) natural unsweetened cocoa powder
- ½ tsp baking soda
- ½ tsp salt
- ½ cup (113g) unsalted butter, softened
- ½ cup (99g) granulated sugar
- ½ cup (107g) brown sugar
- 1 large egg
- 1 tsp vanilla extract
- ⅓ cup (66g) granulated sugar, for rolling
For the Frosting
- 1 stick unsalted butter (½ cup), room temperature
- 1 cup (113g) powdered sugar
- 1 tsp vanilla extract
- Gel food coloring
- Hershey’s Kisses
- Halloween sprinkles
Instructions
- Preheat the oven: Set your oven to 350ºF to prepare for baking the cookies.
- Mix dry ingredients: In a mixing bowl, whisk together the all purpose flour, cocoa powder, baking soda, and salt until well combined.
- Cream butter and sugars: In a separate large bowl, use a mixer on low speed to cream the softened butter with granulated sugar and brown sugar until smooth and combined.
- Add egg and vanilla: Beat in the egg and vanilla extract with the butter mixture on low speed until fully incorporated.
- Combine wet and dry ingredients: Gently add the dry ingredient mixture to the wet ingredients, mixing on low speed or folding by hand just until combined to form the cookie dough.
- Form and sugar the dough balls: Use a small cookie scoop or tablespoon to portion tablespoon-sized dough balls. Roll each between your hands to make uniform balls, then roll each ball in ⅓ cup granulated sugar to coat.
- Arrange and bake: Place the sugared dough balls 2-3 inches apart on a silicone-lined baking sheet. Bake in the preheated oven for 11 minutes.
- Cool cookies: Allow the baked cookies to cool on the baking sheet for 10 minutes before transferring them to a cooling rack to cool completely.
- Prepare frosting: In a mixing bowl, beat the unsalted butter, powdered sugar, and vanilla extract together on medium speed until fluffy. Divide the frosting into bowls and color each with gel food coloring as desired.
- Assemble the cookies: Transfer the colored frosting into a piping bag or sandwich bag with the tip cut off. Pipe a dollop of frosting onto the center of each cooled cookie, then press a Hershey’s Kiss into the frosting so it spreads slightly. Decorate with Halloween sprinkles as desired. Repeat until all cookies are topped.
Notes
- Make sure the butter is softened to room temperature for easier creaming with sugars.
- Rolling the cookie dough balls in granulated sugar adds a crispy, sweet outer layer.
- Allow cookies to cool completely before frosting to prevent melting or sliding of the frosting.
- Use gel food coloring for vibrant frosting colors without thinning the consistency.
- Cookie sheets can be baked one at a time to ensure even baking.
- Store cookies in an airtight container to maintain freshness for up to 5 days.
Nutrition
- Serving Size: 1 cookie
- Calories: 150 kcal
- Sugar: 12 g
- Sodium: 90 mg
- Fat: 7 g
- Saturated Fat: 4 g
- Unsaturated Fat: 3 g
- Trans Fat: 0 g
- Carbohydrates: 20 g
- Fiber: 1 g
- Protein: 2 g
- Cholesterol: 25 mg

