
Valentine Chocolate Dipped Cookie Bites Recipe
If you’re looking for a sweet treat that’s both charming and delicious, you’ll absolutely adore this Valentine Chocolate Dipped Cookie Bites Recipe. Perfect for sharing with your special someone or friends, these little cookie bites combine buttery, tender hearts with a dreamy dip of dark and white chocolate—plus a pop of colorful nonpareils to make them festive and fun. Let me show you how to make these fan-freaking-tastic treats that are as fun to make as they are to eat!
Why This Recipe Works
- Simple Ingredients: You only need a handful of pantry staples, making it easy to whip up anytime.
- Perfect Texture: The cookie dough is tender but sturdy enough to hold its shape and dip in chocolate without breaking.
- Chocolate Variety: Using both white and dark melting wafers creates a beautiful contrast and flavor balance.
- Customizable Decoration: You get to pick your own sprinkles or nonpareils to make these cookie bites uniquely yours.

Ingredients & Why They Work
These ingredients come together to create a buttery, tender base that’s just right for a quick dip in chocolate. I always recommend using good-quality butter and chocolate wafers for the best flavor and smooth coating.
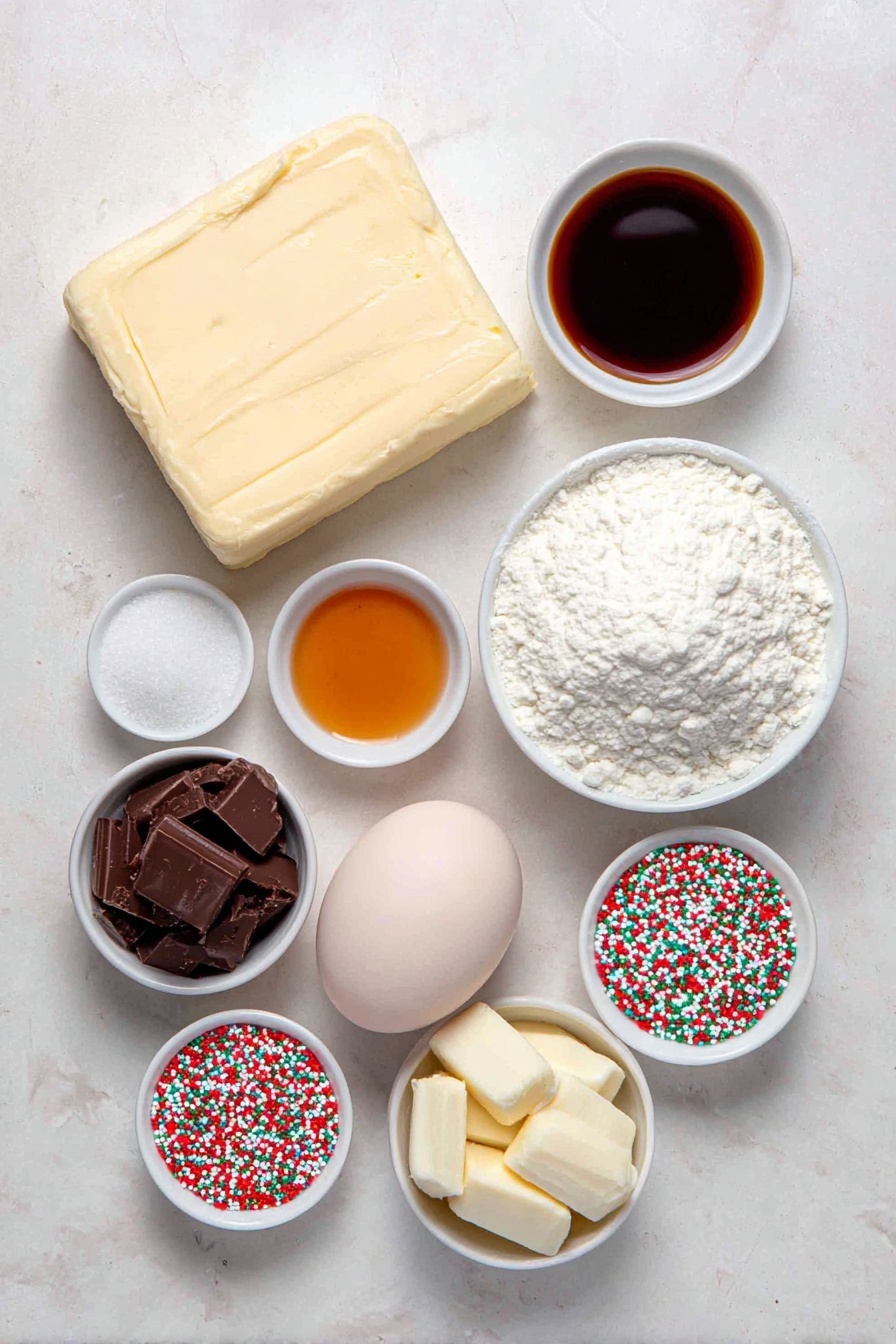
- Unsalted Butter: Softened for easy creaming and a rich, flaky texture.
- Sugar: Adds sweetness and helps with browning during baking.
- Vanilla Extract: Enhances flavors and brings warmth to the dough.
- Salt: Balances sweetness and elevates the overall taste.
- Egg Yolk: Gives richness and helps bind the dough.
- All-Purpose Flour: Provides structure and creates that tender crumb you’re after.
- Dark Chocolate Melting Wafers: For a rich, smooth chocolate coating.
- White Chocolate Melting Wafers: Offers a sweet contrast and helps with the festive look.
- Nonpareils: Adds crunchy texture and bright, colorful decoration.
Tweak to Your Taste
I love to make these cookie bites my own by playing around with different sprinkles or even adding a hint of almond extract instead of vanilla for a twist. Feel free to adjust it however you like—after all, baking is part science, part personal expression.
- Variation: Once, I swapped out some of the dark chocolate wafers for milk chocolate and my kids went nuts for it—it’s sweeter and softer, perfect if you want a milder chocolate flavor.
- Dietary Mods: For dairy-free, try a vegan butter substitute and dairy-free chocolate melts. Just keep an eye on texture—it might be a bit different.
- Seasonal Changes: Around holidays, I sometimes swap out heart cutters for stars or flowers to match the occasion.
Step-by-Step: How I Make Valentine Chocolate Dipped Cookie Bites Recipe
Step 1: Creaming the Butter and Sugar
Start by softening your butter to room temperature—this makes all the difference when creaming. Beat the butter and sugar together until the mixture is light and fluffy. I use a stand mixer, but a hand mixer works just fine. This step traps air, which gives the cookies that delicate texture.
Step 2: Mixing in Flavor and Structure
Stir in vanilla extract and salt next, scraping down the bowl so everything blends evenly. Then add the egg yolk and beat until just combined. Don’t overmix here—you want it just integrated to keep the cookies tender.
Step 3: Adding the Flour
With your mixer on low, gradually add the flour. This part needs some patience because the dough becomes crumbly and dry-looking initially. Scrape the bowl sides and bottom a few times to evenly incorporate all the flour. Once it looks like a rough crumb, turn it out onto a clean surface and press it into a cohesive ball.
Step 4: Chilling & Rolling Out
Flatten your dough ball into a disk, cover it with plastic wrap, and chill for 15 minutes. This rest time helps the butter firm up and prevents the cookies from spreading too much while baking. After chilling, roll the dough out to about ¼ inch thickness on a lightly floured surface.
Step 5: Cutting and Baking
Use your cookie cutters—heart shapes are my go-to for Valentine’s Day—to cut out your cookies. I like to lightly flour the cutters to stop sticking. Don’t forget: once you finish cutting with one section of dough, re-roll the scraps to maximize yield. Bake at 350°F for 10-12 minutes, keeping an eye for light golden edges—this is the sweet spot for the perfect bite.
Step 6: Melting & Dipping Chocolate
While the cookies cool completely, melt your dark and white chocolate wafers separately according to package instructions. I usually microwave in short bursts, stirring frequently to prevent scorching. Then, holding the cookie base firmly, dip the top part into chocolate, letting any excess drip off before setting it on wax paper. Immediately sprinkle your nonpareils to catch the chocolate before it hardens. Alternate colors for a pretty, festive look.
Step 7: Cooling and Serving
Let the chocolate harden at room temperature or pop the tray into the fridge for quicker setting. Once firm, these Valentine chocolate dipped cookie bites are ready to enjoy or gift!
Pro Tips for Making Valentine Chocolate Dipped Cookie Bites Recipe
- Room Temperature Butter: Soft butter blends more evenly with sugar, giving a better cookie texture.
- Scrape the Bowl Often: This ensures every bit of flour is mixed, avoiding dry crumbly spots in your dough.
- Don’t Overbake: Pull the cookies out when their edges just start turning golden for a tender, melt-in-your-mouth bite.
- Dipping Confidence: Use a firm grip on the cookie base and dip quickly to avoid sogginess or breaking.
How to Serve Valentine Chocolate Dipped Cookie Bites Recipe

Garnishes
I love sprinkling classic rainbow nonpareils right after dipping because they add a nostalgic crunch and vibrant splash of color. Sometimes, I swap in heart-shaped sugar sprinkles or even edible glitter for extra sparkle—it never fails to impress guests!
Side Dishes
These cookie bites pair wonderfully with a cup of fresh coffee or lightly brewed tea. For a special occasion, I like to serve them alongside a bowl of fresh berries or some rich whipped cream to balance the sweet chocolate.
Creative Ways to Present
For Valentine’s Day, I like arranging these cookie bites on a festive tray with rose petals or lining them in small clear cellophane bags tied with red ribbons. It’s a sweet and simple way to make your gift or dessert feel that much more special.
Make Ahead and Storage
Storing Leftovers
I store leftover cookie bites in an airtight container at room temperature. They keep well for up to five days, but honestly, they usually disappear before then in my house!
Freezing
If you want to make these ahead in bulk, I freeze the baked, undecorated cookies first, wrapped tightly in plastic and stored in a freezer bag. When ready to serve, thaw and then dip them in chocolate for fresher coating and crunch.
Reheating
Since these are cookies, reheating isn’t necessary, but if you prefer them slightly warm, I pop them in the microwave for 5-7 seconds—just enough to soften the chocolate without melting it fully and losing that crisp snap.
FAQs
-
Can I use regular chocolate chips instead of melting wafers?
You can, but melting wafers are formulated to melt smoothly and maintain a good consistency for dipping. Regular chips might be thicker or grainier and harder to melt evenly. If using chips, try melting with a bit of shortening to get that silky dip.
-
How do I prevent cookies from breaking when dipping?
Make sure your cookies are completely cooled before dipping and hold them firmly by the base. Also, dip quickly and don’t submerge the entire cookie. This keeps them sturdy and crisp.
-
Can I make the dough ahead of time?
Absolutely! You can prepare the dough, wrap it tightly, and refrigerate it for up to 2 days before rolling and baking. This actually helps develop deeper flavor.
-
Are these cookies gluten-free?
The recipe uses all-purpose flour, so these cookies aren’t gluten-free as-is. However, you can try substituting with a gluten-free flour blend designed for baking. Results can vary, so I recommend testing a small batch first.
-
How long do the dipped cookies stay fresh?
Stored in an airtight container at room temperature, these cookies stay fresh for about 4-5 days. The chocolate dip keeps them nicely sealed and tasty during this time.
Final Thoughts
Honestly, this Valentine Chocolate Dipped Cookie Bites Recipe has become one of my favorites for holidays and gifting because it feels both special and approachable. The balance of buttery cookie and smooth chocolate always scores major brownie points with family and friends. Plus, dipping and decorating make it a fun activity to do together. I hope you enjoy making and sharing these as much as I do—trust me, they’re going to be your go-to recipe for heartfelt treats!
Print
Valentine Chocolate Dipped Cookie Bites Recipe
- Prep Time: 30 minutes
- Cook Time: 12 minutes
- Total Time: 42 minutes
- Yield: 45 cookies
- Category: Dessert
- Method: Baking
- Cuisine: American
Description
Delightful Valentine Cookies made with a buttery dough, baked to perfection, and dipped in dark and white chocolate with festive nonpareil decorations. Perfect for gifting or sharing during the Valentine season.
Ingredients
Cookie Dough
- 1 cup (226 g) unsalted butter softened
- ¾ cups (150 g) sugar
- 1 teaspoon vanilla extract
- ½ teaspoon salt
- 1 large egg yolk
- 2 ¼ cups (295 g) all-purpose flour
Chocolate Coating & Decoration
- 1 cup (170 g) dark chocolate melting wafers
- 1 cup (170 g) white chocolate melting wafers
- Nonpareils for decoration
Instructions
- Cream Butter and Sugar: Combine softened butter and sugar in the bowl of a stand mixer or a large bowl. Beat until well-creamed and fluffy.
- Add Vanilla and Salt: Stir in vanilla extract and salt until well-combined. Scrape down the sides of the bowl to ensure even mixing.
- Incorporate Egg Yolk: Add the large egg yolk and beat until fully combined with the mixture.
- Add Flour: With the mixer on medium-low speed, gradually add the all-purpose flour. Scrape down the sides and bottom of the bowl several times to fully incorporate the dry mixture and form a crumbly dough.
- Form Dough Ball: Transfer the dough to a clean surface and use your hands to form it into a cohesive ball.
- Chill Dough: Flatten the dough ball into a disk about 1 inch thick, cover it with plastic wrap, and chill in the refrigerator for 15 minutes.
- Preheat Oven and Prepare Baking Sheet: Preheat your oven to 350°F (175°C) and line cookie sheets with parchment paper. Set aside.
- Roll Out Dough: Once chilled, transfer the dough to a lightly floured surface. Use a lightly floured rolling pin to roll it out to ¼ inch thickness.
- Cut Out Cookies: Lightly flour your cookie cutters, cut out shapes from the dough, and transfer them to the ungreased cookie sheet. Recombine scraps, roll out, and cut again to maximize yield.
- Bake Cookies: Bake cookies at 350°F for 12 minutes or until edges begin to turn lightly golden brown. Adjust time if cookies are smaller or larger. Allow cookies to cool completely before decorating.
- Prepare Chocolate: Melt dark chocolate melting wafers in one bowl and white chocolate melting wafers in another, following package instructions.
- Dip Cookies: Holding each cooled cookie by the base, dip the surface into the melted chocolate. Place the dipped side up onto a wax paper-lined cookie sheet. Immediately sprinkle with nonpareils or sprinkles.
- Alternate and Repeat: Alternate dipping cookies in dark and white chocolate until all are coated and decorated.
- Allow Chocolate to Harden: Let the chocolate set and harden completely before serving or storing.
Notes
- The baking time may vary depending on the size and thickness of the cookie cutters used; adjust accordingly.
- Chilling the dough helps with easier rolling and cleaner cookie shapes.
- Use parchment paper on baking sheets to prevent sticking and ensure even baking.
- For easier chocolate melting, use a double boiler or microwave in short bursts, stirring frequently.
- Store cookies in an airtight container at room temperature to maintain freshness.
Nutrition
- Serving Size: 1 cookie
- Calories: 150 kcal
- Sugar: 10 g
- Sodium: 60 mg
- Fat: 9 g
- Saturated Fat: 5 g
- Unsaturated Fat: 3 g
- Trans Fat: 0 g
- Carbohydrates: 16 g
- Fiber: 1 g
- Protein: 2 g
- Cholesterol: 20 mg

