
Spider Web Cupcakes Recipe
If you’ve been on the lookout for a festive, fun, and downright adorable way to celebrate Halloween or just love quirky dessert ideas, you’re going to flip for this Spider Web Cupcakes Recipe. These cupcakes aren’t just good—they’re showstoppers, combining rich chocolate flavor with a spooky spider web design that’s surprisingly easy to pull off. I remember making these for a Halloween party last year, and seeing those little Oreo spiders all perched on perfect webs was a total crowd-pleaser. Stick around, because I’ll walk you through every step and share tips to make sure you nail it on your first try!
Why This Recipe Works
- Rich Chocolate Base: The combination of cocoa and a hint of instant coffee really deepens the chocolate flavor without tasting like coffee.
- Fluffy, Creamy Frosting: The buttercream is smooth, spreadable, and easy to tint perfectly for the web design.
- Fun & Simple Design: You only need a few basic piping skills, and yet the spider web looks impressive and festive.
- Sweet & Playful Garnishes: Mini Oreos and candy eyeballs instantly turn these cupcakes into little spider critters kids and adults will adore.

Ingredients & Why They Work
To get that perfect balance of moist, chocolatey cupcakes topped with luscious frosting that pipes beautifully, I chose ingredients that complement each other and are easy to find. Here’s why each plays its part in the magic of the Spider Web Cupcakes Recipe.
- All-purpose flour: Provides structure for the cupcakes without being too dense.
- Cocoa powder: Gives the deep, rich chocolate flavor; using unsweetened natural or Dutch-processed will both work great.
- Instant coffee granules: Optional but highly recommended to enhance the chocolate notes without adding actual coffee flavor.
- Baking soda & baking powder: Perfect combo for achieving a nice rise and tender crumb.
- Unsalted butter: Adds richness and helps create a tender texture—make sure it’s at room temp for easy mixing!
- Granulated sugar: Sweetens and helps create a light crumb when properly creamed with butter.
- Eggs: Bind everything together while adding moisture.
- Buttermilk: Adds tanginess and moisture, keeping cupcakes soft and fresh longer.
- Hot tap water: Helps bloom the cocoa and create a smoother batter.
- Powdered sugar: For silky, sweet frosting that’s easy to pipe.
- Vanilla extract: Adds subtle depth and balances the chocolate’s richness.
- Black gel food coloring: For the dramatic spider web and spider legs—you want gel for vibrant color without thinning the frosting.
- Candy eyeballs & Mini Oreos: These garnishes transform your cupcakes into playful spider characters!
Tweak to Your Taste
One of the best parts about this Spider Web Cupcakes Recipe is how easy it is to customize. Whether you want to dial up the chocolate, try a different frosting flavor, or swap in other festive garnishes, it’s all about making it yours and having some fun in the process.
- Chocolate Variations: On a whim, I once replaced half the cocoa powder with melted dark chocolate for an extra fudgy cupcake—delicious, though a slight texture change.
- Frosting Flavors: Try cream cheese frosting instead of buttercream for a tangier contrast, or add a hint of peppermint extract for a holiday twist.
- Decorating Variations: Play around with colored icing webs in orange or purple for Halloween, or even gold and silver for a classy spider web effect on other occasions.
- Dietary Modifications: This can be adapted to gluten-free by swapping flour blends and using dairy-free alternatives for butter and milk.
Step-by-Step: How I Make Spider Web Cupcakes Recipe
Step 1: Gather and Prep Your Ingredients
Start by preheating your oven to 350ºF and line a muffin tin with cupcake liners. Then, whisk together your dry ingredients—flour, cocoa powder, instant coffee powder, baking powder, baking soda, and salt—in one bowl. This little combo builds your cupcake’s flavor base and helps your cupcakes rise beautifully. Having everything ready before mixing saves last-minute scrambles.
Step 2: Cream Butter and Sugar, Then Add Eggs
In a separate bowl, beat the room-temperature butter and sugar with an electric mixer until it’s pale and fluffy, about two minutes. This is such a key step for light cupcakes, so don’t rush it. Next, add the eggs one at a time, beating briefly after each. The batter might look slightly curdled here, but that’s totally normal.
Step 3: Alternate Mixing Dry Ingredients and Liquids
Add half the buttermilk, then half the dry ingredients, mixing gently after each addition. Then pour in the hot tap water with the remaining buttermilk, mix until just combined, then add the rest of the dry ingredients and mix on low. This alternating method keeps the batter tender and prevents overmixing, which I learned the hard way after a few denser batches.
Step 4: Bake and Cool Your Cupcakes
Fill your cupcake liners about halfway and pop them into the oven. Bake for 17-19 minutes, or until a toothpick inserted near the center comes out with just a few moist crumbs. Once out, let them cool completely before frosting—trust me, frosting warm cupcakes leads to a melty mess.
Step 5: Whip Up the Buttercream Frosting
Beat your butter and vanilla extract on medium speed until fluffy. Then add the powdered sugar gradually, mixing on low so you don’t end up with a powdery cloud. If the frosting feels too thick, add a dash of milk or cream to get that perfect spreading texture. If you want it extra fluffy like I do, add ¼ cup of heavy whipping cream near the end and beat for 3-4 minutes.
Step 6: Create Your Spider Web Design
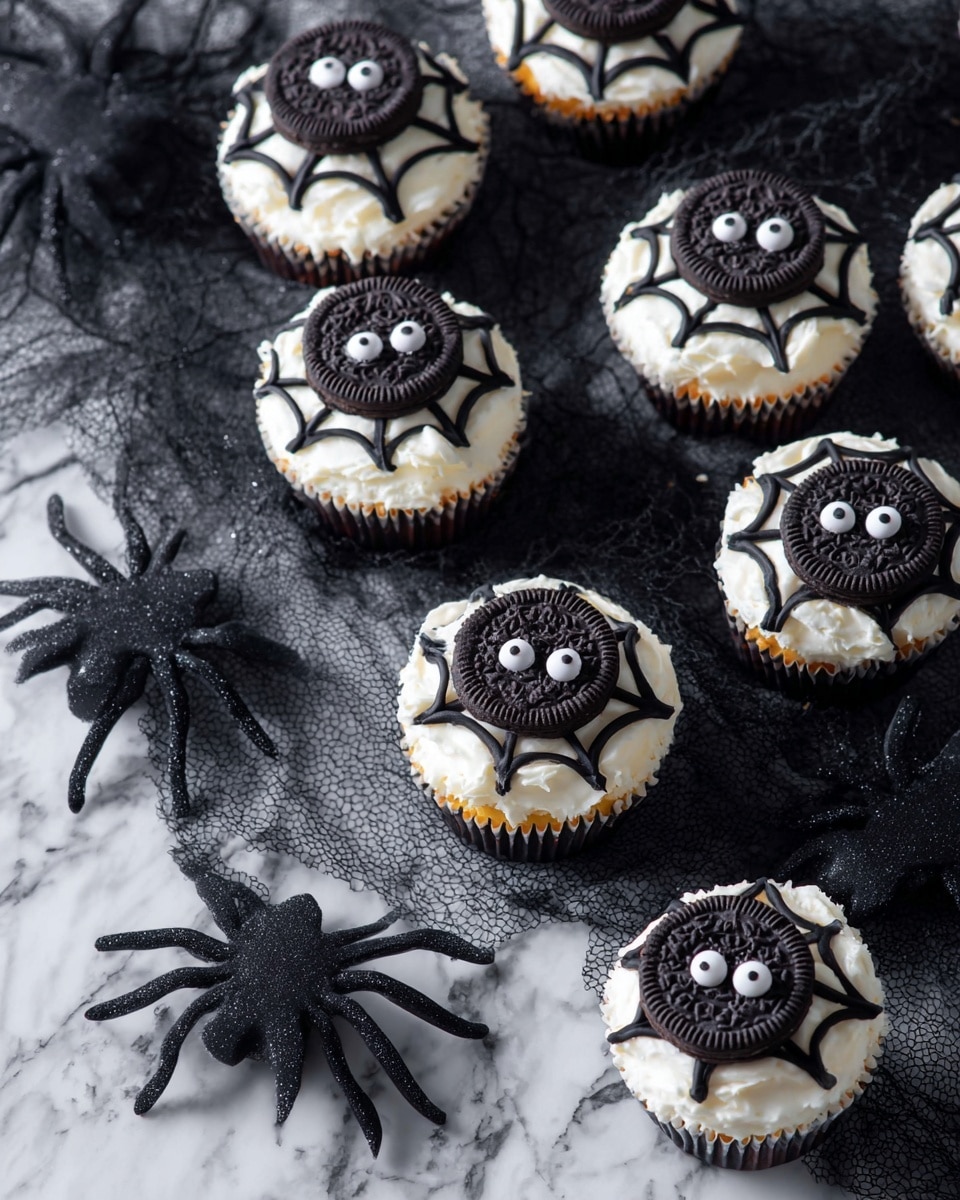
Separate about 1 cup of frosting and tint it black using gel food coloring—gel is key because regular liquid color can thin the frosting. Spread the white frosting thickly on each cupcake as your base. Then pipe a horizontal black line across the cupcake, add two diagonal lines to make an X, and finally connect these with slightly curved lines to simulate the web. I love this part because even if your piping isn’t perfect, the design still looks impressively spooky!
Step 7: Add the Spiders and Finishing Touches
Top your web with a mini Oreo, and use a little bit of frosting to stick candy eyeballs on it — this becomes your spider’s head. Then pipe eight legs, four on each side of the mini Oreo, using the black frosting. This final step is my favorite; seeing those little spiders come to life never gets old!
Pro Tips for Making Spider Web Cupcakes Recipe
- Use Room Temperature Ingredients: Butter and eggs at room temp blend better, making your batter smoother and cupcakes fluffier.
- Don’t Overmix the Batter: Mix until ingredients are just combined to keep cupcakes tender, avoiding toughness.
- Test Your Oven Temperature: I always check with an oven thermometer because a too-hot oven can burn edges while leaving centers wet.
- Practice Piping on Parchment: If you’re nervous about the spider web design, practice piping the pattern on parchment paper before decorating cupcakes.
How to Serve Spider Web Cupcakes Recipe
Garnishes
I usually stick with the mini Oreos and candy eyeballs because they add such a fun, playful vibe and are easy to find. But sometimes for an extra spooky touch, I sprinkle a few edible glitter stars for a “magical web” effect. It’s those small details that guests notice and rave about!
Side Dishes
These cupcakes pair beautifully with a light fruit salad or a fresh pumpkin spice latte on the side. For a party setting, I love serving them alongside a bowl of candied nuts or simple vanilla bean ice cream to balance the rich chocolate.
Creative Ways to Present
One year, I arranged the cupcakes on a tiered stand with edible cobweb decorations draped around, plus some faux spiders and pumpkin props scattered about. For kids’ parties, I’ve delivered them in cute Halloween-themed boxes so each guest can take a spider home. Presentation really cranks up the wow factor!
Make Ahead and Storage
Storing Leftovers
I usually keep the frosted cupcakes in an airtight container in the fridge. They stay moist and fresh for up to 3 days. Just be sure to bring them to room temperature before serving so the buttercream tastes soft and creamy again.
Freezing
Freezing works like a charm! I freeze cupcakes without frosting first—it keeps their texture more intact. When I’m ready, I thaw them overnight in the fridge and then frost and decorate the next day. If you want to freeze frosted cupcakes, pop them in the freezer uncovered until the frosting hardens, then wrap tightly.
Reheating
Since these are cupcakes, reheating is more about bringing them back to room temperature. Just leave them out for about 30 minutes before serving. If you want the buttercream a little softer, a few seconds in the microwave (be careful!) can help, but I usually prefer to enjoy them as-is.
FAQs
-
Can I make this Spider Web Cupcakes Recipe dairy-free?
Absolutely! Swap the butter for a dairy-free margarine or coconut oil (though consistency might vary), use a non-dairy milk like almond or oat milk mixed with a splash of lemon juice or vinegar in place of buttermilk, and check that your candy eyeballs and decorations are also dairy-free.
-
How do I pipe the spider web if I’ve never done it before?
Start by practicing on a piece of parchment paper. Pipe a horizontal line, then two diagonal lines crossing to form an X. Next, connect the lines with curved lines that form the web pattern. Don’t worry if your lines aren’t perfect – it still looks spooky and fun!
-
Can I use store-bought frosting for this recipe?
You can, but homemade buttercream is worth the extra effort for taste and texture. If using store-bought, choose a stiff frosting that holds its shape well and tint it with gel food coloring for the web effect.
-
What’s the best way to store decorated cupcakes overnight?
Store them in an airtight container at room temperature if your kitchen isn’t too warm, or in the fridge if it is. Just make sure to let them come to room temp before serving for the best flavor and texture.
Final Thoughts
I can’t recommend this Spider Web Cupcakes Recipe enough if you want to impress your friends or family with something a little different this season—or anytime you’re in the mood for cute and delicious. It’s an easy recipe that feels special and festive without being fussy, and the smiles it brings are absolutely worth the few extra minutes piping each web. So grab your piping bag, and trust me—you’ll love the magic you create!
Print
Spider Web Cupcakes Recipe
- Prep Time: 35 minutes
- Cook Time: 19 minutes
- Total Time: 1 hour 24 minutes
- Yield: 24 cupcakes
- Category: Dessert
- Method: Baking
- Cuisine: American
Description
These Spider Web Cupcakes are a spooky and delicious treat perfect for Halloween or any themed party. Moist chocolate cupcakes are topped with fluffy vanilla buttercream and decorated with a fun spider web design, complete with mini Oreos and candy eyeballs for a creepy-crawly effect.
Ingredients
Chocolate Cupcakes
- 2 cups (240g) all purpose flour
- 3/4 cup (63g) cocoa powder, natural unsweetened or dutch processed
- 1 tsp instant coffee granules (optional)
- 1/2 tsp baking soda
- 1 tsp baking powder
- 1 tsp salt
- 1/2 cup (113g) unsalted butter, room temperature
- 1 1/2 cups (297g) granulated sugar
- 2 large eggs
- 1 cup (236ml) buttermilk
- 1/2 cup (118ml) hot tap water
Frosting
- 1 1/2 cups (339g) unsalted butter, room temperature
- 1 tsp vanilla extract
- 2-3 cups (227-339g) powdered sugar
- Dash of milk or heavy cream if frosting becomes too thick
Extras
- Candy eyeballs
- Piping bag
- Wilton 4 piping tip
- Black gel food coloring
- Mini Oreos
Instructions
- Preheat and Prepare: Preheat the oven to 350º F. Line a muffin pan with muffin liners to prevent sticking.
- Mix Dry Ingredients: In a mixing bowl, combine the all purpose flour, cocoa powder, instant coffee granules (if using), baking soda, baking powder, and salt. Set aside.
- Cream Butter and Sugar: In a separate bowl, beat the butter and granulated sugar with an electric mixer for 2 minutes until pale and fluffy. Add the eggs and beat for another 30 seconds to incorporate.
- Add Liquids and Dry Ingredients: Add half of the buttermilk and beat for about 20 seconds. Then add half of the dry ingredients and beat to combine. Add the remaining buttermilk plus the hot tap water and beat just until the liquid is mixed in. Finally, add the remaining dry ingredients and beat on low speed until combined. Avoid overmixing.
- Fill and Bake: Fill the muffin liners halfway with the batter. Bake for 19 minutes at 350º F or until a toothpick inserted into the center comes out with a few moist crumbs. Let cupcakes cool completely before frosting.
- Make Frosting: In a mixing bowl, beat butter and vanilla extract with an electric mixer for 1-2 minutes until fluffy. Gradually add powdered sugar on low speed until combined. If frosting is too thick, add a dash of milk or heavy cream. For extra fluffy frosting, add 1/4 cup heavy whipping cream when adding the last powdered sugar and whip for 3-4 minutes.
- Color Frosting: Remove about 1 cup of the frosting and add black gel food coloring to create black frosting for the spider web details.
- Decorate Cupcakes: Spread a generous amount of white frosting over each cooled cupcake. Transfer black frosting to a piping bag fitted with a Wilton 4 piping tip.
- Create Spider Web: Pipe a horizontal black line across the cupcake, then add two diagonal lines forming an X. Connect these lines with slightly curved lines, adding two curved lines per section to form a spider web pattern.
- Add Spider Decorations: Place a mini Oreo cookie onto the web. Attach candy eyeballs using a small dab of frosting. Pipe four spider legs on each side of the Oreo for a total of eight legs. Repeat for each cupcake.
Notes
- Using room temperature butter and eggs helps create a smoother batter and frosting.
- The instant coffee granules enhance the chocolate flavor but can be omitted if desired.
- If the frosting becomes too thick after adding powdered sugar, a little milk or cream will help loosen it.
- For a sturdier piping bag, consider using parchment paper or disposable piping bags.
- You can substitute mini Oreos with other small round cookies if preferred.
- Ensure cupcakes are completely cooled before frosting to prevent melting.
- For a vegan version, substitute butter and eggs with plant-based alternatives and use vegan-friendly powdered sugar.
Nutrition
- Serving Size: 1 cupcake
- Calories: 320 kcal
- Sugar: 27 g
- Sodium: 150 mg
- Fat: 18 g
- Saturated Fat: 11 g
- Unsaturated Fat: 6 g
- Trans Fat: 0 g
- Carbohydrates: 38 g
- Fiber: 3 g
- Protein: 4 g
- Cholesterol: 55 mg
