Spider Cookies Recipe
If you’re ready to impress your friends with a fun and delicious treat, then you’re going to love this Spider Cookies Recipe. These cookies are not just any chocolate chip cookies—they have a spooky twist that’s perfect for Halloween, themed parties, or anytime you want to add a little creativity to your baking. I’ve made this recipe more times than I can count, and every time, people ask for the secret. Stick around, and I’ll show you how to make these creepy-cute spider cookies with tips to nail them perfectly every time.
Why This Recipe Works
- Perfect Texture: These cookies balance soft centers with slightly crisp edges for that melt-in-your-mouth feel.
- Simple Ingredients: You likely have everything in your pantry, making it super easy to whip up anytime.
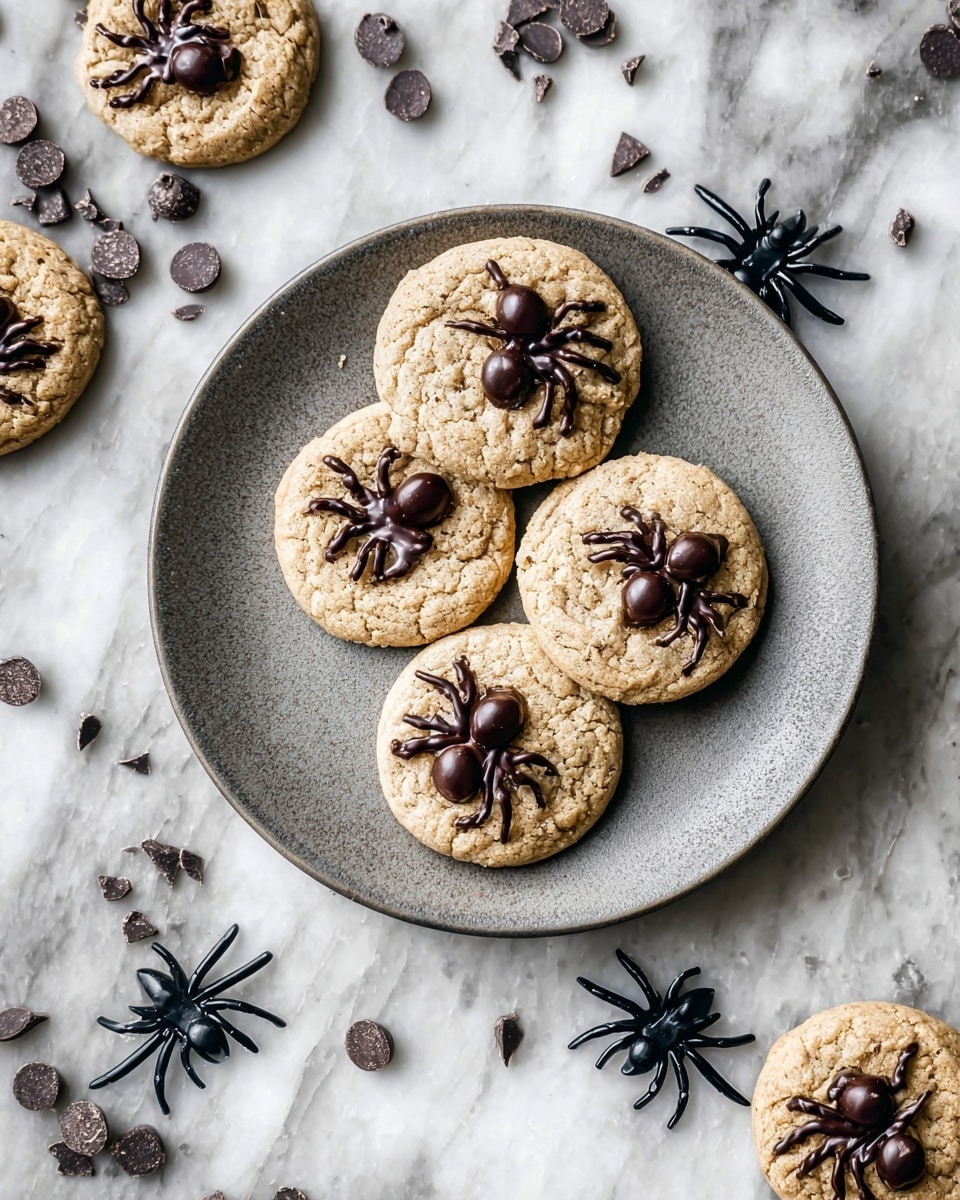
- Fun Presentation: The spider legs made with melted chocolate chips add a playful, eye-catching touch that’s sure to wow.
- Customizable: You can tweak the sweetness and chocolate placement to suit your taste.
Ingredients & Why They Work
The magic of this Spider Cookies Recipe lies in how classic cookie ingredients come together with just the right touch of chocolatey goodness to form those adorable and creepy spider shapes. Each ingredient plays a role, and I’ve learned a few tricks for picking the best quality items to elevate the whole experience.
- All-purpose flour: The backbone of your dough, providing structure without weighing down your cookies.
- Baking soda: Gives a little rise and helps create a tender crumb.
- Salt: Enhances flavor and balances the sweetness.
- Butter (melted): Use real butter for richness; melting it gives a denser but tender cookie texture.
- Light brown sugar: Brings moisture and a hint of molasses flavor that deepens the cookie’s taste.
- Granulated sugar: Adds crispness and sweetness to balance the brown sugar.
- Egg and egg yolk: The egg gives elasticity and helps bind, while the extra yolk adds chewiness.
- Vanilla extract: A must for classic cookie flavor — don’t skip it!
- Semi-sweet chocolate chips: Divided into the dough and the decorating step, they’re key to both chocolatey goodness inside and for making those spider legs outside.
Tweak to Your Taste
I love how easy it is to put your spin on this Spider Cookies Recipe. I’ve experimented with a few variations over time, and I encourage you to do the same. Play around with different chocolates or spices to make it really your own.
- Variation: I once swapped half the semi-sweet chips for dark chocolate chunks—gave the spiders a richer, slightly bitter edge that was a hit among my grown-up friends.
- Dietary mods: Try using gluten-free flour blends, or coconut sugar instead of brown sugar if you’re looking for alternatives.
- Seasonal twist: I sprinkled a little cinnamon into the flour mix for a warm note during fall months, which paired perfectly with the spider theme.
Step-by-Step: How I Make Spider Cookies Recipe
Step 1: Mix Dry Ingredients First
Start by whisking together the all-purpose flour, baking soda, and salt in a medium bowl. I find that mixing them well before adding to the wet ingredients ensures even distribution and helps the dough come together smoothly without any surprises.
Step 2: Cream Butter and Sugars
In a large bowl, beat the melted (but just warm) butter with the brown sugar and granulated sugar. Using an electric mixer here makes this step a breeze. The mixture should be smooth and well combined. This step is critical—you want those sugars fully dissolved into the butter for proper texture.
Step 3: Add Eggs and Vanilla
Beat in the whole egg, egg yolk, and vanilla extract. The extra yolk adds a real chewiness to these cookies, making them stand out from your regular chocolate chip batch. Just mix until smooth—don’t overdo it or you’ll risk making your cookies too dense.
Step 4: Combine Wet and Dry
Slowly stir in your dry ingredients until just combined. Resist the urge to keep mixing here; a gentle fold will ensure tender cookies. Then stir in ¾ cup of chocolate chips gently into the dough. This little mix-in of chips within the body of the cookie is the perfect foundation for those spider toppings.
Step 5: Scoop and Bake
Drop cookie dough balls onto a parchment-lined baking sheet. I use a 1.5-tablespoon cookie scoop for consistent sizing. Bake at 350°F (175°C) for about 10-12 minutes until the edges are golden but the centers are still soft. Don’t overbake—these cookies finish cooking on the hot tray, so pull them out just as they set.
Step 6: Add “Spiders” and Legs
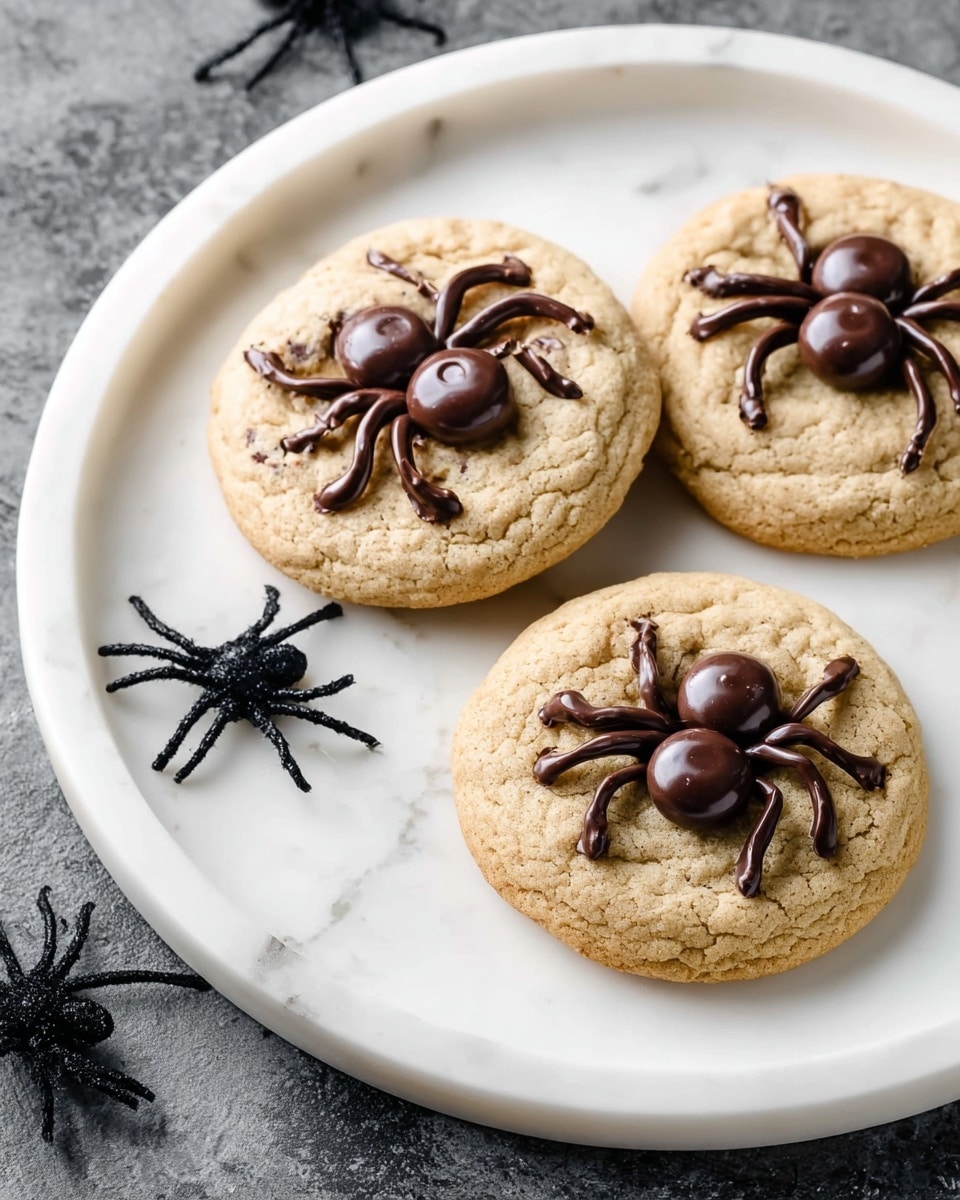
Immediately after baking, press 3-4 chocolate chips on top of each cookie, arranging them pointy side up to form the spider’s body. Meanwhile, melt the remaining chocolate chips slowly in the microwave at low power. Transfer melted chocolate to a small plastic bag, snip a tiny corner, and carefully pipe 8 spider legs radiating out from each cluster of chips. This part is fun and a little artistic—don’t worry if your “spiders” look unique, that’s part of the charm!
Pro Tips for Making Spider Cookies Recipe
- Melt Butter Carefully: Avoid overheating your butter; it should be warm but not hot to keep your dough texture perfect.
- Small Piping Hole: When cutting the ziplock bag corner, make the hole tiny to get delicate spider legs rather than blobs.
- Chocolate Chip Placement: Press chips on while cookies are warm so they stick well without melting into the dough.
- Don’t Overbake: These cookies stay soft; pulling them just as edges turn golden keeps them chewy and tender inside.
How to Serve Spider Cookies Recipe
Garnishes
I usually keep the spider decoration simple with those chocolate chip “legs,” but a sprinkle of powdered sugar dusted over right before serving gives a spooky web effect that’s surprisingly fun. If you want to get fancy, several tiny candy eyes can be stuck on with a dab of melted chocolate for an even more realistic critter.
Side Dishes
This cookie is a star on its own, but I love pairing it with a cold glass of milk or a warm cup of chai tea. For parties, setting out some fresh fruit or creamy vanilla ice cream alongside these spider cookies provides a nice balance to the chocolate richness.
Creative Ways to Present
Once, I arranged these cookies on a platter on a bed of licorice “webbing” for a Halloween party—it was a total conversation starter! Another time, I packaged individual spider cookies in mini boxes as party favors with a little note saying “Don’t let the spider bite!” Fun presentation like this really takes the recipe up a notch.
Make Ahead and Storage
Storing Leftovers
I keep leftover spider cookies in an airtight container at room temperature, where they stay fresh for 1-2 days. If you want to extend their life, I recommend freezing them. I’ve found they hold up beautifully without losing the soft texture.
Freezing
Once cooled, I place the cookies in a single layer on a tray to freeze quickly, then transfer them into freezer-safe bags. They last up to 3 months this way. When it’s time to enjoy again, just thaw them at room temperature or warm quickly in a low oven for that fresh-baked feel.
Reheating
Reheating is easy—pop cookies in a 300°F oven for 5-7 minutes to bring them back to that soft, melty texture. Microwave reheating works too, but watch the time closely or they’ll get chewy.
FAQs
-
Can I make the Spider Cookies Recipe without eggs?
You can try substituting eggs with mashed bananas or applesauce, but keep in mind the texture might be a bit different and less chewy. I recommend sticking to the eggs for the best classic cookie texture.
-
What if my melted chocolate is too thick to pipe legs?
If the melted chocolate becomes too thick, warm it gently again, stirring continuously, or add a tiny splash of coconut oil to thin it out for easier piping.
-
Can I use mini chocolate chips instead of regular size?
Yes! Mini chips work great, especially for making more delicate spider legs. Just adjust the number of chips on top so the spiders still look balanced.
-
How do I prevent the chocolate legs from smudging or breaking off?
Make sure to add the chocolate legs after the cookies cool slightly but are still warm enough for the melted chips to set well. Let them cool completely before stacking or packaging to avoid smudging.
Final Thoughts
This Spider Cookies Recipe has become a fun favorite in my kitchen, especially when I want to make something a little different that still tastes incredible. Baking these with friends or kids adds an extra layer of joy too—everyone loves piping those little spider legs and seeing their creepy creations come to life. I hope you enjoy making (and eating!) them as much as I do. Go ahead, give it a try—you won’t be disappointed.
Print
Spider Cookies Recipe
- Prep Time: 20 minutes
- Cook Time: 12 minutes
- Total Time: 32 minutes
- Yield: 15 cookies
- Category: Dessert
- Method: Baking
- Cuisine: American
- Diet: Vegetarian
Description
Spider Cookies are fun, spooky treats perfect for Halloween or themed parties. These soft chocolate chip cookies feature melted chocolate spider legs drawn on top, crafted using semi-sweet chocolate chips for a playful and delicious presentation.
Ingredients
Dry Ingredients
- 2 cups + 2 tablespoons all-purpose flour
- ½ teaspoon baking soda
- ½ teaspoon salt
Wet Ingredients and Mix-ins
- 12 tablespoons butter, melted and cooled until warm
- 1 cup light brown sugar
- ½ cup granulated sugar
- 1 large egg
- 1 large egg yolk
- 2 teaspoons vanilla extract
- 2 cups semi-sweet chocolate chips, divided
Instructions
- Preheat Oven: Preheat your oven to 350 degrees Fahrenheit to prepare for baking the cookies.
- Mix Dry Ingredients: In a medium bowl, combine the all-purpose flour, baking soda, and salt. Stir to evenly distribute the leavening and seasoning.
- Prepare Cookie Dough: In a large mixing bowl, beat together the melted butter, light brown sugar, and granulated sugar using an electric mixer until well blended. Add the egg, egg yolk, and vanilla extract, mixing thoroughly. Gradually add the dry ingredients and stir until just combined to avoid overmixing. Gently fold in ¾ cup of the semi-sweet chocolate chips; the dough should be soft but hold together.
- Shape and Bake Cookies: Using a scoop or spoon, form dough balls and place them on a parchment-lined baking sheet, giving space between each. Bake in the preheated oven for 12 minutes until the edges are lightly golden but the centers remain soft.
- Add Additional Chocolate Chips: Remove the cookies from the oven. While still warm, press 3 to 4 chocolate chips into the top of each cookie with the pointed side facing up to create the spider body base.
- Melt Remaining Chocolate Chips: Place the remaining chocolate chips in a microwave-safe bowl. Microwave them on low power, stirring every 30 seconds to prevent burning, until completely melted and smooth.
- Draw Spider Legs: Transfer the melted chocolate into a ziplock bag and snip a very small corner to create a fine tip. Pipe 8 spider legs by squeezing the melted chocolate out next to the chocolate chips on each cookie, arranging the lines to resemble spider legs extending from the chocolate chip ‘body.’
Notes
- Make Ahead: Store leftover spider cookies in an airtight container at room temperature for 1-2 days to keep them fresh.
- Freezing: For longer storage, freeze baked cookies in a freezer-safe bag or container for up to 3 months. Thaw at room temperature before serving.
- Use parchment paper on the baking sheet to prevent sticking and ease cleanup.
- Ensure your melted chocolate is smooth and not overheated to avoid clumping when piping spider legs.
- For a richer flavor, consider using dark chocolate chips instead of semi-sweet for the spider bodies and legs.
Nutrition
- Serving Size: 1 cookie
- Calories: 190 kcal
- Sugar: 15 g
- Sodium: 110 mg
- Fat: 10 g
- Saturated Fat: 6 g
- Unsaturated Fat: 3 g
- Trans Fat: 0 g
- Carbohydrates: 23 g
- Fiber: 1 g
- Protein: 2 g
- Cholesterol: 40 mg


