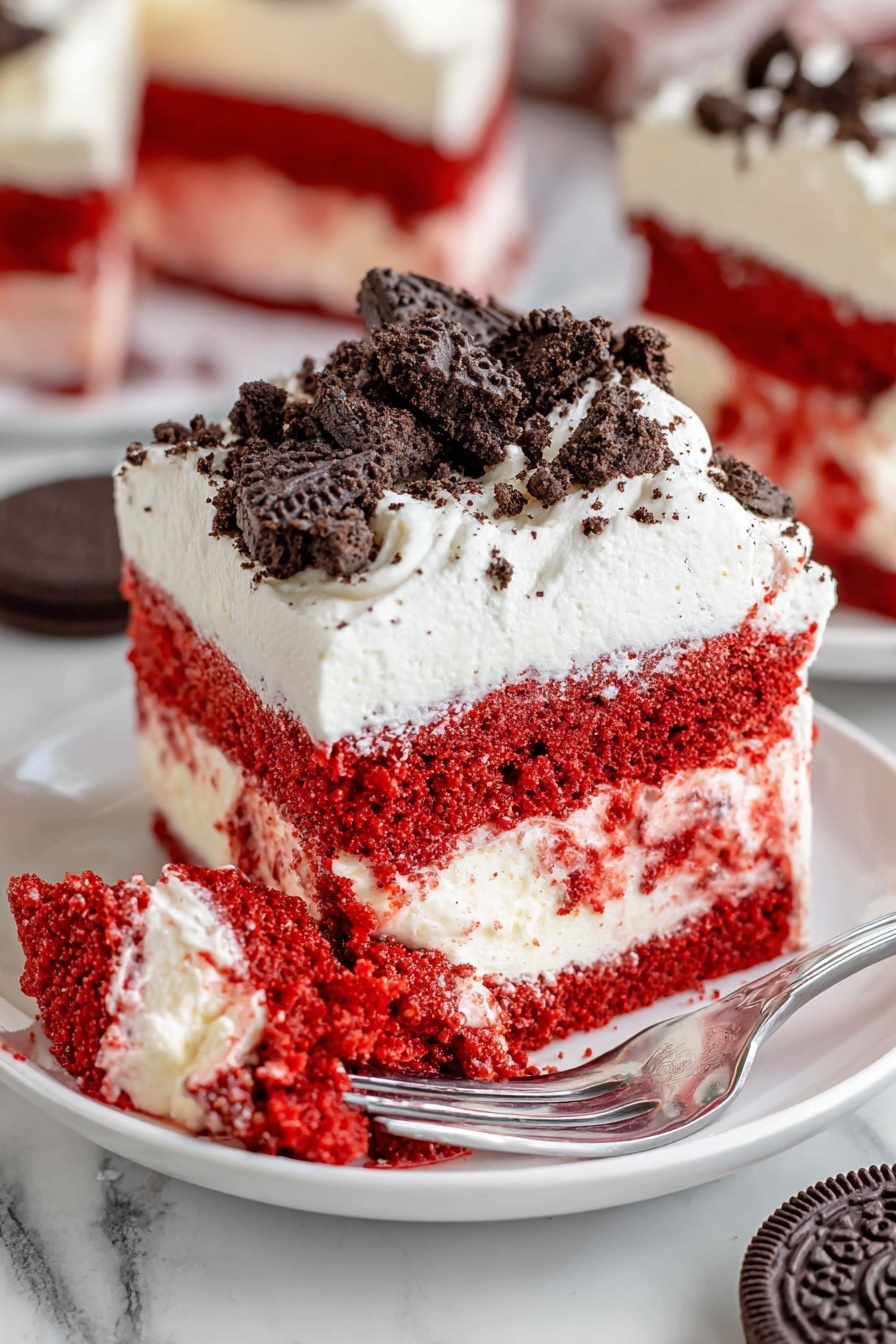
Red Velvet Poke Cake with Cheesecake Filling Recipe
If you’re a fan of all things sweet, creamy, and just a little bit nostalgic, then you’re absolutely going to love this Red Velvet Poke Cake with Cheesecake Filling Recipe. It’s one of those desserts that feels fancy but is really easy — a perfect combo for when you want to impress without stressing. The way the silky cheesecake pudding seeps into the warm red velvet cake? Seriously, it’s magic. Stick with me because I’m sharing all my tips to make sure your poke cake comes out perfectly every time!
Why This Recipe Works
- Moist and Flavorful: Poking holes allows the cheesecake pudding to soak deep, making every bite incredibly moist.
- Simple Ingredients: You only need a box of red velvet cake mix and instant pudding, making it super convenient.
- Crowd-Pleaser: With the creamy cheesecake filling and whipped topping, this dessert disappears fast at any gathering.
- Customizable and Fun: Easy to add crushed Oreos or swap puddings for your own twist.

Ingredients & Why They Work
Each ingredient in this Red Velvet Poke Cake with Cheesecake Filling Recipe plays a crucial role in creating that dreamy texture and flavor. Using a boxed red velvet cake mix helps save time while still delivering a classic flavor, and the instant cheesecake pudding filling brings that luscious creaminess. Plus, whipped topping lightens it up perfectly. Here’s why I use each component:
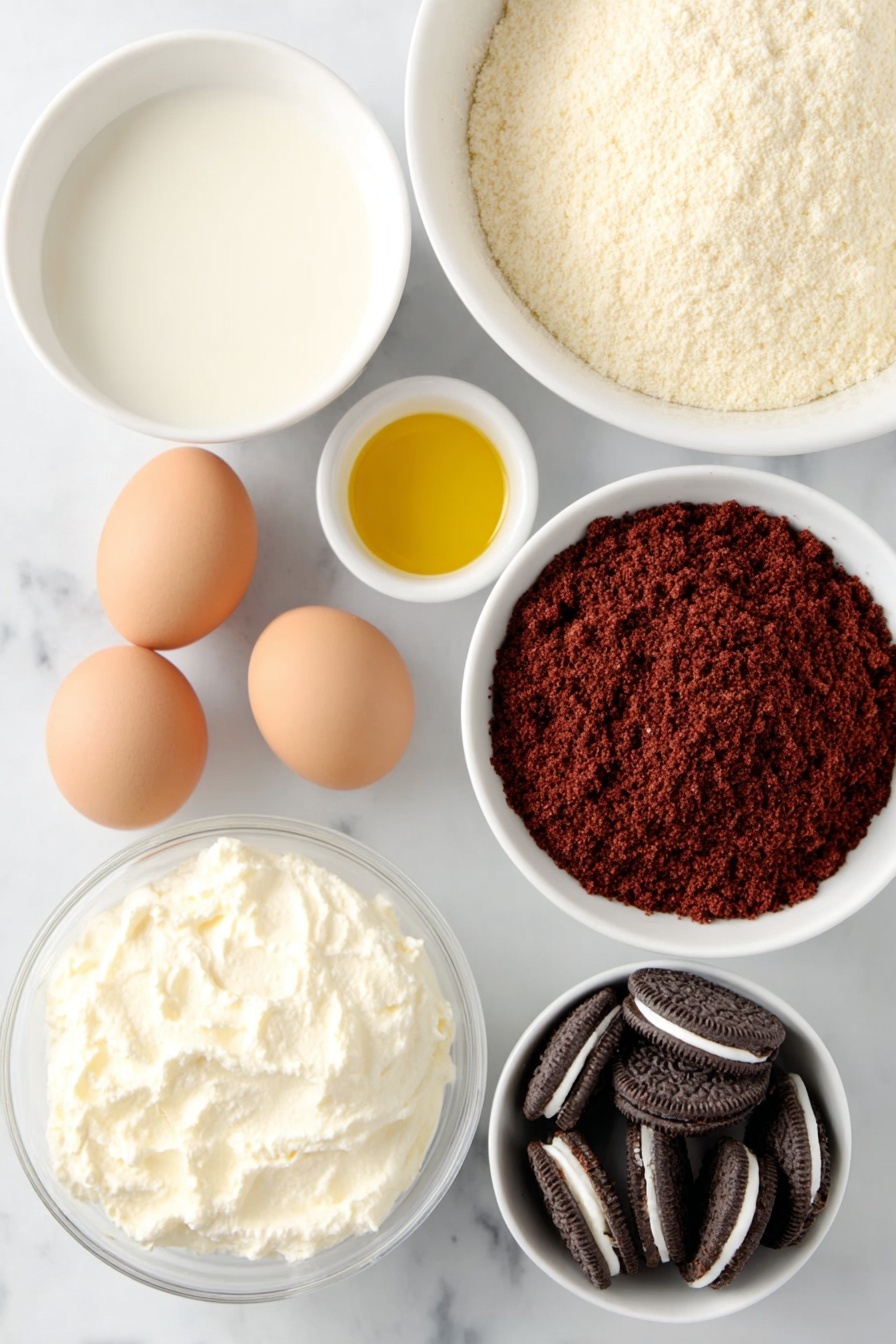
- Red velvet cake mix: Convenient and flavorful, it’s the base that gives the cake its signature color and subtle cocoa taste.
- Eggs, oil & water: Follow the box directions exactly for moist texture; I don’t recommend substitutions here for best results.
- Instant cheesecake pudding mix: This adds richness and tang for a decadent filling that’s an easy alternative to traditional cheesecake.
- Milk: Using whole milk makes the pudding creamier — skim milk works too, but the texture changes slightly.
- Whipped topping: I use thawed Cool Whip for a light, fluffy finish, but homemade whipped cream can work if you prefer.
- Crushed Oreo cookies (optional): Adds a delightful crunch and extra chocolate flavor, making each bite exciting.
Tweak to Your Taste
I like to keep things pretty classic with this Red Velvet Poke Cake with Cheesecake Filling Recipe, but that’s the great thing — it’s super easy to personalize. If you like a little extra texture, try adding some chopped nuts or swap Oreo crumbs with chocolate shavings. I sometimes add a tablespoon of espresso powder to the cake mix for depth — trust me, it’s a game changer.
- Black Forest version: Adding a cherry pie filling layer on top of the cheesecake pudding gives a fruity, tangy twist I ended up loving for holidays.
- Gluten-free option: Use a gluten-free red velvet cake mix and pudding to make this dessert accessible to everyone without sacrificing taste.
- Lower sugar: Try sugar-free pudding and reduce the amount of sugar in the cake mix if you want a less sweet variation.
- Non-dairy swap: Use almond or oat milk and dairy-free whipped topping for a vegan-friendly version that still tastes fantastic.
Step-by-Step: How I Make Red Velvet Poke Cake with Cheesecake Filling Recipe
Step 1: Bake Your Red Velvet Cake
Start by preparing your red velvet cake mix exactly as the box instructs — eggs, oil, and water in the right proportions. Pour the batter into a greased 9×13-inch pan because this size works perfectly for the pudding amount. Bake it until a toothpick inserted in the center comes out clean, about 25-30 minutes depending on your oven. Let it cool just a few minutes — you want it warm but not hot. This little cooling period is essential or the pudding will melt right off.
Step 2: Poke Those Holes (Don’t Be Shy!)
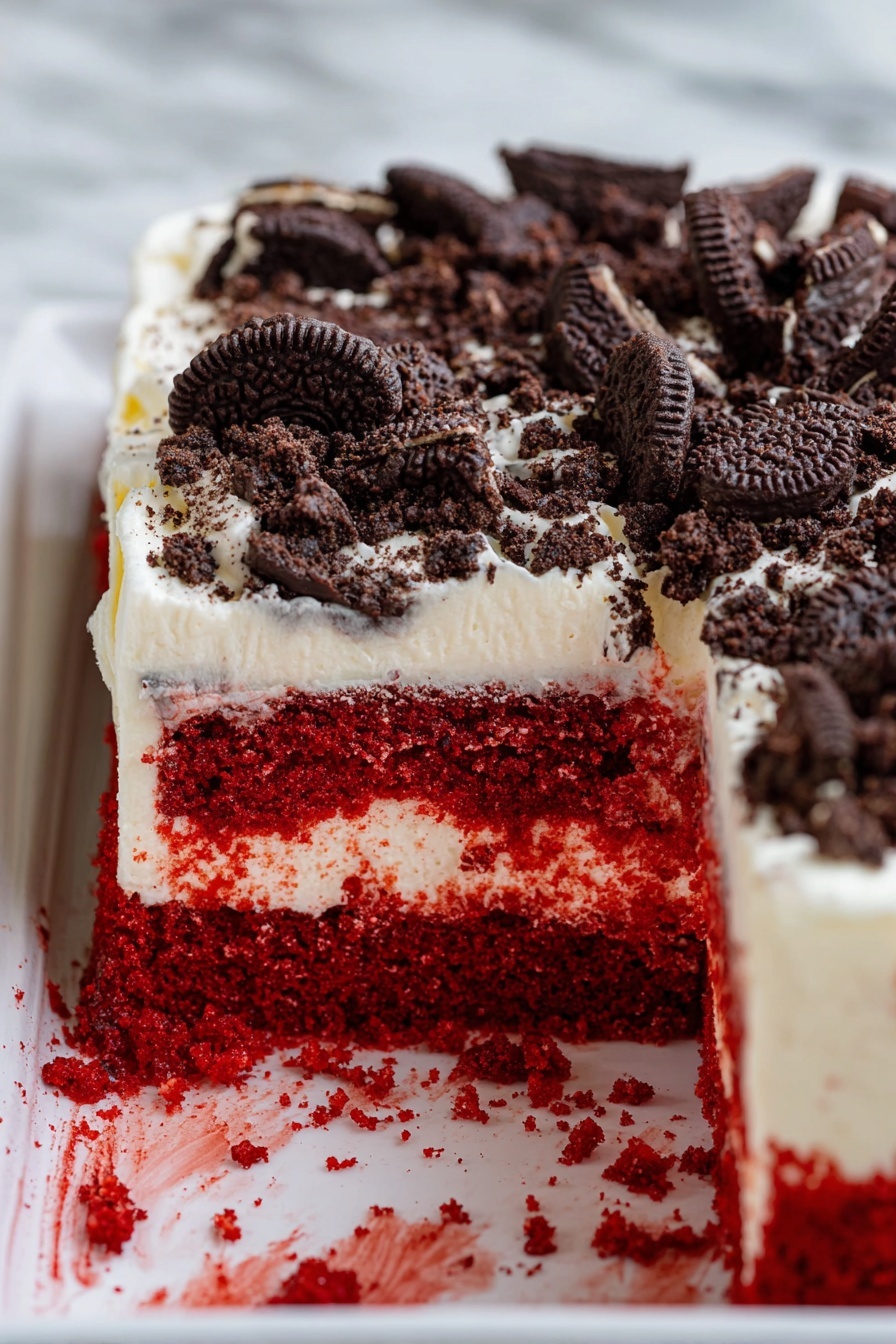
Grab a wooden spoon handle or any round tool about the width of a pencil and start poking holes all over the cake. I’d say poke at least 30 to 40 holes evenly spaced so your pudding has room to seep in. The holes should go straight to the bottom — keep poking until you feel it hit the pan. This step is the heart of why your cake gets that unbelievably moist texture, so don’t rush it!
Step 3: Mix Up Your Cheesecake Filling
While the cake is warm and ready, whisk together the two boxes of instant cheesecake pudding mix with 4 cups of cold milk. Whisk until smooth with no lumps — I like using a balloon whisk for this. This creates the creamy puddle that will fill all those poked holes. If your pudding is lumpy, it won’t slide in as nicely and that smooth layer you want won’t happen.
Step 4: Pour and Push the Pudding In
Pour the pudding evenly over the cake, focusing on those holes to really let the mix sink in deep. Use the back of a spoon gently to push the pudding into the holes even further. Spread the remaining pudding around the surface so every slice is deliciously coated. Then, cover your cake and pop it into the fridge for at least 2 hours — the longer, the better for full soak and setting.
Step 5: Top with Fluffy Whipped Cream and Crunchy Oreos
After chilling, take your cake out and spread an even layer of thawed whipped topping over the pudding. This balances the tanginess with airy sweetness. Finally, sprinkle crushed Oreo cookies on top — they add crunch and an extra chocolatey hit I can’t resist. Slice it up and get ready for the “Wow, this is amazing!” compliments.
Pro Tips for Making Red Velvet Poke Cake with Cheesecake Filling Recipe
- Warm But Not Hot: Poke the cake while warm to make sure the holes form easily but avoid melting your pudding later.
- Don’t Skip the Chill: Refrigerate at least 2 hours to set the filling and get that perfect texture; I sometimes chill it overnight for best results.
- Gentle Spreading: When adding whipped topping, use a spatula to spread lightly so you don’t disturb the pudding layer.
- Crush Oreos Finely: For the topping, crushing the Oreos well helps avoid large chunks that can overpower the cake texture.
How to Serve Red Velvet Poke Cake with Cheesecake Filling Recipe
Garnishes
I’m a sucker for simple, classic garnishes here — crushed Oreos on top add the perfect texture contrast, and sometimes I’ll toss on a few fresh raspberries or a light dusting of cocoa powder to brighten up the look. These little touches make your dessert feel like it just came from a boutique bakery.
Side Dishes
This Red Velvet Poke Cake pairs beautifully with a hot cup of coffee or rich hot chocolate. If you’re serving it at a larger meal, light fruit salads or simple whipped cream on the side complement the richness without weighing down your guests.
Creative Ways to Present
For special occasions, I’ve served this poke cake in clear glass trifle dishes so the layers shine through — always a showstopper. You can also cut it into mini parfait glasses, layering cake, pudding, whipped topping, and toppings for individual servings that feel upscale and are easy to grab at parties.
Make Ahead and Storage
Storing Leftovers
After serving, I store any leftovers tightly covered in the refrigerator. It stays moist and delicious for up to 4 days — honestly, it rarely lasts that long! Keeping it chilled also helps the cheesecake filling keep its structure and taste fresh.
Freezing
I’ve frozen this cake a couple of times, usually without the whipped topping or Oreos on top. Wrap it tightly in plastic wrap and then foil, and freeze for up to 2 months. When you’re ready, thaw overnight in the fridge and then add fresh whipped topping. It won’t be quite as fresh as the first day, but still tasty!
Reheating
Since this is a moist poke cake with pudding, I recommend enjoying it cold or at room temperature. If you want it a bit warmer, I gently let it sit out for 15-20 minutes — microwaving tends to alter the texture of the cheesecake filling and whipped topping.
FAQs
-
Can I use homemade red velvet cake instead of the mix?
Absolutely! While the boxed mix saves time and gives consistent results, a homemade red velvet cake recipe works great too. Just be sure your cake is baked evenly and still warm when you poke holes for the pudding to soak in fully.
-
What if I don’t have cheesecake pudding mix?
You can substitute instant vanilla pudding mix for the cheesecake flavor, but the cheesecake version adds that extra tangy richness that really complements red velvet. If you want to get creative, try mixing cream cheese into vanilla pudding for a similar effect.
-
How long should I chill the cake before serving?
A minimum of 2 hours is ideal to allow the pudding to set and fully penetrate the cake. Overnight chilling gives an even better texture and allows flavors to meld beautifully.
-
Can I skip the Oreo topping?
Yes! The crushed Oreos add a nice crunch and extra chocolate flavor, but the cake is perfectly delicious on its own with whipped topping. Feel free to swap in sprinkles, chopped nuts, or fresh fruit instead.
Final Thoughts
I honestly can’t get enough of this Red Velvet Poke Cake with Cheesecake Filling Recipe — it’s become my go-to potluck dessert and a staple for family celebrations. The best part? It delivers that luxurious, homemade feel without hours in the kitchen. I hope you’ll try it out and see how easy it is to wow your friends and family. Once you nail this, trust me, you’ll be making it again and again!
Print
Red Velvet Poke Cake with Cheesecake Filling Recipe
- Prep Time: 10 minutes
- Cook Time: 30 minutes
- Total Time: 40 minutes
- Yield: 12 servings
- Category: Dessert
- Method: Baking
- Cuisine: American
Description
A delicious and moist Red Velvet Poke Cake featuring a rich red velvet base filled with creamy cheesecake pudding, topped with whipped topping and crushed Oreo cookies for added texture and flavor. Perfect for dessert lovers seeking a crowd-pleasing, easy-to-make treat.
Ingredients
Cake Ingredients
- 1 box red velvet cake mix
- Ingredients needed to make cake: eggs, oil & water (use amounts on back of box)
Pudding Layer
- 2 (3.4 ounce) boxes instant cheesecake pudding (or vanilla)
- 4 cups milk
Topping
- 8 ounce tub whipped topping, thawed (Cool Whip)
- 10 Oreo cookies, crushed (optional)
Instructions
- Prepare the Cake: Preheat the oven according to package directions. Prepare the red velvet cake mix with eggs, oil, and water as instructed on the box for a 9×13-inch pan. Pour batter into the pan and bake for 30 minutes or until a toothpick inserted comes out clean. Allow the cake to cool for just a couple of minutes once out of the oven.
- Poke Holes in Cake: Using a wooden spoon handle or a similar round object, poke holes all over the warm cake, pressing down to the bottom. The holes should be big enough to allow the pudding to seep in deeply.
- Make the Pudding: In a medium bowl, whisk together the two boxes of instant cheesecake pudding with 4 cups of milk. Whisk until the mixture is smooth and free of lumps.
- Fill Holes with Pudding: Pour the pudding mixture slowly over the cake, trying to fill the holes as much as possible. Use the back of the spoon to gently spread the pudding evenly and push it down into each hole.
- Chill the Cake: Place the cake in the refrigerator and let it set for about 2 hours to allow the pudding to firm up and fully soak into the cake.
- Add Whipped Topping and Oreos: Once the cake is completely cooled and set, spread the thawed whipped topping evenly over the pudding layer. Sprinkle the crushed Oreo cookies evenly over the top for added crunch and flavor.
- Serve: Slice the cake into 12 servings and enjoy this rich and creamy dessert.
Notes
- Use vanilla pudding instead of cheesecake pudding for a slightly different flavor.
- Allow the cake to cool slightly before poking holes to prevent cracks but not completely cooled so the pudding can soak better.
- For a dairy-free option, substitute whipped topping and pudding with plant-based alternatives.
- Crushed Oreos are optional; feel free to garnish with fresh berries or chocolate chips instead.
- Store leftover cake covered in the refrigerator for up to 3 days for best freshness.
Nutrition
- Serving Size: 1 slice
- Calories: 350 kcal
- Sugar: 30 g
- Sodium: 300 mg
- Fat: 18 g
- Saturated Fat: 8 g
- Unsaturated Fat: 7 g
- Trans Fat: 0.5 g
- Carbohydrates: 44 g
- Fiber: 1 g
- Protein: 4 g
- Cholesterol: 40 mg

