
Peanut Butter Spider Cookies Recipe
If you’re looking for a fun, festive treat that’s as whimsical as it is delicious, then this Peanut Butter Spider Cookies Recipe is exactly what you need. These buttery, peanut butter-packed cookies topped with mini Reese’s cups and chocolate legs are not only adorable but seriously tasty — perfect for Halloween or any time you want to impress your guests with a creative twist on classic peanut butter cookies. Trust me, once you try these, you’ll be hooked!
Why This Recipe Works
- Balanced Flavor: The creamy peanut butter mixes perfectly with brown and granulated sugars, giving both richness and just the right sweetness.
- Perfect Texture: The combination of baking powder and baking soda creates a tender yet slightly chewy cookie that’s irresistible.
- Cute Presentation: Topping the cookies with chilled mini Reese’s cups keeps the peanut butter center intact and adds a fun spider look with the chocolate legs and candy eyes.
- Simple Prep: Straightforward steps and common ingredients mean you can whip these up effortlessly — even with picky kiddos helping!

Ingredients & Why They Work
The magic behind this Peanut Butter Spider Cookies Recipe lies in the simple, pantry-friendly ingredients that complement each other beautifully. Choosing the right kind of peanut butter and chilling those Reese’s cups are little tricks that make a big difference.
- Unsalted Butter: Room temperature butter creates that creamy texture without added salt affecting the flavor.
- Brown Sugar: Adds moisture and a deeper caramel flavor to the cookies.
- Granulated Sugar: For balance and to help the cookies spread just right.
- Creamy Peanut Butter (not natural): Ensures smooth dough and classic peanut butter flavor — natural tends to separate and can affect texture.
- Egg: Binds everything together and adds richness.
- Vanilla Extract: Enhances the overall flavor and brings warmth.
- All-Purpose Flour: The base structure for the cookies.
- Baking Soda & Baking Powder: Work together to create lift and lightness without too much rise.
- Salt: Balances sweetness and boosts the peanut butter flavor.
- Granulated Sugar (for rolling): Adds a subtle crunch and sparkle to the cookie exterior.
- Mini Reese’s Peanut Butter Cups: The spider’s body — freezing them keeps their shape intact on warm cookies.
- Semi-Sweet Chocolate Chips: Melted for drawing spider legs and attaching candy eyes.
- Candy Eyes: Adorable finishing touch that sells the spider look perfectly.
Tweak to Your Taste
I love how versatile this Peanut Butter Spider Cookies Recipe is. You can tweak it a bit to suit your taste or dietary needs, and it still turns out fantastic. I sometimes swap out the candy eyes for small chocolate chips when I’m in a pinch, and it works just fine. Feel free to personalize it!
- Peanut Butter Swap: Using natural peanut butter can add a more intense flavor but might change the dough’s texture; you may need to add a little extra flour.
- Nut-Free Variation: Substitute the peanut butter with sunflower seed butter and use allergy-friendly chocolate chips — I’ve done this for kids with peanut allergies and it was a hit.
- Extra Crunch: Toss in some chopped peanuts for added texture if you like a bit of crunch in your cookies.
- Festive Colors: Use colorful candy eyes or drizzle some white chocolate alongside the spider legs for a fun seasonal twist.
Step-by-Step: How I Make Peanut Butter Spider Cookies Recipe
Step 1: Prep the Mini Reese’s Cups and Oven
First things first: unwrap about 24 mini Reese’s Peanut Butter Cups and pop them in the freezer. This little trick really helps them hold their shape when you press them into the hot cookies later. While that’s happening, preheat your oven to 350°F — warm and ready to go!
Step 2: Cream Butter and Sugars
In a mixing bowl, beat together the softened unsalted butter with the brown sugar and granulated sugar using an electric mixer. Mix on medium speed for about 1 minute until the mixture becomes smooth and fluffy. This step is key for those soft, melt-in-your-mouth cookies.
Step 3: Mix in Peanut Butter, Egg, and Vanilla
Add the creamy peanut butter, large egg, and vanilla extract to the butter and sugar mix. Beat it all together on medium speed for less than a minute until fully combined. The dough will start smelling like heaven right about now.
Step 4: Fold in Dry Ingredients
Mix the all-purpose flour, baking soda, baking powder, and salt in a separate bowl. Then, add these dry ingredients to the wet ingredients. Stir gently with a spatula or mix on low speed, just until no flour streaks remain. Overmixing can toughen the cookies, so take it easy here.
Step 5: Shape, Roll in Sugar, and Bake
Grab a small cookie scoop or tablespoon and form tablespoon-sized balls from the dough. Roll each ball between your palms to smooth it out, then roll it in granulated sugar — this gives a lovely crunch and a subtle sparkle on the finished cookie. Place them 2 to 3 inches apart on a silicone-lined baking sheet and bake for 8 to 11 minutes. You’ll know they’re done when the edges start to crack and turn golden.
Step 6: Add the Spider Bodies
As soon as the cookies come out of the oven, gently press a frozen mini Reese’s cup into the center of each cookie. This step needs to be done while the cookie is warm but not hot, so the candy cup stays in place without sinking. Let the cookies cool for about 15-20 minutes before moving them to a cooling rack.
Step 7: Melt Chocolate and Draw Spider Legs
Place the semi-sweet chocolate chips into a microwave-safe bowl and heat them on 50% power for 3 minutes, stirring every minute until smooth and fully melted. Transfer the melted chocolate into a squeeze bottle or cut a tiny corner off a sandwich bag to pipe. Now, draw four spider legs on each side of the Reese’s cup on every cookie.
Step 8: Add Candy Eyes
Using a tiny dab of melted chocolate on the back of candy eyeballs, stick two eyes onto each Reese’s cup. This really brings the spider to life! Allow the chocolate to set completely before moving your adorable cookies to a serving platter.
Pro Tips for Making Peanut Butter Spider Cookies Recipe
- Freeze the Reese’s Cups: Trust me on this — freezing keeps them firm and prevents melting during baking.
- Don’t Overmix the Dough: Mixing too much after adding flour can make your cookies tough instead of soft and tender.
- Roll in Sugar for Texture: The granulated sugar coating adds a pretty sparkle and a tiny crunch that elevates simple peanut butter cookies.
- Handle Warm Cookies Gently: Moving the cookies before they cool completely can cause the Reese’s cups to sink — be patient!
How to Serve Peanut Butter Spider Cookies Recipe

Garnishes
When I serve these peanut butter spider cookies, I usually keep it simple — the candy eyes and Reese’s cups are the perfect garnish on their own! But if I want to get extra festive, I sometimes dust a little powdered sugar or add orange sprinkles around the platter for those Halloween vibes.
Side Dishes
I like pairing these with a cold glass of milk or a hot cup of coffee for the adults. For a party setting, I’ve served them alongside pumpkin spice cupcakes or caramel apples — the peanut butter spiders add a fun flavor contrast.
Creative Ways to Present
For Halloween parties, I love arranging these cookies on a big black platter with web-shaped doilies underneath. Sometimes I nestle edible “graveyard” items like crushed Oreo dirt or candy bones around them for a spooky scene that guests rave about.
Make Ahead and Storage
Storing Leftovers
These cookies keep well in an airtight container at room temperature for up to 4 days. Because of the peanut butter and chocolate, they stay soft and flavorful even a day or two later. Just make sure to keep them away from heat or direct sunlight to preserve the candy eyes and chocolate legs.
Freezing
I’ve frozen these cookies successfully by placing them in a single layer on a baking sheet first, freezing until solid, then transferring to a sealed freezer bag. When you’re ready, let them thaw at room temperature — the texture and appearance hold up nicely.
Reheating
If you want warm cookies, I pop them in a preheated 300°F oven for 5 minutes. They warm through without melting the decorations. If using a microwave, heat for just 10-15 seconds and watch closely so the Reese’s cups don’t get too melty.
FAQs
-
Can I use natural peanut butter for the Peanut Butter Spider Cookies Recipe?
Yes, but natural peanut butter contains oils that may separate and change the cookie dough consistency. You might need to chill the dough before baking and possibly add a little extra flour to compensate.
-
Why do I need to freeze the mini Reese’s cups before baking?
Freezing helps the mini Reese’s cups maintain their shape without melting into the cookie dough during baking, giving your cookies that perfect spider body that stands out.
-
How long do Peanut Butter Spider Cookies stay fresh?
Stored in an airtight container at room temperature, these cookies should stay fresh and delicious for up to 4 days.
-
Can I make these cookies gluten-free?
Absolutely! Substitute the all-purpose flour with a gluten-free flour blend that measures cup-for-cup, but be sure to check the blend includes xanthan gum or a similar binder for best results.
Final Thoughts
I have to say, this Peanut Butter Spider Cookies Recipe has become my go-to when I want to combine cute with delicious. Baking these brings a bit of joy and a great excuse to lick the bowl clean (don’t pretend you don’t!). Plus, they’re so easy to tweak that they adapt to any tastes or occasions. Next time you want a fun twist on classic peanut butter cookies, give these a try — I promise they’ll make you smile and become a favorite in your family too.
Print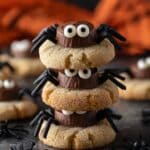
Peanut Butter Spider Cookies Recipe
- Prep Time: 15 minutes
- Cook Time: 11 minutes
- Total Time: 26 minutes
- Yield: 24 cookies
- Category: Dessert
- Method: Baking
- Cuisine: American
Description
These Peanut Butter Spider Cookies are a fun and festive treat perfect for Halloween or any occasion. Soft peanut butter cookies are topped with a mini Reese’s Peanut Butter Cup, decorated with melted chocolate legs and candy eyeballs to create adorable spider designs. Easy to make and delightfully delicious, they combine creamy peanut butter flavor with a chocolatey finish.
Ingredients
Cookie Dough
- ½ cup (113g) unsalted butter, 1 stick, room temperature
- ½ cup (107g) brown sugar
- ⅓ cup (66g) granulated sugar
- ¾ cup (201g) creamy peanut butter, not natural
- 1 large egg
- 1 tsp vanilla extract
- 1 ½ cups (180g) all purpose flour
- 1 tsp baking soda
- ½ tsp baking powder
- ½ tsp salt
For Rolling and Decorating
- Granulated sugar, for rolling the cookies
- About 24 mini Reese’s Peanut Butter Cups
- ½ cup (85g) semi-sweet chocolate chips, for melting
- Candy eyeballs
Instructions
- Freeze Reese’s Cups: Unwrap about 24 mini Reese’s Peanut Butter Cups and place them in a bowl in the freezer to help maintain their shape when added to the hot cookies.
- Preheat Oven: Set the oven to 350ºF and line a baking sheet with silicone or parchment paper.
- Cream Butter and Sugars: In a mixing bowl, combine the butter, brown sugar, and granulated sugar. Beat with an electric mixer for 1 minute until the mixture is smooth and fluffy.
- Add Wet Ingredients: Mix in the creamy peanut butter, egg, and vanilla extract. Beat again for less than 1 minute until well combined.
- Combine Dry Ingredients: In a separate bowl, whisk together the all-purpose flour, baking soda, baking powder, and salt.
- Mix Dry into Wet: Add the dry ingredients to the wet mixture and mix on low speed or fold in gently with a spatula just until combined, being careful not to overmix.
- Form Cookie Balls: Use a small cookie scoop or tablespoon to portion out tablespoon-sized balls of dough. Roll each ball between your hands for uniform shape, then roll in granulated sugar to coat.
- Place and Bake: Arrange the sugar-coated dough balls 2-3 inches apart on the prepared baking sheet. Bake for 11 minutes, or until the edges begin to crack and turn golden.
- Add Reese’s Cups: Remove the cookies from the oven and immediately press one chilled mini Reese’s Cup into the center of each cookie. Allow cookies to cool for 15-20 minutes before transferring to a cooling rack.
- Melt Chocolate: Place the semi-sweet chocolate chips in a microwave-safe bowl. Microwave at 50% power for 3 minutes, stirring after each minute, until fully melted.
- Decorate Legs: Transfer melted chocolate to a squeeze bottle or a sandwich bag with a corner cut off. Draw four legs on each side of the cookies to create spider legs.
- Attach Eyes: Use a small dab of melted chocolate on the back of the candy eyeballs to stick them onto the Reese’s Cup on each cookie. Let the chocolate set before serving.
Notes
- Freezing the mini Reese’s cups before use prevents them from melting into the warm cookies during baking.
- Rolling the dough balls in granulated sugar adds a nice crunch and sparkle to the cookies’ surface.
- Melt chocolate carefully at 50% power to avoid burning and ensure smooth consistency for decorating.
- Allow cookies to fully cool and the chocolate to set before moving to avoid damaging the spider decorations.
- Store cookies in an airtight container at room temperature for up to 3 days.
Nutrition
- Serving Size: 1 cookie
- Calories: 210 kcal
- Sugar: 15 g
- Sodium: 135 mg
- Fat: 13 g
- Saturated Fat: 4 g
- Unsaturated Fat: 7 g
- Trans Fat: 0 g
- Carbohydrates: 20 g
- Fiber: 2 g
- Protein: 5 g
- Cholesterol: 30 mg


