
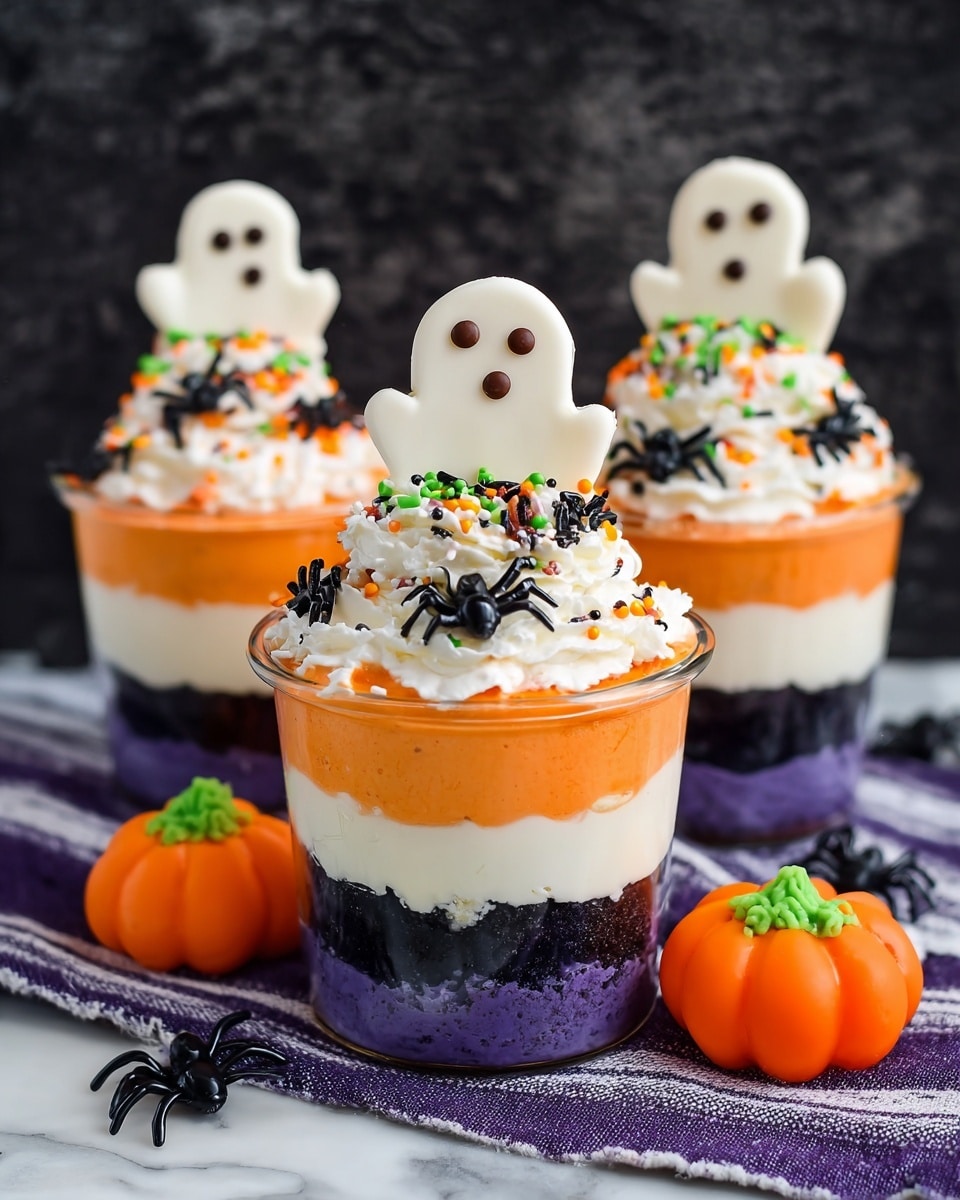
No Bake Halloween Cheesecake Cups Recipe
If you’re looking for an easy, show-stopping dessert to wow your friends and family this spooky season, I’ve got just the thing for you. This No Bake Halloween Cheesecake Cups Recipe is my go-to for Halloween parties—it’s simple, creamy, and festive without any oven fuss. Trust me, once you try these cheesecake cups, you’ll never want to bake a layered Halloween dessert again!
Why This Recipe Works
- No Bake Convenience: You skip the oven but still get a rich, creamy cheesecake texture that’s perfect for quick prep.
- Easy Layering: The Oreo cookie crumbs create a crunchy base and mid-layer that pairs perfectly with the fluffy cheesecake filling.
- Festive and Customizable: You can use orange food coloring and Halloween-themed toppings to make it super cute and festive with minimal effort.
- Perfect Individual Portions: The cups make it easy to serve and share without any messy slicing.

Ingredients & Why They Work
The magic of this No Bake Halloween Cheesecake Cups Recipe is all in the thoughtful layering and easy-to-find ingredients. Each component plays its part to build delicious, creamy, and fun parfaits.
- Oreo cookies: They provide that iconic chocolate crunch and flavor, with the creamy center blending well into crumbs for texture.
- Cream cheese: This is the star of the cheesecake filling, lending rich tanginess and smoothness.
- Powdered sugar: Sweetens the cream cheese without gritty sugar texture, dissolving completely for silky filling.
- Vanilla extract: Just a bit adds complexity and enhances the creamy flavors.
- Cool Whip: Lightens the dense cream cheese mixture, creating the fluffy, airy texture perfect for no-bake cheesecake.
- Orange gel coloring: This seasonal touch lets you fully embrace Halloween spirit with vibrant orange hues.
- Ghost Peeps, Halloween sprinkles, candy pumpkins: Fun toppings make the presentation festive and inviting.
Tweak to Your Taste
I love mixing up this recipe depending on the mood or who’s coming over. The beauty of this No Bake Halloween Cheesecake Cups Recipe is how easy it is to tweak without losing that creamy, mouth-watering magic.
- Variation: Once, I swapped Oreo crumbs for crushed Biscoff cookies and tinted the cheesecake bright green instead of orange for a fun “witch’s brew” look — everyone loved the twist!
- Dietary Modifications: You can opt for dairy-free cream cheese and whipped topping for allergy-friendly versions that still taste fantastic.
- Flavor Swaps: Try adding a splash of almond or pumpkin pie spice extract to the cream cheese for a seasonal punch.
Step-by-Step: How I Make No Bake Halloween Cheesecake Cups Recipe
Step 1: Crush Those Oreos Right
First thing I do is pulse 7 Oreo cookies in my food processor until they’re fine crumbs. This gets the crust layer perfect without big chunks that can mess with the texture. Divide these crumbs evenly among seven 5-ounce cups for the base.
Step 2: Whip Up the Cream Cheese Filling
Next, beat two packages of softened cream cheese with powdered sugar and vanilla extract until silky smooth. I like to set my cream cheese out 30 minutes beforehand to avoid lumps and make the mixing easier. Once creamy, fold in 2 cups of thawed Cool Whip gently, so it stays fluffy.
Step 3: Split and Color the Cheesecake
Divide the cheesecake filling into two bowls. Add a few drops of orange gel coloring to one bowl and mix until you get that perfect pumpkin orange shade. The other bowl stays white to give you the classic Halloween contrast.
Step 4: Layering Magic
Spoon or pipe the white cheesecake filling evenly over the Oreo base in each cup. Then crush the remaining 7 Oreos and sprinkle these crumbs as a middle layer in each cup. Top that with the orange cheesecake filling, dividing it equally.
Step 5: The Perfect Fluffy Top
Using a piping bag with a 1M tip (or a ziplock bag with the corner snipped), swirl the remaining Cool Whip over each cup for that gorgeous, cloud-like finish. This also adds the ideal light creaminess on top.
Step 6: Add Your Spooky Toppings
Right before serving, decorate the top with your fun Halloween-themed toppings—Ghost Peeps, sprinkles, candy pumpkins—you name it. I always wait to add these if I’m transporting the cups to keep everything fresh and perfectly in place.
Pro Tips for Making No Bake Halloween Cheesecake Cups Recipe
- Use Room Temperature Ingredients: This makes the cream cheese mix silky smooth without lumps—trust me, it’s worth the wait.
- Pulse Oreos Thoroughly: Leaving some chunks is tempting, but fine crumbs create a better crunch and smoother layering.
- Pipe Your Layers: Using a piping bag for the cheesecake layers helps you get even portions and neat cups, which looks way more professional.
- Add Toppings Last: If transporting, cover the cups and add decorations right before serving to keep everything looking fresh and perfectly in place.
How to Serve No Bake Halloween Cheesecake Cups Recipe
Garnishes
I usually top mine with Ghost Peeps—they’re the cutest and totally get a lot of “aww” from guests. Halloween sprinkles add a fun crunch and color pop, and candy pumpkins add that classic festive vibe. You can get creative — edible eyes or mini chocolate bats make fun additions too!
Side Dishes
These cheesecake cups are rich enough to stand on their own, but if I’m serving a bigger Halloween spread, I pair them with light snacks like caramel popcorn, spiced nuts, or even miniature pumpkin muffins for a nice balance.
Creative Ways to Present
For a party, I love setting up a DIY dessert station where guests can add their own toppings — extra sprinkles, crushed cookies, or gummy worms — right before eating. Layering the cups in a tiered tray with mini signs describing each flavor layer always gets compliments too!
Make Ahead and Storage
Storing Leftovers
Leftovers keep great covered tightly in the fridge for up to 3 days. I find storing them in individual airtight containers helps everything keep its shape and flavor without the toppings getting soggy. Just add the decorations fresh when ready.
Freezing
I’ve frozen these cheesecake cups once or twice when prepping early for Halloween. Wrap each cup tightly in plastic wrap and place in a freezer-safe container. They freeze well for up to a month. When thawing, put them in the fridge overnight and add toppings after thawing for the best texture.
Reheating
Since these are no-bake and served cold, reheating isn’t necessary. Just bring them to room temperature for about 15-20 minutes before serving if you want the filling slightly softer. Cold cheesecake cups straight from the fridge are my personal favorite though!
FAQs
-
Can I make these No Bake Halloween Cheesecake Cups Recipe ahead of time?
Absolutely! They can be made a day in advance and stored in the refrigerator. Just wait to add any toppings like Peeps or sprinkles until right before serving to keep everything looking fresh.
-
Can I use a different cookie instead of Oreos?
Yes! I’ve substituted crushed graham crackers or Biscoff cookies for a different flavor and texture. Both work beautifully as a crust and mid-layer in this recipe.
-
What can I use if I don’t have Cool Whip?
You can substitute homemade whipped cream or any store-bought whipped topping, but keep the texture light and fluffy for the best cheesecake filling consistency.
-
Is there an easy way to color the cheesecake filling?
Gel food coloring is my favorite because it adds vibrant color without thinning the filling. Just a few drops and gentle mixing will do the trick!
Final Thoughts
Honestly, this No Bake Halloween Cheesecake Cups Recipe feels like magic when you pull it together — a fancy looking dessert without the stress of oven time, fuss, or multiple bowls to wash. I keep coming back to this for how easy, fun, and absolutely delicious it is. If you want a guaranteed crowd-pleaser that’s cute, creamy, and perfectly festive, give these cheesecake cups a try. I can’t wait to hear how you make them your own!
Print
No Bake Halloween Cheesecake Cups Recipe
- Prep Time: 15 minutes
- Cook Time: 0 minutes
- Total Time: 15 minutes
- Yield: 7 parfaits
- Category: Dessert
- Method: No-Cook
- Cuisine: American
- Diet: Vegetarian
Description
Delight in these festive No Bake Halloween Cheesecake Cups, perfect for a spooky celebration. Layered with crushed Oreo cookies, creamy cheesecake filling tinted in Halloween colors, and topped with fun seasonal treats like ghost Peeps and candy pumpkins, these individual parfaits are easy to make and visually impressive. No oven required, just simple mixing and assembling to create a luscious, creamy dessert that captures the Halloween spirit.
Ingredients
Crust
- 14 Oreo cookies
Cheesecake Filling
- 2 – 8 ounce packages cream cheese, softened
- ½ cup powdered sugar
- 2 teaspoons vanilla extract
- 1 – 8 ounce container Cool Whip, thawed and divided
- Orange gel coloring
Toppings
- Ghost Peeps
- Halloween sprinkles
- Candy pumpkins
Instructions
- Prepare Crust: Crush 7 Oreo cookies into fine crumbs using a food processor or by hand and divide the crumbs evenly into 7 – 5 ounce cups to form a cookie crust base.
- Make Cheesecake Filling: In a mixing bowl, beat the softened cream cheese, powdered sugar, and vanilla extract together until smooth and creamy. Gently fold in 2 cups of Cool Whip to blend without deflating the mixture.
- Color the Cheesecake Mixtures: Divide the cheesecake filling evenly into two bowls. Add orange gel coloring to one bowl and mix thoroughly to create a vibrant orange cheesecake layer, leaving the other bowl white.
- Assemble White Layer: Spoon or pipe the white cheesecake mixture evenly over the Oreo crumb base in each cup.
- Add Middle Crust Layer: Crush the remaining 7 Oreo cookies into fine crumbs and divide evenly among the cups, layering them over the white cheesecake mixture.
- Assemble Orange Layer: Spoon or pipe the orange cheesecake mixture evenly over the Oreo crumb middle layer in each cup.
- Top with Cool Whip Swirls: Using a piping bag fitted with a 1M tip, swirl the remaining Cool Whip on top of each parfait to create a fluffy topping.
- Decorate: Add ghost Peeps, Halloween sprinkles, and candy pumpkins on top of each cup just before serving to keep decorations fresh and intact.
Notes
- Use room temperature ingredients to ensure smooth and creamy cheesecake filling; set cream cheese out beforehand.
- Use a food processor to finely crush Oreos, including the frosting, resulting in a consistent crumb texture.
- Substitute the Oreo crust with crushed graham crackers or Biscoff cookies for a different flavor.
- Customize colors by tinting cheesecake filling with different gel colors, like bright green for a unique Halloween effect.
- Use a piping bag or a ziplock bag with a corner cut off to achieve neat, professional-looking layers and toppings.
- Wait to add toppings if transporting; cover cups with lids or plastic wrap and decorate upon arrival to maintain freshness and decoration quality.
Nutrition
- Serving Size: 1 parfait
- Calories: 350 kcal
- Sugar: 25 g
- Sodium: 250 mg
- Fat: 22 g
- Saturated Fat: 13 g
- Unsaturated Fat: 7 g
- Trans Fat: 0.5 g
- Carbohydrates: 30 g
- Fiber: 1 g
- Protein: 5 g
- Cholesterol: 55 mg

