
No-Bake Cookie Butter Icebox Cake Recipe
If you’re craving a dreamy dessert that feels fancy but takes almost no effort, you’ve got to try this No-Bake Cookie Butter Icebox Cake Recipe. It’s like all your favorite cookie butter treats rolled into one ridiculously creamy, layered cake—no oven required! Trust me, this cake quickly became a favorite in my household, especially when I want something special but don’t want to spend hours baking. Plus, it’s fun to make together with friends or family, and the wait is totally worth that first bite. Let me walk you through making this fan-freaking-tastic dessert.
Why This Recipe Works
- Effortless Prep: No baking means less time in the kitchen, perfect for busy days or last-minute guests.
- Rich, Layered Flavor: The spiced cookie butter and creamy mascarpone elevate classic icebox cake to a new level.
- Make-Ahead Friendly: It improves after sitting overnight, so you can prep in advance and enjoy stress-free entertaining.
- Customizable and Crowd-Pleasing: Easy to tweak and always a hit at any gathering or cozy night in.

Ingredients & Why They Work
This No-Bake Cookie Butter Icebox Cake Recipe balances creamy and crunchy textures with rich, spiced flavors that everyone loves. Each ingredient plays its part to create that melt-in-your-mouth magic. Keep an eye out for fresh mascarpone and a good quality Biscoff spread for best results.

- Heavy cream: This is your base for the luscious whipped cream that lifts the cake’s texture into cloud-like deliciousness.
- Lotus Biscoff spread: The star ingredient with caramelized, spiced flavoriness that makes this cake unforgettable.
- Mascarpone cheese: Adds richness and slight tang to the cream mixture, keeping it smooth and velvety.
- Pure vanilla extract: A small touch of vanilla heightens the overall sweetness without overpowering the cookie butter.
- Kosher salt: Just a pinch balances all the sweetness perfectly.
- Confectioner’s sugar: Ensures the cream is sweet and silky without grit—essential for whipped cream consistency.
- Lotus Biscoff cookies: Crisp, spiced cookies create structure and that signature crunch for layering.
Tweak to Your Taste
I love making this No-Bake Cookie Butter Icebox Cake Recipe my own by adding little twists here and there. Don’t be shy to experiment — you’ll find your perfect version in no time. Plus, personalizing it can make the process even more fun.
- Extra crunch: I often sprinkle crushed Biscoff cookies between layers for added texture — it’s like a surprise with every bite!
- Chocolate lovers’ version: Adding a drizzle of melted dark chocolate over the top before chilling is my go-to for a rich, indulgent touch.
- Dairy-free option: Use coconut cream and a dairy-free cream cheese alternative, but remember the texture might be a bit different.
- Seasonal spices: A dash of cinnamon or nutmeg in the cream gives a cozy holiday vibe that friends adore.
Step-by-Step: How I Make No-Bake Cookie Butter Icebox Cake Recipe
Step 1: Whip That Cream to Perfection
Start by pouring 2 cups of cold heavy cream into the bowl of your stand mixer — I recommend chilling your bowl beforehand for quicker whipping. Whisk the cream until it forms medium peaks, meaning it should hold soft but firm peaks when you lift the whisk. This is the base of your creamy filling, so don’t rush it. If it’s too soft, the cake could get watery; too stiff, and it’ll feel heavy.
Step 2: Fold in the Cookie Butter Magic
Next, add ½ cup of Lotus Biscoff spread, ⅓ cup of mascarpone, 1 tsp vanilla extract, a pinch of kosher salt, and 2 tablespoons of confectioner’s sugar to your whipped cream. Gently fold these ingredients in until fully combined — the texture will be dreamy, velvety, and smooth. I like to warm the cookie butter slightly so it blends easier. Remember, gentle folding preserves the fluffiness we just perfected!
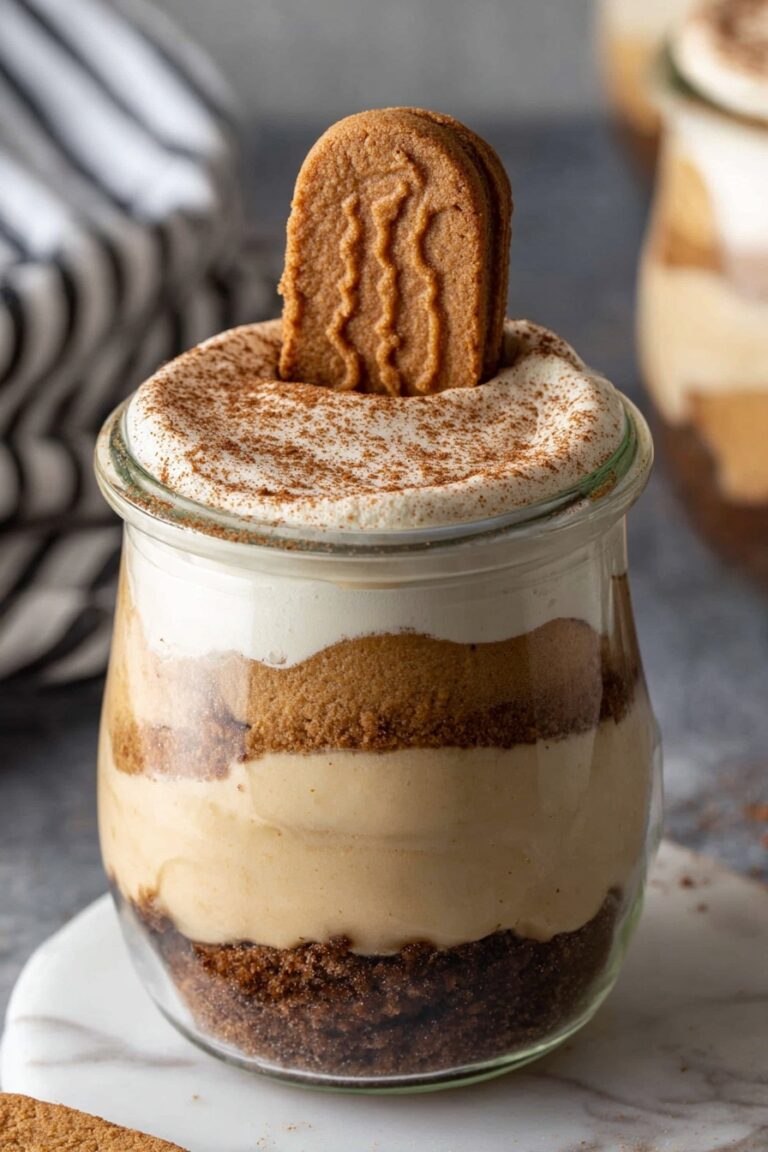
Step 3: Layer Your Cake Like a Pro
Line a loaf pan with plastic wrap so it’s easy to remove the cake later. Place a single layer of Biscoff cookies at the bottom — no crumbling here, just perfectly lined cookies. Then spread an even layer of your cookie butter cream on top that’s about the same thickness as the cookie layer. Repeat these cookie and cream layers until you reach the top, finishing with cookies. Keep your layers neat but don’t stress if it’s not perfect — the flavors shine through anyway.
Step 4: Chill and Wait (Patience is a Virtue!)
Wrap the loaf pan loosely with plastic wrap to keep everything moist and refrigerate for at least 24 hours — this allows the cookies to soften and the flavors to meld beautifully. I’ve found that the longer you chill it (up to 3 days), the better it gets, so making it ahead is a real win if you want to impress with little stress.
Pro Tips for Making No-Bake Cookie Butter Icebox Cake Recipe
- Use chilled utensils: Cold bowls and beaters help the cream whip faster and hold better—that’s my secret for fluffy layers.
- Gently warm the cookie butter: Melting it just a bit in short bursts keeps it spreadable without becoming oily, making folding easier.
- Don’t rush the chill time: The texture and flavor improve the longer you let it set; 24 hours minimum, but 48 hours is even better.
- Line your pan carefully: Plastic wrap prevents sticking and helps you unmold the cake smoothly without losing any of those beautiful layers.
How to Serve No-Bake Cookie Butter Icebox Cake Recipe

Garnishes
I love topping my slices with a drizzle of warmed Biscoff spread paired with a sprinkle of crushed Biscoff cookies for that extra crunch and intense flavor burst. Sometimes, a light dusting of cocoa powder or even a few chocolate shavings add a classy finish. It’s these little details that make serving feel special.
Side Dishes
This cake pairs beautifully with a scoop of vanilla ice cream or a dollop of freshly whipped cream to keep things light. For coffee lovers, a strong espresso or chai latte complements the spiced cookie butter flavors perfectly—my go-to combo for an afternoon treat.
Creative Ways to Present
I’ve served this icebox cake in a glass trifle bowl for guests, layering everything right in the bowl for a show-stopping visual. For birthdays, adding edible gold leaf or fresh berries on top turns it into a celebratory centerpiece. Using clear glass lets everyone admire those beautiful cookie layers!
Make Ahead and Storage
Storing Leftovers
After serving, I keep any leftovers tightly wrapped in plastic wrap or in an airtight container in the refrigerator to maintain freshness. It usually lasts up to 3 days and honestly, it’s hard to resist finishing it off sooner!
Freezing
I’ve frozen this cake a couple of times wrapped securely in plastic wrap and frozen inside a sturdy container to avoid freezer burn. When you’re ready to enjoy it again, I recommend thawing it overnight in the fridge so the texture stays just right.
Reheating
This dessert is best served cold, so reheating isn’t necessary. If you want to soften the cookie butter drizzle for topping, just warm it gently in the microwave for 20-30 seconds, stirring after each burst until pourable.
FAQs
-
Can I use other cookies instead of Lotus Biscoff?
While Lotus Biscoff cookies are iconic for this recipe because of their signature caramel spice flavor, you can substitute with thin ginger snaps or speculoos cookies if you can’t find them. Keep in mind the flavor profile will change slightly, but the overall texture and concept will still be delicious.
-
How long should I chill the cake before serving?
Chilling for at least 24 hours is key to let the cookies soften and the layers meld. I’ve found that chilling up to 48 or even 72 hours enhances the flavors even more, but any time over a day will give you a tender, sliceable cake.
-
Can I make this dairy-free or vegan?
Yes! You can replace heavy cream with coconut cream and mascarpone with a plant-based cream cheese alternative. Use vegan Biscoff spreads and cookies to keep the spiced flavor. The texture might differ slightly, but it’s still wonderful.
-
Is this recipe suitable for kids?
Absolutely! Kids love the sweet, creamy layers and the little crunch from the cookies. Just make sure to keep an eye on any allergies and avoid adult-only flavorings like alcohol if you ever decide to experiment.
Final Thoughts
This No-Bake Cookie Butter Icebox Cake Recipe holds a special place in my heart because it’s effortlessly elegant and totally satisfying, whether for a holiday dessert or just a weekend treat. Making it reminds me of cozy kitchen chats and sweet moments — and I know you’ll enjoy it just as much as I do. Next time you want something impressive without the fuss, grab that Biscoff spread, whip up this cake, and get ready to be wowed. You’ve got this!
Print
No-Bake Cookie Butter Icebox Cake Recipe
- Prep Time: 15 minutes
- Cook Time: 0 minutes
- Total Time: 1 day 15 minutes
- Yield: 8 servings
- Category: Dessert
- Method: No-Cook
- Cuisine: American
- Diet: Vegetarian
Description
A delicious No-Bake Cookie Butter Icebox Cake featuring layers of Lotus Biscoff cookies and a creamy, dreamy cookie butter mascarpone filling. Perfectly chilled for a rich and indulgent dessert that requires no baking and can be made ahead.
Ingredients
Filling
- 2 cups heavy cream
- ½ cup (150g) Lotus Biscoff spread
- ⅓ cup (80g) mascarpone cheese
- 1 tsp pure vanilla extract
- Pinch of Kosher salt
- 2 Tbsp confectioner’s sugar
Cookies
- 2 packages Lotus Biscoff cookies (32 cookies per package)
For Serving
- ⅓ cup warmed Lotus Biscoff spread
- Crushed Lotus Biscoff cookies
Instructions
- Whip the cream: Pour 2 cups heavy cream into a stand mixer bowl fitted with a whisk attachment. Whisk on medium-high speed until medium peaks form, which should take about 3 to 5 minutes.
- Prepare the cookie butter cream: Add ½ cup (150g) Lotus Biscoff spread, ⅓ cup (80g) mascarpone cheese, 1 tsp vanilla extract, a pinch of Kosher salt, and 2 Tbsp confectioner’s sugar to the whipped cream. Mix gently on low speed until the cream mixture is well combined and smooth.
- Assemble the icebox cake: Line a straight-sided loaf pan with plastic wrap. Place a single layer of Biscoff cookies evenly along the bottom. Spread a layer of the Biscoff cream mixture over the cookies to about the same thickness as the cookie layer. Repeat layering cookies and cream until the pan is filled, finishing with a layer of cookies on top.
- Refrigerate: Loosely cover the loaf pan with plastic wrap. Chill in the refrigerator for 24 hours to allow the cookies to soften and flavors to meld.
- Serve: Unmold the loaf onto a serving plate. Drizzle with ⅓ cup of warmed Biscoff spread and sprinkle crushed Biscoff cookies on top for added texture and flavor.
Notes
- Nutrition facts are estimated based on the use of 45 cookies, which equals approximately 1½ packages.
- Loaf pan sizes vary; a straight-sided pan uses about 9 cookies per layer. Adjust the number of cookies accordingly to fit your pan shape.
- To melt cookie butter, microwave ⅓ cup in 30-second increments, stirring between each, until warm and pourable.
- This icebox cake can be prepared up to 3 days in advance and stored in the refrigerator.
- Store leftovers in an airtight container or tightly wrapped in the loaf pan for up to 3 days.
- For freezing, wrap the cake tightly in plastic wrap and place in a freezer-safe container. Thaw overnight in the refrigerator before serving.
Nutrition
- Serving Size: 1 slice
- Calories: 390 kcal
- Sugar: 25 g
- Sodium: 140 mg
- Fat: 28 g
- Saturated Fat: 16 g
- Unsaturated Fat: 10 g
- Trans Fat: 0 g
- Carbohydrates: 30 g
- Fiber: 1 g
- Protein: 4 g
- Cholesterol: 100 mg


