
No Bake Biscoff Mini Cheesecakes Recipe
If you’re looking for a dessert that’s incredibly indulgent but doesn’t require turning on your oven, you’re in for a treat. This No Bake Biscoff Mini Cheesecakes Recipe is one of my absolute favorites to make when I want something creamy, dreamy, and delightfully spiced—without the fuss. These bite-sized cheesecakes pack all the rich caramelized flavor of Biscoff cookies and cookie butter in a smooth, velvety filling that sets perfectly in the fridge. Trust me, once you try this recipe, it will become your go-to dessert for parties, simple sweet cravings, or anytime you want to impress without stress.
Why This Recipe Works
- No Bake Convenience: You don’t need an oven, making this perfect for warm days or last-minute dessert cravings.
- Biscoff Magic: The combo of Biscoff cookie crumbs and creamy cookie butter gives these cheesecakes a unique, irresistible flavor that stands out.
- Perfect Mini Portions: These bite-sized treats are great for parties—you can eat a couple without feeling guilty and everyone gets a pretty little cheesecake.
- Easy to Make Ahead: You can prepare them in advance, making your entertaining stress-free and enjoyable.

Ingredients & Why They Work
The ingredients in this No Bake Biscoff Mini Cheesecakes Recipe blend buttery, creamy, and sweet textures that complement each other beautifully. Each gives a different layer of flavor or structure, and I have a few tips to make sure you pick the best ones for success.

- Biscoff Cookies: These spiced, caramelized cookies are the star of the crust and garnish—make sure they’re fresh for a crisp crust and strong flavor.
- Unsalted Butter: Melts smoothly into the cookie crumbs, binding the crust without overpowering the flavor.
- Heavy Cream: Use very cold cream for whipping to stiff peaks—that’s what lightens the cheesecake and balances richness.
- Cream Cheese: Full-fat and softened at room temp to avoid lumps but not melted, ensuring a silky filling texture.
- Powdered Sugar: Dissolves quickly and sweetens without gritty texture.
- Biscoff Cookie Butter: Adds extra Biscoff flavor and creaminess—choose a creamy version for smooth mixing.
- Sour Cream: Adds a slight tang that brightens the cheesecake’s richness.
- Vanilla Extract: Adds warmth and depth—pure vanilla is always best.
- Pinch of Salt: Enhances all the flavors, balancing the sweetness.
- Extra Biscoff Cookie Butter & Cookies for Topping: For that final, irresistible glaze and decorative crunch.
- Whipped Cream: Optional but lovely for extra creaminess and presentation.
Tweak to Your Taste
One thing I love about this No Bake Biscoff Mini Cheesecakes Recipe is how easy it is to customize. Whether you want to add a little crunch, switch up the flavors, or make it a bit lighter, the base is so versatile it welcomes your creativity.
- Nutty Twist: I sometimes sprinkle chopped toasted pecans or hazelnuts on top for an added crunch and nutty undertone.
- Dairy-Free Version: Swap the cream cheese and heavy cream for dairy-free alternatives, but keep in mind the texture may be slightly different.
- Chocolate Boost: Adding a swirl of melted chocolate to the filling or topping can make these mini cheesecakes extra decadent.
- Spice It Up: A pinch of cinnamon or nutmeg stirred into the crust gives a nice seasonal spin.
Step-by-Step: How I Make No Bake Biscoff Mini Cheesecakes Recipe
Step 1: Crush Those Cookies to Perfection
First things first, blitz the Biscoff cookies in a food processor until they’re finely ground — think sandy texture, not flour-fine powder. Then slowly stream in your melted butter as the processor runs, letting that buttery goodness coat the crumbs evenly. You want the mixture to hold together when you squeeze it—if it’s too dry it won’t form a good crust, so a little extra butter might be okay if needed. Once ready, press about a tablespoon of this mixture into each mini cheesecake pan or cupcake liner; this step is crucial for a solid, buttery base that doesn’t crumble when you bite into it.
Step 2: Whip That Cream Just Right
Next, whip your cold heavy cream to stiff peaks. I like to chill my bowl and whisk attachment beforehand—it really helps the cream whip faster and fluff up nicely. Be careful though; whip too long and it turns buttery! Set the whipped cream aside in the fridge while you prepare the rich cream cheese filling.
Step 3: Beat the Cheesecake Filling
In another bowl, beat the softened cream cheese with powdered sugar until super smooth. Then add the Biscoff cookie butter, sour cream, vanilla, and a pinch of salt. Beat until everything is silky and combined—you shouldn’t see any lumps. This is your moment to taste the filling; it should be just sweet enough with that signature warm, spiced Biscoff flavor. If it feels too thick, a teaspoon or two of milk can loosen it slightly without ruining the texture.
Step 4: Fold in the Whipped Cream Gently
Now, the key to keeping your No Bake Biscoff Mini Cheesecakes light and airy is folding, not mixing, the whipped cream into the cream cheese batter. Use a rubber spatula to do this in gentle, sweeping motions until no white streaks remain. This keeps all that lovely air you whipped in, so your mini cheesecakes won’t turn dense or heavy.
Step 5: Pipe and Chill
For neatness and ease, I like to spoon the filling into a piping bag fitted with a round tip. Then pipe the filling onto your chilled crusts—this helps keep each cheesecake perfectly portioned and smooth on top. If you don’t have a piping bag, a spoon works fine; just smooth the tops gently with the back of a spoon. Pop them into the refrigerator for at least 6 hours—or overnight if you have the time—to let everything set firmly in place.
Step 6: The Perfect Biscoff Topper
Once your cheesecakes are chilled and set, warm up the remaining Biscoff cookie butter just until melty in the microwave (about 20-30 seconds). Spread a thin layer gently on the tops—don’t worry if it drips down the sides; that just adds to the rustic charm. Chill again for 15-20 minutes to set that glossy top. Finally, garnish with whole or crushed Biscoff cookies and a dollop of whipped cream if you like. Now your mini bites of cheesecake are ready to wow!
Pro Tips for Making No Bake Biscoff Mini Cheesecakes Recipe
- Chill Your Tools: Always chill your mixing bowls and beaters before whipping cream for best volume and texture.
- Avoid Overmixing: When folding in whipped cream, go slow and gentle to keep your cheesecakes light and fluffy.
- Press Crust Evenly: Using the back of a spoon or your fingers, press crust firmly but evenly—this helps the base hold together after chilling.
- Temperature Matters: Let cream cheese and sour cream come to room temp for a smoother, lump-free mixture.
How to Serve No Bake Biscoff Mini Cheesecakes Recipe

Garnishes
I love keeping the garnishes simple but impactful. Usually, a small dollop of freshly whipped cream and a single Biscoff cookie piece angled artfully on top is enough to make these mini cheesecakes look elegant. For a little crunch and color contrast, sprinkling some crushed Biscoff crumbs or a dusting of cocoa powder is a quick way to amp up their charm.
Side Dishes
Since these mini cheesecakes are rich and sweet, I typically pair them with something fresh and light like fresh berries or a simple mint leaf garnish. If serving at a party, a small cup of espresso or a hot cup of tea complements the spice notes in the Biscoff perfectly and balances the richness.
Creative Ways to Present
For birthdays or special celebrations, I’ve fun-sized these cheesecakes into clear mini cups layered with a little homemade berry compote before piping the cheesecake on top. It looks stunning and tastes like a fancy dessert you’d pay for! You can also drizzle some caramel or melted chocolate across the tops for an extra wow factor.
Make Ahead and Storage
Storing Leftovers
I usually store leftovers in an airtight container in the fridge—these mini cheesecakes keep wonderfully for up to 4 days. Keeping them chilled maintains their texture and flavor. Just remember to place parchment paper between layers if stacking to avoid sticking or damaging the pretty tops.
Freezing
These cheesecakes freeze beautifully! I like to wrap each mini cheesecake individually in plastic wrap, then place them in a freezer-safe container or bag. They can stay frozen for up to 3 months. When you’re ready to enjoy, just thaw them overnight in the fridge for best texture.
Reheating
Since this is a no-bake cheesecake, you don’t want to reheat it like, say, a slice of pie. Instead, just let it come to room temperature for about 20 minutes before serving to soften slightly and enhance flavor. Avoid microwaving or heating for this dessert, as it can melt the beautiful texture you worked hard to achieve.
FAQs
-
Can I use regular graham crackers instead of Biscoff cookies?
You can definitely substitute graham crackers if you don’t have Biscoff cookies, but you’ll lose that signature cinnamon-caramel flavor that makes this recipe unique. I recommend Biscoff if you want the authentic taste, but graham crackers work fine in a pinch.
-
Do I really need to chill the cheesecakes for 6 hours?
Yes, chilling for at least 6 hours, preferably overnight, allows the filling to firm up properly for the best texture and flavor. If rushed, the filling might be too soft and won’t hold its shape when served.
-
Can I make this recipe vegan?
Making a vegan version would require swapping cream cheese, heavy cream, and sour cream with plant-based alternatives and ensuring your cookie butter and crust ingredients are vegan-friendly. The texture and flavor might differ, but with good-quality vegan substitutes, it’s possible!
-
What size pan should I use for mini cheesecakes?
The recipe works great with either mini cheesecake pans or 12-count muffin pans lined with cupcake liners. Each mini cheesecake is roughly a tablespoon of crust and filling, making the perfect bite-sized treat.
-
Can these cheesecakes be made ahead for parties?
Absolutely! In fact, I recommend making them the day before—it gives all the flavors time to meld and makes your party prep so much easier.
Final Thoughts
This No Bake Biscoff Mini Cheesecakes Recipe is one of those recipes I always come back to because it’s foolproof, festive, and downright delicious. Whether I’m hosting friends or just treating myself, these little cheesecakes satisfy every time. The Biscoff flavor is like a little hug in dessert form. I hope when you make them, you get as much joy out of eating (and sharing!) them as I do. Happy baking (or should I say chilling)!
Print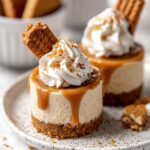
No Bake Biscoff Mini Cheesecakes Recipe
- Prep Time: 30 minutes
- Cook Time: 0 minutes
- Total Time: 6 hours 30 minutes
- Yield: 24 mini cheesecakes
- Category: Dessert
- Method: No-Cook
- Cuisine: American
Description
Delight in these no-bake mini Biscoff cheesecakes featuring a crunchy Biscoff cookie crust, creamy cheesecake filling infused with Biscoff cookie butter, and a luscious Biscoff topping. Perfect bite-sized treats that require no baking and can be prepared ahead for effortless dessert indulgence.
Ingredients
Crust
- 1 (8.8 oz, 250g) package Biscoff cookies
- 1/2 cup melted butter, unsalted
Filling
- 1 cup heavy cream, cold
- 3 (8 oz.) blocks full-fat cream cheese, softened to room temperature
- 1 cup powdered sugar
- 1 cup creamy Biscoff cookie butter
- 1/3 cup sour cream, room temperature
- 2 tsp pure vanilla extract
- Pinch of salt
Topping
- 1/2 cup creamy Biscoff cookie butter
- Additional Biscoff cookies for garnish (whole or crushed)
- Whipped cream
Instructions
- Prepare the crust: Blitz the Biscoff cookies in a food processor until finely ground. Slowly stream in the melted unsalted butter until combined. The mixture will be sandy but should clump when pressed together.
- Mold the crust: Spray 2 mini cheesecake pans or two 12-count muffin pans lined with cupcake liners with non-stick spray. Press about 1 tablespoon of the crumb mixture into each cup evenly. Place the pans in the freezer or refrigerator to chill while preparing the filling.
- Whip the cream: In a chilled medium mixing bowl, beat the cold heavy cream using a hand mixer or stand mixer with the whisk attachment until stiff peaks form, about 2 minutes. Avoid overbeating. Refrigerate the whipped cream until needed.
- Make the cheesecake filling: In a separate large bowl, beat the softened cream cheese, powdered sugar, creamy Biscoff cookie butter, sour cream, vanilla extract, and a pinch of salt until smooth and fully combined.
- Fold in whipped cream: Gently fold the whipped cream into the cheesecake mixture using a rubber spatula until no white streaks remain, taking care to maintain lightness.
- Fill the molds: Transfer the filling into a piping bag fitted with a round 1A tip and pipe the filling evenly onto the chilled crusts. Smooth the tops for an even appearance.
- Chill the cheesecakes: Refrigerate the mini cheesecakes for 6 hours or overnight, covering loosely if desired, to allow them to set properly.
- Add topping: Melt the 1/2 cup creamy Biscoff cookie butter in the microwave for 20 to 30 seconds until runny. Spread it over the tops of the chilled cheesecakes, letting some drip down the sides. Return to the refrigerator for 15 to 20 minutes to set the topping.
- Garnish and serve: Decorate with additional Biscoff cookies either whole or crushed, and a dollop of whipped cream as desired. Serve chilled and enjoy!
Notes
- Store the mini cheesecakes in the refrigerator for up to 4 days or freeze for up to 3 months.
- For firmer crust, press crumbs tightly into the pans before chilling.
- Be careful not to overbeat the heavy cream to avoid grainy texture.
- If you don’t have a piping bag, you can spoon the filling into the molds and smooth the tops with a spatula.
- Use full-fat cream cheese for the creamiest texture and best flavor.
Nutrition
- Serving Size: 1 mini cheesecake
- Calories: 220 kcal
- Sugar: 14 g
- Sodium: 95 mg
- Fat: 17 g
- Saturated Fat: 10 g
- Unsaturated Fat: 6 g
- Trans Fat: 0 g
- Carbohydrates: 14 g
- Fiber: 0.5 g
- Protein: 3 g
- Cholesterol: 55 mg
