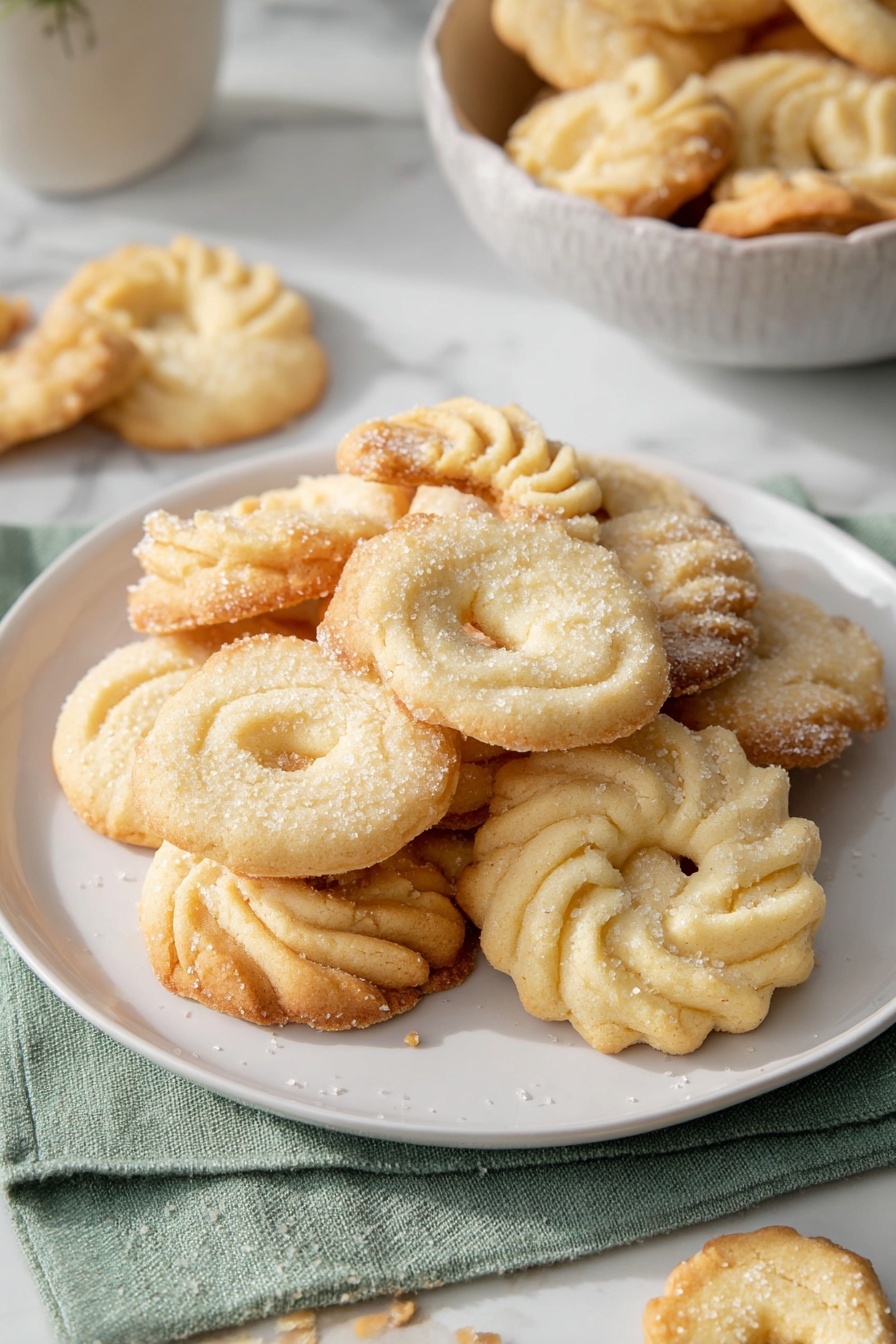
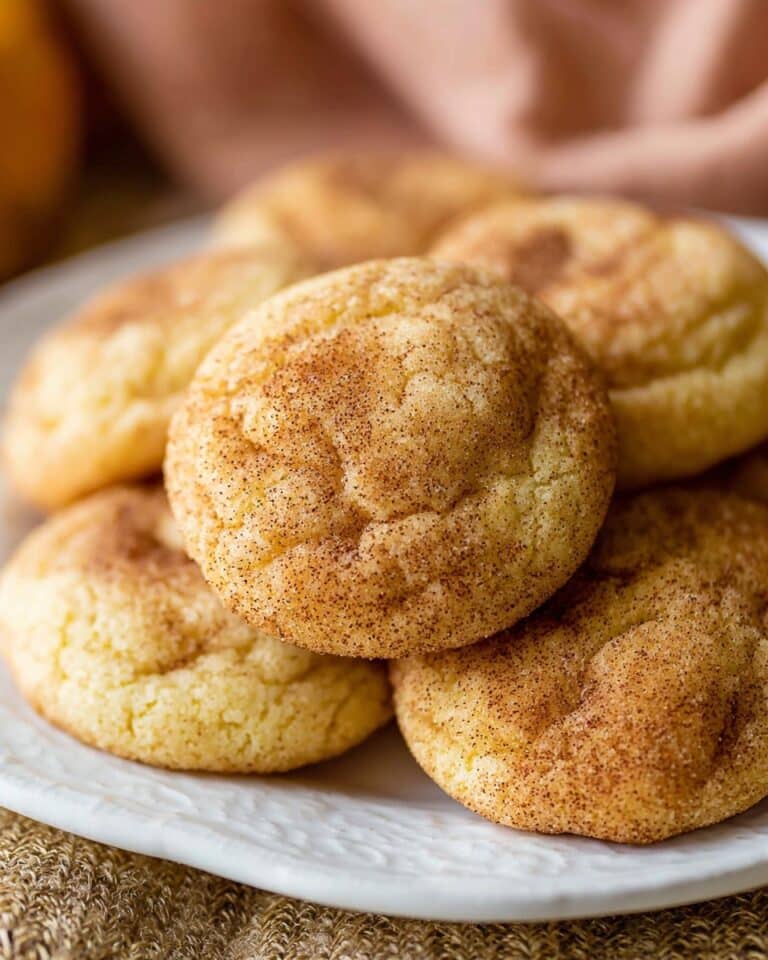
Melt-in-Your-Mouth Danish Butter Cookies Recipe
If you’ve ever dreamed of biting into cookies that simply melt away in your mouth, then you’re in for a treat with this Melt-in-Your-Mouth Danish Butter Cookies Recipe. I remember the first time I made these — the rich buttery flavor combined with that perfect crumb had me hooked immediately! Whether you’re baking for a holiday, a cozy coffee date, or just because, these cookies never disappoint. Stick with me, and I’ll walk you through every step to make sure your batch turns out impeccable.
Why This Recipe Works
- Buttery Goodness: Using European salted butter adds an irresistible richness and just the right amount of saltiness to balance sweetness.
- Perfect Texture: Combining all-purpose and cake flour creates a crisp yet tender cookie that literally dissolves on your tongue.
- Piping for Precision: Piping the dough ensures uniform shapes and sizes, which means even baking and that flawless appearance.
- Chill Time: Refrigerating the cookies before baking stops them from spreading too much, preserving their pretty design and lovely texture.

Ingredients & Why They Work
Every ingredient in this Melt-in-Your-Mouth Danish Butter Cookies Recipe plays a critical role in creating that iconic tender, buttery crunch. Choosing good quality butter and the right flours will truly elevate your cookies from “meh” to magnificent.

- European salted butter: This butter is richer and creamier than regular butter, which makes the flavor more authentic and decadent. Plus, the salt enhances the sweetness perfectly.
- Granulated sugar: Provides the sweetness while helping to create that slight crunch on the surface when baked.
- Salt: Just a pinch balances flavors and lifts the buttery richness.
- Egg yolks: They add richness and help bind ingredients together for that tender bite.
- Vanilla extract: A splash of real vanilla amps up the flavor beautifully.
- Whole milk: Adds just enough moisture to soften the dough without making it sticky — important for piping.
- All-purpose flour: Gives structure and firmness so cookies hold their shape well.
- Cake flour: Essential for creating that melt-in-your-mouth, delicate crumb texture.
- Coarse sugar (optional): Sprinkled on top, this adds a festive sparkle and a satisfying crunch.
Tweak to Your Taste
One of my favorite things about this Melt-in-Your-Mouth Danish Butter Cookies Recipe is how easily it adapts. Personally, I love experimenting with a little lavender or dipping half the baked cookies in melted dark chocolate for special occasions — your kitchen, your rules!
- Lavender or citrus zest: Adding a teaspoon of dried lavender or a tablespoon of lemon zest can give the cookies a fresh, sophisticated twist. I tried lavender once, and my guests were obsessed.
- Chocolate dip: After cooling, dip half of each cookie in dark chocolate and let them set — the rich chocolate pairs heavenly with the buttery cookie.
- Salted butter swap: If you only have unsalted butter, just add an extra ¼ teaspoon of kosher salt to get the perfect balance.
- Milk alternatives: You can use cream or even almond milk to slightly change the texture and flavor, just adjust the amount to keep the dough pipeable.
Step-by-Step: How I Make Melt-in-Your-Mouth Danish Butter Cookies Recipe
Step 1: Prep and Get Your Space Ready
I always make sure to clear some space in my fridge because chilling the shaped cookies before baking is key to keeping their shapes intact. I line two baking sheets with parchment paper or silicone mats and set them aside. Once you’ve piped the dough, pop the trays in the fridge for 20-30 minutes. Trust me, this step saves you from cookies flattening out and losing their charm.
Step 2: Cream Butter, Sugar, and Salt
Using a stand mixer with a paddle attachment, beat the room temperature butter on medium until smooth and creamy. Then, while it’s still mixing on low, gradually add the sugar and salt. Continue mixing until the mixture is light and fluffy — this usually takes about 3-4 minutes. You’ll notice the batter kind of ‘puffs up’ as air gets whipped in, which is what makes these cookies so tender.
Step 3: Add Egg Yolks, Vanilla, and Milk
Next, pour in the egg yolks, vanilla extract, and the whole milk. Keep mixing on medium speed until everything’s combined and smooth. I like to scrape down the sides of the bowl here to make sure no uneven pockets of butter or flour sneak in. This step helps keep the dough uniform and easy to pipe.
Step 4: Mix in the Flours
Whisk together the all-purpose flour and cake flour separately so they’re evenly blended. Then add them to the butter mixture in two batches, mixing on low speed just until you don’t see any flour traces. The dough should be soft but hold its shape when piped. If it feels too stiff, add a little more milk, a tablespoon at a time — this flexibility will really help when you’re piping shapes.
Step 5: Pipe Your Cookies
Fill a large piping bag fitted with a ½-inch open star tip with your dough. Pipe 2-inch shapes like rosettes, pretzels, circles, or squares onto your prepared baking sheets. Make sure to space them at least 2 inches apart; these cookies won’t spread too much, but a little breathing room never hurts. Feel free to sprinkle coarse sugar on top now if you want that extra sparkle and crunch.
Step 6: Chill and Bake
Pop the trays in your fridge for 20-30 minutes to chill the cookies so they hold their pretty shapes. Meanwhile, preheat your oven to 350°F (175°C) and position the rack in the middle. Bake the cookies for 10-15 minutes, watching closely towards the end. You want the edges just barely golden because that’s when they’re perfectly crisp but still tender inside. After baking, let them cool on the sheet for 5 minutes before transferring them to a wire rack to finish cooling.
Pro Tips for Making Melt-in-Your-Mouth Danish Butter Cookies Recipe
- Room Temperature Butter: I always let my butter sit out for about 45 minutes — it should be soft but still cool to the touch (around 67°F). This ensures smooth creaming without melting the dough.
- Don’t Overmix Dry Ingredients: Mixing too long develops gluten which can toughen cookies — stop as soon as the flour disappears.
- Use a Kitchen Scale: Measuring flour by weight is a game-changer. I learned this the hard way after dry, dense cookies—too much flour sneaks in easily otherwise.
- Keep an Eye in the Oven: Baking times vary based on cookie shapes and your oven. I check mine around 10 minutes; a slight golden edge is your green light.
How to Serve Melt-in-Your-Mouth Danish Butter Cookies Recipe
Garnishes
I usually stick with a simple sprinkle of coarse sugar before baking because it gives just the right crunch and sparkle. Sometimes for a festive twist, I tap a little colored sanding sugar or even finely chopped nuts like pistachios or almonds on top. These tiny touches make the cookies feel extra special without overpowering that classic buttery taste.
Side Dishes
These cookies pair wonderfully with a hot mug of tea or freshly brewed coffee — think of them as the ultimate cozy companion. They’re also fabulous served alongside fruit preserves or a lightly whipped cream for a simple dessert. Whenever I host a brunch, I always include these cookies because everyone loves munching on something that feels indulgent yet delicate.
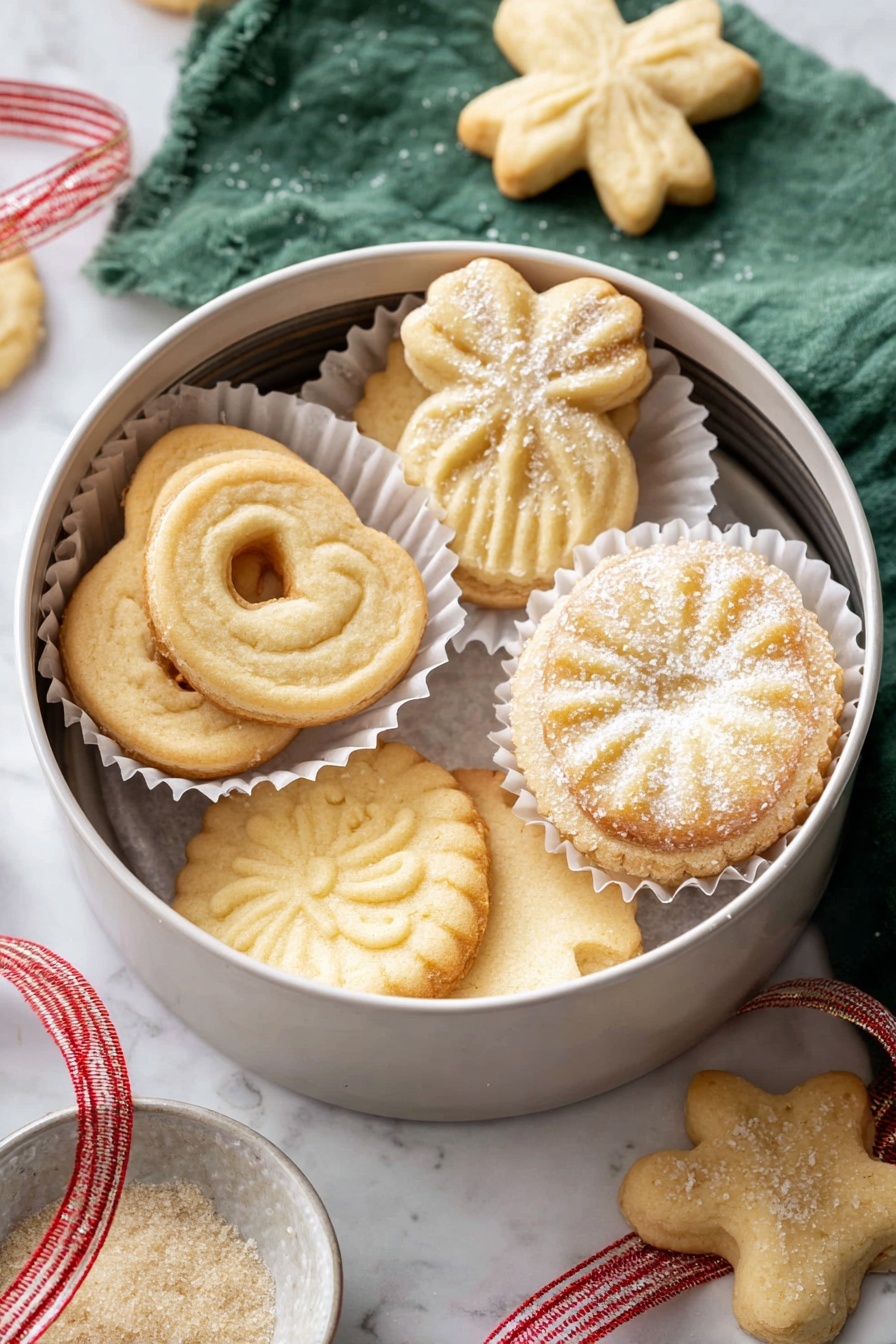
Creative Ways to Present
For holidays or parties, I like to arrange these Butter Cookies on a tiered serving tray with ribbons and fresh flowers to elevate the look. Wrapping small stacks tied with twine or colorful ribbon also makes adorable gifts for neighbors. If you’re feeling fancy, drizzle some melted white or dark chocolate over half of each cookie and let them harden for a classy presentation that’s both eye-catching and delicious.
Make Ahead and Storage
Storing Leftovers
These Danish Butter Cookies keep beautifully in an airtight container at room temperature for up to 5 days. I usually layer them between parchment paper to avoid sticking or breakage. The texture stays crisp and fresh — perfect for nibbling over a few days or sharing with friends.
Freezing
I love freezing both the shaped dough before baking and the baked cookies. For the dough, I pipe the shapes on parchment-lined trays, freeze until solid, then transfer to airtight containers. When I’m ready to bake, I add a couple of minutes to the baking time — no thawing required! Baked cookies freeze well too; just thaw at room temp before serving.
Reheating
If you want to revive some frozen baked cookies, I pop them in a preheated 300°F oven for 5-7 minutes. This warms them through and refreshes that delicate crisp exterior without drying them out. Just be careful not to leave them too long or they can become brittle.
FAQs
-
Can I use unsalted butter instead of European salted?
Absolutely! Just make sure to add ¼ teaspoon of kosher salt along with the sugar to balance out the flavors. European salted butter has a bit more salt and richness, but this substitution works well without compromising taste.
-
Why do we use both all-purpose and cake flour?
Using a mix of these flours strikes the perfect balance between structure and tenderness. All-purpose flour gives body so cookies hold their shapes, while cake flour lowers the gluten content, resulting in softer, melt-in-your-mouth texture. You can replace cake flour with extra all-purpose flour if needed, but the texture will be slightly less delicate.
-
What’s the best way to pipe the cookies if I don’t have a piping bag?
A resealable plastic bag with the corner snipped off can work in a pinch—just make sure the opening is the right size for the shapes you want. Alternatively, you can drop spoonfuls for a more rustic look, though the shapes won’t be as uniform.
-
How do I prevent my butter cookies from spreading too much?
Chilling your piped cookies for at least 20-30 minutes is crucial. Cold dough holds its shape in the oven better and reduces spreading. Also, avoid using melted butter or overly warm dough which can cause excessive spread.
-
Can I make this recipe gluten-free?
It’s possible by using a gluten-free flour blend, but the texture and piping consistency might vary. You may need to experiment with binding agents and adjust liquid amounts slightly to get a similar melt-in-your-mouth feel.
Final Thoughts
This Melt-in-Your-Mouth Danish Butter Cookies Recipe holds a warm spot in my heart because it’s one of those classic, no-fail treats that always impress and comfort. I hope you enjoy making and sharing these as much as I do. They’re the perfect excuse to slow down, enjoy a sweet moment, and maybe share with a friend over coffee. Give them a try—you’ll see exactly why the name “melt-in-your-mouth” fits so perfectly!
Print
Melt-in-Your-Mouth Danish Butter Cookies Recipe
- Prep Time: 15 minutes
- Cook Time: 15 minutes
- Total Time: 1 hour 30 minutes
- Yield: 24 cookies
- Category: Dessert
- Method: Baking
- Cuisine: Danish
- Diet: Vegetarian
Description
These Danish Butter Cookies are classic melt-in-your-mouth treats featuring rich European salted butter, a blend of flours for perfect texture, and a delicate vanilla flavor. Piped into charming shapes and lightly baked until golden, they offer a crisp yet tender bite perfect for any occasion.
Ingredients
Wet Ingredients
- 1 cup (227 g) European salted butter room temperature
- 2 egg yolks
- 2 teaspoons (10 g) vanilla extract
- 1 tablespoon (15 g) whole milk or more to soften
Dry Ingredients
- ½ cup (100 g) granulated sugar
- ⅛ teaspoon salt
- 2 cups (220 g) all-purpose flour
- ½ cup (50 g) cake flour
For Decoration
- Coarse sugar for decorating
Instructions
- Prepare chilling and baking equipment: Clear space in your refrigerator to chill a baking sheet with shaped cookies for 20-30 minutes to prevent over-spreading. Line two baking sheets with parchment paper or a silicone mat and set aside.
- Cream butter, sugar, and salt: Using a stand mixer with paddle attachment, beat the room temperature butter on medium speed until smooth. Slowly add sugar and salt while mixer runs on low, then increase speed to medium and whip until light and fluffy.
- Add egg yolks, vanilla, and milk: With mixer on medium, incorporate egg yolks, vanilla extract, and milk until fully combined. Scrape the bowl sides to ensure even mixing.
- Combine dry ingredients and mix in: Whisk together the all-purpose and cake flours in a separate bowl. Add flour mixture to the wet ingredients in two portions, mixing on low speed until just combined with no flour streaks. If dough is too stiff to pipe, add an additional tablespoon of milk to soften.
- Pipe cookies onto baking sheets: Transfer dough to a large piping bag fitted with a ½-inch open star tip. Pipe 2-inch cookies in desired shapes (rosettes, pretzels, circles, squares), spacing them at least 2 inches apart. Sprinkle coarse sugar or festive sprinkles if desired. Chill cookies in the refrigerator for 20-30 minutes.
- Preheat oven and bake: Preheat oven to 350°F with the rack in the middle position. Bake the chilled cookies for 15 minutes or until edges are just lightly golden brown.
- Cool cookies: Allow cookies to cool on the baking sheet for 5 minutes before transferring them to a wire rack to cool completely to room temperature.
Notes
- Use room temperature butter softened to about 67°F (19°C) to ensure easy mixing and smooth texture.
- Bring eggs to room temperature by placing them in warm water for 5 minutes so cookies bake evenly.
- Avoid over mixing the batter to prevent gluten development which makes cookies tough.
- Keep a close eye on baking time as it varies with cookie size and shape to avoid over-baking.
- If cake flour is unavailable, use 260 grams of all-purpose flour instead for a slightly different texture.
- Measure flour accurately using a kitchen scale or fluff, spoon, and level method to avoid overly dense cookies.
- If using unsalted butter, add ¼ teaspoon kosher salt to the dough for balanced flavor.
- Store baked cookies in airtight containers at room temperature up to 5 days or freeze for up to 3 months.
- Chill shaped cookies on baking sheets covered with plastic wrap for up to 2 days before baking; freeze unbaked dough shapes for 2-3 months and bake from frozen, adding baking time.
Nutrition
- Serving Size: 1 cookie
- Calories: 90 kcal
- Sugar: 5 g
- Sodium: 40 mg
- Fat: 6 g
- Saturated Fat: 4 g
- Unsaturated Fat: 2 g
- Trans Fat: 0 g
- Carbohydrates: 8 g
- Fiber: 0.2 g
- Protein: 1 g
- Cholesterol: 25 mg


