
Maple Glazed Donut Recipe
Hey friend, if you’ve ever dreamed of biting into a fluffy, tender donut with a smooth, indulgent maple glaze, then you’re in the right kitchen. Today, I’m sharing my all-time favorite Maple Glazed Donut Recipe that is as satisfying to make as it is to eat. From mixing up that soft dough to perfecting the shiny maple glaze, I promise this recipe will make your mornings—or any time—extra special. Stick around and I’ll walk you through all my tips to get these donuts just right!
Why This Recipe Works
- Soft, Tender Dough: The perfect balance of bread flour and a slightly sticky texture creates a delicate crumb that melts in your mouth.
- Warm Yeast Proofing: Using your oven as a gentle proofing box helps the dough double in size beautifully without drying out.
- Classic Maple Glaze: The maple glaze strikes just the right note between sweet and rich, with corn syrup adding that perfect glossy finish.
- Straightforward Frying Technique: Frying in peanut oil at the right temperature ensures that golden-brown exterior and pillowy inside everyone loves.

Ingredients & Why They Work
Every ingredient in this Maple Glazed Donut Recipe plays an important role in building flavor and texture. Knowing a little bit about them helps you nail the end result.

- Warm water (105–110°F): Activates the yeast without killing it—too hot and your dough won’t rise properly.
- Active dry yeast: The magic behind your donuts’ rise and fluffiness.
- Sugar (granulated and powdered): Adds sweetness and helps with browning and texture.
- Butter-flavored shortening: Adds tenderness and richness while keeping the dough light. You can use regular shortening if you don’t have butter-flavored.
- Egg yolks: These add richness and help with a tender crumb.
- Vanilla extract: A subtle but essential flavor boost in both dough and glaze.
- Bread flour: More protein than all-purpose flour, it gives dough strength and chew while still softening nicely.
- Kosher salt: Balances sweetness and enhances all flavors.
- Baking powder: Lightens the dough a little for extra tenderness.
- Peanut oil: Great for frying because of its high smoke point and neutral flavor.
- Light corn syrup: Helps the glaze stay smooth and glossy without crystallizing.
- Maple extract: Brings that unmistakable sweet maple flavor to the glaze.
- Hot water for icing: Ensures your glaze is just thin enough to dip donuts without making a mess.
Tweak to Your Taste
I love making this recipe my own depending on the season or mood, and you absolutely should too! Feel free to adjust the maple intensity and try fun toppings to make these donuts uniquely yours.
- Extra Maple Punch: I often double the maple extract in the glaze when I want that bold, syrupy kiss—just be mindful it doesn’t get overpowering.
- Salted Maple Glaze: Sprinkle a tiny pinch of flaky sea salt on top of the glaze for an addictive sweet-salty combo (my personal fave).
- Vegan Variation: Swap egg yolks for a flaxseed “egg” and use vegan shortening to make these donuts vegan-friendly. The texture changes slightly but still delicious.
- Spiced Maple Glaze: Add a pinch of cinnamon or nutmeg to your glaze for a cozy autumn twist that’s just perfect with a hot latte.
Step-by-Step: How I Make Maple Glazed Donut Recipe
Step 1: Wake the Yeast and Mix Your Dough
Start by adding warm water, yeast, and a tablespoon of sugar to a large bowl. Let it sit for about five minutes until you see those bubbles form—that’s your yeast waking up and ready to work. If it doesn’t bubble, start over because your yeast might be dead (happens to the best of us!). Then add the remaining sugar, shortening, egg yolks, and vanilla. Beat together until the shortening breaks up but isn’t fully incorporated yet—it’s a little quirky at this stage, but hang in there!
Step 2: Add Flour and Knead to Soft Perfection
Next, add 1 cup of bread flour on top of the wet ingredients without stirring right away. Sprinkle salt and baking powder on top of the flour and stir it in lightly. Then beat it all together for a minute. Gradually add the rest of the flour, switching to a dough hook or hand knead, aiming for a dough that’s slightly sticky but pulls away from the bowl. The stickier the dough, the softer your donuts will be—don’t fight it. Knead for about 5 minutes until smooth and elastic.
Step 3: First Rise in Your Homemade Proofing Oven
Shape your dough into a ball and place it on a floured baking sheet, covering it lightly with flour and a clean cloth. We’re going to proof the dough in a warm, humid environment: turn your oven on for 30 seconds at 350°F, then turn it off. Place the dough inside with a pan of boiling water on the rack below to create steam. Close the door and let the dough rise for about an hour until doubled. This method keeps the dough cozy and moist while it puffs—trust me, it makes a big difference.
Step 4: Shape and Second Rise
Gently turn the dough onto a floured surface—don’t fuss with it to keep all the lovely air bubbles intact. Roll it out into a rectangle about 11×12 inches and cut into 12 long rectangular “bars.” I like to trim the rounded edges for neat bars, but if you enjoy a rustic look, skip that step. Place them spaced apart on floured baking sheets. Then back into your warm proofing oven for a second rise, again with a hot water pan, this time for 45 minutes or until doubled.
Step 5: Fry Until Golden, But Don’t Rush!
While the dough finishes rising, heat peanut oil in a heavy pot to 350°F. Use a candy thermometer to keep that temperature steady—it’s essential for perfectly cooked donuts. Fry your donuts in small batches, 30-40 seconds on one side, then flip and fry for about 20 seconds more. They should be golden but not too dark. Remove with a slotted spoon and drain on paper towels. Take your time here—rushing can deflate those light, fluffy bars.
Step 6: Dip in That Glorious Maple Glaze
Once the donuts have cooled completely (warm glaze won’t stick), whisk together powdered sugar, corn syrup, salt, vanilla, maple extract, and hot water to make your glaze. Adjust the consistency by adding more powdered sugar or water until it’s perfectly dip-ready—not too thick, not runny. I like to double the maple extract sometimes for a lungful of that cozy flavor. Dip the rounded side of each donut, letting the excess drip back into the bowl, then set on a wire rack to let the glaze harden about 15-20 minutes. Patience here seriously pays off!
Pro Tips for Making Maple Glazed Donut Recipe
- Keep a Consistent Oil Temperature: Frying at a steady 350°F ensures the donuts cook evenly without soaking up too much oil.
- Use Your Oven as a Proofing Box: This trick creates perfect warmth and humidity for dough to rise without drying out.
- Don’t Skip Cooling Before Glazing: Ice a warm donut and your glaze will slide right off—cool completely for best results.
- Handle the Dough Gently: Treat your dough like a delicate puff—it keeps the donuts airy and soft.
How to Serve Maple Glazed Donut Recipe

Garnishes
I love adding a sprinkle of flaky sea salt or a light dusting of finely chopped toasted pecans on top of the glaze when I serve these donuts. The salt elevates the sweetness with a little crunch, while nuts add a lovely texture contrast without overpowering the maple flavor.
Side Dishes
Pair your maple glazed donuts with a strong cup of coffee or a creamy chai latte—that combination nearly brings tears to my eyes every time. If you’re brunching, sliced fresh fruit or a simple yogurt parfait makes an excellent fresh companion.
Creative Ways to Present
For birthdays or special events, I’ve arranged these donuts on a tiered cake stand surrounded by candles and fresh flowers—guests were so impressed! You can also drizzle contrasting chocolate or sprinkle colorful edible flowers on top for a whimsical vibe that’s as joyful to look at as it is to eat.
Make Ahead and Storage
Storing Leftovers
I recommend storing these donuts in an airtight container at room temperature; they’ll stay fresh for 2-3 days. If you live somewhere humid, popping a piece of bread in the container helps keep them moist, a little trick I adore for preserving softness.
Freezing
Yes, you can freeze these donuts! I usually flash freeze them on a baking sheet first, then transfer to a freezer bag to save space. When you want some, thaw them at room temperature. The glaze might crack a bit, but the taste and texture stay pretty amazing.
Reheating
I gently warm leftover donuts in a toaster oven or regular oven at 300°F for 5-7 minutes to freshen them up. This keeps the outside slightly crisp and the inside soft, just like fresh! Avoid microwaving or you’ll end up with a chewy mess.
FAQs
-
Can I use all-purpose flour instead of bread flour for this Maple Glazed Donut Recipe?
You absolutely can! The donuts will be a touch less chewy and might be a little softer, but they’ll still taste amazing. Bread flour gives your donuts a bit more structure and that signature chewiness.
-
What if my yeast doesn’t bubble during proofing?
That usually means the yeast is dead. Make sure your water isn’t too hot or too cold—between 105-110°F is ideal. Try fresh yeast if yours fails to activate, as it’s key to getting the perfect rise.
-
Can I bake these donuts instead of frying?
While you can bake donuts, this particular recipe is designed for frying to get that crisp outside and pillowy inside. Baking will give a different texture and won’t have the same golden crust, but for a lighter option, bake at 375°F for 10-12 minutes until golden.
-
How do I store leftover maple glazed donuts to keep them fresh?
Store at room temperature in an airtight container up to 3 days. To maintain softness longer, adding a slice of bread inside the container helps keep the donuts from drying out.
-
Can I adjust the sweetness of the maple glaze?
Yes! Feel free to add more or less powdered sugar and maple extract to suit your taste. I often like it extra maple-y, but if you prefer less sweet, you can reduce sugar or add a touch more water for a thinner glaze.
Final Thoughts
Making this Maple Glazed Donut Recipe has become one of my favorite little kitchen adventures—it’s relaxing, fun, and the result is pure magic. Sharing these maple-coated delights with family and friends feels like gifting a cozy hug, and I’m confident you’ll find the same joy. Don’t be intimidated by the steps; take it slow, savor the process, and I promise you’ll be rewarded with warm, melt-in-your-mouth donuts you’ll proudly claim as your own. Now go make your kitchen smell like a heaven-scented bakery—your perfect maple bar is waiting!
Print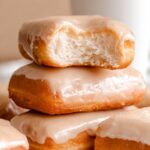
Maple Glazed Donut Recipe
- Prep Time: 30 minutes
- Cook Time: 2 minutes
- Total Time: 2 hours 32 minutes
- Yield: 12 servings
- Category: Breakfast
- Method: Frying
- Cuisine: American
Description
This Maple Bar Donut recipe delivers light, fluffy homemade yeast donuts with a rich maple glaze. Perfectly tender and sweet, these classic treats are fried to golden perfection and coated with a luscious maple icing made from powdered sugar, maple extract, and corn syrup for the ultimate indulgence.
Ingredients
Dough Ingredients
- 1 cup warm water, about 105 degrees F
- 3 tablespoons active dry yeast
- 1 tablespoon granulated sugar
- 1/2 cup granulated sugar
- 1/4 cup butter-flavored shortening or regular shortening
- 3 large egg yolks
- 1 teaspoon vanilla extract
- 3 1/2 cups bread flour, spooned and leveled (up to 4 cups if needed)
- 2 1/2 teaspoons kosher salt
- 1/2 teaspoon baking powder
- Peanut oil for frying, about 48 ounces
Maple Icing Ingredients
- 4 cups powdered sugar, plus an extra 1/2 cup (1 pound total)
- 2 teaspoons light corn syrup
- 1/4 teaspoon kosher salt
- 1/2 teaspoon vanilla extract
- 1 teaspoon maple extract, or more to taste
- 1/3 cup hot water, plus more if needed
Instructions
- Activate Yeast: In a large bowl or stand mixer, combine 1 cup warm water (105-110 degrees F), 3 tablespoons yeast, and 1 tablespoon sugar. Let it sit for 5 minutes until bubbly and frothy, indicating the yeast is active.
- Mix Wet Ingredients: Add 1/2 cup granulated sugar, 1/4 cup shortening, 3 large egg yolks, and 1 teaspoon vanilla to the yeast mixture. Beat with the paddle attachment until the shortening breaks up but is not fully blended.
- Add Initial Flour and Leavening: Stir in 1 cup bread flour, then sprinkle 2 1/2 teaspoons kosher salt and 1/2 teaspoon baking powder over the flour. Use a teaspoon to mix the salt and baking powder into the flour, then beat the mixture for about 1 minute until smooth.
- Add Remaining Flour: Gradually add remaining flour, 1 cup at a time, switching to the dough hook or kneading by hand once thick. Add a total of 3 1/2 to 4 cups flour until the dough forms a mass that pulls away from the bowl, kneading for about 5 minutes until smooth and elastic.
- Prepare Proofing Environment: While kneading, bring at least 2 quarts of water to a boil in a large pot. Lightly flour a baking sheet (no silicone mats). Preheat oven to 350 degrees F for 30 seconds, then turn it off to create a warm, humid environment for rising.
- First Rise: Shape dough into a 6×6 inch square on the floured baking sheet. Flour top lightly and cover with a clean cloth. Place dough in the warm, off oven. Place a glass 9×13 inch pan on the rack below and pour boiling water into it to create steam. Let dough rise for 1 hour or until doubled.
- Prepare for Frying: Once risen, pour water from pan back into boiling pot and reboil. Turn dough onto a floured surface, being gentle to keep it puffy. Dust two baking sheets with flour.
- Shape Donuts: Roll dough gently into an 11×12 inch rectangle without pressing hard. Cut into 12 rectangles approximately 5 inches by 2 inches, trimming edges for nice shapes if desired. Transfer rectangles to floured baking sheets spaced 2 inches apart.
- Second Rise: Preheat oven briefly to 350°F, then turn off. Place baking sheets uncovered in the oven with another boiling water bath as before. Let rise for 45 minutes until doubled.
- Heat Oil: About 15 minutes before the second rise finishes, heat 2 inches of peanut oil in a large, high-sided pot with a candy thermometer to 350 degrees F over medium heat. Maintain steady temperature for frying.
- Fry Donuts: In batches of 2 or 3, carefully transfer dough rectangles to hot oil using a spatula. Fry each side for 30-40 seconds on the first side then 20 seconds on the second side until golden brown. Drain on paper towels. Let cool completely before icing.
- Prepare Maple Icing: Whisk together 4 cups powdered sugar, 2 teaspoons corn syrup, 1/4 teaspoon salt, 1/2 teaspoon vanilla, 1 teaspoon maple extract, and 1/3 cup hot water until smooth. Adjust consistency with more hot water or powdered sugar as needed to be dip-ready.
- Glaze Donuts: Dip the roundest side of each cooled donut into the maple icing, letting excess drip off. Place on a wire rack and allow glaze to harden for 15-20 minutes before serving.
- Store: Keep donuts in a sealed container at room temperature for up to 3 days for best freshness.
Notes
- All-purpose flour can be used as a substitute for bread flour, resulting in slightly less chewy donuts.
- Save used peanut oil by straining and funneling back into bottles for reuse in future frying.
- Keep dough warm and humid during rises by using the oven warming method described.
- Be gentle when handling dough to retain puffiness and lightness in final donuts.
- Adjust maple extract amount in icing to taste for stronger or milder flavor.
- Do not ice donuts while warm, or the glaze will not adhere properly.
Nutrition
- Serving Size: 1 donut
- Calories: 320 kcal
- Sugar: 20 g
- Sodium: 250 mg
- Fat: 15 g
- Saturated Fat: 4 g
- Unsaturated Fat: 10 g
- Trans Fat: 0 g
- Carbohydrates: 40 g
- Fiber: 1 g
- Protein: 5 g
- Cholesterol: 70 mg

