How to Make Individual Tiramisu Cups Recipe
If you’ve ever craved that classic Italian dessert without the fuss of slicing into a big cake, you’re going to love this one. Let me share with you my go-to method for How to Make Individual Tiramisu Cups Recipe—it’s simple, elegant, and perfect for serving up in your own kitchen or impressing guests at your next dinner party.
Why This Recipe Works
- Individual Servings: No need to slice or scoop messy portions—everyone gets their own perfectly layered cup.
- Simple But Classic Flavors: The creamy mascarpone mousse married with espresso-soaked ladyfingers nails that authentic tiramisu taste.
- Flexible Ingredients: You can swap out liqueurs or use whatever cookies you have on hand to customize flavor and texture.
- Make Ahead Friendly: These cups hold up well in the fridge for days, making them an easy dessert for busy schedules or unexpected guests.

Ingredients & Why They Work
The magic behind How to Make Individual Tiramisu Cups Recipe lies in the balance of creamy mascarpone mousse, strong espresso, and delicate ladyfingers. Each element brings its own role to the party and, combined, you end up with a dessert that’s both airy and indulgent.
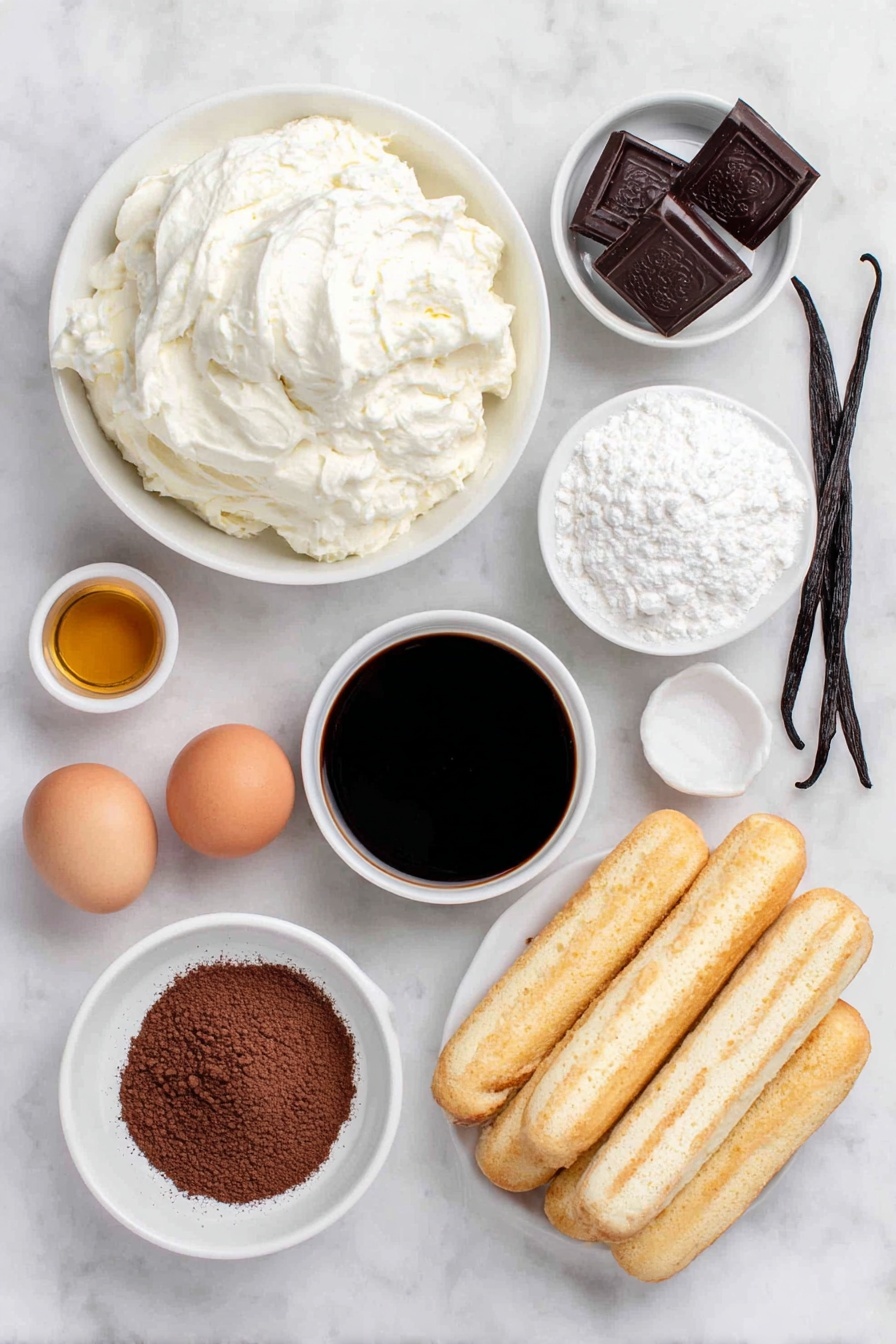
- Mascarpone Cheese: This creamy Italian cheese is the heart of tiramisu, giving the dessert its luscious texture and slight tang.
- Heavy Whipping Cream: Whipped to soft peaks, it lightens the mascarpone, making the mousse fluffy instead of dense.
- Powdered Sugar: Blends smoothly without any graininess, sweetening the mousse without overpowering.
- Vanilla and Almond Extract: They add subtle warmth and complexity—almond is optional but I recommend a little twist!
- Espresso or Strong Coffee: The bold coffee flavor is non-negotiable—makes all the difference in authentic tiramisu.
- Brandy or Liqueur: Adds a lovely boozy depth, but you can omit or swap with more coffee if you prefer.
- Ladyfingers: These light cookies soak up coffee beautifully without turning mushy too fast.
- Cocoa Powder and Dark Chocolate: For dusting and garnishing—a little bitterness on top balances the sweet cream.
Tweak to Your Taste
I love making this recipe my own depending on the occasion, and I encourage you to play around with the flavors too. Maybe you’ll want to dial up the boozy factor or go totally caffeine-free for the kiddos—both totally doable.
- Chocolate Lover’s Version: I’ve added a layer of chocolate ganache before the mascarpone mousse for an extra decadent treat.
- Non-Alcoholic: Simply skip the brandy and use extra espresso—it still tastes fantastic and is kid-friendly.
- Seasonal Spins: Try sprinkling a bit of cinnamon or nutmeg on top for fall vibes or a dash of orange zest for a fresh zing.
- Ladyfingers Substitutes: When I run out, I swap with pound cake or even Biscoff cookies—each brings a fun twist!
Step-by-Step: How I Make How to Make Individual Tiramisu Cups Recipe
Step 1: Whip Up That Creamy Mascarpone Mousse
First, bring your mascarpone to room temperature so it blends easily. In a large bowl, combine the mascarpone, cold heavy cream, powdered sugar, vanilla, and almond extract (if using). Using a handheld electric mixer, whip everything until smooth and creamy—but watch closely and stop once peaks start to hold; over-mixing can cause it to separate, and that’s not what you want! I’ve learned the hard way that patience here pays off for a silky mousse.
Step 2: Prepare the Coffee & Liqueur Dip
Next, take your cooled espresso or strong coffee and mix it with your choice of brandy, marsala, rum, or coffee liqueur in a shallow bowl. This coffee mix is key—it should be flavorful but not overly sweet. I like to dip ladyfingers just briefly, about 1 to 2 seconds per side, so they soak up enough without getting soggy and falling apart. It’s a delicate balance but you’ll get the hang of it quickly.
Step 3: Build Each Tiramisu Cup
Now, grab your 12-ounce glasses. Start with a dollop of mascarpone mousse on the bottom, smoothing it gently. Then dip 2 ladyfinger halves and layer them on top. Repeat with another layer of cream, then more ladyfingers, and finish off with a final layer of mousse. Six cups means six perfect individual treats, ready to show off. This layer-by-layer build creates that beautiful contrast of textures and flavors everyone loves.
Step 4: The Final Touches
To finish, sift a generous dusting of unsweetened cocoa powder on top and add dark chocolate curls if you’re feeling fancy. If you’ve got time, pop the cups in the fridge for at least 10 minutes—longer if you can—for the flavors to meld perfectly. Believe me, pulling these chilled cups out of the fridge is always a moment of “wow.”
Pro Tips for Making How to Make Individual Tiramisu Cups Recipe
- Don’t Over-Soak the Ladyfingers: Quick dips preserve structure and prevent watery cups.
- Use Room Temperature Mascarpone: It blends so much better with cream, giving you a silky mousse.
- Chill at Least 10 Minutes: This lets the flavors marry nicely and firm up layers without losing the whipped texture.
- Customize Your Glasses: I’ve used everything from mason jars to elegant wine glasses—just pick a size you love!
How to Serve How to Make Individual Tiramisu Cups Recipe
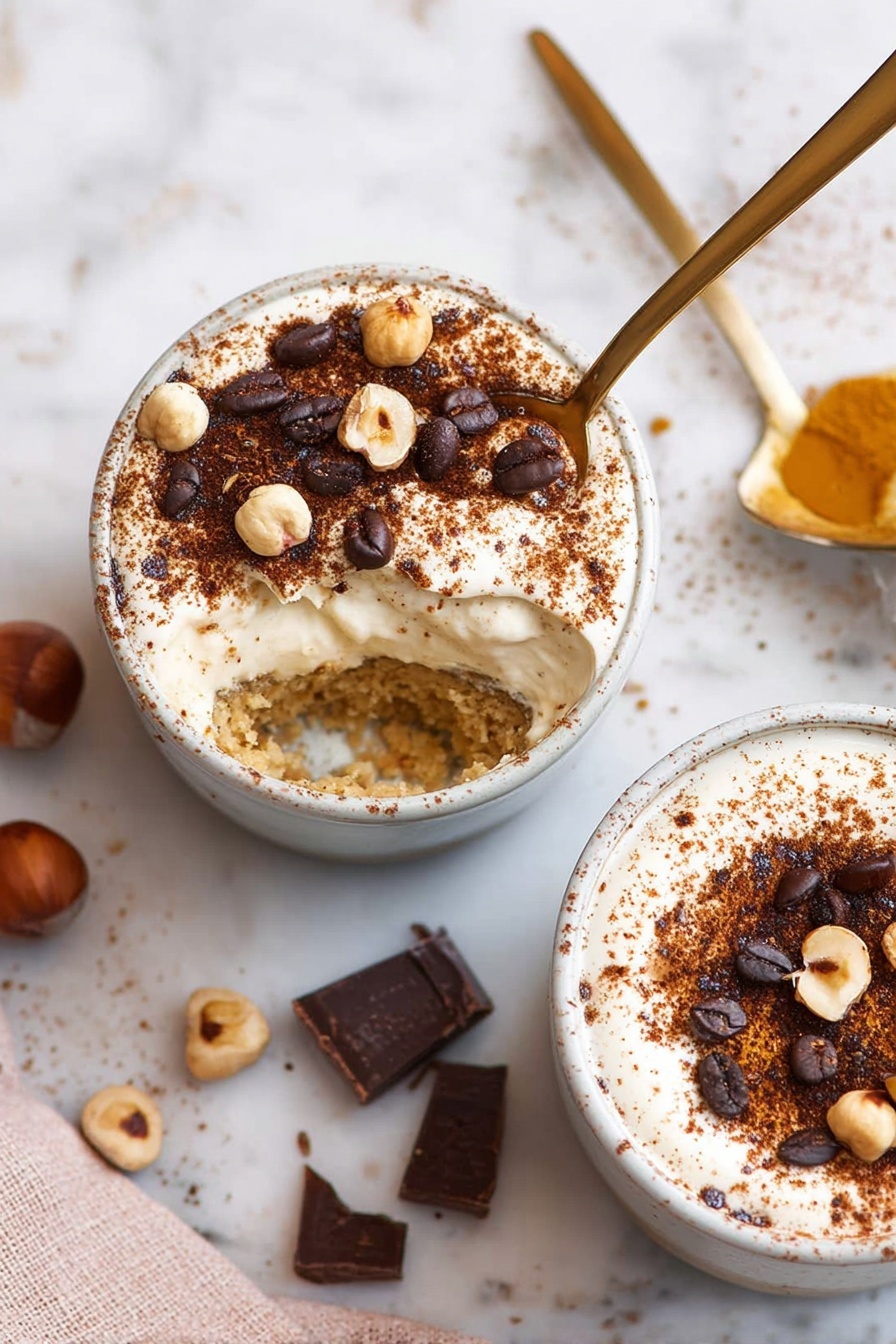
Garnishes
I love topping these tiramisu cups with a dusting of cocoa powder every time—it adds that classic look and a hint of bitter contrast. When I want to go the extra mile, I grate some dark chocolate or shave small curls on top for texture and a bit of indulgence. Fresh mint leaves can be a lovely, colorful touch if you’re serving outdoors or during warmer months.
Side Dishes
Since tiramisu cups are rich, I often pair them with something light like fresh berries or a simple citrus salad to cut through the sweetness. A strong espresso or cappuccino alongside helps keep that Italian vibe going, and if you want to keep it casual, a scoop of vanilla gelato is always a winning companion.
Creative Ways to Present
For special occasions, I’ve layered tiramisu parfaits in tall glasses and added edible gold dust or delicate chocolate decorations on top. If you’re making this for a crowd, try mini mason jars tied with twine for a rustic style, or elegant stemmed glasses to elevate the look—guests always comment on how pretty these desserts look!
Make Ahead and Storage
Storing Leftovers
Once assembled, cover each tiramisu cup tightly with plastic wrap or an airtight lid to prevent drying out and fridge odors sneaking in. These keep beautifully fresh for up to 4 days, which is great when you want to prep ahead or save some for later indulgence.
Freezing
I’ve frozen these cups wrapped individually in plastic wrap and placed in a freezer-safe container, which works surprisingly well for up to 3 months. When you’re ready, thaw in the fridge overnight for the best texture. Sometimes, I even serve them slightly frozen like an ice cream dessert, which is a fun twist!
Reheating
Since tiramisu is best served cold or chilled, I don’t recommend reheating. Instead, make sure you plan to serve it straight from the fridge after thawing if frozen. The flavors and creamy consistency shine best this way.
FAQs
-
Can I make Individual Tiramisu Cups without alcohol?
Absolutely! You can simply omit the brandy or liqueur and replace it with extra cooled espresso or coffee. The coffee flavor is still central, so skipping alcohol doesn’t compromise taste much. It also makes this dessert more family-friendly.
-
How long can I store individual tiramisu cups in the fridge?
They keep really well for up to 4 days when tightly covered. The flavors actually develop nicely overnight, but beyond 4 days the texture may start to decline due to the ladyfingers soaking.
-
What can I use if I can’t find ladyfingers?
You have great substitution options like sponge cake, pound cake slices, Nilla wafers, shortbread, or even Biscoff cookies. Just keep in mind that the texture and taste will vary slightly, so choose based on your preference.
-
Can I prepare these cups ahead of time?
Yes! These are perfect for making a day or two ahead—the flavors deepen and the mousse firms up beautifully. Just cover well and refrigerate until ready to serve.
Final Thoughts
I’ve been making this How to Make Individual Tiramisu Cups Recipe for years, and it always brings smiles—whether it’s a casual weeknight treat or a special occasion showstopper. The best part is how easy it is to assemble with just a handful of ingredients but deliver big, authentic flavor. So go ahead and give it a try—you’ll feel like a dessert pro in no time, and trust me, everyone will want the recipe after one bite!
Print
How to Make Individual Tiramisu Cups Recipe
- Prep Time: 10 minutes
- Cook Time: 0 minutes
- Total Time: 10 minutes
- Yield: 6 servings
- Category: Dessert
- Method: No-Cook
- Cuisine: Italian
- Diet: Vegetarian
Description
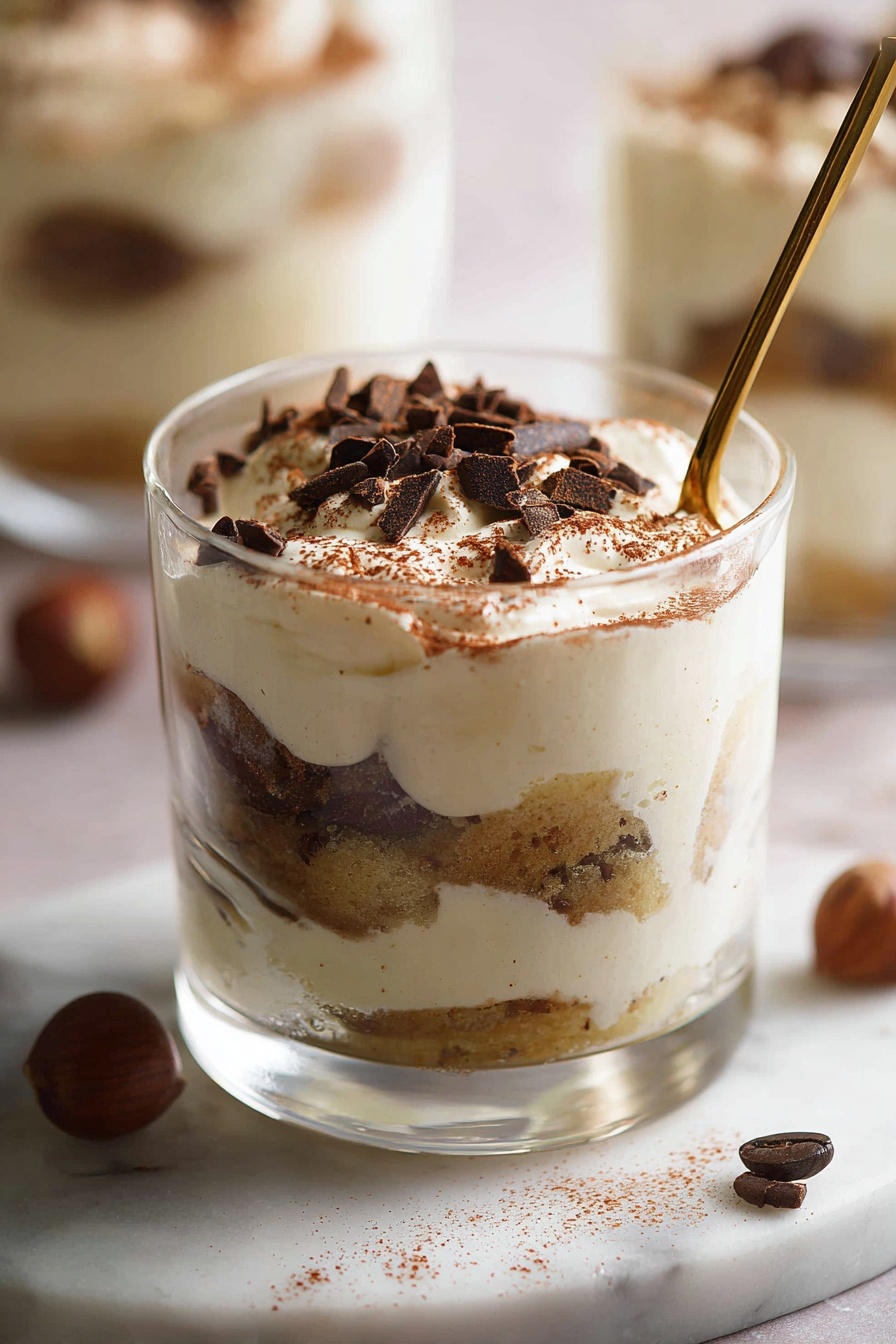
Individual Tiramisu Cups are a delightful no-bake dessert featuring layers of mascarpone mousse, espresso-soaked ladyfingers, and a dusting of cocoa powder and chocolate curls. Perfectly portioned in 12-ounce glasses, this recipe offers a creamy and rich treat that’s easy to assemble and can be made ahead for convenient serving.
Ingredients
Mascarpone Mousse:
- 8 ounces mascarpone at room temperature
- 1 cup heavy whipping cream cold from the fridge
- 1/2 cup powdered sugar
- 1/2 tablespoon pure vanilla extract
- 1/4 teaspoon almond extract or hazelnut extract (optional)
Other Ingredients:
- 2/3 cup cooled espresso or double-strength brewed coffee
- 2 tablespoons brandy or marsala wine, rum, hazelnut liqueur, almond liqueur, or coffee liqueur (optional; or extra espresso)
- 12 ladyfingers each broken in half
- 2 teaspoons unsweetened cocoa powder for topping
- 2 teaspoons dark chocolate curls or shaved dark chocolate (optional)
Instructions
- Prepare Mascarpone Mousse: Add all mascarpone mousse ingredients to a large bowl. Use a handheld electric mixer to beat until smooth and creamy, taking care not to over-mix to avoid curdling.
- Mix Espresso and Liqueur: In a shallow bowl, combine cooled espresso and brandy or your choice of liqueur, stirring to mix evenly.
- Assemble the Cups: Spread a little mascarpone cream at the bottom of each 12-ounce glass. Quickly dip 2 ladyfinger halves into the espresso mixture (1 to 2 seconds per side, do not soak). Place dipped ladyfingers over the cream layer in the glass.
- Layer the Dessert: Add another layer of mascarpone cream on top of the ladyfingers. Repeat the process with another layer of dipped ladyfingers followed by a final layer of mascarpone cream, finishing each cup with a smooth top layer.
- Finish with Toppings: Sift unsweetened cocoa powder evenly over the top of each cup, then sprinkle with dark chocolate curls or shavings if using.
- Chill Before Serving: Refrigerate the tiramisu cups for at least 10 minutes to allow them to set. For best results, chill up to 4 days before serving.
Notes
- You can substitute ladyfingers with sponge cake, pound cake, Nilla wafers, shortbread cookies, Biscoff cookies, or graham crackers, noting it will alter the flavor.
- These tiramisu cups are served in 12-ounce glasses, making them regular-sized, pre-portioned desserts instead of miniature shooters.
- Cover and store prepared tiramisu cups in the refrigerator for up to 4 days.
- Tiramisu cups can be frozen for up to 3 months; thaw before eating or serve frozen for an ice cream-like texture.
Nutrition
- Serving Size: 1 cup (approx.)
- Calories: 320 kcal
- Sugar: 20 g
- Sodium: 50 mg
- Fat: 24 g
- Saturated Fat: 15 g
- Unsaturated Fat: 7 g
- Trans Fat: 0 g
- Carbohydrates: 22 g
- Fiber: 1 g
- Protein: 5 g
- Cholesterol: 80 mg

