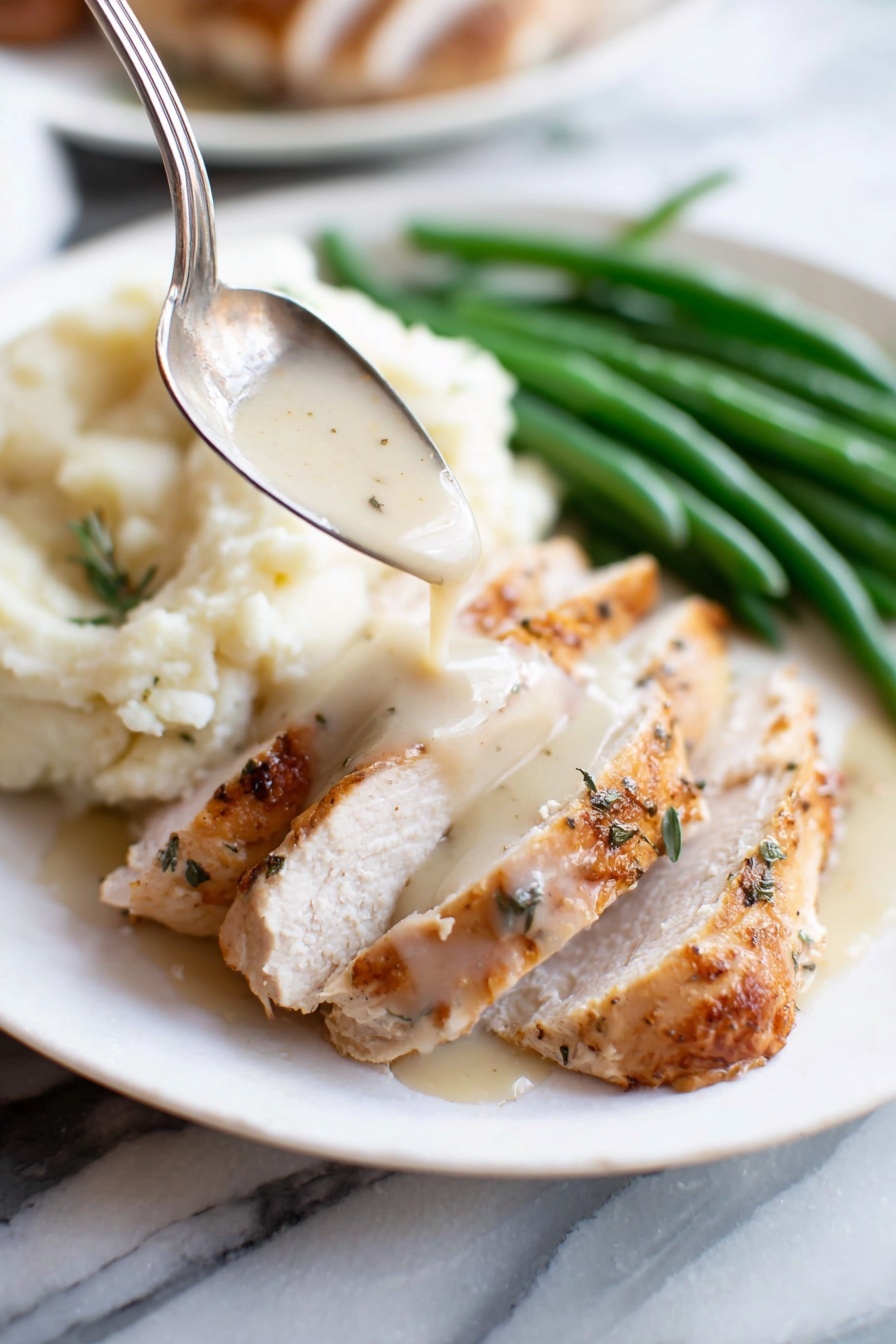
Homemade Turkey Gravy Recipe
I gotta tell you, this Homemade Turkey Gravy Recipe might just become your new secret weapon for holiday dinners or any time you roast a turkey. It’s rich, silky, and packed with all those classic herb flavors – plus, the way it clings to every bite of turkey and mashed potatoes is downright addictive. If you’re hunting for a gravy that wins hearts and handles easily, stick around because I’m sharing exactly how I make this magical sauce every time.
Why This Recipe Works
- Real Turkey Flavor: Using pan drippings or turkey stock makes all the difference, giving you rich depth that’s hard to beat.
- Herb Harmony: Fresh thyme and dried sage add that perfect earthy, fragrant note without overwhelming the gravy.
- Silky Texture: The flour and butter roux creates a smooth, luscious consistency that coats every bite beautifully.
- Simple & Fast: This recipe comes together quickly, perfect for busy kitchens without compromising flavor or quality.

Ingredients & Why They Work
The beauty of this Homemade Turkey Gravy Recipe lies not just in the flavor, but in the simplicity of a few well-chosen ingredients that blend perfectly. Each component has its role, whether it’s to enrich, thicken, or brighten the gravy, so picking quality basics will really pay off.

- Butter: Acts as the fat base for the roux and lends that rich, silky mouthfeel you want in gravy.
- Dried Sage: Adds warm, woodsy undertones that complement turkey beautifully; go easy here, a little goes a long way.
- Fresh Thyme: Provides a fresh, aromatic lift that balances richness and keeps the flavor complex.
- Garlic: A tiny bit of garlic adds savoriness and boosts the overall taste profile without overpowering.
- All-Purpose Flour: The thickening agent – it’s key to achieving that smooth, gravy consistency.
- Turkey Stock or Pan Drippings: The foundation for your gravy’s flavor; homemade stock or drippings give authenticity, but store-bought works in a pinch.
Tweak to Your Taste
I love how forgiving this Homemade Turkey Gravy Recipe is when it comes to tweaks—and honestly, that’s part of the fun. Feel free to adjust the herbs based on what you love or what you have on hand, and don’t be shy about boosting the garlic or adding a splash of white wine for a touch more depth.
- Mushroom Variation: Adding finely chopped sautéed mushrooms makes it heartier and gives a lovely earthy flavor. It’s one of my go-to twists when I want something a little different.
- Gluten-Free: Swap all-purpose flour with a gluten-free blend or cornstarch slurry to keep it light and safe for gluten-sensitive guests.
- Herb Swap: Tried rosemary instead of thyme once and it worked beautifully, though I stick to thyme for that classic balance.
Step-by-Step: How I Make Homemade Turkey Gravy Recipe
Step 1: Strain and Reserve the Pan Drippings
After roasting your turkey, I always pour the pan drippings through a fine mesh sieve to catch any bits or burnt pieces that might turn the gravy bitter. Save about 2½ cups of this golden liquid. If you don’t have enough, no worries — turkey or vegetable stock works fine as a substitute. This step sets the flavor foundation, so don’t skip it!
Step 2: Sauté the Aromatics in Butter
Heat ¼ cup of butter in a medium saucepan over medium heat until melted. Toss in minced garlic, dried sage, and fresh thyme and stir constantly for about a minute—just until fragrant. This aromatic base adds layers of flavor that you’ll notice with every bite.
Step 3: Make the Roux with Flour
Whisk in ¼ cup of all-purpose flour into your butter-herb mixture and keep whisking for about 2 minutes, letting it cook slightly until it turns a pretty golden color. This cooks the raw flour taste out and helps your gravy thicken up smoothly without lumps.
Step 4: Add Stock and Simmer
Gradually pour your 2½ cups of strained pan drippings or turkey stock into the roux while whisking steadily to prevent lumps. Bring everything to a boil, then reduce heat and let it simmer gently for 5 to 7 minutes. You’ll see the gravy thicken beautifully into that perfect consistency.
Step 5: Season and Serve
Taste your gravy and add salt and freshly ground black pepper as needed. Trust me—seasoning late ensures you don’t overdo it. Serve immediately while it’s luxuriously warm, ready to elevate every plate.
Pro Tips for Making Homemade Turkey Gravy Recipe
- Use Pan Drippings Whenever Possible: Nothing beats that deep, natural turkey flavor. If you’re short, boost with a splash of turkey stock instead of plain water.
- Whisk Constantly: To avoid lumps, keep the whisk moving when adding stock and while simmering—your patience pays off with silky smooth gravy.
- Don’t Rush the Roux: Cooking flour in butter until golden removes the raw flour taste and gives a beautiful color and depth.
- Season at the End: Salt can concentrate as gravy reduces, so always taste and season once it’s thickened.
How to Serve Homemade Turkey Gravy Recipe

Garnishes
Whenever I serve this gravy, I like to sprinkle a little fresh thyme or finely chopped parsley right on top. It adds a fresh pop of color and light herbal aroma. Sometimes a few small crispy fried sage leaves give it a fancy restaurant vibe, and guests always notice that extra touch.
Side Dishes
This gravy is a dream poured over fluffy mashed potatoes that soak up every drop. I also love pairing it with roasted vegetables (think carrots, Brussels sprouts, or green beans) and fluffy dinner rolls for sopping up every last bit. It’s a classic combo that never fails to bring smiles at the table.
Creative Ways to Present
For holidays, I sometimes serve gravy in a rustic, carved-out bread bowl—super charming and edible! Another favorite is a warm mini gravy boat for each guest—it feels thoughtful and definitely makes the meal feel special. Little details make a big difference.
Make Ahead and Storage
Storing Leftovers
I store leftover gravy in an airtight container in the fridge, and it stays great for up to 2 days. Before using it again, I always bring it to a boil just to refresh the flavor and ensure safety, especially if it’s been sitting around.
Freezing
Freezing gravy works like a charm. I pour mine into a freezer-safe container and keep it for up to 4 months. When I’m ready, I thaw it overnight in the fridge and reheat on the stove until it’s bubbling, whisking to bring back that perfect texture.
Reheating
Reheating gravy gently on the stovetop is my favorite method. I keep it on low to medium heat, stirring often to prevent sticking and smooth out any lumps. Adding a splash of stock or water if it thickened too much helps get it back to that pourable beauty.
FAQs
-
Can I make this Homemade Turkey Gravy Recipe without pan drippings?
Absolutely! If you don’t have pan drippings, you can substitute with turkey stock or even vegetable stock. While pan drippings add the deepest flavor, quality stock still creates a delicious gravy that pairs beautifully with your turkey.
-
How do I avoid lumps in my turkey gravy?
The key to a smooth gravy is whisking constantly whenever you add the stock to the roux, and cooking the mixture until it thickens, whisking frequently. Also, make sure you cook the flour long enough in the butter before adding any liquid to prevent clumping.
-
Can I prepare the gravy ahead of time?
Yes! You can make the gravy a day ahead and refrigerate it. When you’re ready to serve, gently reheat it on the stovetop and whisk in a bit of stock or water if it needs loosening.
-
How thick should the gravy be?
Great question! Your gravy should be thick enough to coat the back of a spoon and pour smoothly without being overly thick or gluey. If it’s too thin, simmer a bit longer. If it’s too thick, whisk in a little extra stock or water.
Final Thoughts
This Homemade Turkey Gravy Recipe is one of those recipes that feels like a warm hug at the dinner table. I’ve had my fair share of lumpy or bland gravies, and this one is the answer I always come back to when I want something that’s reliable, flavorful, and downright delicious. I hope you give it a try—once you do, I’m willing to bet it’ll become your go-to gravy too. Nothing beats that moment when you pour this velvety sauce over your turkey and sides, and the whole room lights up. Happy cooking, friend!
Print
Homemade Turkey Gravy Recipe
- Prep Time: 5 minutes
- Cook Time: 15 minutes
- Total Time: 20 minutes
- Yield: 12 servings
- Category: Sauce
- Method: Stovetop
- Cuisine: American
Description
A rich and flavorful Turkey Gravy made from pan drippings, butter, herbs, and flour, perfect for enhancing your turkey dinner with a classic homemade touch.
Ingredients
Gravy Ingredients
- 1/4 cup butter
- 1/4 teaspoon dried sage
- 2 teaspoons fresh thyme minced
- 1 garlic clove minced
- 1/4 cup all-purpose flour
- 2 1/2 cups turkey stock preferably from pan drippings
Instructions
- Prepare Pan Drippings: If using pan drippings, strain them through a fine mesh sieve to remove solids. Reserve about 2 1/2 cups of the liquid and set it aside. If you don’t have enough pan drippings, substitute with turkey or vegetable stock.
- Melt Butter and Cook Herbs: In a 3-quart saucepan over medium heat, melt the butter. Add minced garlic, dried sage, and fresh thyme, cooking for 1 minute while stirring constantly to release the flavors.
- Add Flour: Whisk in the all-purpose flour and cook, whisking frequently, for about 2 minutes until the mixture turns golden and forms a roux.
- Incorporate Stock: Gradually whisk in the reserved pan drippings or turkey stock. Bring the mixture to a boil, then reduce heat to a simmer. Continue whisking frequently for 5 to 7 minutes until the gravy thickens to your desired consistency.
- Season and Serve: Taste the gravy and add salt and freshly ground black pepper as needed. Serve immediately over turkey or your favorite side dishes.
Notes
- Refrigerate leftover gravy in an airtight container for up to 2 days; reheat to a boil before serving to maintain freshness.
- Freeze gravy in a freezer-safe container or bag for up to 4 months; thaw overnight in the refrigerator and heat to boiling before serving.
- If fresh thyme is unavailable, dried thyme can be used but reduce quantity by half as it is more potent.
- For a gluten-free version, substitute all-purpose flour with a gluten-free flour blend or cornstarch slurry.
Nutrition
- Serving Size: 1/4 cup
- Calories: 70 kcal
- Sugar: 0.2 g
- Sodium: 150 mg
- Fat: 5 g
- Saturated Fat: 3 g
- Unsaturated Fat: 2 g
- Trans Fat: 0 g
- Carbohydrates: 4 g
- Fiber: 0 g
- Protein: 0.5 g
- Cholesterol: 15 mg


