
Healthy Cocoa Date Truffles Recipe
If you’re looking for a guilt-free, utterly delicious treat that satisfies your sweet tooth without any refined sugar, you’re going to love this Healthy Cocoa Date Truffles Recipe. These little bites are rich, fudgy, and surprisingly simple to whip up — plus they’re packed with wholesome ingredients that will keep you coming back for more. Whether you need a quick snack, a healthy dessert, or something special to share, this recipe is fan-freaking-tastic and I can’t wait to walk you through it!
Why This Recipe Works
- Natural Sweetness: Dates provide a caramel-like sweetness that makes added sugar totally unnecessary.
- Simple Ingredients: Just a handful of pantry staples come together to create a luxurious, healthy snack.
- Versatile Coating: The melted dark chocolate adds richness, but you can customize it in so many ways.
- No-Bake & Quick: With only about 25 minutes total, these truffles are perfect for your busy schedule.

Ingredients & Why They Work
This Healthy Cocoa Date Truffles Recipe relies on a handful of wholesome and easy-to-find ingredients that blend into a silky, fudgy filling with just the right amount of chocolatey goodness. Each ingredient serves a purpose and I’ll share some tips for picking the best versions!
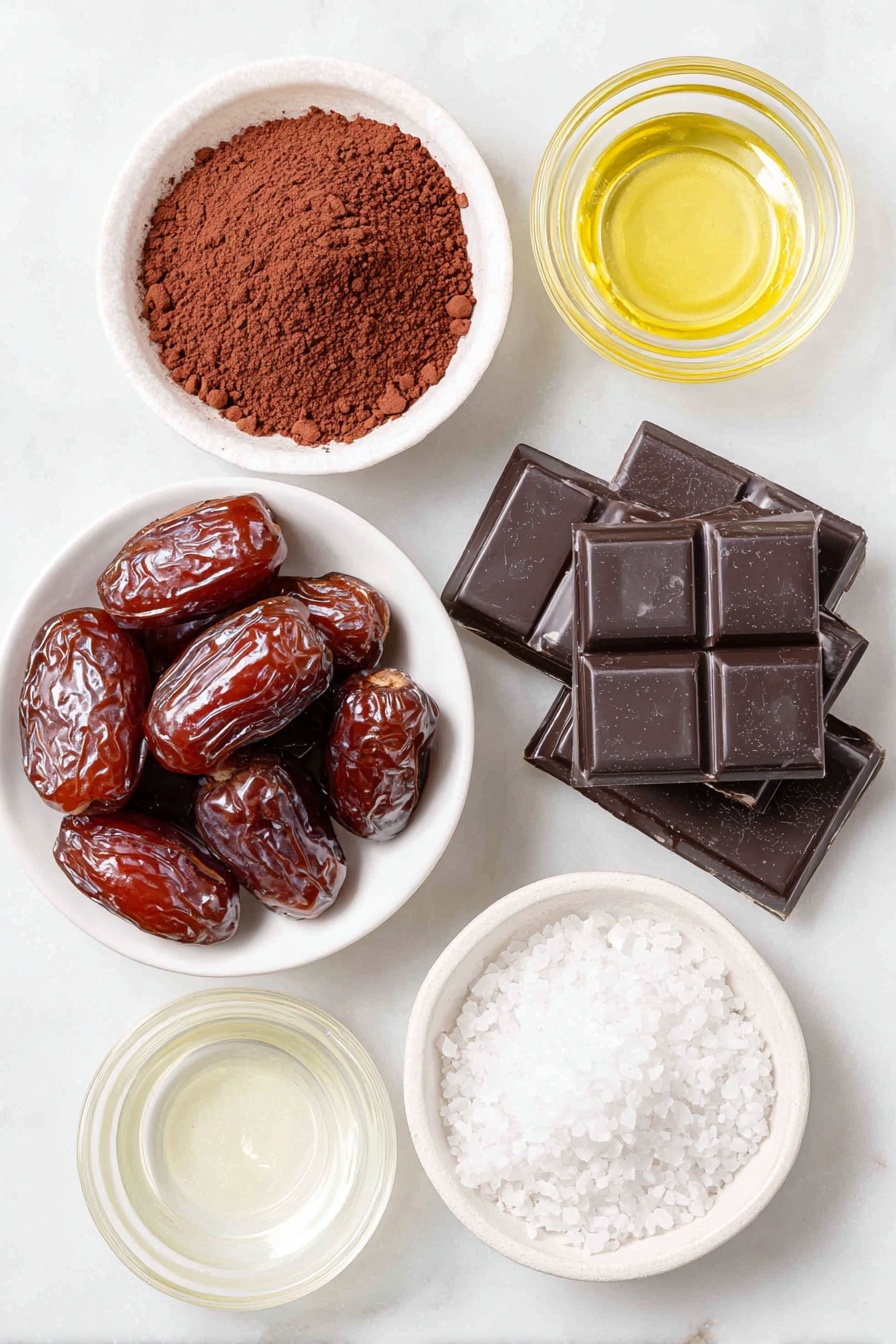
- Dates: Choose Medjool dates for their softness and natural caramel flavor—they blend easily and create that luscious texture truffles need.
- Cocoa powder: Use unsweetened natural cocoa powder for that deep chocolate flavor without added sugars or bitterness.
- Dark chocolate: Go for 70% or higher cocoa content for rich flavor and antioxidants, plus it pairs beautifully with the sweet dates.
- Coconut oil (optional): Adding a little coconut oil helps to thin the melted chocolate for smooth coating, but you can skip it if you prefer oil-free.
- Flavored extracts (optional): Raspberry, orange, or peppermint extracts add a fun twist—choose what excites your palate!
- Toppings (optional): Flaky sea salt, shredded coconut, or chopped nuts add texture and a finishing touch that makes these truffles look and taste like candy.
Tweak to Your Taste
We all love a little freedom in the kitchen, right? I find this Healthy Cocoa Date Truffles Recipe is a perfect canvas for flavor experiments. Don’t be shy—make it your own! Over the years, I’ve personalized it in loads of fun ways, and I encourage you to try what feels adventurous or comforting to you.
- Variation: I once added a pinch of cinnamon and a few drops of orange extract—it transformed these truffles into a festive holiday treat that my whole family raved about.
- Dairy-Free & Vegan: Using just dark chocolate and coconut oil keeps it totally plant-based and suitable for almost everyone.
- Nut-Free Option: Skip any nut toppings and opt for shredded coconut or freeze-dried fruit to keep things allergy-friendly.
- Extra Crunch: Mixing in chopped hazelnuts right into the batter gives an unexpected texture that makes these truffles feel extra special.
Step-by-Step: How I Make Healthy Cocoa Date Truffles Recipe
Step 1: Soften the Dates to Perfect Blendability
I always start by soaking my pitted dates in boiling water for about five minutes. This softens them up and guarantees a super smooth blend without any chunks. Don’t toss your soaking water—it’s golden! You’ll use a little of it to get the texture just right later on. After soaking, drain but reserve the water for the next step.
Step 2: Blend Everything into a Silky Batter
Into your food processor goes the softened dates, cocoa powder, and about 2 tablespoons of that reserved soaking water. If you’re feeling fancy and adding an extract, now’s the time. You want to pulse and scrape down the sides often, blending for around 4-5 minutes until the mix is smoother than cookie dough but still thick enough to shape. If it feels too stiff, add water a teaspoon at a time. This part takes patience, but it’s so worth it.
Step 3: Chill to Firm Up Before Rolling
This batter is pretty soft right now, so scoop it out with a tablespoon or cookie scoop onto parchment-lined sheet pans. Don’t stress if the scoops look lumpy—it’ll firm up in the freezer. Pop them in the freezer for about 10 minutes until you can roll them smoothly between your palms. This chilling step is essential for that perfect truffle shape.
Step 4: Melt Chocolate for That Dreamy Coating
While the truffles are chilling, melt your dark chocolate with coconut oil in a microwave-safe bowl. I usually zap it for 60 seconds, stir, and if lumps remain, do 15-second bursts with stirring in between. The coconut oil really helps thin the chocolate so it coats the truffles evenly and smoothly. If you prefer oil-free, melt the chocolate on its own—but you’ll want to work a bit quicker before it thickens.
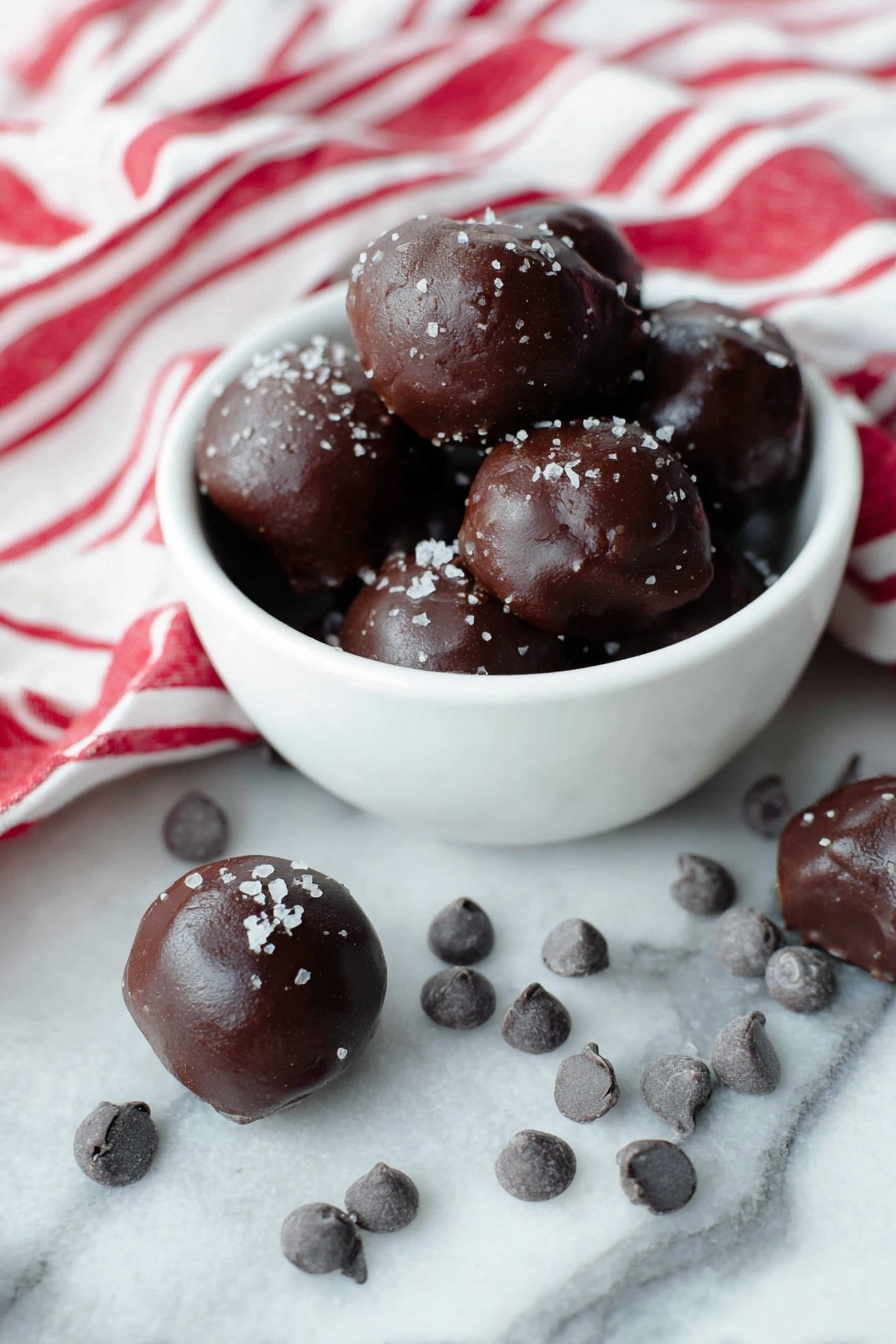
Step 5: Coat, Garnish, and Set
Once the truffles have chilled, roll them into balls between your hands. Using a fork, dip each truffle into the melted chocolate, twirling to coat fully. Tap off any excess chocolate by gently hitting the fork on the bowl’s edge before placing it back on parchment. If you’re topping with flaky sea salt, shredded coconut, or anything else, sprinkle it immediately while the chocolate is still wet so it sticks perfectly. Then back in the freezer for about 5 minutes to set the chocolate.
Pro Tips for Making Healthy Cocoa Date Truffles Recipe
- Don’t Skip the Soaking: It’s key to blending smooth truffles—skipping this step usually means gritty texture and uneven mixing.
- Use a Food Processor: A blender won’t get the same silky smoothness; a food processor lets you scrape and blend evenly without heating up the mix.
- Chill for Easier Handling: If truffles are too sticky, they’ll be a pain to roll and coat—pop them back in the freezer any time they start warming up.
- Add Toppings Quickly: Chocolate hardens in seconds! Have your toppings ready so you can add flair before it sets.
How to Serve Healthy Cocoa Date Truffles Recipe
Garnishes
I love finishing these truffles off with flaky sea salt sprinkled on top—it enhances the chocolate flavor beautifully and adds that textural pop. Sometimes, I roll them in shredded coconut or chopped pistachios for a festive look and extra crunch. Freeze-dried raspberries make a pretty and tangy topping if you want something a little different. Try what you love!
Side Dishes
These truffles shine as a sweet bite alongside your afternoon coffee or herbal tea. For a dessert spread, I often pair them with fresh berries or a light fruit salad to balance the richness. They’re also perfect for gifting or nibbling at a casual party where you want something both healthy and indulgent.
Creative Ways to Present
For special occasions, I like to arrange the truffles in mini cupcake liners and place them in a pretty box tied with ribbon. Another fun idea I tried was rolling them in edible gold dust for an ultra-luxe appearance. You could also place them on a dessert platter with handwritten tags describing the flavor—always a hit with guests!
Make Ahead and Storage
Storing Leftovers
I keep leftover truffles stored in an airtight container in the fridge, and they last up to two weeks. Just bring them to room temperature for about 5-10 minutes before enjoying so that the texture softens slightly.
Freezing
These truffles freeze wonderfully! I pop them in a single layer on parchment in the freezer to harden, then transfer to a freezer-safe bag or container. When you want a treat, just thaw them in the fridge overnight or sit them out for about 30 minutes. They maintain flavor and texture beautifully.
Reheating
No real reheating needed here—these truffles are meant to be enjoyed cold or at room temp. But if the chocolate is too firm, letting them sit on the counter 10 minutes before eating brings out that fudgy interior perfectly.
FAQs
-
Can I use other sweeteners instead of dates?
Dates offer a unique texture and natural caramel flavor that’s tough to replace in truffles, but you might experiment with dried figs or prunes for a similar effect. Keep in mind that the moisture content and sweetness levels vary, so you may need to adjust liquids.
-
Is this recipe suitable for people with nut allergies?
Absolutely! The base recipe is nut-free if you skip nut toppings. The filling contains no nuts, so it’s a great option if you’re cautious about allergies—just be mindful of cross-contamination with any nuts used nearby.
-
What’s the best way to melt chocolate without a microwave?
A double boiler is your best bet. Place chopped chocolate in a heatproof bowl set over gently simmering water, stirring frequently until smooth. Be sure no water boils into the chocolate or it could seize.
-
Can I make these truffles oil-free?
Yes! You can skip the coconut oil in the melted chocolate coating, but the chocolate will be thicker and a bit trickier to coat evenly. Alternatively, roll the truffles in shredded coconut or nuts instead of chocolate for an oil-free option.
-
How long do these truffles last?
Stored properly in an airtight container in the fridge, they stay fresh up to two weeks. Freezing extends their life to a couple of months if you want to make them ahead for occasions.
Final Thoughts
I have to say, this Healthy Cocoa Date Truffles Recipe is one of my all-time favorites because it’s quick, simple, and feels indulgent while being genuinely good for you. Whenever I want a chocolate fix that doesn’t leave me feeling guilty later, these truffles come to the rescue. I hope you enjoy making and tweaking them as much as I do—you might even surprise yourself with how often you reach for these little delights. So go on, give them a try and treat yourself lovingly. You deserve it!
Print
Healthy Cocoa Date Truffles Recipe
- Prep Time: 10 minutes
- Cook Time: 0 minutes
- Total Time: 25 minutes
- Yield: 12 truffles
- Category: Dessert
- Method: No-Cook
- Cuisine: International
- Diet: Vegan
Description
These Easy Cocoa Date Truffles are a healthy, delicious treat made from dates, cocoa powder, and dark chocolate. Perfect as a refined sugar-free snack, they are soft, fudgy, and can be customized with flavored extracts or rolled in various toppings. No baking required, making them a quick and simple dessert or snack option.
Ingredients
Main Ingredients
- 1 cup dates, pitted
- ⅓ cup cocoa powder
- ⅓ cup dark chocolate, chopped
- 1 tablespoon coconut oil, optional
Optional Add-Ins
- ½ teaspoon flavored extract (e.g., raspberry, orange, coconut, or peppermint)
- ¼ cup flaky sea salt, shredded coconut, chopped nuts, or freeze-dried fruit, for topping or rolling
Instructions
- Soften Dates: Soak the pitted dates in boiling water for five minutes to soften them, then drain and reserve the soaking water.
- Blend Ingredients: Add the dates, cocoa powder, and 2 tablespoons of the reserved soaking water to a food processor. Add any optional extracts if using. Process for 4-5 minutes, scraping down the sides frequently, until the mixture is very smooth. Add additional soaking water a teaspoon at a time if needed to achieve a texture slightly thinner than cookie dough.
- Chill Mixture: Use a cookie scoop or tablespoon to drop the mixture onto a parchment-lined sheet pan. Freeze for 10 minutes until firm enough to roll.
- Melt Chocolate: Place dark chocolate and optional coconut oil in a microwave-safe bowl. Microwave for 60 seconds, stir, and continue microwaving in 15-second intervals with stirring until fully melted. Set aside.
- Form Truffles: Roll the chilled date mixture between your palms into balls. Using a fork, dip each ball into the melted chocolate, coat completely, and tap off excess chocolate. Place back onto the parchment-lined tray.
- Add Toppings: While the chocolate is still wet, sprinkle with flaky sea salt or desired toppings.
- Set Chocolate: Return the coated truffles to the freezer for 5 minutes to allow the chocolate to harden completely before serving.
Notes
- For oil-free coating, skip the coconut oil in the chocolate; it will be thicker but still workable.
- You can omit the chocolate coating and roll truffles in shredded coconut, chopped nuts, or freeze-dried fruit for a refined sugar-free option.
- Store truffles in an airtight container in the refrigerator for up to 2 weeks.
- Use flavored extracts to change the flavor profile of the truffles easily.
- If the mixture is too dry, add soaking water gradually until the right texture is achieved.
Nutrition
- Serving Size: 1 truffle
- Calories: 90 kcal
- Sugar: 12 g
- Sodium: 15 mg
- Fat: 3 g
- Saturated Fat: 2 g
- Unsaturated Fat: 1 g
- Trans Fat: 0 g
- Carbohydrates: 15 g
- Fiber: 3 g
- Protein: 1 g
- Cholesterol: 0 mg

