
Halloween Red Velvet Cupcakes Recipe
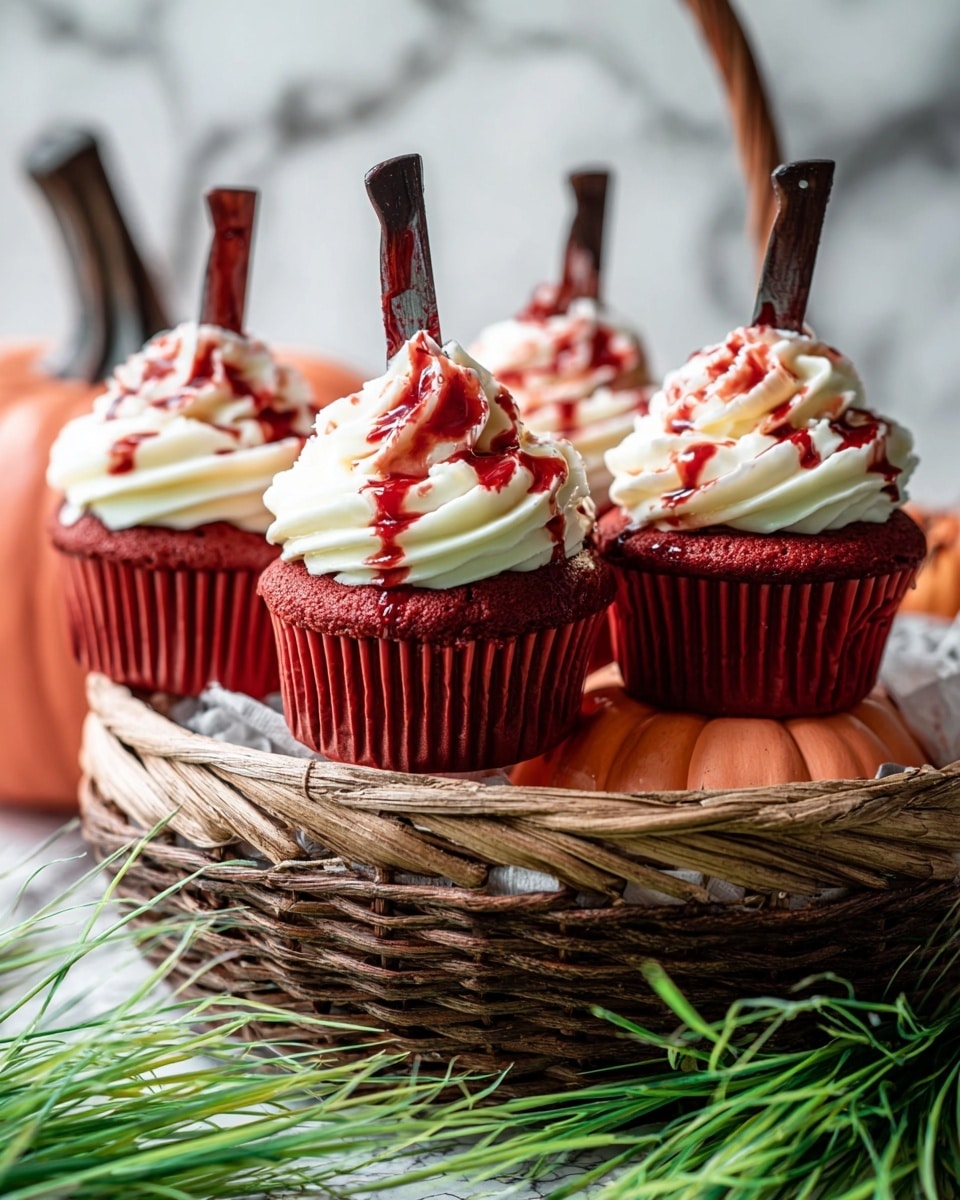
Ready to make your Halloween celebrations extra special? This Halloween Red Velvet Cupcakes Recipe is one of my absolute favorites to bake when the spooky season rolls around. The cupcakes come out tender and rich with that classic red velvet tang, topped with a dreamy cream cheese frosting, and the finishing touch? A fun (and slightly eerie) bloody drizzle and cute knife decorations that make these cupcakes the star of any Halloween party. Stick with me—I’ll share all my tips so your batch turns out perfect every time.
Why This Recipe Works
- Perfect Texture: The combination of sour cream and butter keeps these cupcakes ultra moist and tender.
- Classic Flavor: A subtle cocoa and vanilla balance gives authentic red velvet taste without overpowering.
- Easy Decorating: The simple cream cheese frosting and red drizzle make assembling spooky cupcakes effortless.
- Customizable: You can easily adjust the food coloring or decorations to fit your Halloween theme.

Ingredients & Why They Work
I’ve found that these ingredients work beautifully together to give you cupcakes that are tender, full-flavored, and perfectly festive. When shopping, go for quality butter and cream cheese—they really elevate your frosting game!
- All-purpose flour: The base for structure, provides just the right amount of crumb.
- Unsweetened cocoa powder: Adds a subtle chocolate undertone classic to red velvet.
- Baking powder and salt: Help create a lovely rise and balanced flavor.
- Unsalted butter: Using unsalted means you control salt levels and get rich creaminess.
- Granulated and brown sugar: Brown sugar adds a hint of molasses flavor and moistness.
- Eggs: Vital for binding and texture; add them one at a time to keep the batter smooth.
- Vanilla extract: Brightens the flavors and warms up the batter taste.
- Sour cream: Keeps cupcakes moist and tender with a subtle tang.
- Red food coloring: Crucial for that iconic red velvet look; I recommend gel or paste for vibrant color without thinning the batter.
- Cream cheese: The star of the frosting, providing tangy richness.
- Icing sugar: Sweeter frosting and smooth texture.
- Optional Halloween knife decorations: Fun, spooky finishing touch, but frosting and drizzle are the real stars.
Tweak to Your Taste
One thing I love about this Halloween Red Velvet Cupcakes Recipe is how easy it is to make your own. Whether you want it less sweet, more festive, or even dairy-free, you can tweak it to suit your needs.
- Variation: I’ve swapped sour cream with Greek yogurt once—I didn’t notice much difference, just a slight tang that I actually enjoyed!
- Dietary Modifications: For a dairy-free version, try coconut cream and dairy-free cream cheese alternatives; just keep the moisture balance in mind.
- Frosting Texture: If you want a thicker frosting, add a bit more icing sugar to stiffen it up, but I find the texture here just right.
Step-by-Step: How I Make Halloween Red Velvet Cupcakes Recipe
Step 1: Get Everything Ready
Preheat your oven to 350℉ and line your muffin tin with paper liners — then spray those liners with cooking spray so nothing sticks. In my experience, this step is key because paper liners alone can sometimes make the cupcakes a pain to peel.
Step 2: Mix Dry Ingredients
In a medium bowl, whisk together the flour, cocoa powder, baking powder, and salt. This ensures your baking powder is evenly distributed and that the cocoa is lump-free, so you’re off to a smooth start.
Step 3: Cream Butter and Sugars
In another bowl, beat the softened butter with both sugars until the mixture is light and fluffy — it usually takes about 3-4 minutes. This step aerates the batter which helps the cupcakes rise beautifully.
Step 4: Add Eggs, Vanilla & Sour Cream
Add the eggs one at a time, beating well after each. Then mix in vanilla extract and sour cream. This combo gives the cupcakes richness and just the right hint of tanginess—trust me, it makes all the difference.
Step 5: Add the Red Food Coloring
I start with 1 teaspoon of red food color and add more until I get that vibrant halloween-red hue I want—it ended up being 3 teaspoons total for me. Use gel or paste coloring for the best payoff without watering down your batter.
Step 6: Combine Dry and Wet
Slowly add the dry ingredients to the wet, mixing on low speed just until combined. Overmixing can make your cupcakes dense, so keep an eye on the texture.
Step 7: Fill and Bake
Using an ice cream scoop, fill each lined muffin cup about 3/4 full. I find this is the perfect amount to get those nicely domed cupcakes without overflow. Bake for 20-25 minutes, testing with a toothpick—if it comes out clean, you’re good!
Step 8: Make Frosting
Beat cream cheese and butter until smooth, then add vanilla, salt, and icing sugar. Keep beating until the frosting is fluffy and spreadable. This frosting is dangerously good, so watch out—you might want to skip the cupcakes and just eat it by the spoonful.
Step 9: Frost and Decorate
Fill a piping bag with frosting and pipe onto cooled cupcakes or use a knife if you prefer a rustic look. Mix powdered sugar, milk, and red food coloring to make your “blood” drizzle. Dip knife decorations into the red icing and place on each cupcake for that spooky stabbing effect. Drizzle extra red icing over for maximum gore effect!
Pro Tips for Making Halloween Red Velvet Cupcakes Recipe
- Use Gel Food Coloring: I learned gel colors give a richer red without making the batter watery, which is crucial for texture.
- Don’t Overmix: Once you add the dry ingredients, mix just enough to combine to keep your cupcakes tender.
- Cool Completely Before Frosting: If you frost warm cupcakes, the frosting melts and loses shape, so patience here pays off.
- Thin Drizzle Icing: Keep your icing thin for the best “bloody” drizzle effect; thick icing just won’t drip right.
How to Serve Halloween Red Velvet Cupcakes Recipe
Garnishes
For garnishes, I’m obsessed with the little Halloween knife icing decorations—they add that perfect creepy vibe without being too complicated. Sometimes I also sprinkle a few edible black or orange glitter flakes for some festive sparkle. If you like a more natural look, a few fresh blackberries or a tiny mint leaf can bring contrast beautifully.
Side Dishes
These cupcakes stand on their own, but if you’re planning a party, I like serving them alongside a warm pumpkin spice latte or rich hot chocolate. They also pair well with simple finger foods like mini cheese boards or spiced nuts for a balanced spread.
Creative Ways to Present
For a party, I arranged cupcakes on a tiered stand decorated with cobwebs and small plastic spiders. You can also place each cupcake inside a mini coffin-shaped cookie box or use themed cupcake wrappers to amp up the spooky factor. I once dipped cupcake tops in dark chocolate before frosting for an extra decadent touch.
Make Ahead and Storage
Storing Leftovers
I store leftover cupcakes in an airtight container in the fridge for up to 5 days. Keeping them chilled preserves the cream cheese frosting’s freshness and prevents it from getting too soft.
Freezing
These cupcakes freeze very well if you wrap each one securely in plastic wrap, then place in an airtight container. I’ve kept them frozen for several months without tastiness loss. When you want to eat some, just thaw them completely at room temperature before frosting and decorating.
Reheating
If your cupcakes are a bit chilled and you want that fresh-baked feel, I warm them in the microwave for about 10 seconds. Be careful not to overdo it or your frosting might melt. Then, serve immediately for the best experience.
FAQs
-
Can I make this Halloween Red Velvet Cupcakes Recipe without food coloring?
Yes! The red velvet flavor will still be there thanks to the cocoa and vanilla, but your cupcakes will look more brownish than red. If you want to keep the festive red appearance without artificial colors, you might experiment with natural food colorings, but they’re usually less vibrant.
-
What if I don’t have sour cream?
You can substitute sour cream with plain Greek yogurt or buttermilk. Just keep in mind the consistency might differ slightly, but in my experience, the cupcakes still turn out moist and delicious.
-
Is the cream cheese frosting easy to pipe?
This frosting is a bit thinner than some other recipes, so I don’t recommend using a star tip because it won’t hold the shape well. A plain round tip or just spreading with a knife works best and still looks great.
-
How do I make the “blood” drizzle?
Simply whisk together icing sugar, milk, and red food coloring until thin enough to drizzle but not runny. Dip a small knife into it and then gently place it on each cupcake for that creepy stabbing effect, and drizzle more over the frosting for maximum impact.
Final Thoughts
This Halloween Red Velvet Cupcakes Recipe holds a special place in my heart because it never fails to wow guests—and it’s just so fun to make! Whether you’re baking with kids, prepping for a party, or just craving a festive treat, I promise you’ll enjoy this recipe as much as I do. Give it a go, and get ready for compliments (and maybe a few spooky smiles) at your Halloween gathering.
Print
Halloween Red Velvet Cupcakes Recipe
- Prep Time: 20 minutes
- Cook Time: 25 minutes
- Total Time: 45 minutes
- Yield: 12 servings
- Category: Dessert
- Method: Baking
- Cuisine: American
- Diet: Vegetarian
Description
Delight in these festive Halloween Red Velvet Cupcakes with a rich red color, moist texture, and smooth cream cheese frosting, perfect for spooky celebrations with an optional bloody icing decoration for extra effect.
Ingredients
For Red Velvet Cupcakes
- 1 ¼ cups all-purpose flour
- 1 tablespoon cocoa powder (unsweetened)
- ¾ teaspoon baking powder
- ¼ teaspoon salt
- ¾ cup butter (unsalted, softened)
- ½ cup sugar (granulated)
- ½ cup brown sugar (packed)
- 3 eggs
- 2 teaspoon vanilla extract
- ½ cup sour cream
- 2-3 teaspoon red food color
For Cream Cheese Frosting
- 8 ounce cream cheese
- 4 tablespoon butter (unsalted, softened)
- 2 teaspoon vanilla extract
- ⅛ teaspoon salt
- 2 cups icing sugar
For Decorations
- 12 Halloween Knife Icing Decorations (optional)
- ¼ cup icing sugar
- 3 tablespoon milk
- 2 teaspoon red food color
Instructions
- Preheat Oven and Prepare Muffin Tin: Preheat your oven to 350℉. Line a 12-cup standard muffin tin with paper liners and spray them with cooking spray to avoid sticking.
- Mix Dry Ingredients: In a medium bowl, combine all-purpose flour, cocoa powder, baking powder, and salt. Set aside.
- Cream Butter and Sugars: In another bowl or mixer, beat softened butter with granulated sugar and brown sugar until lightened in color and well combined.
- Add Eggs and Flavorings: Add eggs one at a time, beating well after each addition. Then mix in vanilla extract and sour cream.
- Add Red Food Coloring: Stir in red food color starting with 1 teaspoon and adding up to 3 teaspoons until the desired vibrant red color is achieved.
- Combine Wet and Dry Ingredients: Add the flour mixture to the wet ingredients and mix on low speed until fully incorporated. Scrape the bowl sides as needed.
- Fill Muffin Cups and Bake: Using an ice cream scoop, fill each paper liner about ¾ full with batter. Bake for 25 minutes or until a toothpick inserted in the center comes out clean.
- Cool Cupcakes: Let the cupcakes cool in the pan for 5 minutes then transfer to a wire rack to cool completely.
- Prepare Cream Cheese Frosting: Beat cream cheese and butter until smooth. Add vanilla extract, salt, and icing sugar and beat until fluffy and smooth.
- Frost Cupcakes: Fill a piping bag with the frosting and frost the cooled cupcakes evenly.
- Make Red Icing Drizzle: In a small bowl, whisk together icing sugar, milk, and red food color until the icing is thin and dark blood-like.
- Decorate with Knife Icing: Dip a Halloween knife decoration blade side down into the red icing, then place it into the frosting of each cupcake. Drizzle additional icing for a bloody effect.
Notes
- Do not use a star tip to pipe the frosting as the consistency is too thin; a piping bag or knife works best.
- Store cupcakes in an airtight container in the fridge for up to 5 days.
- These cupcakes can be frozen for up to one year when wrapped securely in plastic and stored airtight; thaw fully at room temperature before frosting.
Nutrition
- Serving Size: 1 cupcake
- Calories: 320 kcal
- Sugar: 30 g
- Sodium: 220 mg
- Fat: 18 g
- Saturated Fat: 10 g
- Unsaturated Fat: 7 g
- Trans Fat: 0.5 g
- Carbohydrates: 35 g
- Fiber: 1 g
- Protein: 4 g
- Cholesterol: 65 mg
