
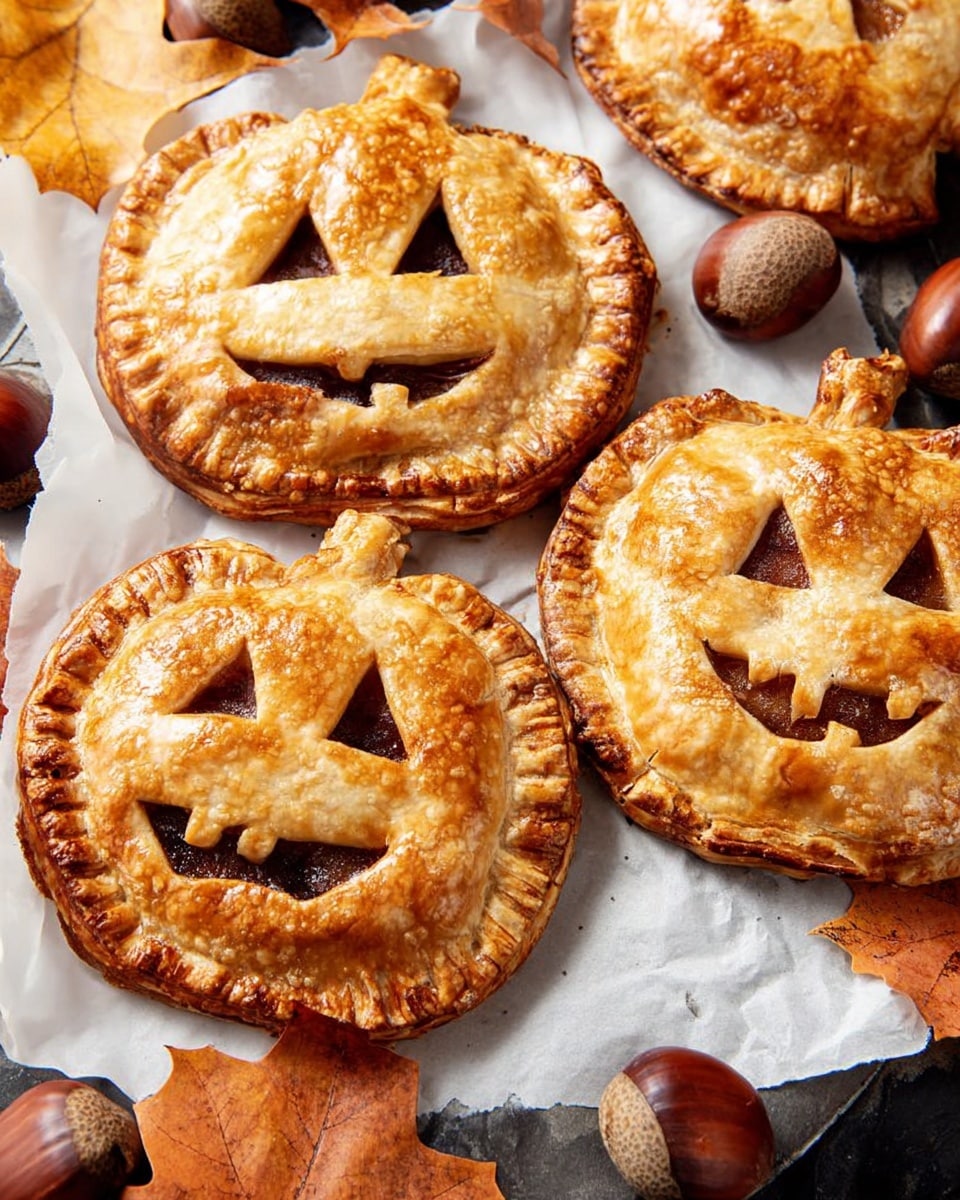
Halloween Pumpkin Hand Pies Recipe
If you’re anything like me, fall just isn’t complete without some pumpkin treats that look as fun as they taste. That’s why I’m so excited to share this Halloween Pumpkin Hand Pies Recipe with you—it’s a little festive magic wrapped inside flaky golden pockets of pumpkin goodness. Whether you’re hosting a spooky party or just want a cozy snack, these hand pies bring that perfect mix of pumpkin spice and buttery pastry, plus they’re so fun to make and customize. Stick around, and I’ll walk you through everything so you nail this recipe with ease!
Why This Recipe Works
- Simple Ingredients: Uses easy-to-find pantry staples and refrigerated pie crust to save time without sacrificing flavor.
- Perfect Pumpkin Filling: A smooth pumpkin pie mix filling with just the right spices for cozy autumn vibes.
- Fun Festive Design: Jack O’ Lantern faces or slits let off steam while adding a playful Halloween touch.
- Flexible Cooking Options: Can be baked in the oven or air fryer, whichever you prefer or have on hand.

Ingredients & Why They Work
This Halloween Pumpkin Hand Pies Recipe keeps things straightforward but flavorful by combining pie crust with spiced pumpkin filling. Every ingredient contributes to that perfect balance of flaky, sweet, and warmly spiced.
- Refrigerated pie crust: Using pre-made crust makes these hand pies quick and foolproof without sacrificing that buttery, flaky texture.
- Pumpkin pie mix: This gives you a ready-made blend of pumpkin puree and spices that set the cozy fall tone. You can also make your own mix for personalization.
- Egg wash (egg + water or milk): It seals the edges and gives the pies a shiny, golden finish so they look as good as they taste.
- Cinnamon sugar (optional): A sprinkle adds a little sweet crunch and extra cozy aroma on top—totally worth a try.
Tweak to Your Taste
One of my favorite things about this Halloween Pumpkin Hand Pies Recipe is how easy it is to make your own. I love experimenting by tossing in little extras or swapping things out depending on what I’m craving or have on hand.
- Variation: Sometimes I add a handful of mini chocolate chips or a sprinkle of chopped pecans inside the pumpkin filling for a surprise texture contrast—totally delicious!
- Dietary substitutions: You can easily find gluten-free pie crust or make your own vegan egg wash using plant milk and a bit of oil.
- Seasonal fun: Feeling festive? Try cutting faces with mini cookie cutters for eyes and mouths, or make other shapes like ghosts or bats.
Step-by-Step: How I Make Halloween Pumpkin Hand Pies Recipe
Step 1: Chill and Prep for Perfect Shapes
First things first: make sure your pie crust stays cold. I usually keep the second disk in the fridge while working with the first—it makes cutting those pumpkin shapes so much easier. Use a 4-inch pumpkin cookie cutter if you have one, or create a simple cardboard template and cut around it for a consistent size. Aim to cut out 8 shapes per dough sheet for the ideal batch size.
Step 2: Fill with Pumpkin Goodness
Place four pumpkin cutouts on your lined baking sheet. Spoon about 2 tablespoons of pumpkin pie mix right in the center of each, leaving a ⅓-inch border all around so there’s room to seal. Then brush a little egg wash around the edges—this is the magic that keeps your filling from leaking out during baking.
Step 3: Add Jack O’ Lantern Faces and Seal
Take the remaining four cutouts and get creative! I love carving classic Jack O’ Lantern faces—mini cookie cutters help with little eyes and smiles—but even a few vertical slits work wonders for steam to escape. Then carefully place each top on the filled bottom, align the edges, and press with a fork to crimp them closed. Brush the tops with egg wash for that perfect golden shine.
Step 4: Bake or Air Fry to Golden Perfection
Pop your hand pies into the oven preheated to 400 °F (200 °C) for about 16 to 19 minutes. You’ll want to watch for that beautiful golden to dark brown color I adore. If you’re using an air fryer, 13 to 16 minutes at 350 °F (180 °C) works like a charm—plus the second batch always cooks quicker since the basket is nice and hot.
Pro Tips for Making Halloween Pumpkin Hand Pies Recipe
- Keep It Cold: Always keep the pie crust chilled between steps to avoid tearing and for cleaner cuts.
- Don’t Overfill: Too much filling can cause leaks, so stick to about 2 tablespoons filling per pie.
- Egg Wash Magic: It not only seals but gives that gorgeous shiny crust—don’t skip it!
- Watch Your Oven: Since ovens vary, start checking at 15 minutes to avoid overbaking and drying out your pies.
How to Serve Halloween Pumpkin Hand Pies Recipe
Garnishes
I like to sprinkle my hand pies with a dusting of cinnamon sugar just before serving for a little extra sparkle and sweetness. Sometimes a quick drizzle of maple syrup or a dollop of whipped cream makes the experience extra cozy and indulgent.
Side Dishes
These hand pies pair beautifully with a warm cup of chai latte or hot apple cider—perfect for sipping while watching scary movies or welcoming trick-or-treaters. For a more substantial spread, throw in a simple green salad or roasted root veggies.
Creative Ways to Present
When serving guests, I love placing hand pies on a rustic wooden board surrounded by small bowls of whipped cream, caramel sauce, and cinnamon sugar for dipping and sprinkling. For a festive touch, scatter a few candy corns or mini pumpkins around the platter. It instantly makes your snack table feel like Halloween magic.
Make Ahead and Storage
Storing Leftovers
After enjoying your fresh batch, store any leftovers in an airtight container in the fridge for up to 4 days. I usually arrange them in a single layer to keep the crust crisp and avoid sogginess.
Freezing
I’ve had great luck freezing these hand pies after baking. Just let them cool completely, then wrap individually in plastic wrap and place in a freezer-safe bag. They’ll keep well for up to 2 months—perfect for making ahead of Halloween or autumn get-togethers.
Reheating
To reheat, I like popping the pies in a toaster oven or regular oven at 350 °F for about 8-10 minutes until warmed through and crispy again. Microwaving works too, but it can make the crust soft, so I save that for a quick snack if I’m in a rush.
FAQs
-
Can I make Halloween Pumpkin Hand Pies Recipe ahead of time?
Absolutely! You can assemble the hand pies a few hours in advance and keep them chilled in the fridge until you’re ready to bake. Just cover the tray with plastic wrap so the dough doesn’t dry out.
-
What can I use instead of pumpkin pie mix?
If you don’t have pumpkin pie mix, you can substitute with canned pumpkin puree mixed with sugar, cinnamon, nutmeg, ginger, and cloves. This homemade blend lets you adjust the spices to your liking.
-
Can I freeze the hand pies before baking?
Yes! After assembling but before baking, place the pies on a baking sheet, freeze until firm, then transfer to a freezer bag. When ready, bake from frozen but add a few extra minutes to the baking time.
-
How do I prevent the filling from leaking?
Try not to overfill and make sure to brush egg wash around the edges before sealing and crimping with a fork. Keeping the dough cold also helps create a tight seal.
Final Thoughts
These Halloween Pumpkin Hand Pies Recipe always bring a little extra joy and warmth to my autumn days. They’re the kind of treat that feels homemade but never fussy, a perfect project to share with kids or friends. I hope you enjoy making and savoring them as much as I do—there’s just something magical about that flaky crust wrapped around spiced pumpkin filling, especially when they’re shaped like smiling pumpkins! Go ahead, grab your pie crust and pumpkin mix, and let’s make some holiday memories.
Print
Halloween Pumpkin Hand Pies Recipe
- Prep Time: 5 minutes
- Cook Time: 19 minutes
- Total Time: 24 minutes
- Yield: 8 servings
- Category: Dessert
- Method: Baking
- Cuisine: American
- Diet: Vegetarian
Description
These Halloween Pumpkin Hand Pies are a festive and fun treat made with flaky pie crust filled with spiced pumpkin pie mix. Decorated with charming Jack O’ Lantern faces, these hand pies are perfect for a seasonal dessert or snack. They can be baked in the oven or air fried for convenience, offering a golden-brown, deliciously spiced pastry.
Ingredients
Pie Crust
- 1 2-count package refrigerated pie crust
Filling
- 1 cup pumpkin pie mix
Egg Wash
- 1 egg whisked with 1 tablespoon water or milk
Optional Cinnamon Sugar Topping
- 1 tablespoon cinnamon
- 4 tablespoons baker’s sugar
Instructions
- Preheat Oven: Preheat your oven to 400 °F (200 °C) and line a baking sheet with parchment paper or a silicone baking mat to prepare for baking the hand pies.
- Cut Pie Shapes: Unroll one sheet of the refrigerated pie crust on parchment paper. Keep the second disk chilled in the fridge. Use a 4-inch pumpkin cookie cutter or cardboard template to cut out 8 pumpkin shapes from the dough.
- Fill the Pies: Place about 2 tablespoons of pumpkin pie mix in the center of four cutouts, leaving a ⅓-inch border around the edges. Brush the edges around the filling lightly with egg wash to help seal the pies.
- Create Ventilation: On the remaining four pumpkin cutouts, carve Jack O’ Lantern faces or cut four vertical slits to resemble pumpkin ridges. These allow steam to escape during baking.
- Assemble Pies: Place the decorated tops on the filled bottoms, aligning the edges carefully. Crimp the edges with a fork and brush the entire top surface with the remaining egg wash for a golden finish.
- Repeat Process: Repeat filling, venting, and sealing steps with the second sheet of pie dough to prepare the remaining pies.
- Bake in Oven: Place the pies on the prepared baking sheet and bake in the oven at 400 °F (200 °C) for 19 minutes or until the pies are golden to dark brown, according to your preference.
- Air Fryer Option: Alternatively, place 4 hand pies in the air fryer basket and cook at 350 °F (180 °C) for 16 minutes until golden brown. Cook the second batch similarly; it will require less time.
Notes
- Using a 4-inch pumpkin cookie cutter or a 4-inch by 3.5-inch cardboard template helps create uniform pumpkin shapes.
- Keeping the pie dough chilled makes it easier to cut out detailed Jack O’ Lantern faces using a small knife or mini cookie cutters.
- You can pull extra hand pies by rerolling the dough scraps after the initial cut.
- For extra sweetness, sprinkle a cinnamon sugar mixture (1 tablespoon cinnamon with 4 tablespoons baker’s sugar) over the pies before or after baking.
- Store leftover pies in an airtight container in the refrigerator for up to 4 days. Reheat in a toaster or toaster oven for the best taste.
Nutrition
- Serving Size: 1 hand pie
- Calories: 250 kcal
- Sugar: 12 g
- Sodium: 220 mg
- Fat: 12 g
- Saturated Fat: 4 g
- Unsaturated Fat: 7 g
- Trans Fat: 0 g
- Carbohydrates: 30 g
- Fiber: 3 g
- Protein: 3 g
- Cholesterol: 40 mg

