
Halloween Pretzels with Colorful Candy Eyes Recipe
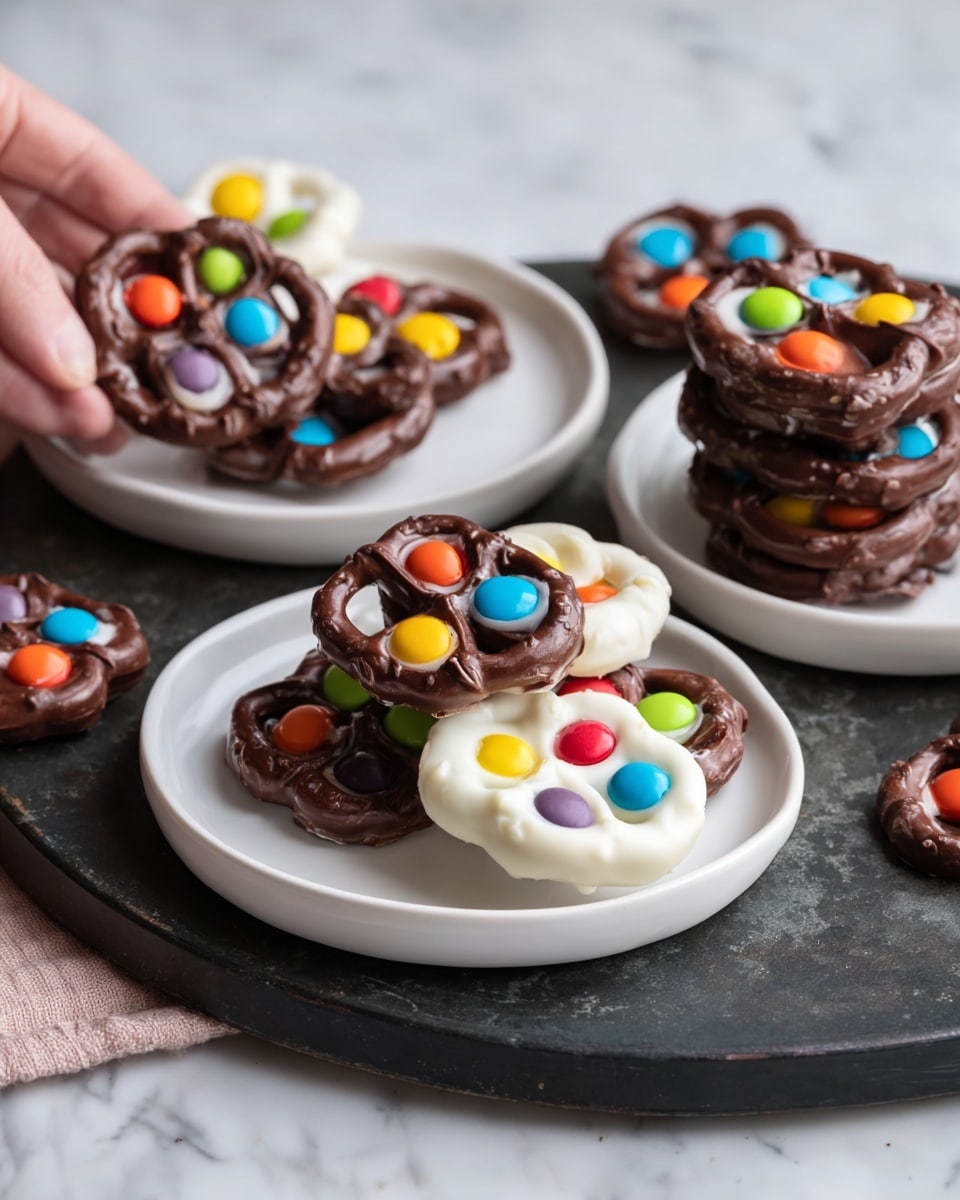
If you’re looking for a fun, spooky-yet-simple treat this season, you’ve got to try my Halloween Pretzels with Colorful Candy Eyes Recipe. These adorable little snacks are not just cute—they’re irresistibly tasty and super easy to whip up, making them perfect for last-minute party favors or an afternoon of creativity in the kitchen. Trust me, once you see those colorful eyes staring back at you, you’ll want to make these every Halloween!
Why This Recipe Works
- Quick & Easy: It takes just minutes to put together, perfect for busy days or last-minute guests.
- Eye-Catching & Fun: The colorful candy eyes turn simple pretzels into festive Halloween treats that kids (and adults!) adore.
- Customizable: You can mix and match candy melts and sprinkles for endless spooky creativity.
- Great for Gifting: These pretzels store nicely and make fun homemade gifts or party favors.

Ingredients & Why They Work
Every ingredient in this Halloween Pretzels with Colorful Candy Eyes Recipe has its own charm—combining crunchy, sweet, and festive elements that come together beautifully. Plus, they’re easy to find in most stores around Halloween, so you won’t have to hunt down anything too obscure.
- Yogurt-covered pretzels (and/or milk chocolate-covered pretzels): The creamy coating contrasts perfectly with the salty crunch of the pretzel underneath, giving a delightful flavor combination.
- Colored candy melts (orange, red, green, yellow): These melts add vivid, playful eyes that stand out and give the pretzels their Halloween personality.
- Sprinkles, jimmies, nonpareils, dots: These tiny candies work as pupils and add texture and color, turning each pretzel into a little character.
Tweak to Your Taste
I love making these Halloween Pretzels with Colorful Candy Eyes Recipe my own by swapping candy melt colors based on whatever I have lurking in the cabinet. Sometimes I sneak in purple or black melts for an even spookier look—you can totally customize to fit your vibe!
- Variation: One year, I switched out sprinkles for mini M&Ms and the kids went wild for the pop of chocolate in every bite. Try what you love!
- Allergy-friendly: If dairy is an issue, look for dairy-free candy melts to keep these pretzels inclusive and just as festive.
- Shape switch-up: Instead of traditional pretzels, try pairing the candy eyes with other small cookies or crackers—the fun is in the eye design!
Step-by-Step: How I Make Halloween Pretzels with Colorful Candy Eyes Recipe
Step 1: Lay Out Your Pretzels
Start by placing your pretzels in a single layer on a piece of wax paper or parchment paper. This keeps them from sticking and makes cleanup a breeze. Lining up about six at a time works best for the next step—trust me, you’ll want to work in small batches to avoid the candy melts setting too quickly.
Step 2: Melt the Candy Melts
Follow the package directions to melt your candy melts—usually in short bursts in the microwave with stirring in between. Once smooth, transfer the melted candy into a piping bag or a resealable plastic bag with a tiny corner snipped off. This will give you control as you pipe the “eyes” onto each pretzel.
Step 3: Pipe the Candy Eyes
Squeeze small circles of the melted candy into the top left and right holes of each pretzel. This creates the “eye” bases. Here’s the trick: do about six pretzels at once so the candy is still soft enough for the next step.
Step 4: Add the Colorful Pupils
Quickly sprinkle your chosen mini sprinkles or candies onto the melted circles before they harden. These become the pupils of the eyes and the colorful detail that makes these Halloween Pretzels with Colorful Candy Eyes Recipe so charming. I like to tap the tray gently afterwards to help them settle and stick better.
Step 5: Let Them Set Completely
Allow your pretzels to rest until the candy melts are fully hardened. This usually takes about 20–30 minutes at room temperature. If you’re in a hurry, popping them in the fridge speeds it up, but be sure not to leave them too long or you risk condensation.
Step 6: Store or Share
Once set, pack your pretzels into an airtight container or wrap them individually in cellophane bags for gifting. They stay fresh and crunchy, making them great for Halloween parties or handing out to little ghosts and goblins.
Pro Tips for Making Halloween Pretzels with Colorful Candy Eyes Recipe
- Work in Small Batches: Piping six pretzels at a time helps you add candy eyes before the melts dry and ensures sprinkles stick well.
- Even Melting: Stir melts frequently to avoid clumps and get the smoothest piping texture.
- Sprinkle Variety: Mix tiny shapes and colors for pupils to give your pretzels unique personalities.
- Avoid Humidity: Store pretzels in a cool, dry place to keep the candy eyes crisp and prevent melting.
How to Serve Halloween Pretzels with Colorful Candy Eyes Recipe
Garnishes
I like to scatter a few extra colorful sprinkles around the serving platter to tie in the candy eyes and add that festive pop. Sometimes, I throw in a handful of Halloween-themed confetti or mini candy pumpkins for an extra seasonal touch that makes the table look welcome and fun.
Side Dishes
These pretzels go amazingly well paired with a cozy cup of hot cocoa or spiced apple cider—both warming and kid-friendly. If you want to go savory-sweet, some cheese and charcuterie alongside these treats make for an interesting mix that surprises guests without overwhelming the candy vibe.
Creative Ways to Present
Try arranging the pretzels on a black or orange Halloween-themed platter shaped like a pumpkin or ghost. You could even glue straws upright in a foam block and gently hang pretzels on them for a “hanging eyeball” display—a total crowd-pleaser at parties! Gift-wrapping them individually in clear bags tied with Halloween ribbon also makes for a festive take-home bite.
Make Ahead and Storage
Storing Leftovers
After making this Halloween Pretzels with Colorful Candy Eyes Recipe, I store leftovers in an airtight container at room temperature. This keeps the pretzels crisp and prevents the candy eyes from sweating or melting. Make sure your container fits them in a single layer or with parchment paper separated layers so the candies don’t stick.
Freezing
I’ve tried freezing these pretzels, but they don’t quite keep their crunch and the candy melting can sometimes discolor. For best results, I recommend enjoying them fresh or within a few days of making them.
Reheating
Since this recipe is a no-bake treat, reheating isn’t really necessary. But if you want to warm them slightly, use a low oven (about 200°F) for just a few minutes to avoid melting your candy eyes. Let cool before serving to keep the fun look intact.
FAQs
-
Can I use regular chocolate chips instead of candy melts?
Regular chocolate chips can work, but they don’t harden with the same smooth, colorful finish that candy melts offer. Candy melts are designed to set quickly and maintain a glossy, sturdy appearance, perfect for holding your sprinkles in place.
-
How long do Halloween pretzels with candy eyes stay fresh?
Stored properly in an airtight container at room temperature, these pretzels stay fresh and crunchy for up to a week. Just watch out for humidity, which can cause the candy coating to soften or sweat.
-
What if I don’t have a piping bag?
No worries! A small resealable plastic bag with a tiny corner cut off works just as well for piping the candy melts onto the pretzels.
-
Can I make these pretzels vegan or allergy-friendly?
Absolutely! Look for vegan or dairy-free candy melts and pretzels if needed. Just double-check sprinkles and candy for any hidden allergens—there are plenty of allergen-friendly options available around Halloween.
Final Thoughts
This Halloween Pretzels with Colorful Candy Eyes Recipe holds a special place in my heart because it combines simple ingredients with festive magic. It’s a perfect project whether you’re baking with little helpers or just want to add a handmade touch to your Halloween spread. I hope you have as much fun making (and eating!) these as I do every year—don’t be surprised if they become a new holiday tradition for you too!
Print
Halloween Pretzels with Colorful Candy Eyes Recipe
- Prep Time: 10 minutes
- Cook Time: 30 minutes
- Total Time: 40 minutes
- Yield: 8 servings
- Category: Snack
- Method: No-Cook
- Cuisine: American
Description
Halloween Pretzels are a fun and festive treat perfect for spooky celebrations. Yogurt or milk chocolate-covered pretzels are decorated with colorful candy melts and sprinkles to create eye-catching edible eyes. These easy-to-make snacks combine sweet and salty flavors, making them ideal for parties or Halloween-themed gatherings.
Ingredients
Main Ingredients
- 1 package yogurt-covered pretzels
- 1 package milk chocolate-covered pretzels
Decorations
- Colored candy melts (orange, red, green, yellow) – about 1/2 cup each
- 1/2 cup sprinkles, jimmies, nonpareils, dots, or Mini M&Ms
Instructions
- Prepare Pretzels: Lay out the yogurt-covered and milk chocolate-covered pretzels on a sheet of wax paper to prepare for decorating.
- Melt Candy: Heat the colored candy melts in the microwave or according to the package instructions until smooth and ready for piping. Transfer the melted candy into piping bags for easier application.
- Decorate Eyes: Pipe the candy melts into the top left and right holes of each pretzel to create the eyes.
- Add Sprinkles: Immediately after piping, add the sprinkles or small candies onto the melted candy for the pupils to ensure they stick before the candy sets.
- Set: Allow the decorated pretzels to set completely at room temperature or in a cool area until the candy is hardened.
- Store: Pack the finished Halloween pretzels in an airtight container to keep them fresh until serving.
Notes
- Work with about 6 pretzels at a time when piping and adding sprinkles to keep the candy melts from setting too quickly.
- Use a piping bag or small zip-top bag with a corner snipped off for more precise candy application.
- You can mix and match yogurt-covered and milk chocolate-covered pretzels based on your preference.
- If Mini M&Ms are used for pupils, place them quickly before the candy melts harden.
- Store pretzels at room temperature in an airtight container to prevent melting or moisture absorption.
Nutrition
- Serving Size: 1 serving
- Calories: 150 kcal
- Sugar: 12 g
- Sodium: 200 mg
- Fat: 7 g
- Saturated Fat: 4 g
- Unsaturated Fat: 2 g
- Trans Fat: 0 g
- Carbohydrates: 18 g
- Fiber: 1 g
- Protein: 2 g
- Cholesterol: 0 mg

