
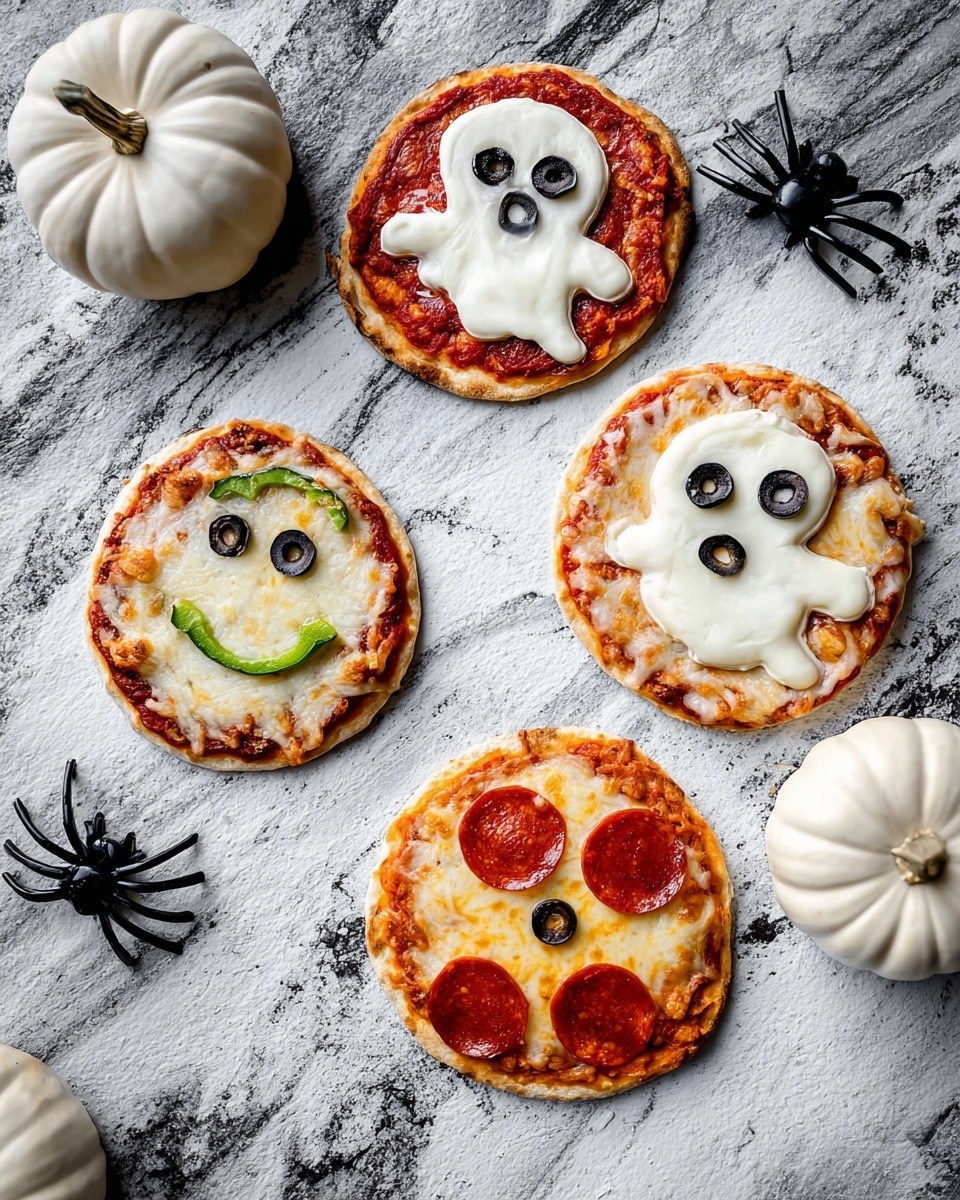
Halloween Pizzas Recipe
Alright, friend, if you’re looking for a fun, spooky twist to your usual pizza night, let me introduce you to my Halloween Pizzas Recipe. These cute-but-creepy creations are easy, delicious, and perfect for gathering around the kitchen with family or friends. Trust me, once you start decorating your pizzas as little monsters, ghosts, or jack-o’-lanterns, you’ll never want to go back to ordinary pizza night again. Stick around—I’ll share every tip I’ve learned to help you nail this festive recipe with ease.
Why This Recipe Works
- No-fuss dough: The no-rise crust recipe means you can have homemade pizza ready in under 30 minutes—perfect for busy nights and impatient pizza lovers!
- Flexible toppings: You get to use whatever you love, so every pizza becomes a personal Halloween masterpiece.
- Kid-friendly fun: Decorating pizzas like spooky creatures doubles as a fun activity for little helpers.
- Make ahead or freeze: Prep parts in advance or freeze assembled pizzas, making party planning a breeze.

Ingredients & Why They Work
Each ingredient in this Halloween Pizzas Recipe plays a crucial role, especially in creating a crust that’s tender but holds up well under all those toppings. Plus, the toppings themselves let you get super creative without worrying too much about precision—meaning it’s stress-free and fun at the same time!
- All-purpose flour: The backbone of the crust; using good quality flour helps the dough develop enough structure while staying soft.
- Yeast: I use Fleischmann’s pizza yeast here – it works great for this no-rise recipe, adding just a touch of that classic pizza flavor without waiting hours.
- Granulated sugar: To give the yeast a little food and balance flavors, plus it slightly browns the crust for that perfect look.
- Salt: Essential for flavor enhancement, so don’t skip it!
- Warm water: Activates the yeast gently—make sure it’s warm, not hot, or you’ll kill the yeast.
- Vegetable or canola oil: Adds tenderness and helps the crust crisp in the oven.
- Pizza sauce: Homemade or store-bought, it’s the perfect canvas for your spooky designs.
- Fresh mozzarella: Melts beautifully and gives that ooey-gooey charm everyone loves.
- Pizza toppings: From pepperoni to bell peppers and olives, these are your decorating tools; pick what you love and let imagination run wild.
Tweak to Your Taste
What’s great about this Halloween Pizzas Recipe is how easy it is to tweak. I love switching up toppings depending on the season or who’s joining me for pizza night, and honestly, the best part is watching the little chefs get creative and make their own monsters and ghosts.
- Vegetarian option: I’ve swapped pepperoni for mushrooms and artichokes, making it just as tasty without meat.
- Spice it up: Add a sprinkle of chili flakes or swap regular mozzarella for a smoked one for some depth.
- Gluten-free tweaks: Use a store-bought gluten-free pizza crust and proceed with the toppings—it’s just as fun!
- Seasonal themes: Experiment with toppings that fit the holiday, like using orange bell peppers for pumpkin faces or black olives to create spider shapes.
Step-by-Step: How I Make Halloween Pizzas Recipe
Step 1: Mix the dough like a pro (but keep it simple!)
Start by stirring together the flour, undissolved yeast, sugar, and salt in your mixing bowl. Then, pour in the warm water and oil and give everything a good stir until blended—it’ll only take about a minute. The dough will be a bit sticky, which is perfect; it means you’re on the right track!
Step 2: Knead and shape
Turn your dough out onto a lightly floured surface and knead for about 4 minutes until it’s smooth and elastic. If it’s stickier than you’d like, sprinkle in a bit more flour—but be gentle here. Divide the dough into four equal balls; these will become your mini pizzas.
Step 3: Pre-bake your canvas
Roll each ball into an 8-inch circle and place it on a greased baking sheet. Pop the sheets in an oven preheated to 450°F and bake for 5-6 minutes. You want the crust to just set and be lightly browned on the bottom—that’s your cue it’s ready for toppings.
Step 4: Time to decorate! Spread sauce and toppings
Spread a spoonful of pizza sauce on each crust, then get creative with your toppings. I’ve found slicing bell peppers into triangles shapes makes perfect jack-o’-lantern mouths, while olives work wonders for spooky eyes. Don’t worry about perfection here—the charmed imperfectness adds to the Halloween vibe.
Step 5: Final bake and bubbly finish
Slide the topped pizzas back into the oven and bake for another 5-8 minutes, until the mozzarella melts into golden bubbly goodness. Keep an eye so you don’t burn those edges—every oven’s a bit different.
Pro Tips for Making Halloween Pizzas Recipe
- Perfect crust texture: Don’t over-flour when kneading; a slightly sticky dough gives you the best tender-yet-crispy crust.
- Even baking: If you have a pizza stone, use it! It helps distribute the heat evenly and crisps the bottom just right without burning.
- Fun toppings prep: Pre-cut toppings and let kids design their own pizzas; it makes the cooking process an event.
- Avoid sogginess: Pre-baking the crust is key to stop sauces and toppings from making the dough soggy—don’t skip this!
How to Serve Halloween Pizzas Recipe
Garnishes
I like to finish my Halloween pizzas with a sprinkle of fresh parsley or basil leaves to add a burst of freshness that balances the richness of the cheese. Sometimes, a drizzle of chili oil adds a subtle heat that contrasts nicely with the melty goodness. And, don’t be shy with cute edible eyes or little pepperoni slices shaped as bats or spiders on top!
Side Dishes
Simple sides are best here—I usually pair these spooky pizzas with a crisp green salad or some roasted garlic veggies. For a real Halloween party, some carrot sticks with hummus ‘dirt’ dip and a few fun Halloween-themed cocktails or mocktails complete the vibe perfectly.
Creative Ways to Present
You can serve each pizza individually on small boards or plates, adding a mini pumpkin or a Halloween-themed napkin on the side for charm. Another cute idea is arranging the pizzas on a large platter shaped like a spider web (think black olives and cheese arranged cleverly on a big pizza) for a real wow factor at parties.
Make Ahead and Storage
Storing Leftovers
Leftover Halloween pizzas keep surprisingly well in the fridge—I wrap them tightly in foil or place in airtight containers. When refrigerated, they stay tasty for up to 3 days but are best enjoyed within the first 24 hours for that fresh-baked vibe.
Freezing
For party prep, I often freeze assembled pizzas after the first baking step (pre-baking the crust). Just wrap each pizza well in plastic wrap and foil, then pop them in the freezer for up to 2 months. When it’s pizza night, bake them from frozen with an extra few minutes added to cook time—it’s a total lifesaver.
Reheating
To keep leftover Halloween pizzas tasting fresh, I reheat them in a hot oven or toaster oven at about 375°F for 5-7 minutes. This way, the crust crisps back up nicely instead of turning soggy like the microwave sometimes does.
FAQs
-
Can I make this Halloween Pizzas Recipe ahead of time?
Absolutely! You can prepare the pizza sauce and chop toppings a day or two in advance. The dough can also be mixed and refrigerated for a few hours before rolling it out. Plus, you can even fully assemble and freeze the pizzas after pre-baking the crust, making your party prep super easy.
-
What’s the best way to decorate these Halloween pizzas?
Get creative with toppings! Use bell peppers cut into triangles or strips for mouths and fangs, olives for eyes, sliced onions for witches’ hats, and pepperoni to make spooky shapes. You can even use small cookie cutters to shape cheese slices. The key is to have fun and not worry about being perfect.
-
Can I use store-bought pizza dough for this recipe?
Yes, using store-bought dough is a great shortcut. Just roll it out into the 8-inch circles and follow the same steps—pre-bake the crust, add toppings, then finish baking. It’s a great option if you’re short on time but still want that homemade spin.
-
How do I prevent soggy pizza crusts?
Pre-baking the crust before adding sauce and toppings is key. This seals the dough and helps it stay crispy once the pizza finishes baking with the toppings. Also, avoid overloading your pizza with too much sauce or very watery toppings to keep the crust crisp.
-
What are good substitutes for mozzarella if I’m dairy-free?
I’ve had good luck using dairy-free shredded cheese blends made from coconut or cashew bases. They melt well and allow you to keep the gooey texture that makes pizza irresistible. Just check the packaging to make sure it’s suitable for your dietary needs.
Final Thoughts
Honestly, this Halloween Pizzas Recipe is one of my absolute favorites because it brings everyone together. I love how it transforms pizza night into a mini celebration where creativity meets comfort food. Whether you’re cooking with kids or just want to impress guests with something fun and tasty, these pizzas deliver. Give it a try this season—you’ll have a blast making (and eating) your spooky masterpieces!
Print
Halloween Pizzas Recipe
- Prep Time: 15 minutes
- Cook Time: 12 minutes
- Total Time: 27 minutes
- Yield: 4 servings
- Category: Main Course
- Method: Baking
- Cuisine: Italian-American
Description
These fun and festive Halloween Pizzas feature a homemade no-rise pizza crust topped with tomato sauce, fresh mozzarella, and your favorite toppings arranged in spooky Halloween designs. Perfect for a kid-friendly party or a creative family dinner, this recipe is easy to prepare with a soft, slightly sticky dough and quick baking times for a delicious pizza night.
Ingredients
No-Rise Pizza Crust:
- 2 cups all-purpose flour
- 1 envelope Fleischmann’s Pizza Yeast
- 1 1/2 teaspoons granulated sugar
- 3/4 teaspoon salt
- 2/3 cup very warm water
- 3 tablespoons vegetable oil or canola oil
Toppings:
- 1 cup pizza sauce
- 1/2 pound fresh mozzarella cheese
- Desired pizza toppings: pepperoni, bell peppers, olives, onion, pineapple, parsley, salami, Canadian bacon
Instructions
- Preheat Oven: Preheat your oven to 450°F to ensure it’s hot enough for baking the pizzas.
- Mix Dry Ingredients: In a large bowl, combine 1 cup of flour, undissolved yeast, sugar, and salt.
- Add Wet Ingredients: Pour in warm water and oil, mixing until well blended, about 1 minute.
- Form Dough: Gradually add the remaining flour until a soft, slightly sticky dough forms a ball. Pour onto a floured surface.
- Knead Dough: Knead the dough for about 4 minutes, adding flour as needed until smooth and elastic.
- Divide Dough: Divide the dough into 4 equal portions.
- Shape Crusts: Roll or pat each portion into an 8-inch circle and place on greased baking sheets.
- Partially Bake Crusts: Bake crusts for 5-6 minutes until just set and lightly browned on the bottom.
- Add Sauce and Toppings: Spread pizza sauce on each crust, then add mozzarella and your desired toppings arranged into Halloween designs.
- Bake Pizzas: Return pizzas to the oven for 5-8 minutes, until the cheese is melted and bubbly.
Notes
- Make Ahead: Pizza sauce can be prepared in advance and stored in the fridge up to one week. Toppings can be chopped ahead and refrigerated separately.
- Dough Storage: Dough can be made a few hours ahead and kept in an airtight container in the fridge.
- Freezing: Assemble pizzas on partially prebaked crusts, cover tightly, and freeze up to 2 months. Bake from frozen, adding extra minutes to the cook time.
- For crispier crust, bake pizzas on a pizza stone or preheated baking sheet.
Nutrition
- Serving Size: 1 pizza
- Calories: 350 kcal
- Sugar: 4 g
- Sodium: 600 mg
- Fat: 12 g
- Saturated Fat: 6 g
- Unsaturated Fat: 5 g
- Trans Fat: 0 g
- Carbohydrates: 40 g
- Fiber: 2 g
- Protein: 15 g
- Cholesterol: 30 mg


