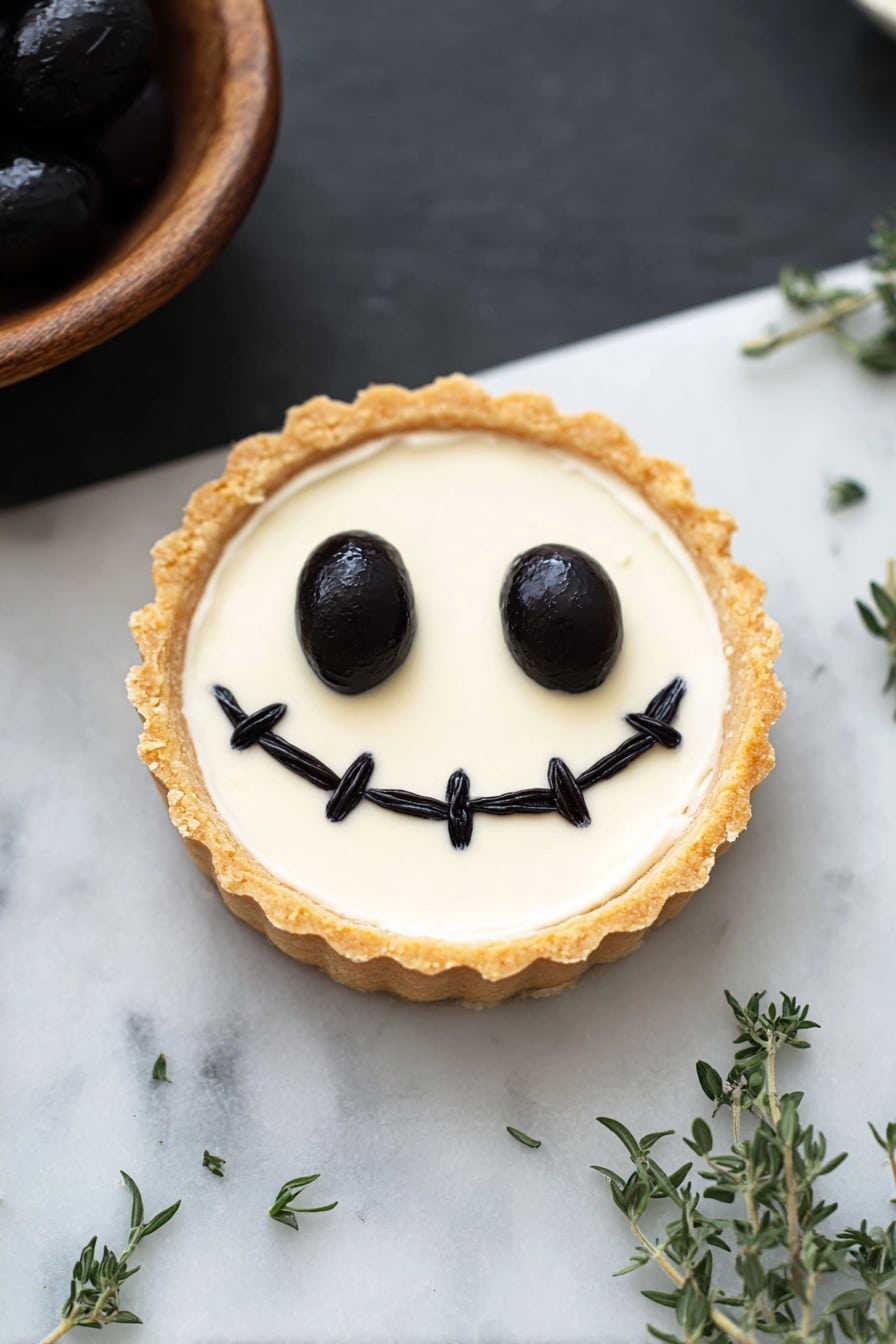
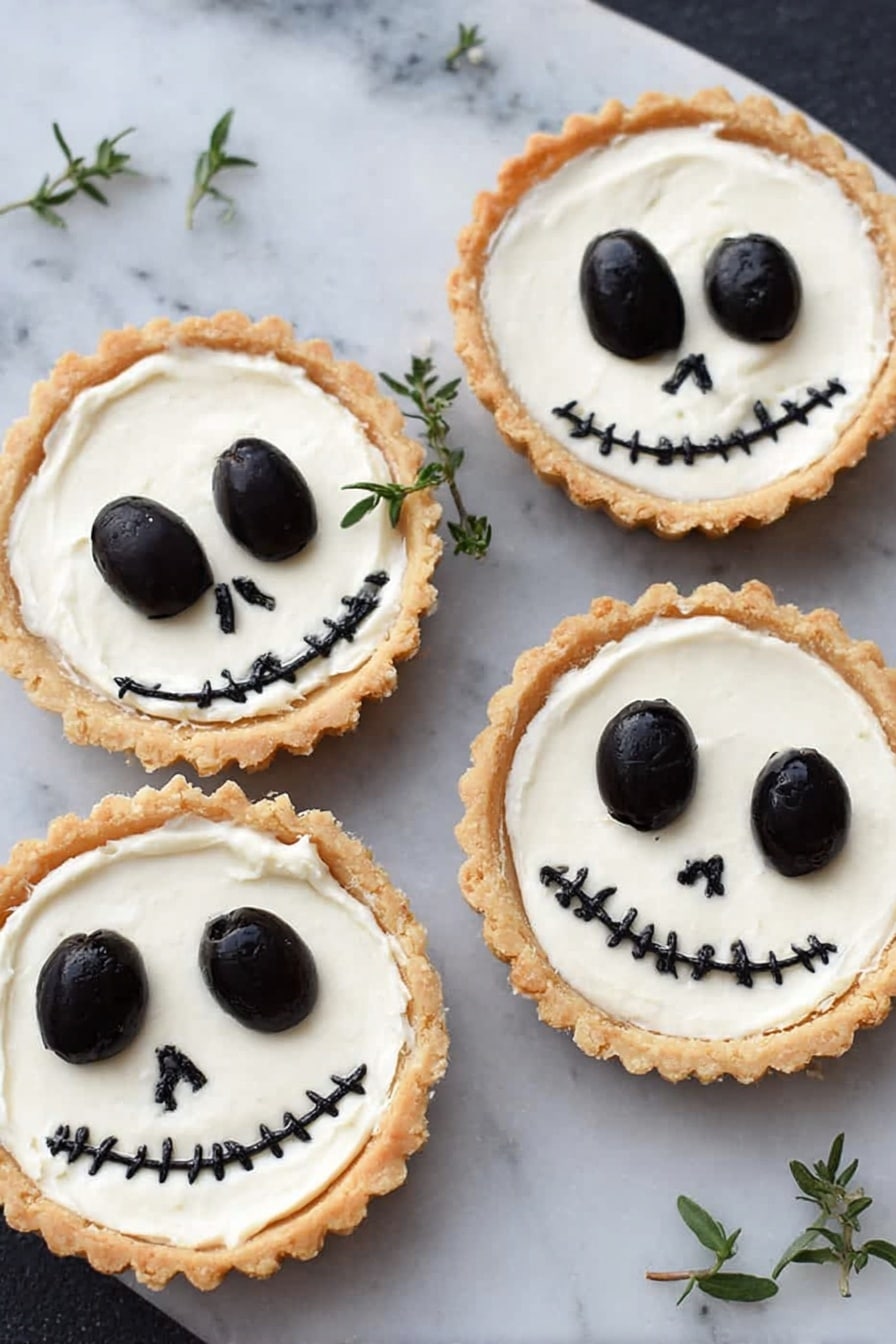
Halloween Jack Skellington Ricotta Olive Tarts Recipe
If you’re hunting for a festive, savory treat that’s as charming as it is delicious, then you’ve got to try my Halloween Jack Skellington Ricotta Olive Tarts Recipe. Not only do these little tarts capture the spooky spirit of Halloween with an adorable Jack Skellington face crafted from olives, but they also combine creamy ricotta, sun-dried tomatoes, and thyme for a flavor that’s simply irresistible. I promise, once you make these, they’ll become a go-to for your seasonal gatherings or anytime you want to impress with something unique and yummy. Trust me, you don’t want to miss this one!
Why This Recipe Works
- Perfect Balance: Creamy ricotta and tangy sun-dried tomatoes create a rich yet bright filling that feels indulgent but fresh.
- Gluten-Free Crust: Using a blend of sweet rice, millet, and oat flours makes for a tender, buttery crust that’s naturally gluten-free.
- Visual Fun: Crafting Jack Skellington’s signature spooky smile with olives is easier than you think and adds a festive wow-factor to your party table.
- Make-Ahead Friendly: The crust and filling can be prepped in advance, letting you breeze through assembly when guests arrive.

Ingredients & Why They Work
This recipe blends special ingredients that come together perfectly for both taste and texture, especially if you’re aiming for that iconic Jack Skellington look without stressing over complicated steps. The gluten-free flours create a light crust while the ricotta and yogurt ensure a creamy, smooth filling that bakes up just right.
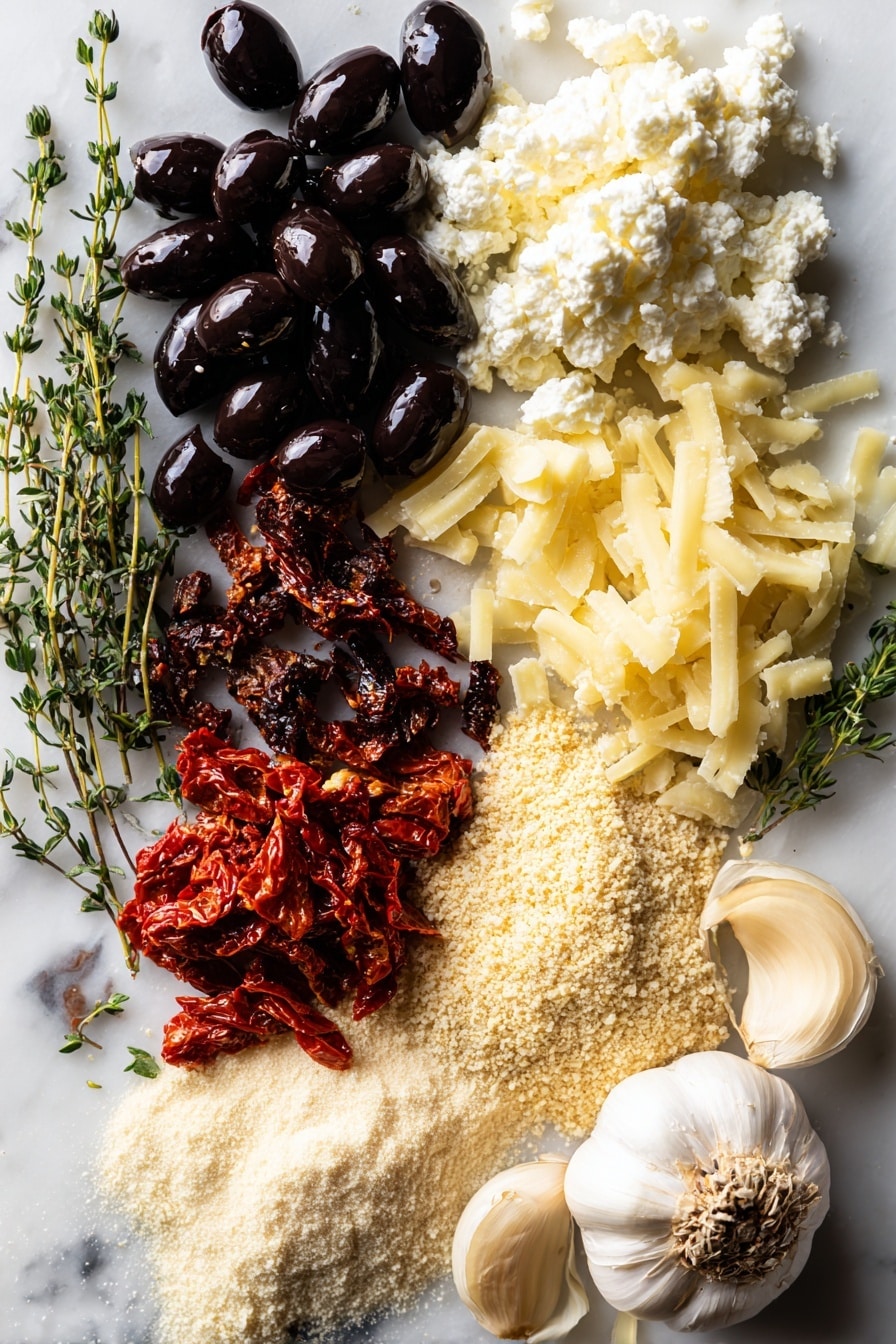
- Sweet rice flour: Brings stickiness and tenderness to the gluten-free crust; key for binding.
- Millet flour: Adds a subtle nutty flavor and a nice crumb to your pastry base.
- Oat flour: Homemade oat flour is my secret for freshness and the perfect mild taste.
- Tapioca starch: Helps to lighten the crust and give it the right elasticity.
- Unsalted butter: Cold butter creates flaky layers when handled properly.
- Ice water: Used sparingly, it keeps the dough together without melting the butter.
- Black olives: Both chopped into the filling for a salty punch, and sliced to craft nose, eyes, and mouth for that Jack Skellington effect.
- Sun-dried tomatoes: Pick me up with their tangy, slightly chewy bite and vibrant color.
- Fresh thyme leaves: Tiny pops of herby brightness that elevate every bite.
- Parmesan cheese: Adds a cheesy umami layer that works beautifully with the ricotta.
- Ricotta cheese: The creamy base for the filling, giving it richness and body.
- Greek yogurt: Adds moisture and tanginess, making the filling lighter and silkier.
- Egg whites: Bind the filling without adding heaviness.
- Garlic: Just a hint to deepen savory notes without overwhelming.
- Kosher salt: Enhances and balances all those beautiful flavors.
Tweak to Your Taste
One of the things I love about this Halloween Jack Skellington Ricotta Olive Tarts Recipe is how flexible it is! Play around with the herbs or cheeses, or even swap out olives for your favorite festive veggies. I’ve found that little changes can make it your own without losing that signature spooky charm.
- Variation: I sometimes add fresh chopped basil instead of thyme for a sweeter, fragrant touch that contrasts nicely with the olives.
- Dairy-Free: You can swap ricotta for a plant-based ricotta style cheese and use a dairy-free yogurt to keep it vegan-friendly.
- Spice it up: A sprinkle of red pepper flakes in the filling adds a surprising little kick if you like heat.
- Mini vs Large: While I usually make 3-4 inch mini tarts, making one large tart with the same flavors works just as well!
Step-by-Step: How I Make Halloween Jack Skellington Ricotta Olive Tarts Recipe
Step 1: Crafting the Gluten-Free Tart Crust
Start by whisking together your gluten-free flours – sweet rice, millet, oat – with tapioca starch and salt in a large bowl. Next up, add the cold butter. I like to break it up with my hands, working quickly to keep the butter chilled; the goal is to get pea-sized bits scattered throughout the flour. This is what’ll create a flaky texture. Then, slowly drizzle ice water, one tablespoon at a time, mixing gently until the dough holds together when pinched. Don’t overwork it—gluten-free dough can get tough! Divide into 6-8 portions, form discs, and chill in the fridge for at least 30 minutes. This resting step is key and not to be skipped.
Step 2: Rolling & Shaping Your Tarts
Once chilled, roll each dough disc between parchment papers dusted with millet flour until it’s about an inch larger than your tart pans. I found rolling between parchment really saves mess and makes transferring dough into the pans a breeze. Peel off the top parchment, flip the dough into your tart pan (parchment side up), then carefully remove the remaining parchment. Use your fingers to press the dough gently to fit the tart pan’s shape. If your pan holds only a few tarts, do this in batches to keep the dough cold and manageable.
Step 3: Prepping the Jack Skellington Face & Filling
Now here’s the fun part — crafting Jack’s face! Slice 6 olives paper-thin lengthwise to form the iconic criss-cross mouth. Then cut 12-14 small oval slices for the nose, setting them aside carefully. Chop the rest of the black olives and sun-dried tomatoes, then sprinkle them along with thyme and parmesan evenly across the tart shells. Pop these into a 400°F oven for about 12 minutes to set the crust without fully cooking it.
Step 4: Mixing & Baking the Ricotta Filling
While your partially baked crusts cool slightly, whisk together the ricotta, Greek yogurt, egg whites, garlic, and salt until silky smooth. Divide the filling into each tart, filling to the top. Place two whole olives for eyes and two small oval slices for the nose, then carefully arrange the sliced olive strips into a criss-cross mouth using chopsticks or tweezers — it’s easier than you’d think! Bake for 20-25 minutes, but start checking at 15 minutes if you’re using smaller tart pans. The filling should be set and slightly golden at the edges. Serve warm, and watch people’s faces light up!
Pro Tips for Making Halloween Jack Skellington Ricotta Olive Tarts Recipe
- Keep the Butter Cold: I learned that keeping butter extremely cold and working quickly is what ensures a flaky crust instead of crumbly.
- Use Chopsticks for Decoration: Placing the olive strips for Jack’s mouth with chopsticks makes positioning the pieces much easier!
- Watch Baking Time Closely: Oven temps can vary—start checking your tarts at 15 minutes for doneness to avoid overbaking.
- Don’t Skimp on Chilling: A well-chilled dough keeps the pastry from shrinking and keeps the texture perfect.
How to Serve Halloween Jack Skellington Ricotta Olive Tarts Recipe
Garnishes
I like to keep the garnishes simple and let Jack’s face shine, but a sprinkle of fresh thyme or a drizzle of quality olive oil on top adds a lovely finishing touch. Sometimes, a tiny pinch of red pepper flakes gives an unexpected pop that my guests adore.
Side Dishes
These ricotta olive tarts shine on their own or alongside a crisp autumn salad with greens, toasted walnuts, and a tangy vinaigrette. I’ve also served them with a warm butternut squash soup for a cozy Halloween dinner that’s as festive as it is comforting.
Creative Ways to Present
For Halloween parties, I love arranging the tarts on a rustic wooden board surrounded by little pumpkins, dried leaves, and candles to set a spooky, inviting vibe. You can also serve them in mini pumpkin-shaped ramekins or on Halloween-themed plates to pump up the festive atmosphere!
Make Ahead and Storage
Storing Leftovers
After enjoying your tarts, store any leftovers in an airtight container in the fridge for up to three days. I keep them tightly covered so the crust doesn’t get soggy and the ricotta filling stays fresh.
Freezing
I’ve frozen both the crust discs before baking and the fully assembled baked tarts. For the crust, wrap individually in plastic and freeze up to 2 months. For baked tarts, freeze thoroughly wrapped in foil and plastic wrap. Thaw overnight in the fridge before reheating, and they come out almost like freshly made!
Reheating
To warm leftovers, pop the tarts in a preheated 400°F oven for about 7 minutes. This revives the crispiness of the crust and refreshes the creamy filling beautifully without drying them out.
FAQs
-
Can I make these Halloween Jack Skellington Ricotta Olive Tarts vegan?
Absolutely! Swap out the ricotta and parmesan for your favorite vegan cheese substitutes, and use plant-based yogurt instead of Greek yogurt. For the egg whites, you can try aquafaba (the liquid from canned chickpeas) to bind the filling. The texture will be slightly different but still great for a vegan-friendly treat.
-
How do I make sure the crust doesn’t get soggy?
Pre-baking (or blind-baking) the crust for 12 minutes before adding the filling helps seal it and maintain crispness. Also, chilling the dough properly and handling it gently keeps a good texture. Make sure not to overload the tart shells with too much wet filling early on.
-
Can I prepare these tarts ahead of time for a party?
Yes! You can prepare the crusts a day or two in advance, roll and chill the dough discs, or even bake the shells ahead and store them separately. The filling can be mixed just before baking. This makes assembling just before your guests arrive quick and stress-free.
-
What’s the best way to slice olives thinly for the decoration?
I recommend using a sharp paring knife to carefully slice olives paper-thin. Cutting lengthwise after slicing off the ends works well, and chilling the olives beforehand helps keep them firmer and easier to handle.
-
Can I use a regular tart crust instead of gluten-free?
Definitely! If gluten isn’t a concern, feel free to swap in your favorite traditional tart crust recipe. Just keep the proportions and baking times similar, and you’ll get a similar flavor and texture with a classic buttery crust.
Final Thoughts
This Halloween Jack Skellington Ricotta Olive Tarts Recipe is truly one of those special dishes that brings a smile to the table. It’s playful, flavorful, and a little bit spooky—a perfect combo for celebrating fall with friends and family. I remember making these tarts last year and the delighted reactions from everyone, especially kids who loved recognizing Jack’s face before tasting the creamy filling. So, pull out your flours, grab some olives, and give this recipe a try—you’ll love how easy and satisfying it is. Happy baking and spooky feasting!
Print
Halloween Jack Skellington Ricotta Olive Tarts Recipe
- Prep Time: 45 minutes
- Cook Time: 37 minutes
- Total Time: 1 hour 22 minutes
- Yield: 6 servings
- Category: Appetizer
- Method: Baking
- Cuisine: American
- Diet: Gluten Free
Description
These Halloween Jack Skellington Ricotta Olive Tarts are a spooky, delicious treat perfect for festive gatherings. Featuring a gluten-free tart crust filled with a creamy ricotta mixture and decorated with black olives and sun-dried tomatoes to create a Jack Skellington face, this recipe combines savory flavors with a fun Halloween theme. These mini tarts are baked to golden perfection and make an impressive appetizer or snack for Halloween parties.
Ingredients
Gluten-Free Tart Crust
- ½ cup sweet rice flour
- ¼ cup millet flour
- ⅓ cup gluten-free oat flour
- 3 tablespoons tapioca flour (or corn starch)
- ¼ teaspoon kosher salt
- 8 tablespoons cold, unsalted butter, cut into tablespoon-sized pieces
- 5-7 tablespoons ice water
Filling and Topping
- 1 can black olives
- 3-4 tablespoons julienned sun-dried tomatoes packed in oil
- 2-3 teaspoons fresh thyme leaves
- 3 tablespoons freshly grated parmesan cheese
- 1½ cups ricotta cheese
- ¼ cup plus 2 tablespoons Greek yogurt
- 3 egg whites
- 3 cloves garlic, minced
- ½ teaspoon kosher salt
Instructions
- Prepare the crust dough: In a large bowl, whisk together sweet rice flour, millet flour, gluten-free oat flour, tapioca flour, and kosher salt. Add cold butter pieces and break them up with your hands until the largest pieces are pea-sized.
- Add ice water gradually: Dribble in ice water one tablespoon at a time, mixing until the dough comes together when pinched; use 5-7 tablespoons as needed.
- Divide and chill dough: Split the dough into 6-8 pieces for mini tartlets. Roll each into a ball, flatten into discs, wrap in plastic, and refrigerate for 30 minutes.
- Preheat oven and roll crusts: Preheat oven to 400ºF. Roll each dough piece between two sheets of parchment or wax paper dusted with millet flour to form a circle 1 inch larger than your tart pan.
- Fit crusts into tart pans: Remove one parchment layer and flip crust into the pan with parchment side up, then remove the top parchment and press dough evenly into mini tart pans. Repeat for all dough pieces.
- Prepare olive decorations: Thinly slice 6 black olives lengthwise into paper-thin strips for mouths and cut 12-14 small oval pieces for noses. Set aside for later decoration.
- Add filling toppings and pre-bake crusts: Chop 3-4 tablespoons black olives and distribute among tarts. Place 3-5 julienned sun-dried tomato strips, sprinkle thyme, and parmesan cheese evenly atop each tart. Bake for 12 minutes until crust is lightly cooked.
- Make ricotta filling: While crusts bake, whisk together ricotta, Greek yogurt, egg whites, minced garlic, and kosher salt until smooth.
- Fill tarts and decorate faces: Remove pre-baked crusts from oven and fill each tart to the top with ricotta mixture. Place two whole black olives for eyes and two olive ovals for the nose on each tart. Use thin olive strips to create a criss-cross mouth pattern delicately, using chopsticks or tweezers for precision.
- Bake filled tarts: Bake filled tarts for 25 minutes or until ricotta filling is set. Start checking doneness at 15 minutes depending on tart size. Serve warm.
- Reheat instructions: To reheat, bake at 400ºF for 7 minutes until warmed through.
Notes
- Use millet flour for rolling dough to prevent sticking without gluten.
- Ensure all butter pieces are cold for a flaky crust texture.
- If you don’t have millet flour, you can substitute with additional oat flour or gluten-free all-purpose flour.
- Trim the olive slices carefully with a paring knife to get thin strips for detailed decorating.
- Mini tart pans of about 3-4 inches diameter work best for this size; adjust dough portions accordingly.
- Chilling the dough discs helps in easier rolling and prevents shrinkage during baking.
- Use chopsticks or small tweezers for precise placement of olive decorations to mimic the Jack Skellington face.
- Store leftover tarts in the refrigerator and reheat as instructed before serving.
Nutrition
- Serving Size: 1 tart
- Calories: 210 kcal
- Sugar: 2 g
- Sodium: 180 mg
- Fat: 14 g
- Saturated Fat: 7 g
- Unsaturated Fat: 6 g
- Trans Fat: 0 g
- Carbohydrates: 15 g
- Fiber: 2 g
- Protein: 6 g
- Cholesterol: 40 mg


