
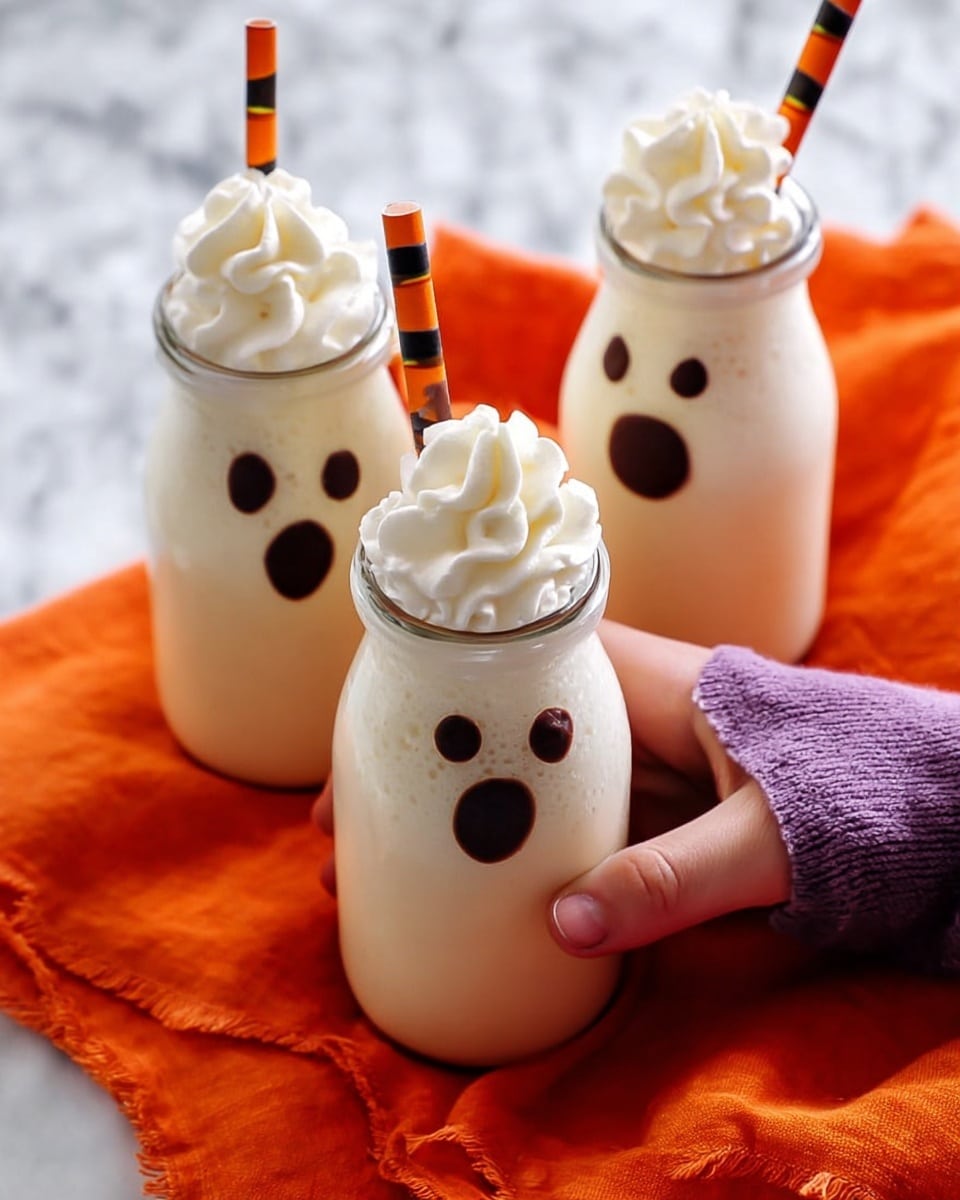
Halloween Ghost Milkshakes Recipe
If you’re looking to wow your friends and family this spooky season, I’ve got just the treat for you. This Halloween Ghost Milkshakes Recipe is not only ridiculously fun to make but tastes creamy, dreamy, and delightfully festive. I love how these milkshakes come to life with cute little chocolate ghost faces — honestly, they’re as fun to create as they are to drink! Stick with me, and I’ll walk you through all the tricks and tips to make this ghostly dessert a total hit at your Halloween gathering.
Why This Recipe Works
- Simple Ingredients: The classic combo of vanilla ice cream and milk keeps the shake rich and creamy without overpowering the ghostly theme.
- Fun Presentation: Decorating the glasses with melted chocolate ghost faces gives it a playful, spooky touch that’s sure to impress.
- Customizable Consistency: You can easily adjust how thick or thin your shake is by adding more ice cream or milk, so everyone gets exactly what they like.
- Perfect for All Ages: No scary ingredients here—just plenty of creamy, chocolaty fun everyone can enjoy.

Ingredients & Why They Work
Here’s the magic behind this Halloween Ghost Milkshakes Recipe — simple ingredients that come together beautifully. The vanilla ice cream provides that rich, velvety base, while milk loosens it up for the perfect drinking consistency. And of course, semisweet chocolate chips for those adorable ghost faces—trust me, the little details make the whole thing pop.
- Vanilla Ice Cream: Pick a good quality, creamy vanilla for a rich flavor; it’s the heart of the milkshake.
- Milk: Whole milk works great to create a smooth shake, but you can go lower fat or dairy alternatives based on your preference.
- Semisweet Chocolate Chips: These melt nicely for decorating, giving you rich, dark “ghost” features against the white cream.
- Whipped Cream: I swear by Reddi Whip for that classic creamy puff on top that just screams Halloween indulgence.
Tweak to Your Taste
One thing I love about this Halloween Ghost Milkshakes Recipe is how easy it is to make it your own. Whether you’re playing with thickness, flavor, or even the spooky factor, a few tweaks can turn it into your signature Halloween sip.
- Variation: I sometimes add a splash of peppermint extract to give it a cool twist that tastes like a haunted winter wonderland — it’s surprisingly good!
- Dietary Modifications: Swap regular milk for almond, oat, or coconut milk, and use dairy-free ice cream to make it vegan-friendly without losing the creamy goodness.
- Kids-Friendly: Use the whipped cream and chocolate for decorating and let the little ones get creative with ghost shapes — it’s a fun family activity before the milkshakes disappear.
Step-by-Step: How I Make Halloween Ghost Milkshakes Recipe
Step 1: Melting the Chocolate for Ghost Faces
Start by placing the semisweet chocolate chips in a microwave-safe dish. Heat them on high for 30 seconds, then give them a good stir. If the chocolate isn’t smooth yet, heat it in 15-second increments, stirring each time, until it’s luscious and creamy. This step is key because you want a drip-worthy melted chocolate that’s just right — not too runny, not too thick.
Step 2: Decorating Your Glasses with Little Ghost Faces
This part is where your Halloween Ghost Milkshakes Recipe really comes alive. Using the end of a spoon handle dipped lightly into the melted chocolate, carefully tap small dots onto the glass to form ghost eyes, a nose, and a quirky mouth. Don’t go overboard — a little chocolate goes a long way here! Once you’ve got your ghostly features in place, pop the glasses in the fridge for about 30 minutes to let the chocolate firm up. I like to do this step while I prepare the milkshakes, so everything’s ready to assemble.
Step 3: Blending the Milkshakes
Next, scoop your vanilla ice cream into the blender. Add the milk and blend until everything’s mixed smooth and creamy. If you want that classic thick milkshake texture, keep it on the thicker side; for a lighter sip, add a little more milk. You really can’t go wrong here — just blend to your preferred consistency.
Step 4: Assemble and Serve
Pour the milkshake into each decorated glass, leaving about an inch of space at the top. Then, crown your shakes with a generous swirl of whipped cream. And voilà — you’ve got festive, fun, and downright adorable Halloween Ghost Milkshakes ready to enjoy immediately.
Pro Tips for Making Halloween Ghost Milkshakes Recipe
- Chocolate Melting: Use a clean and dry spoon handle for decorating, so you get neat, well-defined ghost faces every time.
- Chill Time: Don’t skip the 30-minute fridge setting for the chocolate—this prevents the designs from smudging when you pour in the milkshake.
- Adjust Thickness: Start with less milk and add splash by splash to avoid making the shake too thin.
- Presentation: Keep your whipped cream fresh and fluffy by adding it just before serving to maintain its texture and shape.
How to Serve Halloween Ghost Milkshakes Recipe
Garnishes
I love topping these shakes with a generous swirl of whipped cream because it’s like the ghost’s fluffy cloak. Sometimes I add mini marshmallows or a few extra chocolate chips on top for some extra texture and cuteness. Sprinkle a pinch of edible glitter or orange Halloween sugar for a little sparkle—it totally elevates the look, especially for parties.
Side Dishes
Pair your Halloween Ghost Milkshakes with classic treats like sugar cookies shaped like bats or pumpkins, or even some slightly salty popcorn to balance that sweetness. If you want to keep it easy, plain chocolate or candy corn work perfectly too—no one minds a little sugar overload on Halloween!
Creative Ways to Present
For a Halloween party, I like to serve these milkshakes in clear or frosted glasses on a decorated tray with spider web napkins and plastic spiders tucked around—it creates a fun spooky vibe. You could also rim the glasses with crushed Oreo “dirt” or orange sugar crystals. And if you’re feeling extra festive, swap whipped cream for a scoop of ghost-shaped vanilla marshmallow fluff atop your shake!
Make Ahead and Storage
Storing Leftovers
Milkshakes are definitely best fresh, but if you find yourself with leftovers, pour them into airtight containers and refrigerate for up to 24 hours. Give it a good stir before drinking because settling and separation happen naturally.
Freezing
I’ve tried freezing the blended shakes before, but the texture changes quite a bit—like a frozen dessert more than a milkshake. It’s best to freeze the ice cream and other ingredients separately if you want to prep ahead and keep your shakes tasting fresh.
Reheating
Since these are cold treats, reheating doesn’t really come into play. However, if your leftover shake thickens too much in the fridge, just stir in a splash of milk and whisk gently until you get that perfect sipping softness back.
FAQs
-
Can I make the ghost faces without melting chocolate?
While melted semisweet chocolate works best for neat, stable ghost faces, you can also use black decorating gel or edible markers if you want to skip melting. Just be sure whatever you use will set firmly and not smear when the milkshake is added.
-
How can I make the milkshake thicker or thinner?
To make the milkshake thicker, simply add more vanilla ice cream a scoop at a time before blending. For a thinner consistency, add milk gradually, blending as you go until you hit your ideal texture.
-
Can I prepare the glasses with ghost faces ahead of time?
Absolutely! You can decorate the glasses and chill them in the fridge the day before your party. Just keep them covered to prevent any fridge odors from affecting the chocolate designs and bring them out when you’re ready to serve.
-
Is there a way to make this dairy-free?
Yes! Use your favorite dairy-free vanilla ice cream and substitute milk with almond, coconut, cashew, or oat milk. Make sure your whipped cream is also plant-based or use coconut cream whipped at home for a creamy topping.
Final Thoughts
This Halloween Ghost Milkshakes Recipe has quickly become a festive favorite in my house. It’s perfectly playful, deliciously creamy, and a fun way to get everyone involved in making something special. I hope you’ll try it out, especially if you’re looking for an easy but unforgettable Halloween treat that’s bound to make your spooky celebrations a little more magical. Plus, who can resist sipping a ghost while getting all those sweet chocolate smiles? Happy Halloween and happy blending!
Print
Halloween Ghost Milkshakes Recipe
- Prep Time: 30 minutes
- Cook Time: 0 minutes
- Total Time: 1 hour
- Yield: 4 servings
- Category: Beverage
- Method: Blending
- Cuisine: American
- Diet: Vegetarian
Description
A fun and festive Halloween Ghost Milkshake recipe featuring creamy vanilla ice cream, milk, and whimsical ghost faces made from melted chocolate chips, topped with whipped cream for a spooky treat.
Ingredients
Milkshake
- 3 cups vanilla ice cream
- 1 ¾ cups milk
Ghost Faces
- ¼ cup semisweet chocolate chips
Topping
- Whipped cream (we use Reddi Whip)
Instructions
- Melt Chocolate: Place the semisweet chocolate chips in a microwave-safe dish and heat on high for 30 seconds. Stir well, then continue heating in 15-second increments, stirring after each, until the chocolate is smooth and creamy.
- Decorate Glasses: Using the end of a spoon handle, dip into the melted chocolate and carefully draw ghost faces on the inside of each glass. Use just a small amount of chocolate for the eyes, nose, and mouth. Place the decorated glasses in the refrigerator to set for about 30 minutes.
- Blend Milkshake: In a blender, combine the vanilla ice cream and milk. Blend until smooth and fully mixed.
- Pour Milkshake: Remove the glasses from the refrigerator and pour the milkshake mixture into each, leaving about one inch of space at the top.
- Add Whipped Cream: Top each milkshake with a generous amount of whipped cream.
- Serve: Serve immediately and enjoy your spooky Halloween ghost milkshake.
Notes
- For a thinner milkshake, gradually add more milk until desired consistency is reached.
- For a thicker milkshake, add extra ice cream as needed.
- This recipe yields about 4 ½ cups of milkshake; the number of servings depends on the glass size.
- Use only a small amount of melted chocolate for the ghost faces to avoid clumping or smudging.
- Nutrition info is approximate and should be used as a guide only.
Nutrition
- Serving Size: 1 cup
- Calories: 350 kcal
- Sugar: 30 g
- Sodium: 120 mg
- Fat: 15 g
- Saturated Fat: 9 g
- Unsaturated Fat: 5 g
- Trans Fat: 0 g
- Carbohydrates: 45 g
- Fiber: 1 g
- Protein: 6 g
- Cholesterol: 45 mg
