
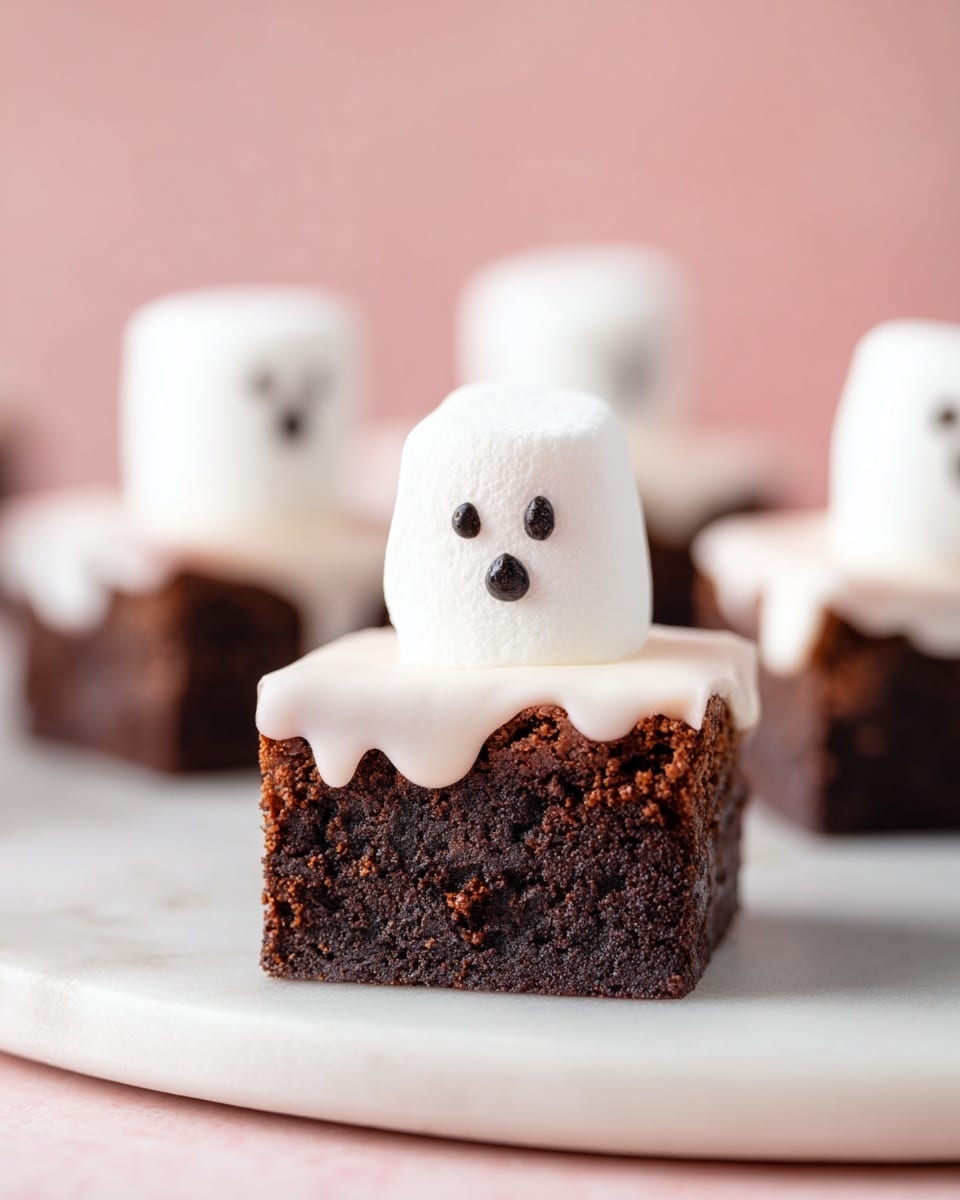
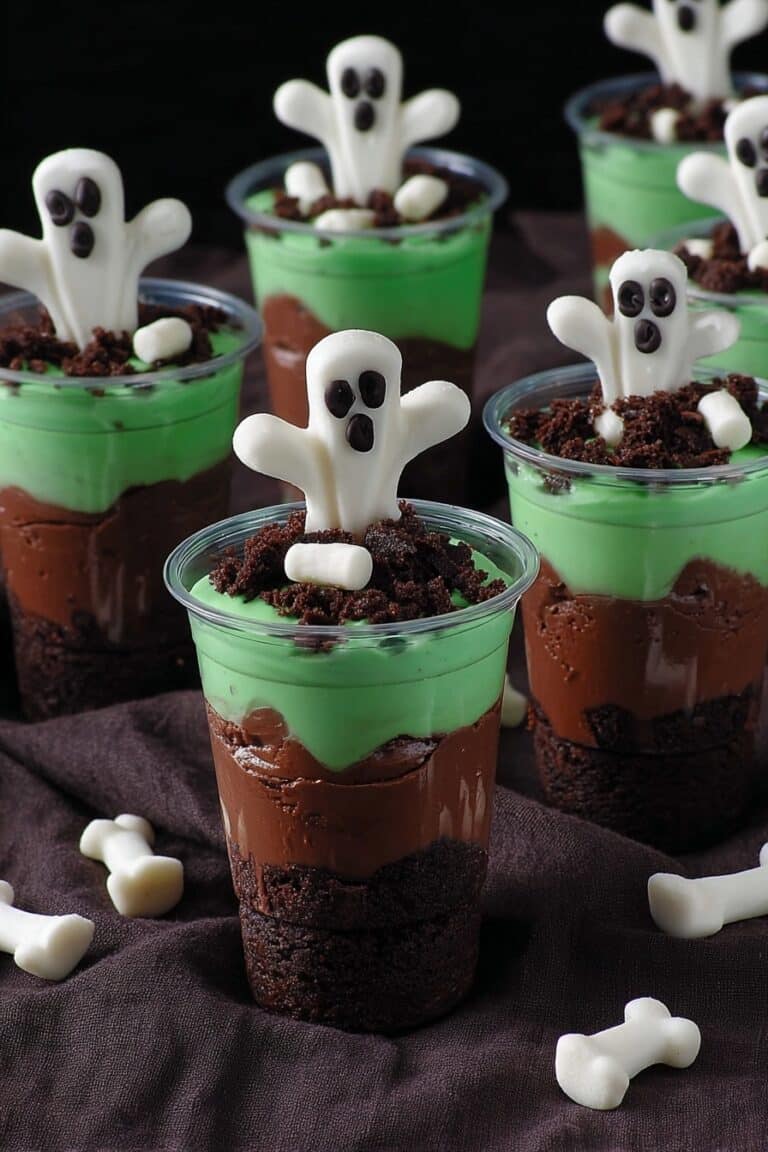
Halloween Ghost Brownies Recipe
If you’re looking for a fun and spooky treat that’s as easy as it is delicious, you’ve got to try this Halloween Ghost Brownies Recipe. I promise it’s perfect for impressing guests (or sneaking bites yourself) without the fuss of complicated baking. These brownies come together quickly, then turn into adorable little ghostly delights that kids and adults alike will rave about. Stick with me — I’ll share my best tips so your Halloween brownies come out perfect every time.
Why This Recipe Works
- Simplicity meets creativity: Using a boxed brownie mix lets you get great flavor and texture without the guesswork.
- Fun decorating approach: Topping with marshmallows and white chocolate gives a ghost shape that’s easy but impresses everyone.
- Flexible and forgiving: You can swap ingredients to suit your tastes or dietary needs without losing the magic.
- Perfect for all ages: Sweet, festive, and not too spooky — these brownies are kid-friendly and a crowd-pleaser.

Ingredients & Why They Work
Each ingredient in this Halloween Ghost Brownies Recipe plays its part, from the rich base to the sweet spooky details. Shopping smart can make your baking smoother and tastier — I always snag the best-quality marshmallows and chocolate I can find because it really makes the difference in flavor and texture.
- Brownie mix: The base of your brownies, these mixes are reliable and yield a fudgy, rich texture every time.
- Eggs: Room temperature eggs mix in better and keep the brownies soft and moist.
- Avocado oil: A neutral oil that keeps brownies tender without overpowering flavor, plus it’s a healthier fat choice.
- Water: Helps create the right batter consistency for that perfect bake.
- Large marshmallows: These create the ghost bodies—avoid minis because they just don’t have the same impact.
- White chocolate chips or candy melts: Melting these into smooth white icing coats the marshmallows, turning them into ghost shapes.
- Black candy melts, candy eyes, or mini chocolate chips: The spooky eyes and mouths that bring your ghost brownies to life.
Tweak to Your Taste
This Halloween Ghost Brownies Recipe is a fantastic canvas for your creativity. I’ve played around with adding different flavors and decorating styles, and it’s so fun to make it your own. Whether you love it extra fudgy or want to swap in allergy-friendly alternatives, there’s room to personalize.
- Variation: I once tried adding a hint of espresso powder to the brownie mix to amplify the chocolate — it was a game changer. You should definitely give that a try if you want a richer flavor.
- Diet-friendly swaps: For a gluten-free option, grab a GF brownie mix. Vegan versions work if you replace eggs with flax eggs and use dairy-free candy melts.
- Spooky upgrades: Swap out the standard marshmallows for flavored ones like pumpkin spice to add a subtle twist.
Step-by-Step: How I Make Halloween Ghost Brownies Recipe
Step 1: Bake the Perfect Brownie Base
Start by following the package directions for the brownie mix, but I love adding room temperature eggs and avocado oil instead of butter. Pour the batter into a greased 9×9-inch pan and bake until a toothpick comes out mostly clean. Pro tip: don’t overbake — you want fudgy brownies that are dense yet moist. Let them cool completely before moving to the next step; this is crucial or your marshmallows will slide off later!
Step 2: Add the Marshmallow Ghosts
Once brownies have cooled, cut them into neat squares. I like to use a sharp knife dipped in warm water for clean edges. Place one large marshmallow smack dab in the center of each brownie square. This is the ghost’s body, so avoid mini marshmallows here — they just don’t give you that spooky shape we want.
Step 3: Coat with White Chocolate for Ghostly Glow
In a microwave-safe bowl, melt your white chocolate chips or candy melts in 30-second bursts, stirring in between to get a perfectly smooth texture. Spoon the melted white chocolate generously over each marshmallow, allowing it to drip down the sides naturally. This creates that eerie ghost shape that’s super fun! If your chocolate feels too thick, just add a teaspoon of coconut oil or vegetable shortening to thin it out.
Step 4: Give Your Ghosts Faces!
While the white chocolate is still warm, melt your black candy melts in a microwave-safe bowl. Using a toothpick, carefully dot eyes and a little mouth onto each ghost for the perfect spooky expression. If you have candy eyes on hand, press those on while the chocolate is soft — it’s easier and just as cute! Mini chocolate chips also work as a fantastic alternative.
Step 5: Let Them Set and Serve
Let the chocolate set at room temperature for about 20–30 minutes, or pop the tray in the fridge for 10–15 minutes to speed things up. Once the chocolate is firm, your Halloween Ghost Brownies are ready to delight your friends and family!
Pro Tips for Making Halloween Ghost Brownies Recipe
- Cool Completely Before Decorating: I can’t emphasize this enough — if your brownies aren’t fully cool, marshmallows will slide off and your ghosts won’t hold their shape.
- Use a Damp Knife for Cutting: Dipping your knife in warm water between cuts gives you clean brownie edges every time, keeping your ghosts neat and tidy.
- Thin Your Chocolate if Needed: If your white chocolate is thick, stirring in a little coconut oil makes it pour smoothly and look more ghostly.
- Chill to Speed Set Time: Pop your brownies in the fridge to help the chocolate firm up faster without messing with texture.
How to Serve Halloween Ghost Brownies Recipe
Garnishes
I usually keep garnishes simple because the ghost shapes are the star. But some powdered sugar sprinkled lightly around the plate or a few edible glitter stars add a magical touch. If you’re feeling extra festive, a little orange zest or crushed candy corn around the edges works great too!
Side Dishes
These brownies are rich, so I like pairing them with something light and refreshing. Fresh fruit skewers or even a tangy pumpkin spice yogurt dip complement the sweetness beautifully. If you want a cozy vibe, serve with a warm cup of cinnamon-spiced hot chocolate or a peppermint mocha latte!
Creative Ways to Present
One Halloween, I arranged my ghost brownies on a tray lined with crinkled black tissue paper, adding some plastic spider rings for spooky ambiance. Another idea: place each ghost brownie in a small cupcake liner decorated with cobweb designs for easy, festive individual servings. Kids absolutely loved that!
Make Ahead and Storage
Storing Leftovers
Once decorated, I store my Halloween Ghost Brownies in an airtight container at room temperature — they keep well for up to three days like this. If your kitchen is warm, I suggest moving them to the fridge to avoid melting, which can last about five days. Just let them come to room temp before serving so the marshmallows stay soft and the chocolate isn’t too hard.
Freezing
I’ve frozen undecorated brownies before and wrapped them tightly in plastic wrap plus foil. When ready to use, thaw completely and add the marshmallow and chocolate decorations fresh — that way your ghosts look their best and don’t get soggy from thawing.
Reheating
If you want your brownies a bit warm, gently microwave a single square for 10-15 seconds — just enough to soften but not melt the chocolate. I avoid reheating the entire pan to keep that perfect glossy look and ghost shape intact.
FAQs
-
Can I make Halloween Ghost Brownies Recipe from scratch instead of using a box mix?
Absolutely! While I love the convenience of a box mix, a homemade brownie recipe works great too. Just make sure your brownies are fudgy and fully cooled before decorating.
-
What if I don’t have black candy melts or candy eyes for decorating?
No worries! You can use mini chocolate chips or melt darker chocolate to pipe on eyes and mouths with a toothpick. Even black icing or food coloring works in a pinch.
-
Can I prepare these brownies a day ahead of the party?
Yes! Bake and cool the brownies the day before, then add marshmallows and chocolate decorations closer to the event for the freshest look and taste.
-
How do I avoid marshmallows melting when topping brownies?
Make sure your brownies are completely cooled before adding marshmallows. If they’re warm, the marshmallows will soften and slide off, which isn’t ideal for the ghost shape.
-
Can I use mini marshmallows instead of large ones for this recipe?
Large marshmallows work best to create that ghostly figure — mini marshmallows don’t cover enough surface and won’t melt into the right shape.
Final Thoughts
This Halloween Ghost Brownies Recipe has become one of my all-time favorite festive treats because it’s simple, visually fun, and a delicious chocolatey hit. I love how it brings smiles every time I serve it, and I think you will too. So next time you want to impress your Halloween crowd without stress, this recipe’s your go-to. Trust me, you’ll end up making this one every October!
Print
Halloween Ghost Brownies Recipe
- Prep Time: 20 minutes
- Cook Time: 35 minutes
- Total Time: 1 hour 30 minutes
- Yield: 16 servings
- Category: Dessert
- Method: Baking
- Cuisine: American
- Diet: Vegetarian
Description
Halloween Brownies are a fun and spooky twist on classic brownies, featuring a moist brownie base topped with ghostly marshmallows coated in white chocolate and decorated with black candy eyes or mini chocolate chips. Perfect for festive parties and easy to make using a brownie mix.
Ingredients
Brownie Base
- 1 box brownie mix
- 2 eggs at room temperature
- ½ cup avocado oil
- 3 tablespoon water
Toppings
- 16 large marshmallows
- 1 cup white chocolate chips or white candy melts
- 1 tablespoon black candy melts or candy eyes or mini chocolate chips
Instructions
- Prepare Brownies: Preheat oven and grease a 9×9-inch pan as directed on the brownie mix package. In a bowl, combine the brownie mix, 2 eggs, ½ cup avocado oil, and 3 tablespoons water. Mix until smooth. Pour batter into the pan and bake according to package directions for about 35 minutes. Let the brownies cool completely before proceeding.
- Cut and Add Marshmallows: Once cool, cut the brownies into squares. Place one large marshmallow in the center of each square.
- Melt White Chocolate: In a microwave-safe bowl, melt 1 cup white chocolate chips or candy melts in 30-second intervals, stirring until smooth and fully melted.
- Coat Marshmallows: Spoon the melted white chocolate over each marshmallow, allowing it to drip down the sides to create a ghostly shape.
- Create Ghost Faces: While the coating is still warm, melt the black candy melts in a microwave-safe bowl. Use a toothpick or small tool to dot eyes and mouths onto each ghost. Alternatively, press candy eyes or mini chocolate chips into the white chocolate to form ghost faces.
- Set the Chocolate: Allow the chocolate to set for 20 to 30 minutes at room temperature or refrigerate for 10 to 15 minutes to harden faster before serving.
Notes
- A box mix makes this recipe quick and reliable, but you can use your favorite homemade brownie recipe as a base.
- Ensure brownies are completely cooled before adding marshmallows and chocolate to prevent toppings sliding.
- Use standard large marshmallows for best results; mini marshmallows are not recommended.
- If white chocolate is too thick, add 1 teaspoon of coconut oil or vegetable shortening to thin it.
- For ghost face eyes, mini chocolate chips, black icing, or dots of melted chocolate can substitute candy eyes.
- Use a sharp knife dipped in warm water and dried between cuts to get neat brownie squares.
- Placing the brownies in the fridge for 10–15 minutes helps chocolate set faster.
- Store decorated brownies in an airtight container at room temperature for up to 3 days or in the fridge for up to 5 days.
Nutrition
- Serving Size: 1 serving
- Calories: 250 kcal
- Sugar: 20 g
- Sodium: 150 mg
- Fat: 12 g
- Saturated Fat: 4 g
- Unsaturated Fat: 7 g
- Trans Fat: 0 g
- Carbohydrates: 33 g
- Fiber: 2 g
- Protein: 3 g
- Cholesterol: 25 mg
