
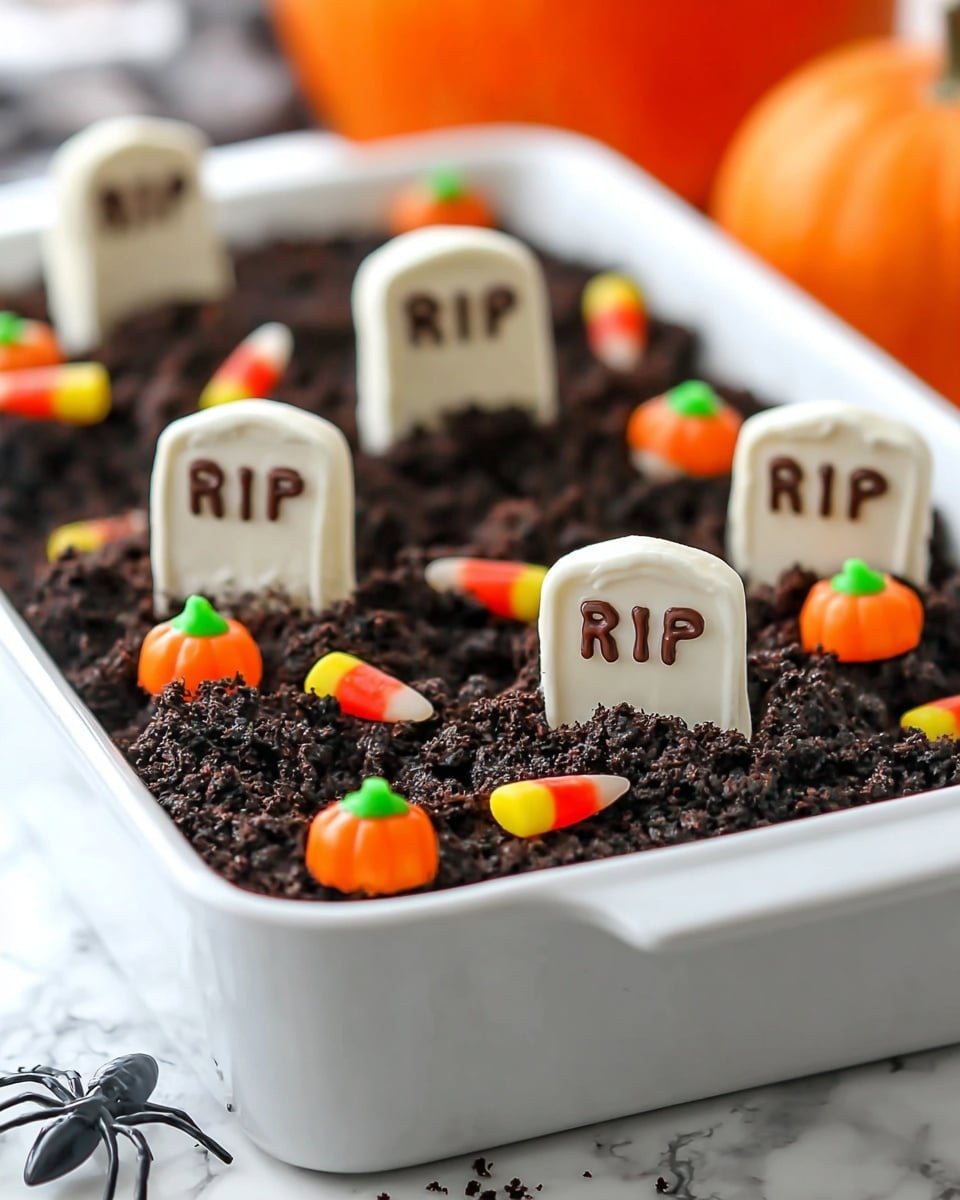
Halloween Dirt Cake Recipe
If you’re on the hunt for a spooky and irresistible dessert to wow your guests this season, then you’re in the right place! This Halloween Dirt Cake Recipe is the kind of treat that throws a little Halloween magic and a whole lot of creamy, chocolatey goodness into one dish. Trust me, this fan-freaking-tastic dessert is super easy to make, and it’s always a hit at parties – especially with kids and anyone who loves a fun twist on classic flavors. Stick around, and I’ll show you how to nail it from start to finish with my favorite tips!
Why This Recipe Works
- Creamy & Rich Layers: The combo of cream cheese, whipped topping, and chocolate pudding creates an irresistibly smooth texture.
- Crunchy Oreo “Dirt”: Crushed Oreos perfectly mimic dirt while adding chocolatey crunch that balances the creaminess.
- Fun Halloween Presentation: Using Nutter Butter cookies for tombstones and gummy worms turns a simple dessert into a spooky centerpiece.
- No-Bake Simplicity: This no-bake recipe is fast, minimal fuss, and great for beginner bakers or last-minute party plans.

Ingredients & Why They Work
The beauty of this Halloween Dirt Cake Recipe is in how well these simple ingredients come together to create something that looks impressive but is super easy to pull off. Each element adds a texture or flavor that makes the whole dish come alive — from creamy layers to crunchy “dirt,” and even the adorable edible decorations!
- Cream Cheese: Softened for smooth creaminess and a slight tang that balances the sweetness.
- Butter: Adds richness and helps create a velvety texture when mixed with cream cheese.
- Powdered Sugar: Dissolves easily for smooth sweetness without graininess.
- Frozen Whipped Topping: Adds lightness and fluffiness to the creamy layer. Make sure it’s thawed and soft.
- Instant Chocolate Pudding Mix: For that deep chocolate flavor; easy and quick since it’s no-bake.
- Milk: Needed to make the pudding. Whole milk enriches the flavor.
- Oreo Cookies: The star “dirt” ingredient – crushing them creates that authentic crumbly dirt effect.
- Nutter Butter Cookies: Perfect for crafting spooky tombstones that hold up well and taste great.
- White Candy Melts: Easy to coat the tombstones for a ghostly appearance.
- Chocolate Chips: Melted to write “RIP” on the tombstones for that fun Halloween touch.
- Gummy Worms: Adds playful creepy-crawly decor that everyone loves.
Tweak to Your Taste
This Halloween Dirt Cake Recipe is like a blank canvas for your spooky creativity! I’ve played around with mix-ins and toppings, and it’s always fun to customize. Whether you want to dial up the sweetness or add a little extra crunch, here’s how you can make it your own.
- Add Peanut Butter: I once folded in some creamy peanut butter to the cream cheese layer for a rich, nutty twist that my family loved.
- Switch Up the Top Layer: Try adding crushed Halloween-themed candy instead of Oreo crumbs or mix some chopped nuts to elevate the texture.
- Make it Vegan: Use dairy-free cream cheese, plant-based whipped topping, and a vegan chocolate pudding mix for a cruelty-free version.
- Extra Spooky: Add edible eyes or Halloween sprinkles on top for an instant Halloween party hit.
Step-by-Step: How I Make Halloween Dirt Cake Recipe
Step 1: Whip Up the Cream Cheese Mixture
Start by beating the cream cheese until super smooth — I like using a stand mixer for ease, but a hand mixer works great, too. Softened cream cheese is key here; if it’s too cold, you’ll end up with lumps. Once smooth, add softened butter, and mix until fully combined. Then, slowly add powdered sugar and your thawed whipped topping while mixing on a low speed so everything blends perfectly without making a mess. This creamy base is what makes the dessert so luscious!
Step 2: Prepare the Chocolate Pudding
Next, get your pudding going by whisking the instant chocolate pudding mix with milk according to package instructions — it sets pretty quickly, so don’t wait too long before moving on. Once your pudding is firm but still soft, gently fold in the cream cheese mixture with a spatula. This folding ensures you keep that airy texture without deflating it.
Step 3: Crush Your Oreos Into “Dirt”
Crush those Oreos to achieve that authentic dirt look! I use a food processor to pulse the cookies until fine crumbs form. If you don’t have one, just toss the cookies into a large zip-top bag and bash them with a rolling pin or mallet — easy, right? Just make sure you get a mix of tiny crumbs and some slightly bigger pieces for texture.
Step 4: Build Your Dirt Cake Layers
Press about half of your Oreo crumbs into the bottom of a 9×13-inch pan to create a firm crust layer. I like to use the bottom of a measuring cup to press it down evenly. Spread the pudding mixture evenly over that crust, then sprinkle the remaining Oreo crumbs on top – this top layer gives it that signature “dirt” look that everyone loves. Pop it in the refrigerator for at least 2 hours or overnight to let everything set and flavors meld.
Step 5: Craft Your Spooky Tombstones & Decorations
While your cake chills, melt the white candy melts in short bursts in the microwave until smooth. Dip each Nutter Butter cookie completely and place them on parchment paper to dry — this coating gives them a ghostly touch that’s perfect for Halloween. Once set, melt chocolate chips and use a small piping bag or a plastic sandwich bag with the corner snipped off to write “RIP” on each cookie. After the chocolate sets, press the tombstones into the cake’s top. Scatter gummy worms and any other fun Halloween candies to finish it off.
Pro Tips for Making Halloween Dirt Cake Recipe
- Softening Matters: Leaving cream cheese and whipped topping out for about 30 minutes before mixing saves you from a lumpy mixture — I learned this the hard way!
- Crush Oreos Carefully: Don’t over-process the Oreos; a mix of crumb sizes gives the best dirt-like texture.
- Use a Spatula for Folding: Folding gently keeps the pudding mixture light and airy instead of dense.
- Make Ahead is Easy: This cake only gets better after sitting in the fridge overnight, so prep a day ahead if you can!
How to Serve Halloween Dirt Cake Recipe
Garnishes
I personally love topping the dirt cake with Nutter Butter tombstones and gummy worms — it’s just the right amount of creepy and cute. If I’m feeling extra festive, I add some edible candy eyeballs or orange and black sprinkles. These details are what really bring the Halloween vibe home and get everyone smiling at the table.
Side Dishes
Because this is a rich and sweet treat, I like pairing it with lighter Halloween-themed snacks like caramel apples, spiced pumpkin seeds, or a simple fruit platter with seasonal fruits like apples and pears. It balances the indulgence perfectly!
Creative Ways to Present
I’ve served this Halloween Dirt Cake Recipe in everything from a classic glass dish to individual clear cups layered like mini dirt parfaits – both are adorable and practical for parties. Another fun idea is to put little plastic toy skeletons on top as a quirky garnish (just remind guests they’re not edible!). Using a themed serving tray or adding dry ice smoke for a spooky effect can really wow your crowd.
Make Ahead and Storage
Storing Leftovers
Once you’ve enjoyed your Halloween Dirt Cake, any leftovers should be tightly covered with plastic wrap or stored in an airtight container in the fridge. From experience, it stays fresh and delicious for up to 5 days — which is perfect because, honestly, it usually doesn’t last that long in my house!
Freezing
I’ve tried freezing this cake before, but I found the texture changes a bit once thawed — the crushed Oreos lose some crunch, and the cream cheese layer can get a little watery. If you want to freeze it, wrap it super well and thaw in the fridge overnight. I’d recommend enjoying it fresh whenever possible.
Reheating
No reheating needed here since this is a chilled dessert! Just take it out of the fridge about 10–15 minutes before serving to take the chill off slightly — that way, every bite is soft, creamy, and melts in your mouth.
FAQs
-
Can I make Halloween Dirt Cake Recipe dairy-free?
Absolutely! Swap regular cream cheese for a dairy-free version, use vegan whipped topping, and choose a dairy-free instant pudding mix. Ensure the Oreos and candy melts you use are also vegan-friendly, and you’ve got a dairy-free spooky treat.
-
What’s the best way to crush Oreos without a food processor?
If you don’t have a food processor, place the Oreos in a large zip-top bag and crush them using a rolling pin or kitchen mallet. Try to get mostly fine crumbs with some slightly larger pieces to maintain great texture.
-
How long should I refrigerate this dessert before serving?
Chill the cake for at least 2 hours to help it set properly, but overnight is even better if you have the time. This allows the flavors to meld and the layers to firm up beautifully.
-
Can I prep the tombstone decorations ahead of time?
Definitely! You can prepare and decorate the Nutter Butter tombstones a day or two in advance. Store them in an airtight container at room temperature until you’re ready to place them on the cake.
-
Is this recipe suitable for kids to help make?
Yes! Kids will love getting involved — especially with crushing Oreos, mixing ingredients, and decorating the tombstones and gummy worms. Just supervise the melting of candy and chocolate for safety.
Final Thoughts
This Halloween Dirt Cake Recipe is one of those “easy but wow” desserts that never fails to put a smile on faces at my gatherings. It brings together creamy, crunchy, and downright fun elements in a way that feels special without being complicated. I’m so excited for you to give it a try — I promise it’s just as delightful to eat as it is to look at. So, grab those Oreos and start mixing; your next memorable Halloween party dessert awaits!
Print
Halloween Dirt Cake Recipe
- Prep Time: 20 minutes
- Cook Time: 0 minutes
- Total Time: 2 hours 20 minutes
- Yield: 20 servings
- Category: Dessert
- Method: No-Cook
- Cuisine: American
- Diet: Vegetarian
Description
A fun and festive no-bake Halloween Dirt Cake featuring layers of crushed Oreo cookies, creamy pudding mixed with cream cheese and whipped topping, and decorated with spooky Nutter Butter cookie tombstones and gummy worms. Perfect for a Halloween party dessert that’s both easy to prepare and delightfully festive.
Ingredients
Dirt Cake Base
- 8 ounces cream cheese (1 package room temperature)
- ½ cup butter (softened)
- 1 cup powdered sugar
- 8 ounces frozen whipped topping (thawed)
- 2 boxes (3.4 ounces each) instant chocolate pudding mix
- 3 cups milk
- 1 package (15.5 ounces) Oreo cookies (regular size)
Tombstone Graveyard Decoration
- 8-10 Nutter Butter cookies
- 6 ounces white candy melts
- ¼ cup chocolate chips (melted for writing RIP)
- 8-9 gummy worms (or other Halloween candy)
Instructions
- Prepare Cream Cheese Mixture: Using a stand or hand mixer, blend the softened cream cheese until smooth. Add softened butter and continue mixing until combined. Gradually add powdered sugar and thawed whipped topping, mixing slowly until fully incorporated. Set the mixture aside.
- Make the Pudding: In a large bowl, prepare the instant chocolate pudding with 3 cups of milk according to package instructions. Fold the cream cheese mixture into the pudding gently using a spatula until well combined. Set aside.
- Crush Oreo Cookies: Add Oreo cookies (including filling) to a food processor and pulse until finely crushed. If a food processor is unavailable, place cookies in a sealed plastic bag and crush with a rolling pin until crumbs are uniform.
- Form the Crust: Press about half of the crushed Oreo crumbs firmly into the bottom of a 9 x 13 inch pan to form a crust. Use your hands or the bottom of a measuring cup for even pressing.
- Build the Layers: Pour an even layer of the pudding and cream cheese mixture over the Oreo crust. Then sprinkle and gently cover this layer with the remaining crushed Oreo crumbs.
- Chill the Cake: Refrigerate the layered cake for at least 2 hours or up to overnight to allow it to set firmly.
- Create Tombstones: While the cake chills, melt white candy melts in the microwave. Coat each Nutter Butter cookie with the melted candy and place on parchment paper to dry. Melt chocolate chips, place melted chocolate into a small plastic bag with a corner cut off, and pipe ‘RIP’ onto each coated cookie. Allow to dry completely.
- Decorate and Serve: Once the cake is fully set, press the decorated Nutter Butter tombstone cookies into the top of the cake. Arrange gummy worms and additional Halloween candy decorations as desired. Serve immediately or keep refrigerated until ready to serve.
Notes
- Use instant pudding mix, NOT cook-and-serve, to keep this dessert no-bake and simple.
- Soften cream cheese and whipped topping by leaving them at room temperature for about 30 minutes before mixing for easier blending.
- If you don’t have a food processor for Oreo crushing, use a plastic ziplock bag and a rolling pin or kitchen mallet to crush the cookies uniformly.
- Store leftover Halloween Dirt Cake tightly covered with plastic wrap in the refrigerator for up to 5 days.
- Nutritional values are approximate and vary based on specific ingredient brands and methods used.
Nutrition
- Serving Size: 1 slice
- Calories: 310 kcal
- Sugar: 28 g
- Sodium: 210 mg
- Fat: 18 g
- Saturated Fat: 10 g
- Unsaturated Fat: 6 g
- Trans Fat: 0.5 g
- Carbohydrates: 34 g
- Fiber: 1.5 g
- Protein: 4 g
- Cholesterol: 45 mg


