
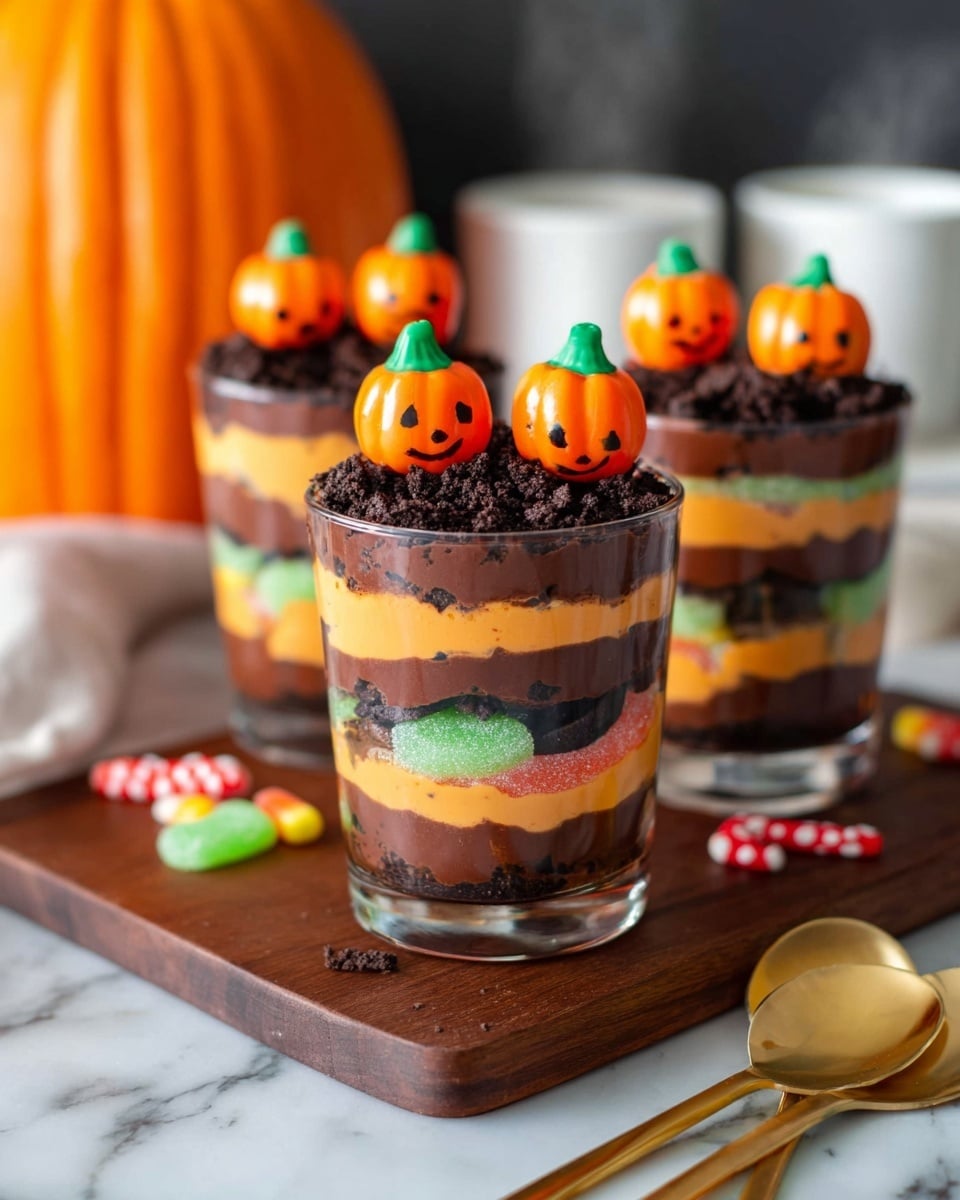
Halloween Dirt Cake Cups Recipe
If you’re searching for a festive dessert that’s as fun to make as it is to eat, you’ve got to try this Halloween Dirt Cake Cups Recipe. It’s the perfect mix of spooky, sweet, and downright delicious—imagine layers of chocolate and orange pudding, crushed Oreos, gummy worms wriggling through, and pumpkin candies perched on top. I promise this treat is fan-freaking-tastic and will have your friends and family coming back for extra bites all night long!
Why This Recipe Works
- Layered Textures: Combining smooth pudding, crunchy Oreos, and chewy gummy worms creates a delightful contrast in every bite.
- Eye-Catching Colors: The bright orange vanilla pudding paired with dark chocolate and Oreo crumbs makes these cups pop visually for Halloween festivities.
- No-Bake and Quick: This recipe comes together in about 25 minutes with no baking, perfect for a last-minute spooky party treat.
- Kid-Friendly Fun: Kids love the gummy worms and pumpkins that make this dessert a playful “dirt cup” delight.

Ingredients & Why They Work
Each ingredient in this Halloween Dirt Cake Cups Recipe brings its own charm, working together to build layers of flavor and texture that are Halloween-ready yet totally delicious any time. Plus, it’s easy to find all these ingredients at your local grocery store — just be sure to get your favorite gummy worms to amp up the fun.
- Milk: Essential for preparing the instant puddings, and dividing it ensures perfect texture for each pudding flavor.
- Instant chocolate pudding mix: Gives you that rich, creamy base that feels indulgent but is super easy to whip up.
- Instant vanilla pudding mix: When tinted orange, it adds a fun Halloween color and lightens the dessert’s richness.
- Orange food coloring: Brightens the vanilla pudding to match the Halloween theme without altering the flavor.
- Gummy worms: The classic “dirt” accessory, adding chewy candy fun and a playful look.
- Oreo cookies: Crushed into crumbs, they bring the authentic “dirt” element with a crunchy texture.
- Pumpkin candies: Perfect festive toppers that make each cup look adorable and complete.
- Bone sprinkles (optional): Adds an extra spooky touch if you want to go all out on Halloween decor.
Tweak to Your Taste
One of the things I love about this Halloween Dirt Cake Cups Recipe is how easy it is to customize. Whether you want to dial up the chocolate or add a personal twist with your favorite candies, you can make it your own without losing that spooky vibe.
- Swap gummy worms for other Halloween candies: I’ve tried mini candy corn and gummy spiders when I wanted to mix things up — both added a cool twist and were a hit with guests.
- Make it gluten-free: Using gluten-free cookies instead of Oreos works great, and nobody notices a difference once it’s all layered up.
- Add a splash of coffee flavor: For a grown-up version, stirring a little espresso powder into the chocolate pudding mix gave it a delightful mocha note.
- Adjust the orange color: Sometimes I play with the food coloring intensity to make it brighter or more muted, depending on the crowd and the vibe I want.
Step-by-Step: How I Make Halloween Dirt Cake Cups Recipe
Step 1: Prep Your Puddings With Love
Start by mixing your milk with each pudding mix separately—chocolate in one bowl, vanilla in another. Make sure you whisk well to avoid lumps, then pop them into the fridge so they can set properly while you prepare everything else. One tip: divide your milk carefully as per the recipe to get that perfect pudding consistency. Trust me, impatient stirring doesn’t help here—you want silky smooth puddings!
Step 2: Bring on the Orange
Once your vanilla pudding has started to thicken, add a few drops of orange food coloring. Stir it in gradually and add more as needed until you reach that fun, vibrant Halloween-orange shade. This is my favorite part because the bright orange layer really makes each cup feel festive and inviting.
Step 3: Create Your Dirt Layers
Now, scoop half of your chocolate pudding into your serving glasses, gently spreading it to make a smooth base. Then sprinkle your gummy worms all over—don’t be shy here! After that, add a generous layer of crushed Oreos to build your dirt. You’re already halfway to Halloween magic!
Step 4: Layer in the Orange Pudding & More Crunch
Next up, spread half of your orange vanilla pudding on top of the gummy worms, smoothing it evenly. Top this with more crushed Oreos, about a third of the total amount. The color contrast here will make everyone’s eyes light up—it’s like dessert art!
Step 5: Finish With Chocolate & Fun Toppers
Complete your cups with the remaining chocolate pudding, smoothing it out, and sprinkle the last of your crushed Oreos as the top dirt layer. Then, place three adorable pumpkin candies on each cup and, if you’re feeling extra festive, add a few bone sprinkles. I love how these finishing touches turn a simple dessert into a Halloween centerpiece.
Pro Tips for Making Halloween Dirt Cake Cups Recipe
- Chill Puddings Properly: Let your puddings set fully in the fridge for at least 5 minutes before layering to avoid runny layers and to keep your cups looking clean and defined.
- Crush Oreos Finely but Not Too Fine: I learned the hard way—too powdery equals muddy texture; aim for small chunks for that perfect dirt and crunch combo.
- Add Candy Just Before Serving: Bottom-lining gummy worms early can make them get sticky or melt, so layer them in right before your guests arrive for the best look and texture.
- Use Clear Cups: Show off those beautiful layers by serving in clear glasses – it’s an eye catcher and gets people excited to dig in!
How to Serve Halloween Dirt Cake Cups Recipe
Garnishes
For garnishes, I love topping mine with candy pumpkins because they add color and festive charm immediately. Bone sprinkles are optional but make the cups extra spooky and fun if you’re hosting a Halloween party. If you want to get creative, a mini plastic spider or edible glitter dust also works wonders to elevate presentation.
Side Dishes
Since these cups pack plenty of sweetness and texture, I usually serve them alongside simple savory snacks like popcorn or light cheese platters. For parties, these cups make a sweet finale after finger foods like mini sliders or hot pretzels.
Creative Ways to Present
I once arranged a bunch of these Halloween Dirt Cake Cups on a tiered dessert stand surrounded by mini pumpkins and cobweb decorations — it looked amazing and saved space on the table. You can also use mason jars with lids if you want to prep and transport them easily for potlucks or school events.
Make Ahead and Storage
Storing Leftovers
I like to cover leftover Dirt Cake Cups with plastic wrap and keep them refrigerated. They hold up well for up to two days, but I recommend adding any gummy worms or candy toppings fresh before serving again to avoid sogginess.
Freezing
Freezing these cups isn’t my go-to since pudding texture changes when frozen and thawed, often becoming watery. If you want to experiment, I’d recommend freezing just the pudding layers separately before assembling the full dessert.
Reheating
This dessert is best served chilled, so no reheating needed! Just grab from the fridge when ready and refresh garnishes if necessary.
FAQs
-
Can I make Halloween Dirt Cake Cups Recipe dairy-free?
Absolutely! You can substitute the milk with almond, oat, or coconut milk, and look for dairy-free pudding mixes or prepare homemade dairy-free pudding. Just keep in mind that texture might vary slightly but the fun layers and flavors will still shine.
-
How far ahead can I prepare these cups?
You can prepare the puddings and even layer the cups a few hours in advance. However, for the freshest texture, add gummy worms and pumpkin candies right before serving.
-
What if I don’t have orange food coloring?
No worries—mix four drops of red and five drops of yellow food coloring to make orange. Start with less and add gradually until you get your favorite shade.
-
Can I use other cookies besides Oreos?
Definitely! Chocolate sandwich cookies work great, or even crushed chocolate graham crackers. Just make sure they’re sturdy enough to hold their texture when layered.
Final Thoughts
This Halloween Dirt Cake Cups Recipe has quickly become a favorite in my kitchen, especially when hosting October get-togethers. It’s simple, crowd-pleasing, and visually fun—everything I want in a festive dessert. I genuinely can’t recommend it enough if you want to bring some easy, playful Halloween spirit to your table. Give it a try and I bet you’ll find yourself making it every Halloween (or anytime you want a little dirt delight)!
Print
Halloween Dirt Cake Cups Recipe
- Prep Time: 25 minutes
- Cook Time: 0 minutes
- Total Time: 25 minutes
- Yield: 8 servings
- Category: Dessert
- Method: No-Cook
- Cuisine: American
Description
Halloween Dirt Cake Cups combine layers of creamy chocolate and orange-colored vanilla pudding with crushed Oreos, gummy worms, and festive pumpkin candies for a fun and spooky dessert perfect for Halloween celebrations.
Ingredients
Pudding
- 4 cups milk divided, for preparing puddings
- 1 box instant chocolate pudding mix 3.4 ounces
- 1 box instant vanilla pudding mix 3.4 ounces
- Orange food coloring as needed
Toppings
- 1 cup gummy worms
- 22 Oreo cookies crushed
- 24 pumpkin candies
- 2 tablespoons bone sprinkles optional
Instructions
- Prepare Puddings: Use milk to prepare and chill each box of pudding in a separate bowl according to package instructions, chilling until set.
- Color Vanilla Pudding: Add a few drops of orange food coloring to the vanilla pudding and stir well. Gradually add more drops until the desired orange color is achieved.
- Layer Chocolate Pudding: Divide half of the chocolate pudding into serving glasses and carefully spread it evenly over the bottom of each glass.
- Add Gummy Worms: Evenly distribute the gummy worms over the chocolate pudding layer in each glass.
- First Oreo Layer: Sprinkle one-third of the crushed Oreos over the gummy worms to create a dirt effect.
- Layer Orange Vanilla Pudding: Divide half of the orange-colored vanilla pudding over the Oreo layer and spread it evenly. Reserve the remaining half of the orange pudding for another use.
- Second Oreo Layer: Sprinkle another one-third of the crushed Oreos over the orange pudding layer.
- Top with Remaining Chocolate Pudding: Divide the remaining chocolate pudding over the crushed Oreos and spread evenly.
- Final Oreo Topping: Sprinkle the remaining crushed Oreos on top of the chocolate pudding layer.
- Decorate: Place three pumpkin candies on top of each glass and decorate with bone sprinkles if desired.
Notes
- If you don’t have orange food coloring, combine four drops of red food coloring with five drops of yellow food coloring to create orange, adjusting based on the concentration of your food coloring.
- Use gel food coloring sparingly as it is more concentrated; add a little at a time and stir thoroughly before adding more.
- Reserve leftover vanilla pudding for another dessert or snack.
- This dessert is best served chilled and within 1-2 days for freshness.
Nutrition
- Serving Size: 1 cup
- Calories: 250 kcal
- Sugar: 25 g
- Sodium: 120 mg
- Fat: 10 g
- Saturated Fat: 4 g
- Unsaturated Fat: 5 g
- Trans Fat: 0 g
- Carbohydrates: 36 g
- Fiber: 1 g
- Protein: 3 g
- Cholesterol: 10 mg


