
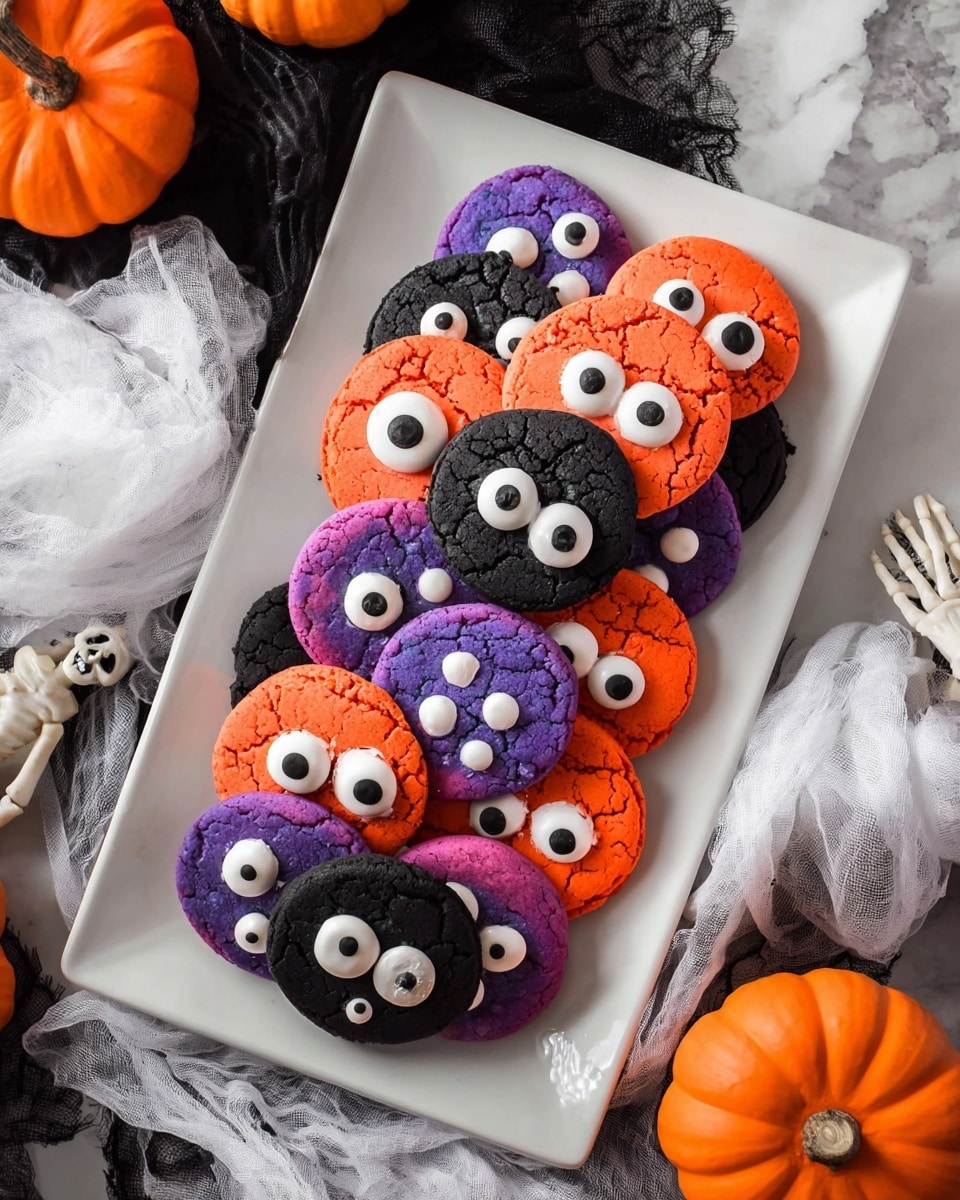
Halloween Crinkle Cookies Recipe
If you’re on the hunt for a fun, festive, and downright adorable cookie to spice up your spooky season, you’re going to love this Halloween Crinkle Cookies Recipe. These cookies come out soft, colorful, and perfectly crackled, making them just as eye-catching as they are delicious. Plus, I promise they’re easier to make than they look, so whether you’re baking solo or with the kids, these cookies will totally deliver that sweet Halloween magic.
Why This Recipe Works
- Quick and Simple: Using a boxed vanilla cake mix keeps things fast and fuss-free without sacrificing flavor.
- Twice-Chilled Dough: Chilling the dough twice gives you those perfect crackles and makes the cookies hold shape beautifully.
- Bright Colors with Gel Food Coloring: Gel coloring delivers vivid Halloween hues without messing up dough consistency.
- Fun Garnishes: The monster eye candies add a playful touch that kids (and adults) will adore.

Ingredients & Why They Work
This Halloween Crinkle Cookies Recipe is all about balancing flavor, color, and texture—without a lengthy ingredient list. I love how the cake mix already has much of the sweetness and vanilla flavor baked in, so you’re really just jazzing it up with colors and fun eyeball candies. Grab gel food colors for vibrant tones, and keep icing sugar handy—that dusting is what gives the cookies their iconic crinkle look.
- Vanilla cake mix: A convenient base that’s soft, sweet, and gives these cookies their tender crumb.
- Vegetable oil: Keeps the cookies moist and tender without overpowering flavors.
- Eggs: Helps bind the dough while adding richness.
- Icing sugar: Coats the dough balls so the cookies crack up beautifully during baking.
- Gel food coloring: For brilliant orange, black, and purple shades that scream Halloween.
- Monster eye candies: The cutest and spookiest topping that sticks right into the dough before baking.
Tweak to Your Taste
One of the things I love most about this Halloween Crinkle Cookies Recipe is how easy it is to personalize. You can have fun mixing up the colors, shapes, or even flavors. I sometimes throw in a teaspoon of pumpkin spice to amp up the fall vibes, or swap out the monster eyes for colorful sprinkles depending on my mood. Trust me, once you get the base right, the sky’s the limit!
- Spice it up: Adding pumpkin spice or cinnamon gives the cookies an extra cozy feel that’s perfect for the season.
- Different colors: Experiment with green or red gel colorings to create a wider Halloween palette or even Christmas versions!
- Alternative toppings: If you can’t find monster eyes, try mini chocolate chips, sprinkles, or edible glitter for fun textures.
- Dietary swaps: This recipe can be adapted with egg substitutes if you need to keep it vegan-friendly—just be sure to chill the dough well.
Step-by-Step: How I Make Halloween Crinkle Cookies Recipe
Step 1: Mix Up Your Colorful Dough
I start by preheating the oven to 350°F—this way, it’s ready to go once the cookies are shaped. In a mixing bowl, I combine the vanilla cake mix, the vegetable oil, eggs, and my chosen gel food colors. Since the dough is soft, I find it easiest to add the colors one at a time, mixing well to create those vibrant, even shades. Don’t worry if it seems a little sticky—that’s totally normal.
Step 2: Chill Twice for Perfect Crackles
Once you’ve got your dough mixed, pop it in the fridge for 15 minutes. This chilling step firms it up so it’s easier to handle and helps develop those signature cracks while baking. After rolling the dough into tablespoon-sized balls and giving them a generous roll in icing sugar, I’m a fan of freezing them for another 10-15 minutes. It’s like giving the cookies a double chill spa treatment that pays off when they bake.
Step 3: Add Monster Eyes and Chill Again
Place the sugared dough balls on a parchment-lined baking sheet—space them out nicely because they will spread a little. Then, gently press one monster eye candy in the center of each cookie. Before sliding the tray into the oven, I chill the cookies in the fridge for another 15 minutes. This helps the cookies keep their shape and the eyes “stick” without melting away.
Step 4: Bake and Let Cool
Bake the cookies for about 6 to 8 minutes until the surface cracks but the centers remain soft. Keep a close eye here because overbaking will dry them out. Once they’re baked, let them cool for a few minutes right on the pan before transferring to a wire rack to cool completely. Watching those little cracks appear as they bake is always my favorite moment!
Pro Tips for Making Halloween Crinkle Cookies Recipe
- Double Chilling Is Key: I’ve learned that chilling the dough twice is what really makes the cookies crack up nicely and prevents them from spreading too much.
- Use Gel Food Coloring: Unlike liquid coloring, gel keeps the dough’s moisture balanced and gives those rich, bold Halloween hues.
- Gentle Rolling in Sugar: Roll lightly so you don’t lose the sugar coating, which is crucial for that signature crackle look.
- Watch Your Oven Time: I once left mine in too long—the cookies turned hard instead of soft, so pull them out right as the cracks show.
How to Serve Halloween Crinkle Cookies Recipe
Garnishes
I love topping these cookies with monster eye candies because they’re such a fun surprise. But you can get creative! For a spooky spin, try edible glitter in purple or green, or even tiny candy spiders. These little details add that extra wow factor, especially if you’re serving at a Halloween party or school event.
Side Dishes
These cookies pair beautifully with a warm cup of spiced cider, hot cocoa, or even a creamy latte. If you’re creating a full Halloween spread, I like setting them alongside pumpkin muffins, caramel apples, or even salty popcorn for some balance. That sweet and salty combo always wins!
Creative Ways to Present
For Halloween gatherings, I’ve arranged these cookies in spider web patterns using black licorice or piped chocolate on a platter. Another favorite is stacking them in a glass jar with layers of candy corns and mini marshmallows—it makes a festive centerpiece and a tasty treat display!
Make Ahead and Storage
Storing Leftovers
I keep leftover Halloween Crinkle Cookies in an airtight container at room temperature. They usually stay soft and delicious for up to 4 days, but honestly, they rarely stick around that long around my house!
Freezing
If you want to prep early, you can freeze the dough balls (before rolling in sugar and baking). Just freeze them on a tray first, then transfer to an airtight bag. When you’re ready, roll them in icing sugar and bake as usual. The cookies themselves also freeze well—just make sure to wrap them tightly to avoid freezer burn.
Reheating
To bring a frozen or stored cookie back to life, I pop it in the microwave for about 10 seconds or in a warm oven for a few minutes. This refreshes the softness and brings back that just-baked feel—trust me, your family will thank you!
FAQs
-
Can I use regular food coloring instead of gel?
While you can use regular liquid food coloring, it tends to add extra moisture which can affect the cookie dough’s texture and prevent proper cracking. Gel food coloring is your best bet for vivid colors without compromising the dough’s consistency.
-
Why is chilling the dough important in this Halloween Crinkle Cookies Recipe?
Chilling the dough twice—before and after shaping—controls spreading and helps the cookies develop their trademark crackle pattern while keeping the center soft and tender.
-
Can I make these cookies gluten-free?
Absolutely! Use a gluten-free vanilla cake mix in place of the regular one. Make sure your other ingredients and decorations are gluten-free too for a safe and delicious treat.
-
How do I prevent the monster eye candies from melting?
Press the candy gently into the dough and then chill the shaped cookies before baking. This step helps the candy set without melting fully, so they keep their fun shape!
-
Are these cookies soft or crunchy?
They’re delightfully soft on the inside with a slightly crisp, crackled exterior—just what a perfect Halloween cookie should be.
Final Thoughts
This Halloween Crinkle Cookies Recipe has quickly become one of my go-to festive treats because it’s fun, forgiving, and absolutely charming. Whether you’re making them for a family party, school bake sale, or just to satisfy your sweet tooth, these cookies never fail to bring smiles and a bit of that Halloween spirit. Give them a try, and trust me—you’ll be hooked on the crackly magic that comes with every bite.
Print
Halloween Crinkle Cookies Recipe
- Prep Time: 10 minutes
- Cook Time: 8 minutes
- Total Time: 48 minutes
- Yield: 20 cookies
- Category: Dessert
- Method: Baking
- Cuisine: American
Description
These Halloween Crinkle Cookies are vibrant, soft, and festive treats perfect for the spooky season. Made with a simple vanilla cake mix and colored gel, these cookies have a delightful crackled top dusted with icing sugar and topped with fun monster eye candies. Their easy preparation and chilling steps ensure perfect texture and bright colors for a fun Halloween celebration.
Ingredients
Cookie Dough
- 1 box vanilla cake mix (Betty Crocker recommended)
- 1/3 cup vegetable oil
- 2 eggs
- food coloring gel in orange, black, and purple
Coating and Decorations
- 2 cups icing sugar (for rolling and dusting)
- monster eye candies
Instructions
- Preheat Oven: Preheat your oven to 350°F to prepare for baking the cookies.
- Mix Ingredients: In a mixer bowl, combine the vanilla cake mix, chosen food coloring gel, vegetable oil, and eggs. Mix until the dough is creamy and fully blended.
- Chill Dough: Place the dough in the refrigerator for 15 minutes to firm up, which helps the cookies hold their shape and crack nicely during baking.
- Form Cookie Balls: Roll a tablespoon of chilled dough into a ball, then gently roll it in icing sugar to coat evenly.
- Freeze Dough Balls: Put the sugar-coated dough balls into the freezer for 10 to 15 minutes to further chill and set the shape.
- Arrange Cookies: Place the dough balls on a parchment-lined baking sheet and gently press a monster eye candy into the center of each cookie.
- Chill Before Baking: Return the baking sheet with prepared cookies to the refrigerator for an additional 15 minutes to chill before baking.
- Bake Cookies: Bake the cookies in the preheated oven for 8 minutes, or until their surfaces just begin to crack.
- Cool Cookies: Let the cookies cool on the baking pan briefly, then transfer them to a wire rack to cool completely.
Notes
- Chill the dough twice to ensure the cookies hold their shape better and develop perfect cracks.
- Use gel food coloring to achieve vivid colors without adding extra moisture to the dough.
- Roll the dough balls gently in icing sugar to keep the coating intact and prevent it from falling off.
- Do not overbake; remove the cookies as soon as crackled surfaces appear to keep them soft and tender.
Nutrition
- Serving Size: 1 cookie
- Calories: 120 kcal
- Sugar: 15 g
- Sodium: 90 mg
- Fat: 4 g
- Saturated Fat: 0.5 g
- Unsaturated Fat: 3 g
- Trans Fat: 0 g
- Carbohydrates: 20 g
- Fiber: 0.5 g
- Protein: 1 g
- Cholesterol: 15 mg


