
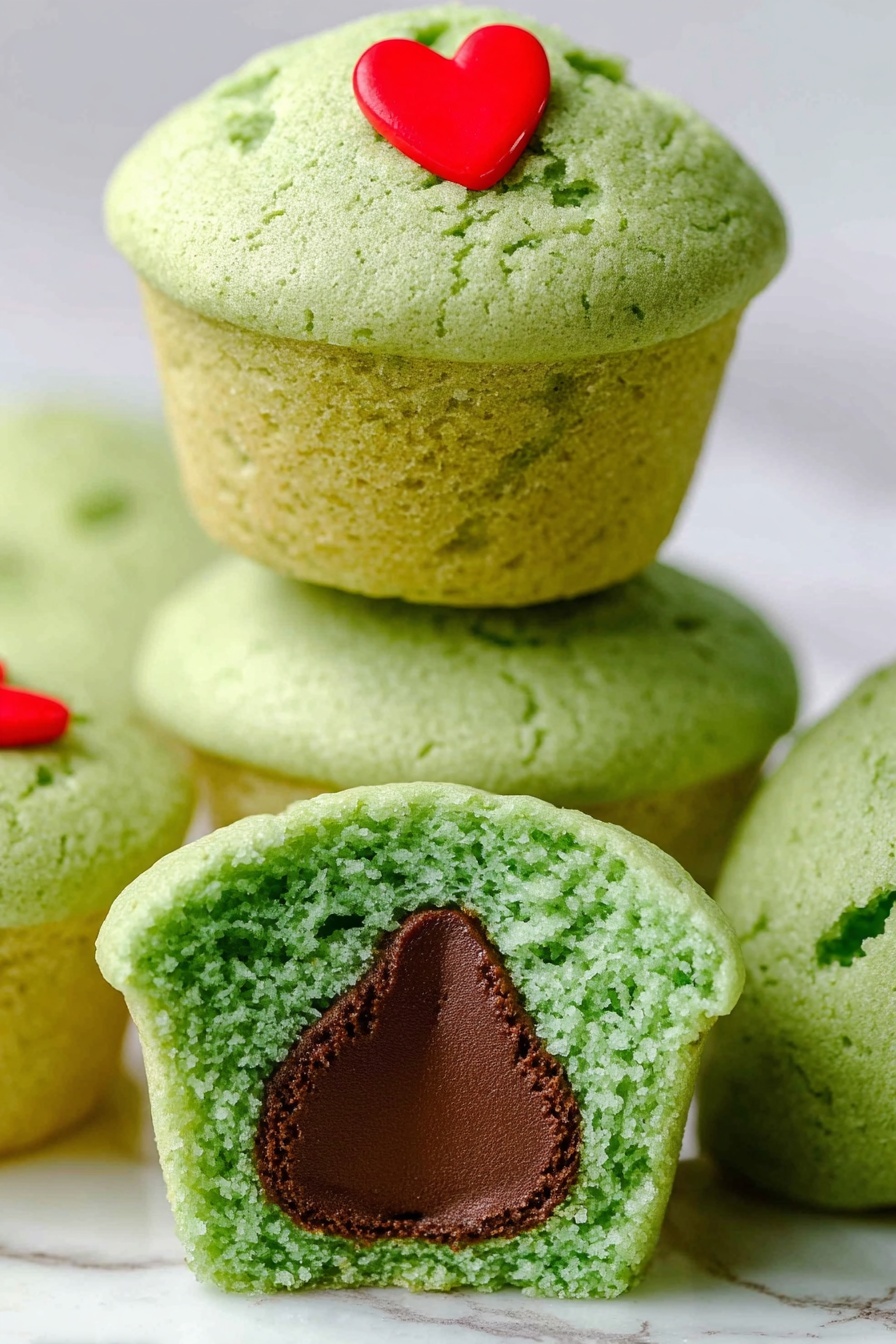
Green Hershey’s Kiss Cookie Cups Recipe
Let me share something I recently made that’s become an instant favorite in my kitchen — the Green Hershey’s Kiss Cookie Cups Recipe. These little gems are not just adorable but also wildly tasty, combining the festive green sugar cookie dough with that perfect melty chocolate kiss surprise inside. If you’ve ever wished for a cookie and candy combo that’s both fun and easy, this recipe is exactly what you need. Stick around — I promise this one is a fan-freaking-tastic treat you’ll keep coming back to!
Why This Recipe Works
- Perfect Texture: The sugar cookie dough stays soft yet holds shape around the Hershey’s Kiss, creating a delightful bite.
- Even Color Infusion: Mixing the green gel food coloring directly with the egg ensures a consistent, festive green tone throughout.
- Easy Assembly: Forming the dough around the candy is straightforward, making this recipe fun and approachable for all skill levels.
- Adorable Finish: The heart candy sprinkle on top adds a charming touch, making these cookie cups perfect for gifting or holiday parties.

Ingredients & Why They Work
Each ingredient in the Green Hershey’s Kiss Cookie Cups Recipe has a role in achieving the perfect balance of flavor, color, and texture. Knowing why they work together will help you appreciate this little baking adventure and maybe even customize it to your liking.
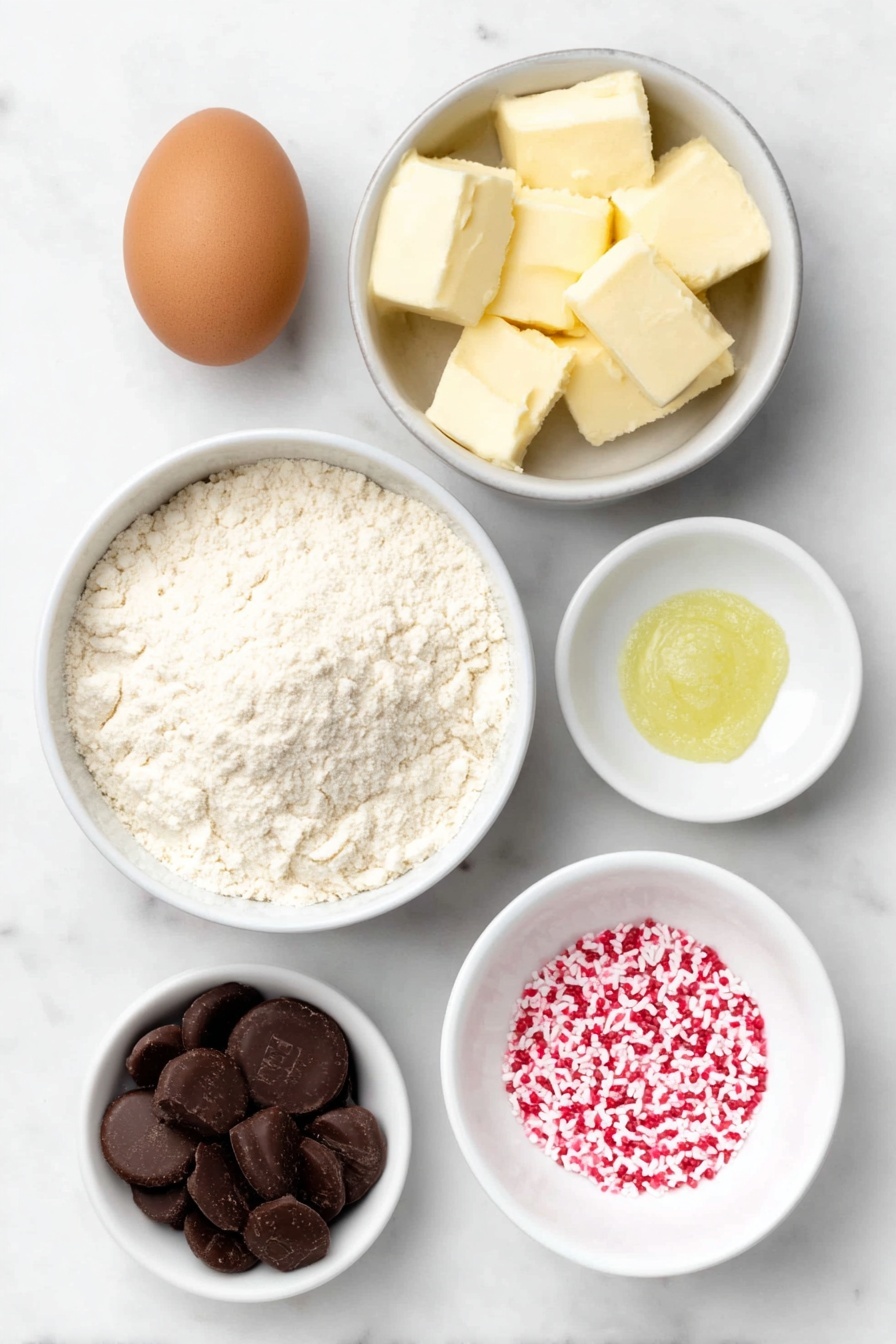
- Hershey’s kisses: The star surprise inside each cookie cup; their melting chocolate centers create that irresistible gooey heart.
- Sugar cookie mix: Using a mix saves time while ensuring the cookie base has that classic, sweet, buttery flavor we all love.
- All-purpose flour: Gives structure and helps the cookie dough hold its shape around the candy without spreading too much.
- Large egg: Mixed with green gel food coloring, it not only binds but also evenly disperses the color, making beautiful green cookies.
- Unsalted butter (room temperature): Adds richness and moisture for a tender, melt-in-your-mouth cookie texture.
- Green gel food coloring: A little goes a long way to get that vibrant Grinch-y green without thinning your dough.
- Large heart candy sprinkles: A cute decorative touch that makes every cookie cup feel special — plus, it gives a little sweet crunch on top!
Tweak to Your Taste
One of my favorite things about the Green Hershey’s Kiss Cookie Cups Recipe is how easily you can make it your own. I love playing with different sprinkles or trying flavored Hershey’s kisses like mint or caramel to switch things up. The green color is perfect for holiday vibes, but you could easily swap food coloring for any other season or theme.
- Variation: For a fun twist, I once added a pinch of matcha powder to the dough for an earthy undertone that balanced the sweetness beautifully.
- Dietary Modification: Try using a gluten-free sugar cookie mix if you’re baking for gluten-free friends – just watch the texture as it may be slightly different.
- Seasonal Flavors: Around Christmas, adding a bit of cinnamon or peppermint extract gives a lovely holiday aroma that pairs perfectly with the green cookie.
Step-by-Step: How I Make Green Hershey’s Kiss Cookie Cups Recipe
Step 1: Prep & Get Your Oven Ready
First things first—preheat your oven to 375°F. I like to lightly spray my mini muffin pan with baking spray to make sure the cookies slide out easily once baked. You can also use mini paper liners if you want to make clean-up even easier and add extra charm.
Step 2: Mix Color Into the Egg
In a small bowl, whisk the egg together with the green gel food coloring. This little trick helps you get a consistent green color in your dough without streaky patches—trust me, it works like magic every time!
Step 3: Combine Dough Ingredients
Next, grab a large mixing bowl and, on low speed, blend your sugar cookie mix, flour, softened butter, and the green egg mixture for about 2 to 3 minutes. The dough is going to be thick — that’s just right. If it feels too sticky, a light dusting of flour on your hands helps when handling.
Step 4: Shape the Cookie Cups
Using a 1½ tablespoon cookie scoop makes this step straightforward. Scoop a ball of dough, then flatten it gently into a 3-inch disc in your palm. Place a Hershey’s Kiss candy upright in the center, then carefully wrap the dough around it, pinching the dough to seal the kiss inside. This step takes a little patience, but it’s so worth it!
Step 5: Bake & Add the Heart
Place each dough ball into your prepared mini muffin pan, making sure the Hershey’s Kiss stays upright. Bake for 10 to 12 minutes — keep an eye so the edges don’t brown; you want just a soft bake with no raw dough in the center. As soon as they come out, gently press one heart sprinkle slightly off-center on top of each cookie cup. Let them cool for at least 10 minutes in the pan before transferring to a cooling rack.
Pro Tips for Making Green Hershey’s Kiss Cookie Cups Recipe
- Use Room Temperature Butter: It blends more smoothly into the dough, giving you a tender cookie every time.
- Keep the Kiss Upright: Placing the chocolate correctly avoids melting into a flat mess and keeps that “surprise” effect intact.
- Don’t Overbake: Cookies should remain pale and soft—you want slightly underbaked for that melty center.
- Cool Before Removing: Leaving them in the pan to cool helps the cookie cups set so they don’t break when you transfer them.
How to Serve Green Hershey’s Kiss Cookie Cups Recipe
Garnishes
I love finishing these cookie cups with big, bold heart candy sprinkles—they add sweetness and a pop of contrasting color that screams festive fun. You could also try edible glitter or crushed peppermint for a holiday spin. For casual get-togethers, keep it simple with mini chocolate chips or colorful nonpareils.
Side Dishes
Pair these cookie cups with a cold glass of milk (classic for a reason!), or a cozy cup of hot cocoa with marshmallows if you want some winter warmth. They also go surprisingly well with fresh fruit like sliced strawberries or tangy oranges to balance out the sweetness.
Creative Ways to Present
I’ve gifted these in little mini cupcake boxes tied with ribbon for holiday parties, and they always bring a smile. You could arrange them on a festive platter, sprinkle powdered sugar over the top for a snowy look, or add tiny edible leaves for a “Grinch” effect. Any way you present them, they’re sure to be a conversation starter!
Make Ahead and Storage
Storing Leftovers
I keep leftover Green Hershey’s Kiss Cookie Cups in an airtight container at room temperature for up to 3 days. The cookies stay wonderfully soft, and the chocolate center remains delightfully melty without getting hard or gritty.
Freezing
These cookie cups freeze beautifully! I wrap each one in plastic wrap then store them in a freezer-safe container or bag. When you want a sweet treat, just thaw at room temperature or pop them in the oven for 5 minutes until warmed through.
Reheating
To bring back that freshly baked feeling, I gently warm my cookie cups in a preheated 350°F oven for about 5 minutes. This melts the chocolate center again and loosens the cookie just a bit—pure perfection every time.
FAQs
-
Can I use other chocolate candies instead of Hershey’s Kisses?
Absolutely! While Hershey’s Kisses are classic, you can swap in mini Reese’s cups, Dove chocolates, or even wrapped truffles to suit your taste — just make sure they’ll hold up well during baking.
-
What if I don’t have green gel food coloring?
You can use green liquid food coloring, but I recommend starting with a small amount and adding more gradually so you don’t thin the dough too much or get uneven coloring. Gel is more concentrated and ideal for doughs like this.
-
How do I prevent the Hershey’s Kiss from melting flat?
Keeping the Kiss upright in the cookie dough during baking is key. Don’t press it down or tilt it before baking. This way, it melts beautifully inside without spreading and losing shape.
-
Can I make the dough from scratch instead of using a mix?
Sure! If you prefer homemade dough, just use your favorite sugar cookie recipe and add green gel coloring to the wet ingredients. The key is to keep your dough thick to wrap properly around the candy.
Final Thoughts
This Green Hershey’s Kiss Cookie Cups Recipe quickly became one of my go-to festive treats for good reason: it’s super simple, results in irresistibly tender cookies, and brings out the kid-in-me every time with that melty chocolate surprise. Whether you’re baking for a crowd or just indulging yourself, these cookie cups feel like a warm hug wrapped in green dough. I can’t wait for you to try them — I bet they’ll become a favorite in your kitchen, too!
Print
Green Hershey’s Kiss Cookie Cups Recipe
- Prep Time: 5 minutes
- Cook Time: 12 minutes
- Total Time: 17 minutes
- Yield: 18 servings
- Category: Dessert
- Method: Baking
- Cuisine: American
Description
These festive Grinch Cookies feature green sugar cookie dough wrapped around Hershey’s Kisses and topped with heart candy sprinkles, perfect for holiday celebrations or any Grinch-themed event. They are soft, colorful, and surprisingly simple to make with a mini muffin pan.
Ingredients
Cookie Dough
- 17.5 ounces sugar cookie mix
- ¼ cup all-purpose flour
- 1 large egg
- ½ cup unsalted butter, room temperature
- ¾ teaspoon green gel food coloring
Assembly
- 18 Hershey’s kisses, unwrapped
- 18 large heart candy sprinkles
Instructions
- Preheat Oven: Preheat your oven to 375°F. Lightly spray a mini muffin pan with baker’s spray or line it with paper cups, then set aside.
- Mix Egg and Food Coloring: In a small bowl, whisk together the large egg and green gel food coloring with a fork until the coloring is evenly combined with the egg.
- Combine Dough Ingredients: In a large mixing bowl, using a handheld mixer on low speed, blend the sugar cookie mix, all-purpose flour, unsalted butter, and the colored egg mixture for 2 to 3 minutes until thoroughly combined and the dough is very thick.
- Form Dough Balls: Using a 1½ tablespoon cookie scoop, scoop out portions of dough and flatten each into a 3-inch disc in your hand. Place one Hershey’s Kiss in the center of each disc, then carefully pull the dough edges up and around the candy, shaping it into a ball. Keep the Hershey’s Kiss upright throughout this process.
- Place in Muffin Tin and Bake: Place the shaped dough balls into the prepared mini muffin tin, ensuring the Hershey’s Kiss remains upright. Bake for 12 minutes, avoiding browning the dough; the center should be fully cooked but the cookie should remain soft.
- Add Sprinkles and Cool: Immediately after removing from the oven, place one heart candy sprinkle offset to the right of the cookie center on each cookie cup. Allow them to cool in the muffin tin for at least 10 minutes before transferring to a wire rack to cool completely.
Notes
- Mixing the green gel food coloring with the egg first helps achieve an even color throughout the dough.
- Keeping the Hershey’s Kiss candy upright ensures it stays centered inside the cookie during baking.
- Do not overbake the cookies to prevent browning; they should remain soft with a fully cooked center.
- Using a mini muffin pan or paper cup liners helps maintain the cookie shape and makes removal easier after baking.
Nutrition
- Serving Size: 1 cookie
- Calories: 160 kcal
- Sugar: 12 g
- Sodium: 110 mg
- Fat: 7 g
- Saturated Fat: 4 g
- Unsaturated Fat: 3 g
- Trans Fat: 0 g
- Carbohydrates: 22 g
- Fiber: 0.5 g
- Protein: 1 g
- Cholesterol: 25 mg


