
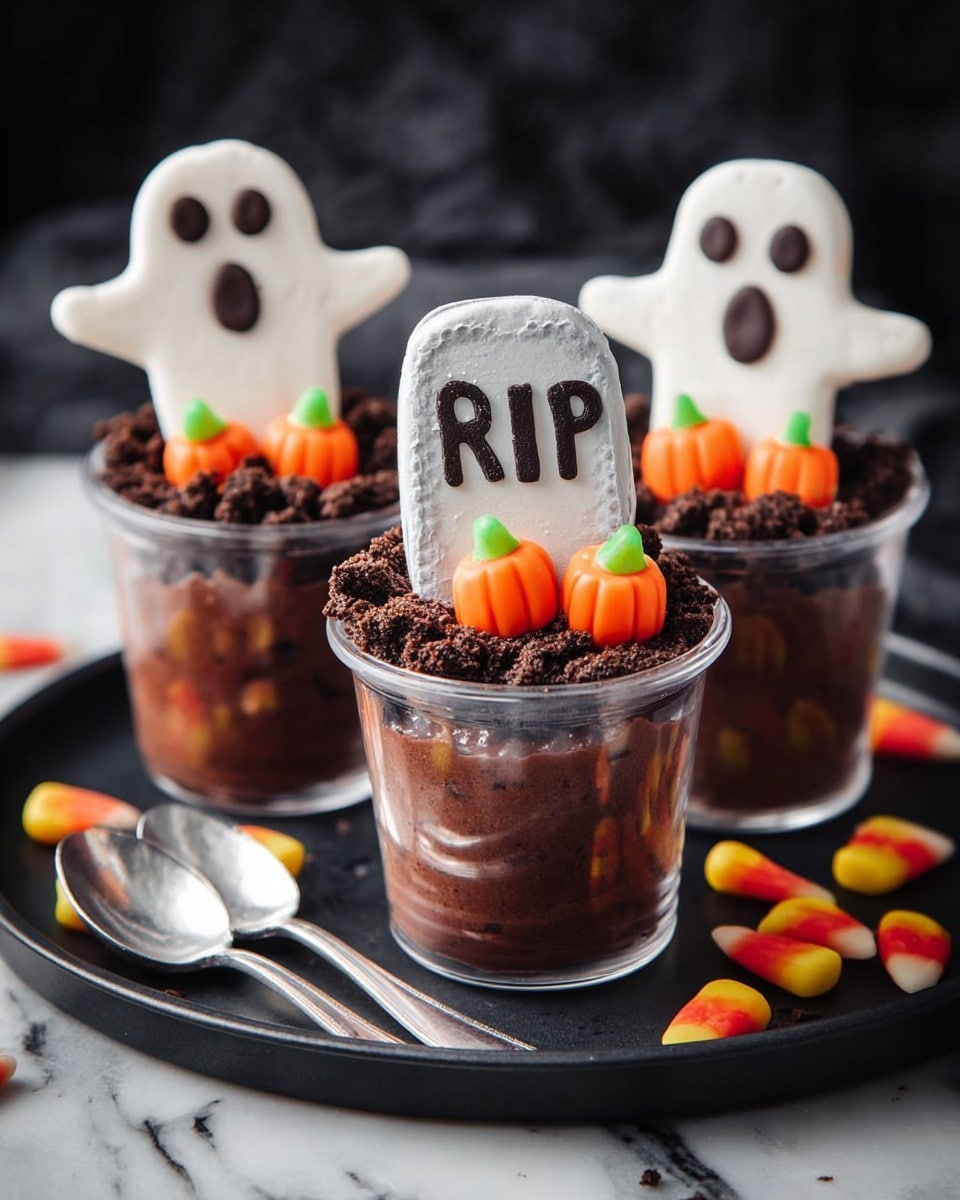
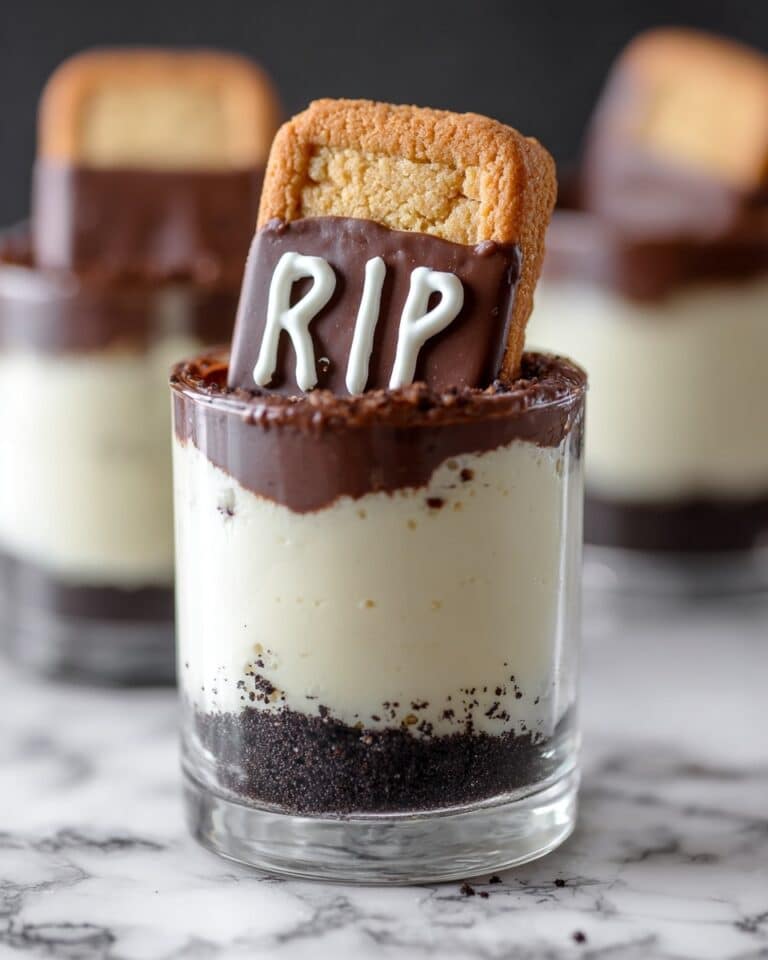
Ghosts in the Graveyard Dirt Pudding Cups Recipe
If you’re looking for a quick, festive treat that’s as fun to make as it is to eat, you’ve got to try my Ghosts in the Graveyard Dirt Pudding Cups Recipe. It’s a perfect blend of creamy chocolate pudding, crunchy cookie crumbs, and cute little spooky decorations all layered into an irresistible little cup. Whether you’re planning a Halloween party or just want a fun dessert to delight the kids (and adults, no judgment here!), this recipe never fails to bring smiles. Trust me, once you make it a couple of times, you’ll find yourself thinking up all sorts of creative twists to make it even cooler.
Why This Recipe Works
- Super Simple Assembly: No baking or complicated prep—just layer and decorate.
- Kid-Friendly Fun: The spooky elements delight little ones and adults alike.
- Flexible Ingredients: Easily customizable with your favorite cookies or candies.
- Perfect Portions: Individual cups make serving and clean-up a breeze.

Ingredients & Why They Work
This Ghosts in the Graveyard Dirt Pudding Cups Recipe is all about layering contrasting textures and fun flavors that combine into a mini dessert story you’ll love sharing. Every ingredient plays its role perfectly, and I’ll share a few tips for picking the right ones so your cups come out picture-perfect.
- Prepared chocolate pudding: You can make pudding from scratch or grab a good-quality pre-made version; the creamy base is what makes the whole cup sing.
- Chocolate graham cracker crumbs: These add that sweet, crunchy “dirt” layer that gives texture and visual appeal—Oreo crumbs are great too if you want a darker dirt look.
- Milano cookie: A subtle-flavored cookie perfect for decorating with “RIP”; its flat surface makes an easy headstone.
- Chocolate frosting: For piping those spooky “RIP” letters — a little dab suffices, so pick a frosting you like to eat by itself.
- Marshmallow ghost: Adds a soft, fluffy touch; I love how it looks floating above the “graveyard.”
- Candy pumpkins: Cute and colorful, these bring festive charm and a little fruity sweetness.
Tweak to Your Taste
One of the best parts about this Ghosts in the Graveyard Dirt Pudding Cups Recipe is how easy it is to make your own. I’ve played around with different cookie bases and spooky toppings, and I encourage you to do the same to keep things fresh and exciting.
- Variation: Personally, I’ve swapped marshmallow ghosts for gummy worms or candy eyeballs to give it a creepier vibe when the mood strikes.
- Dietary tweaks: Use dairy-free chocolate pudding and frosting to make a vegan-friendly version that everyone can enjoy.
- Seasonal spins: Substitute candy pumpkins with autumn leaves-shaped sprinkles or mini candy corn for a harvest theme.
- Flavor upgrades: Stir a bit of espresso powder into the pudding for a grown-up mocha twist — it’s a delightful surprise!
Step-by-Step: How I Make Ghosts in the Graveyard Dirt Pudding Cups Recipe
Step 1: Prepare Your Base
I start by scooping the prepared chocolate pudding into clear plastic cups — it’s important to use clear cups because half the fun is seeing the layers build up. I fill the cup almost to the top but leave a little room for the “dirt” and decorations. If you want the proportions perfect, about two cups of pudding is plenty for a 9-ounce cup.
Step 2: Add the “Dirt” Layer
Next comes the chocolate graham cracker crumbs, which I sprinkle generously on top of the pudding. This not only adds texture but it makes the whole cup look like a little graveyard scene. If you want a darker “soil,” Oreo crumbs work beautifully and pack a bit more chocolate punch.
Step 3: Make the Headstone
Now for the fun decorating—grab a Milano cookie and use a little bit of chocolate frosting to pipe “RIP” onto it. I use a piping bag with a small round tip, but a plastic sandwich bag with a tiny corner snipped off works just as well. Take your time on this part; the cookie is the focal point of your graveyard!
Step 4: Assemble the Graveyard Scene
Place the “headstone” cookie standing or angled into the pudding cup, followed by your marshmallow ghost and candy pumpkins. I arrange them so it looks like a little spooky scene with the ghost gently hovering around the tombstone, and the pumpkins nestled nearby like tiny Halloween sentries.
Step 5: Chill or Serve
You can serve the dirt pudding cups immediately for the freshest marshmallow texture, or cover them with plastic wrap and chill in the fridge for up to 24 hours. Just be aware the cookie might get a bit soggy and marshmallows dry out if you wait too long, so I usually recommend eating within the day.
Pro Tips for Making Ghosts in the Graveyard Dirt Pudding Cups Recipe
- Use Fresh Pudding: Make or buy pudding shortly before assembling for the best creamy texture that holds up well under crumbs and decorations.
- Pipe Carefully: If frosting starts to get thick or clumpy, warm it slightly in your hands or microwave for a few seconds for smoother piping.
- Layer Levelly: Ensure the pudding is spread evenly in the cup to give a solid base so your decorations don’t tip over.
- Avoid Overnight Storage: Cookies get soggy if left overnight—best to assemble close to serving time for that fresh “crunch.”
How to Serve Ghosts in the Graveyard Dirt Pudding Cups Recipe
Garnishes
I like to add just a few candy pumpkins because they add a pop of color and sweetness without overshadowing the pudding. Sometimes, I toss in gummy worms crawling right out of the “dirt,” which my nephew absolutely adores. For a fancier touch, a little edible glitter or colored sugar on top of the crumbs adds spooky sparkle.
Side Dishes
These cups make a great standalone treat, but I’ve served them alongside warm apple cider or a peppery pumpkin soup to balance sweet with savory. If you’re putting together a full Halloween spread, think about pairing with simple finger foods like mini sandwiches or popcorn balls to keep things fun and casual.
Creative Ways to Present
For a party, I’ve set these pudding cups on a spooky tray decorated with faux spider webs and plastic spiders—everyone loved how the cups looked like little haunted graves. Layering them in mason jars instead of plastic cups also adds a rustic touch if you want something a little classier but still playful.
Make Ahead and Storage
Storing Leftovers
If you have leftovers, I recommend keeping them covered in airtight containers in the fridge and eating within 24 hours. After that, the cookie loses its crunch and the marshmallow dries out, which changes the texture quite a bit—not as fun, but still tasty.
Freezing
I don’t usually freeze this dessert because the pudding’s texture can get grainy after thawing, and the cookies soften. But if you must freeze, do so before adding the cookie headstones and marshmallow ghosts, then assemble fresh after thawing.
Reheating
This dessert is meant to be eaten chilled or at room temperature. If stored in the fridge, take it out about 10 minutes before serving to let the pudding soften slightly for maximum enjoyment—no reheating needed!
FAQs
-
Can I use homemade pudding for this recipe?
Absolutely! Homemade pudding works wonderfully and can elevate the flavors. Just make sure it’s set and chilled before layering to keep your dirt pudding cups looking neat and delicious.
-
What’s the best cookie to use for the “headstone”?
I love using Milano cookies because they’re sturdy and have a nice flat surface for decorating. However, any flat cookie like shortbread or sugar cookies would also work well.
-
How far ahead can I assemble these pudding cups?
You can assemble them a few hours ahead, but I suggest adding the cookie and marshmallow decorations closer to serving time to keep them fresh and prevent sogginess.
-
Can I make this recipe without marshmallow ghosts?
Definitely! The marshmallow ghost is just one fun decoration option. Feel free to use gummy worms, candy spiders, or even plastic Halloween picks to make it your own spooky scene.
-
Is this dessert kid-friendly?
Yes! Kids love both making and eating these pudding cups because of how interactive and fun they are. Just keep an eye on little ones when using frosting for piping.
Final Thoughts
This Ghosts in the Graveyard Dirt Pudding Cups Recipe quickly became my go-to Halloween treat because it’s so ridiculously easy but feels special and creative. The joy of layering pudding, “dirt,” and spooky decorations brings out the kid in me every time—and sharing it with friends turns dessert into an event. Give it a try, and don’t be surprised if it becomes your new festive favorite too!
Print
Ghosts in the Graveyard Dirt Pudding Cups Recipe
- Prep Time: 10 minutes
- Cook Time: 0 minutes
- Total Time: 10 minutes
- Yield: 1 serving
- Category: Dessert
- Method: No-Cook
- Cuisine: American
Description
A fun and spooky Halloween-themed dessert featuring chocolate pudding layered with cookie crumbs and decorated with a Milano cookie headstone, marshmallow ghost, and candy pumpkins to create a ‘ghosts in the graveyard’ effect.
Ingredients
Chocolate Pudding Layer
- 8 ounces prepared chocolate pudding
Toppings and Decorations
- 2 tablespoons chocolate graham cracker crumbs or Oreo cookie crumbs
- 1 Milano cookie
- Chocolate frosting, for piping
- 1 marshmallow ghost
- 3 candy pumpkins
Instructions
- Prepare Pudding Cups: Place the prepared chocolate pudding into a clear plastic cup, filling it almost to the top.
- Add Crumbs: Sprinkle the chocolate graham cracker or Oreo cookie crumbs evenly over the pudding to resemble dirt.
- Create Headstone: Using chocolate frosting with a small decorating tip or a plastic bag with the corner snipped off, pipe the letters “RIP” onto the Milano cookie to serve as the graveyard headstone.
- Assemble Decoration: Arrange the decorated Milano cookie upright in the pudding cup along with the marshmallow ghost and candy pumpkins to create the graveyard scene.
- Serve or Store: Serve the pudding cups immediately or cover with plastic wrap and refrigerate for up to 24 hours before serving.
Notes
- Scale the recipe up or down depending on how many pudding cups you want to make.
- If using small prepared pudding cups, about 2 cups are needed to fill each 9-ounce plastic cup.
- For extra spooky fun, add gummy worms, candy spiders, or other Halloween-themed candies on top.
- Serve immediately for best texture, as cookies may get soggy and marshmallows dry out when refrigerated longer than 24 hours.
Nutrition
- Serving Size: 1 cup
- Calories: 350 kcal
- Sugar: 30 g
- Sodium: 150 mg
- Fat: 18 g
- Saturated Fat: 7 g
- Unsaturated Fat: 9 g
- Trans Fat: 0 g
- Carbohydrates: 42 g
- Fiber: 2 g
- Protein: 4 g
- Cholesterol: 15 mg

