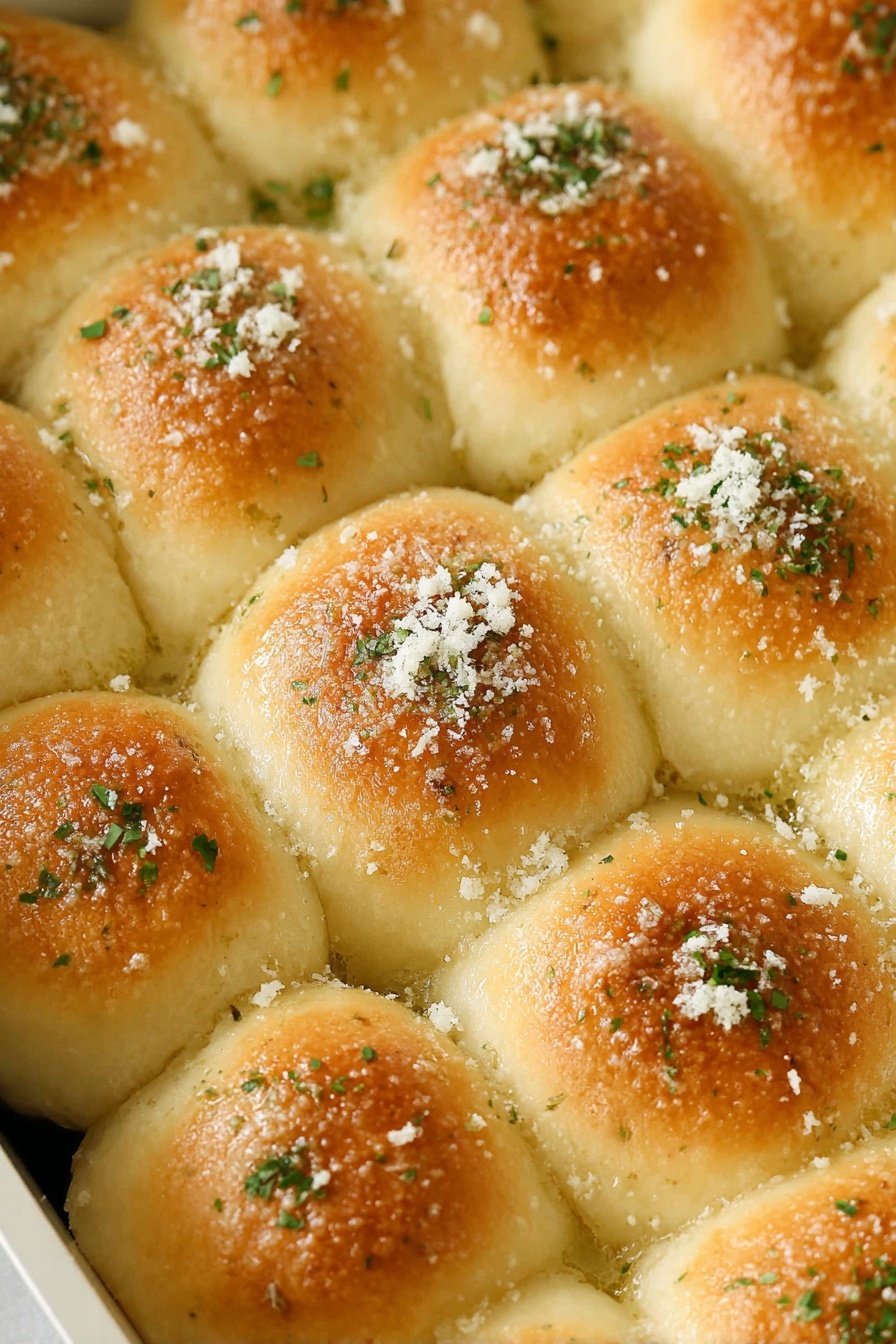
Garlic Parmesan Dinner Rolls Recipe
If you’re on the hunt for a bread recipe that’s quick, full of flavor, and guaranteed to impress, you’re going to love this Garlic Parmesan Dinner Rolls Recipe. These rolls come out warm, soft, and perfectly garlicky with just the right hint of cheesy parmesan to elevate every bite. I remember the first time I baked them, the smell practically had my whole kitchen cheering before they’d even cooled. Stick around, and I’ll walk you through how to make these rolls with tips to get them just right every single time!
Why This Recipe Works
- Quick and Easy: You can whip these rolls up in just 30 minutes, so no long wait times for delicious homemade bread.
- Flavor Packed: The garlic and parmesan combo gives these rolls a rich, savory kick that’s irresistible.
- Soft and Fluffy Texture: Thanks to the right proofing temps and that hint of egg, these rolls come out tender and light.
- Versatile: They pair beautifully with everything from soups to holiday dinners, making them a family favorite.

Ingredients & Why They Work
Each ingredient in this Garlic Parmesan Dinner Rolls Recipe plays a role in making sure you get that perfect balance of richness, flavor, and texture. You’ll find the mix straightforward, but if you pay attention to the details, the results will blow you away.
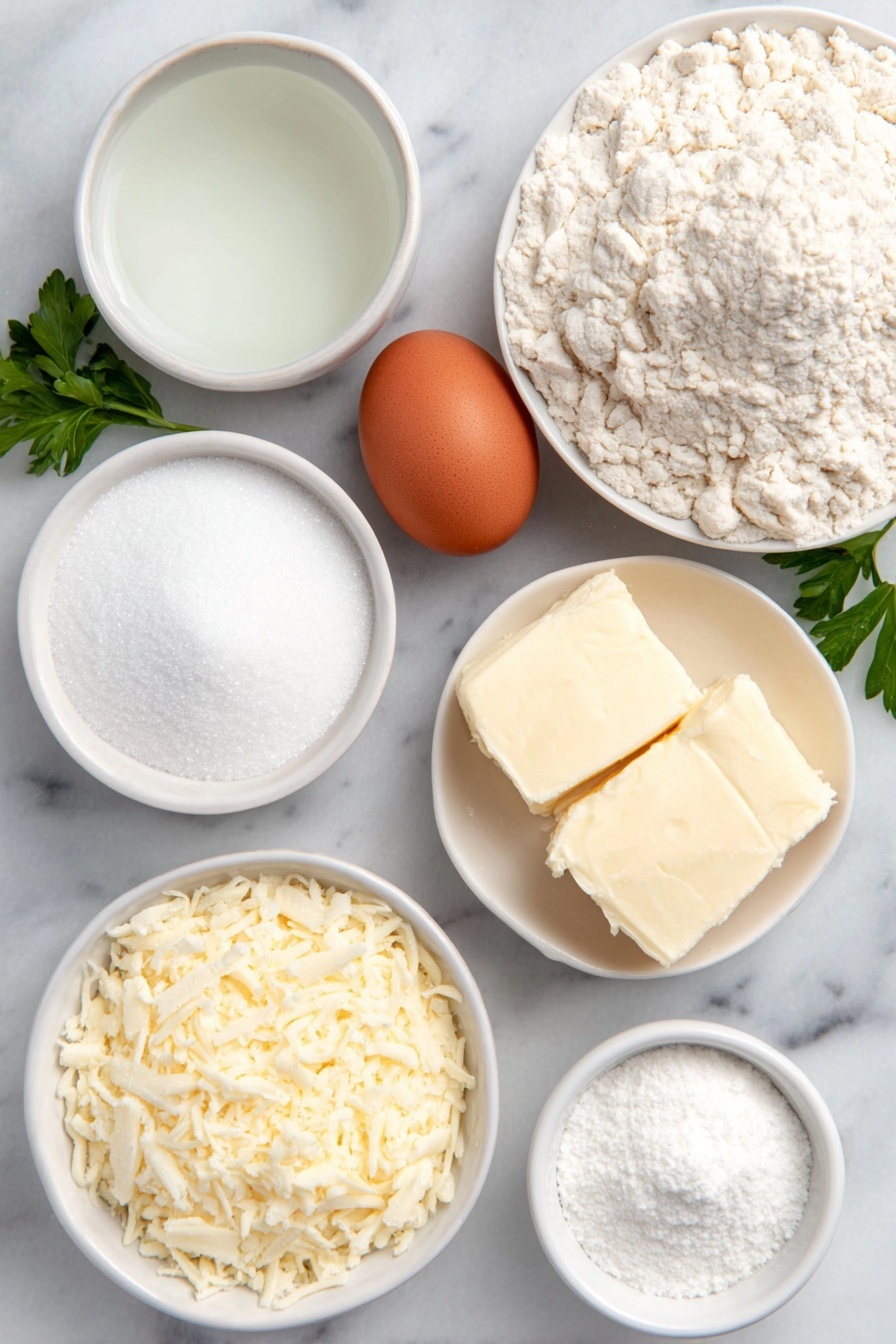
- Warm water: Activates the yeast without killing it—hit that sweet spot around 95-105°F for best results.
- Granulated sugar: Feeds the yeast and adds just a touch of sweetness to balance the savory flavors.
- Yeast (instant or platinum): The magic behind your roll’s rise and fluffiness—instant yeast makes the process quicker.
- Canola oil: Keeps things moist without overpowering the flavor.
- Salt: Essential for enhancing flavor and balancing sweetness.
- Large egg: Adds richness and helps with the dough’s structure.
- All-purpose flour: The base of your dough; can adjust slightly based on humidity or altitude.
- Melted butter: Brushed on top for that golden finish and added buttery goodness.
- Granulated garlic: Infuses that unmistakable savory punch right on the crust.
- Parmesan cheese: Gives these rolls a cheesy, nutty zing that’s downright addictive.
- Parsley: Provides a pop of color and a fresh herbal note to round things out.
Tweak to Your Taste
I love sharing recipes that let you add your own spin, and this Garlic Parmesan Dinner Rolls Recipe is no exception. Whether you like things more garlicky, cheesier, or want to experiment with different herbs, there’s plenty of ways to make these your own.
- More garlic, please: I sometimes double the granulated garlic for a stronger punch—just sprinkle it generously before baking.
- Herb swaps: If parsley isn’t your thing, fresh rosemary or thyme can add a fragrant twist worth trying.
- Dairy-free version: Swap the butter for olive oil and replace the egg with a flax egg for those with dietary restrictions—it still turns out great!
- Cheese variations: Parmesan is classic, but mixing in some shredded mozzarella or asiago can change the flavor game.
Step-by-Step: How I Make Garlic Parmesan Dinner Rolls Recipe
Step 1: Proof the yeast for the perfect rise
Start by combining your warm water (make sure it’s not too hot—95-105°F is just right) with sugar and yeast in a large bowl. Give it a gentle stir, then watch it come alive with bubbles in 2-5 minutes. This quick proofing step is critical; it means your yeast is happy and ready to work its magic. I usually set it near my fireplace or a cozy spot just to keep the temperature steady.
Step 2: Mix in the ingredients & form your dough
Once your yeast is bubbly, add the canola oil, salt, egg, and flour. I start mixing with a spoon or a stand mixer with dough hooks until everything just combines. You might need to add a little more flour if the dough feels sticky—it should be soft but manageable. Here’s a little secret: you don’t need to knead endlessly. This dough is forgiving, so a light knead or mixing usually does the job for fluffiness.
Step 3: Shape, rise, and prep your rolls
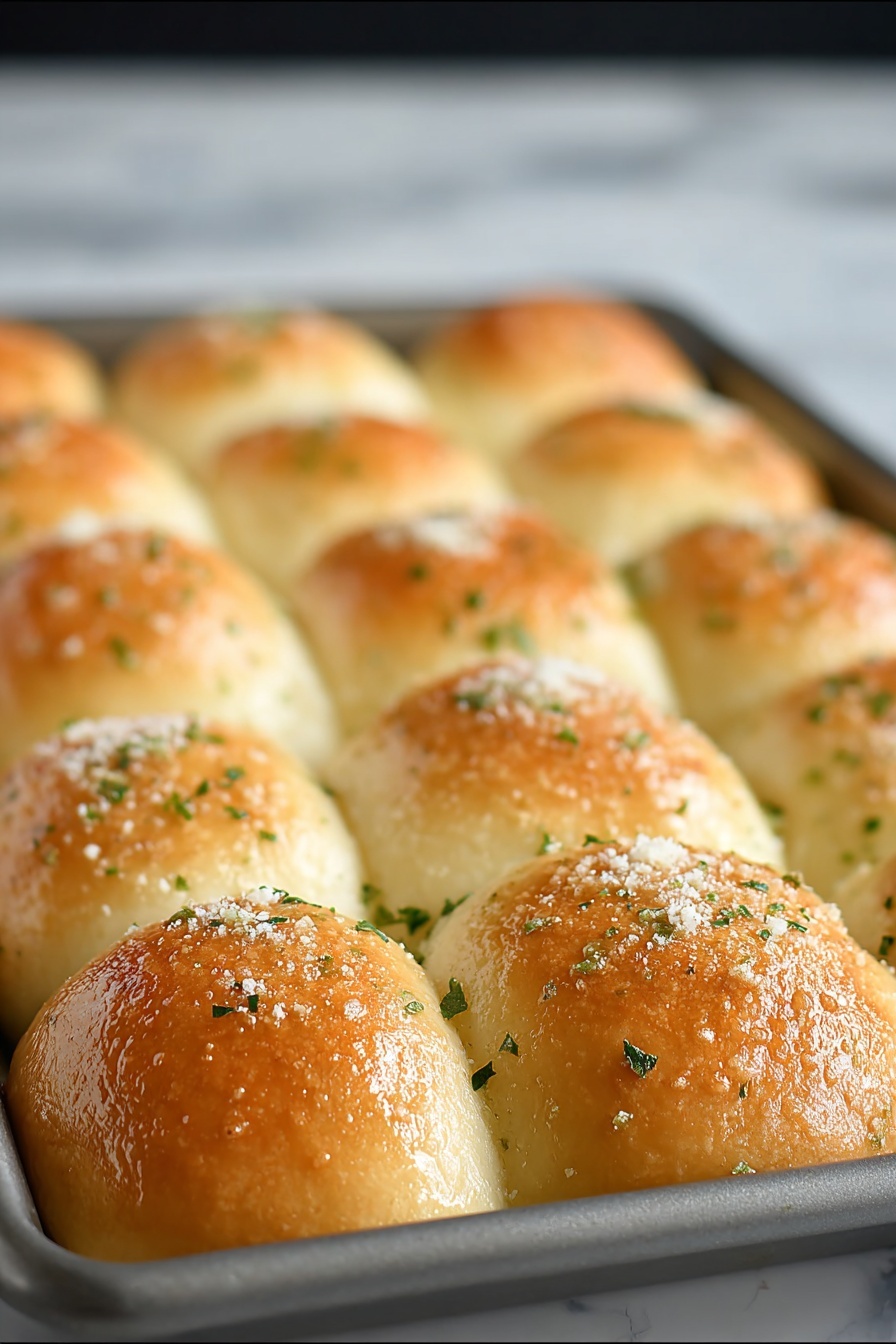
Divide the dough into 16 equal pieces. I find using a kitchen scale helps, but eyeballing works too! Roll each piece into a smooth ball and place them spaced apart on a parchment-lined baking sheet. Cover loosely and let them rise for 5-10 minutes in a warm spot—the fireplace hearth works wonders here. Once they’ve puffed up a bit, brush the tops with melted butter and sprinkle on your granulated garlic, parmesan, and parsley. This final touch is what makes these rolls sing.
Step 4: Bake and enjoy!
Preheat your oven to 375°F and pop those beauties in to bake for 18-20 minutes until golden brown. When they’re out, brush with even more butter for that irresistible shine and extra flavor. Let them cool slightly, then pull one apart and taste the soft, garlicky, cheesy goodness. Warning: it’s hard not to eat them all at once!
Pro Tips for Making Garlic Parmesan Dinner Rolls Recipe
- Control your water temp: Too hot, and the yeast dies; too cold, and it won’t activate. Use a quick thermometer or just a gentle touch.
- Light kneading is key: I found that minimal kneading avoids tough rolls but still lets gluten develop for fluffy texture.
- Use melted butter generously: I never skip the buttery brush before and after baking—it locks in moisture and boosts flavor.
- Don’t rush the rise: Even a short 5-10 min proof in a warm spot makes a huge difference in softness and airiness.
How to Serve Garlic Parmesan Dinner Rolls Recipe
Garnishes
For garnishes, I keep it classic with an extra sprinkle of fresh parsley or a tiny dusting of parmesan on top right before serving. Sometimes, a tiny dab of garlic butter mixed with some fresh herbs really makes those rolls pop even more. If I’m feeling a bit fancy, a little grated lemon zest with parsley lifted their freshness so beautifully.
Side Dishes
These rolls shine alongside creamy tomato soup, roasted chicken, or even a fresh garden salad. I’ve often paired them with hearty stews or pasta dishes—the rolls soak up all those rich sauces and make the meal extra cozy. Trust me, once you try it, you’ll want these rolls with nearly every dinner.
Creative Ways to Present
For special occasions, I’ve arranged the rolls in a beautiful circular wreath shape on the baking tray, brushed with herb butter and served with little bowls of dipping oil and balsamic vinegar. It creates a centerpiece that invites everyone to tear into the warm rolls together—perfect for holidays or family gatherings!
Make Ahead and Storage
Storing Leftovers
I like to store leftover rolls wrapped tightly in foil or in an airtight container at room temperature. They usually stay fresh for 2 days, but if you want to keep their softness longer, refrigeration helps—just bring them back to room temp before reheating.
Freezing
Freezing works like a charm for this recipe! After the rolls cool, I wrap each one individually in plastic wrap, then place them in a freezer bag. When I’m ready, I thaw overnight in the fridge and warm them in the oven the next day. They come out almost as fresh as newly baked.
Reheating
My go-to reheating method is popping them into a 350°F oven for about 5-7 minutes wrapped in foil. This gently warms the rolls while keeping them soft and buttery. For a quick fix, a brief zap in the microwave (about 15 seconds) works too, but watch out—it can dry them out fast.
FAQs
-
Can I make these rolls without an egg?
Absolutely! Some readers have successfully replaced the egg with a heaping tablespoon of fat-free Greek yogurt or a flax egg to keep the dough moist and ensure a good rise. The texture might be slightly different, but the rolls remain delicious.
-
Why is the proofing temperature important?
The yeast loves warm water between 95-105°F because it wakes it up without risking the yeast dying. Too hot and the yeast can die, too cold and the rise will be slow or weak, affecting your roll’s fluffiness.
-
How much garlic flavor can I add?
Feel free to adjust! The recipe calls for 2 tablespoons of granulated garlic sprinkled on top, but you can certainly add more before baking or mix some into the dough if you’re a big garlic fan like me.
-
Can I make these rolls ahead for a party?
Yes! Prepare and shape the dough, then refrigerate the rolls covered overnight. Take them out about an hour before baking to allow them to come to room temperature and rise a bit. Bake as usual for freshly baked warmth at your event.
Final Thoughts
This Garlic Parmesan Dinner Rolls Recipe holds a special place in my kitchen because it’s quick, comforting, and so satisfying every single time. I hope you give it a try and find the same joy in pulling warm, buttery, garlicky rolls fresh from your own oven. You really can’t go wrong here, and your family or guests will thank you—consider this your new go-to bread for all occasions!
Print
Garlic Parmesan Dinner Rolls Recipe
- Prep Time: 10 minutes
- Cook Time: 20 minutes
- Total Time: 30 minutes
- Yield: 16 rolls
- Category: Bread
- Method: Baking
- Cuisine: American
- Diet: Vegetarian
Description
Deliciously soft and buttery 30-minute garlic parmesan dinner rolls perfect for a quick homemade bread option that combines fragrant garlic, savory parmesan cheese, and a touch of parsley.
Ingredients
Dough
- 1¼ cups warm water (95-105 degrees)
- ¼ cup granulated sugar
- 2 Tbsp yeast (instant or platinum)
- ⅓ cup canola oil
- 1 tsp salt
- 1 large egg
- 3½ cups all-purpose flour
Topping
- 4 tbsp melted butter
- 2 tbsp granulated garlic
- ¼ cup parmesan cheese (shredded or grated)
- 2 tsp parsley
Instructions
- Prepare Baking Sheet: Line a baking sheet with parchment paper or a non-stick liner and set it aside.
- Proof Yeast: In a large bowl, combine the warm water, granulated sugar, and yeast. Allow it to proof for approximately 5 minutes until foamy.
- Mix Dough: Add canola oil, salt, egg, and flour to the yeast mixture. Mix until combined. If the dough is too sticky, add a little more flour to achieve the right consistency.
- Shape Rolls: Separate the dough into 16 equal-sized pieces and shape each into a roll. For fluffier rolls, knead the dough on a lightly floured surface for about 5 minutes if needed.
- Let Rolls Rise: Place the shaped rolls on the prepared baking sheet and let them rise in a warm place for about 10 minutes until slightly puffed. A warm spot like near a fireplace or oven works well.
- Add Toppings: Brush the risen rolls with melted butter, then sprinkle with granulated garlic, parmesan cheese, and parsley evenly over the top.
- Preheat Oven: Preheat your oven to 375ºF (190ºC) while the rolls are rising and being prepared.
- Bake Rolls: Bake the rolls in the preheated oven for 20 minutes until golden brown and cooked through.
- Finish and Serve: Remove the rolls from the oven and immediately spread additional melted butter on top before serving for extra richness.
Notes
- You can substitute the water with milk and the egg with a heaping tablespoon of fat-free Greek yogurt for a different texture and flavor.
- Kneading helps develop gluten to make rolls lighter and fluffier, but the mixer’s mixing process is often sufficient for this dough.
- Keep the proofing temperature between 95-105 degrees to avoid killing the yeast; higher temperatures may cause inconsistency.
- If you need to knead by hand, do so on a lightly floured surface for about 5 minutes when in different climates or elevations.
- Using a warm place like near a fireplace or oven hearth for rising improves yeast activation and dough rise.
- For a visual guide, seek out video tutorials on 1-hour dinner rolls that demonstrate similar steps.
Nutrition
- Serving Size: 1 roll
- Calories: 150 kcal
- Sugar: 3 g
- Sodium: 180 mg
- Fat: 6 g
- Saturated Fat: 1 g
- Unsaturated Fat: 4 g
- Trans Fat: 0 g
- Carbohydrates: 20 g
- Fiber: 1 g
- Protein: 4 g
- Cholesterol: 15 mg


