
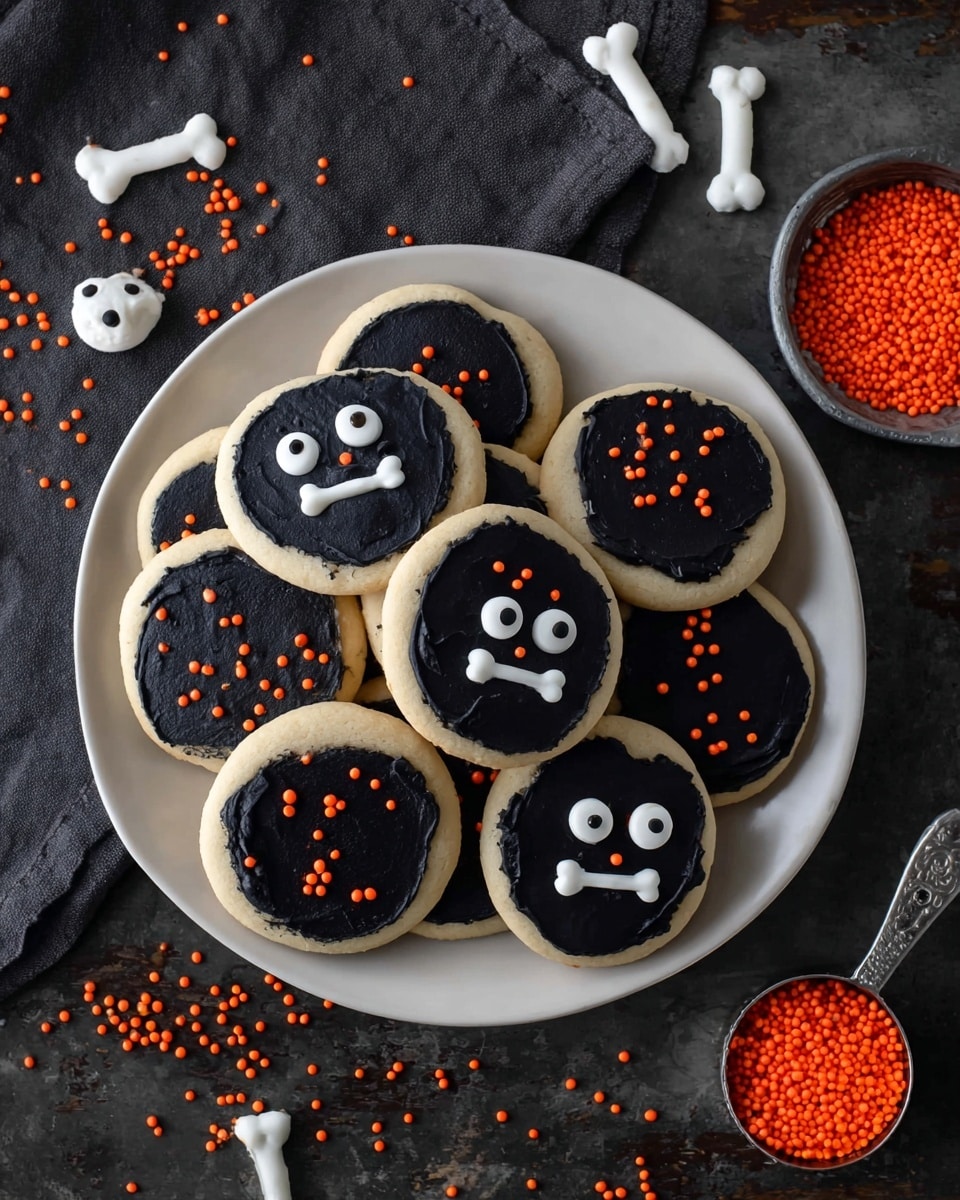
Frosted Halloween Sugar Cookies Recipe
If you’re looking to add a little spooky sweetness to your Halloween celebrations, you’re going to love this Frosted Halloween Sugar Cookies Recipe. These cookies are soft, buttery, and covered in a velvety black frosting that’s just perfect for the season. Trust me, once you try them, they’ll become your go-to treat every October – and decorating them is half the fun!
Why This Recipe Works
- Perfectly Soft Cookies: The combination of cornstarch and baking powder gives these cookies that tender yet sturdy texture you want in a sugar cookie.
- Deep Black Frosting: Making the frosting 24 hours ahead helps the black color deepen, creating a spooky, vibrant finish that holds well.
- Easy Decorating: Simple sprinkles like orange nonpareils and candy eyeballs make decorating festive without any stress.
- Great for Sharing: These cookies travel well and keep their freshness for several days—perfect for parties or gifting!

Ingredients & Why They Work
The magic in these Frosted Halloween Sugar Cookies Recipe lies in both the ingredients and how they play together. The dry components create a soft foundation while the extracts bring subtle warmth, and the frosting really ties it all together with its creamy richness and bold color. I always recommend grabbing good-quality butter and pure extracts for the best flavor.
- All-purpose flour: The base of your cookies, provides structure but used with cornstarch, it keeps cookies tender.
- Cornstarch: Helps soften the cookie’s crumb for that melt-in-your-mouth feel.
- Baking powder: Gives the cookies just a little lift but keeps them from puffing up too much.
- Salt: Enhances all the sweet flavors without being noticeable.
- Unsalted butter: Room temperature is key for creamy mixing and richer flavor.
- Granulated sugar: Provides sweetness and helps the cookies spread and crisp just enough.
- Egg: Binds everything together while adding moisture.
- Vanilla extract: Classic flavor that elevates the whole cookie.
- Almond extract: A splash gives a subtle nutty note that’s surprisingly delicious in sugar cookies.
- Powdered sugar: For frosting, it creates that smooth, fluffy texture you want.
- Black gel food coloring: The secret to that perfect deep black frosting; the gel kind is stronger and won’t thin your frosting.
- Milk or heavy cream: Optional to thin the frosting if it gets too thick.
- Sprinkles (orange nonpareils, candy eyeballs, skeleton bones): Festive finishing touches that make these cookies pop!
Tweak to Your Taste
One of the best things about this Frosted Halloween Sugar Cookies Recipe is how adaptable it is—you can switch up flavors or decorations to make it your own. I love adding a pinch of cinnamon or swapping almond extract for peppermint when I want a different vibe. Don’t shy away from making these cookies uniquely yours!
- Variation: Once, I added fresh orange zest to the dough, and it gave the cookies a bright fall aroma that paired perfectly with the spooky black frosting.
- Dietary swap: I’ve tried using a gluten-free flour blend with moderate success; the texture changes slightly but still delicious for friends who need gluten-free treats.
- Difficulty levels: For easy decorating, try just swirling the frosting with a knife or spoon instead of piping, especially if you’re short on time or casual bakers.
Step-by-Step: How I Make Frosted Halloween Sugar Cookies Recipe
Step 1: Mixing the Dry Ingredients
I start by whisking together the flour, cornstarch, baking powder, and salt in a bowl. Getting this mix ready before anything else helps avoid overmixing later—a classic pitfall with sugar cookies. It also makes your dough come together beautifully after the wet ingredients are combined.
Step 2: Creaming Butter and Sugar
In a larger bowl, I beat the softened butter and granulated sugar on low for about a minute until smooth and fluffy. This part is key because it traps air in the batter, contributing to the soft texture we want. Don’t rush it, but don’t go too long—about a minute is perfect.
Step 3: Adding Flavor and Binding
Next up, I mix in the egg, vanilla, and almond extract for just twenty seconds to blend them in without overmixing. This step adds fragrance and moisture, which is where your cookies start to take on their unique personality.
Step 4: Combining Dry Ingredients with Wet
Gradually add the flour mixture on low speed. At first, the dough will look crumbly—that’s totally normal. I stop using the mixer here and switch to a spatula to gently bring the dough together. This prevents tough cookies from overworked gluten and gives you that tender texture you’re aiming for.
Step 5: Shaping and Baking
I scoop the dough balls around 3 tablespoons (for larger cookies) and place them 2-3 inches apart on a parchment- or silicone-lined baking sheet. Then I gently flatten each ball with my palm to about ½ inch thickness. Baking at 350º F for 13-15 minutes does the trick—just watch them closely and adjust baking time for smaller cookies around 10-12 minutes. Let them cool completely before frosting.
Step 6: Making the Frosting
I whip softened butter and powdered sugar with vanilla until fluffy—this takes about 1-2 minutes. Then I add black gel food coloring little by little until I get that rich, jet-black color. A quick tip: making the frosting a day ahead and letting it sit covered on the counter helps deepen the black even more!
Step 7: Decorating Your Halloween Cookies
Once the cookies are cooled, I spread or pipe the frosting on top and finish off with some fun Halloween sprinkles – orange nonpareils, candy eyeballs, and even tiny skeletons if I’m feeling artsy. It’s a great way to get the family involved and make cookies that look as festive as they taste.
Pro Tips for Making Frosted Halloween Sugar Cookies Recipe
- Room Temperature Butter: Make sure your butter is soft—not melted or cold—to get a smooth cookie dough and frosting.
- Spacing Matters: Give cookies plenty of space on the baking sheet to prevent sticking or spreading into one giant cookie!
- Frosting Consistency: If your frosting gets too thick after sitting, just add a little milk or cream a drop at a time to thin it out without losing color intensity.
- Cool Cookies Before Frosting: Never frost warm cookies—frosting will melt and slide off, and no one wants that mess!
How to Serve Frosted Halloween Sugar Cookies Recipe
Garnishes
I love to finish these cookies with bright orange nonpareils and creepy candy eyes—they add delightful texture and make the cookies really pop on a Halloween dessert table. For a little extra flair, sprinkle some edible glitter or mini skeleton shapes; they never fail to wow guests!
Side Dishes
These Frosted Halloween Sugar Cookies go great with a warm drink like spicy hot cider or a cup of chai tea. I also often serve them alongside a plate of pumpkin bread or cinnamon-spiced popcorn for a festive snack spread.
Creative Ways to Present
For a fun party, I’ve arranged these cookies on tiered trays decorated with Halloween-themed napkins and little plastic spiders. Wrapping a few in clear cellophane tied with orange and black ribbons makes them perfect party favors or trick-or-treat gifts.
Make Ahead and Storage
Storing Leftovers
I store leftover cookies in an airtight container at room temperature for up to 4 days. I make sure the frosting has fully set to avoid any stickiness. You can place wax paper between layers to keep them from smushin’ together if you’ve got a big batch.
Freezing
Freezing works well! I usually freeze the unfrosted cookies after baking and cooling by placing them in a single layer on a baking sheet, then transferring to a freezer bag. Frost them when ready to serve for the freshest look. If you want to freeze frosted cookies, flash freeze them first so frosting sets solid, then store carefully.
Reheating
When I reheat leftover cookies, I pop them in a warm (not hot) oven at 300ºF for about 5 minutes to get them soft again. Don’t heat frosted ones—just let them come to room temp for the best texture and flavor.
FAQs
-
Can I make these Frosted Halloween Sugar Cookies gluten-free?
Absolutely! I recommend swapping the all-purpose flour with a 1-to-1 gluten-free flour blend that contains xanthan gum for structure. The texture will be a bit different but still tasty. Just watch the baking time, as gluten-free flours can bake faster.
-
How do I get a really black frosting without it tasting bitter?
Using gel food coloring helps keep the frosting soft and flavorful. Start with a little and build up the color gradually. Making the frosting a day ahead also deepens the color without altering taste. Avoid liquid food coloring as it can thin your frosting and affect texture.
-
Can I use store-bought frosting instead?
Sure! If you’re short on time, you can use a smooth vanilla buttercream from the store and add black gel coloring for the Halloween vibe. Homemade frosting does taste fresher and you can control sweetness, but store-bought works in a pinch!
-
What’s the best way to decorate these cookies with kids?
Keep it simple: let kids spread the frosting with a butter knife or spoon, then sprinkle on candies and nonpareils. It’s mess-friendly and fun — plus kids feel like little cookie artists without needing piping skills!
Final Thoughts
This Frosted Halloween Sugar Cookies Recipe holds a special place in my kitchen every fall. It’s the perfect blend of childhood nostalgia, spooky fun, and deliciousness wrapped in one. I hope you’ll enjoy making (and eating!) them as much as I do—they’re perfect for sharing with friends, family, or sneaking a few late at night. Give it a try this Halloween, and trust me, you’ll be hooked!
Print
Frosted Halloween Sugar Cookies Recipe
- Prep Time: 10 minutes
- Cook Time: 15 minutes
- Total Time: 55 minutes
- Yield: 15 cookies
- Category: Dessert
- Method: Baking
- Cuisine: American
Description
These Frosted Halloween Sugar Cookies are a festive treat perfect for celebrating the spooky season. Soft, buttery sugar cookies are baked to perfection and topped with rich black frosting and fun Halloween-themed sprinkles like orange nonpareils, skeleton bones, and candy eyeballs. Perfect for parties or a delightful seasonal snack.
Ingredients
Cookies
- 2 ¼ cups (270g) all purpose flour
- ½ tsp cornstarch
- 1 tsp baking powder
- ¼ tsp salt
- ½ cup (113g) unsalted butter, 1 stick, room temperature
- 1 cup (198g) granulated sugar
- 1 large egg
- 1 tsp vanilla extract
- ¼ tsp almond extract
Frosting
- ½ cup (113g) unsalted butter, 1 stick, room temperature
- 2 ½ cups (283g) powdered sugar
- ½ tsp vanilla extract
- 1 tsp milk or heavy cream, if needed
- Black gel food coloring
- Sprinkles: orange nonpareils, skeleton bones & candy eyeballs
Instructions
- Preheat and prepare baking sheet: Preheat the oven to 350º F. Line a baking sheet with a silicone mat or parchment paper to prevent sticking.
- Mix dry ingredients: In a mixing bowl, combine the all purpose flour, cornstarch, baking powder, and salt. Set aside.
- Cream butter and sugar: In a larger mixing bowl, beat the unsalted butter and granulated sugar on low speed for 1 minute using an electric mixer until smooth and fluffy.
- Add wet ingredients: Beat in the egg, vanilla extract, and almond extract for 20 seconds until combined.
- Combine dry and wet: Gradually add the dry ingredient mixture to the wet ingredients, mixing on low for 1 minute. The dough will be crumbly; then use a spatula to work the dough together until it forms a cohesive dough.
- Shape cookies: Use a cookie scoop to form dough balls approximately 2.5 to 3 tablespoons each. Place the dough balls 2-3 inches apart on the prepared baking sheet and flatten them gently with your palm.
- Bake cookies: Bake in the preheated oven for 15 minutes. For smaller cookies, adjust baking time to 12 minutes. The cookies should be lightly golden around the edges.
- Cool cookies: Remove cookies from the oven and allow them to cool completely on a wire rack before frosting.
- Prepare frosting: In a mixing bowl, beat the unsalted butter, powdered sugar, and vanilla extract using an electric mixer until fluffy, about 1-2 minutes. Optionally, add 1 tsp milk or heavy cream if the frosting is too thick.
- Add color: Mix in black gel food coloring until the frosting reaches a deep, even color. For best results, prepare frosting 24 hours in advance and cover it to deepen the black color.
- Frost and decorate: Spread the black frosting on the cooled cookies. Decorate with Halloween-themed sprinkles such as orange nonpareils, skeleton bones, and candy eyeballs.
Notes
- Make frosting 24 hours ahead to achieve a deeper black color by allowing it to sit covered at room temperature.
- Adjust baking times based on cookie size to avoid over or under baking.
- Use parchment paper or silicone mats to prevent sticking and ensure easy cleanup.
- Add a teaspoon of milk or heavy cream to the frosting if it feels too thick for spreading.
- Store cookies in an airtight container at room temperature to keep them fresh for several days.
Nutrition
- Serving Size: 1 cookie
- Calories: 180 kcal
- Sugar: 14 g
- Sodium: 80 mg
- Fat: 9 g
- Saturated Fat: 5 g
- Unsaturated Fat: 3 g
- Trans Fat: 0 g
- Carbohydrates: 23 g
- Fiber: 0.5 g
- Protein: 1 g
- Cholesterol: 30 mg

