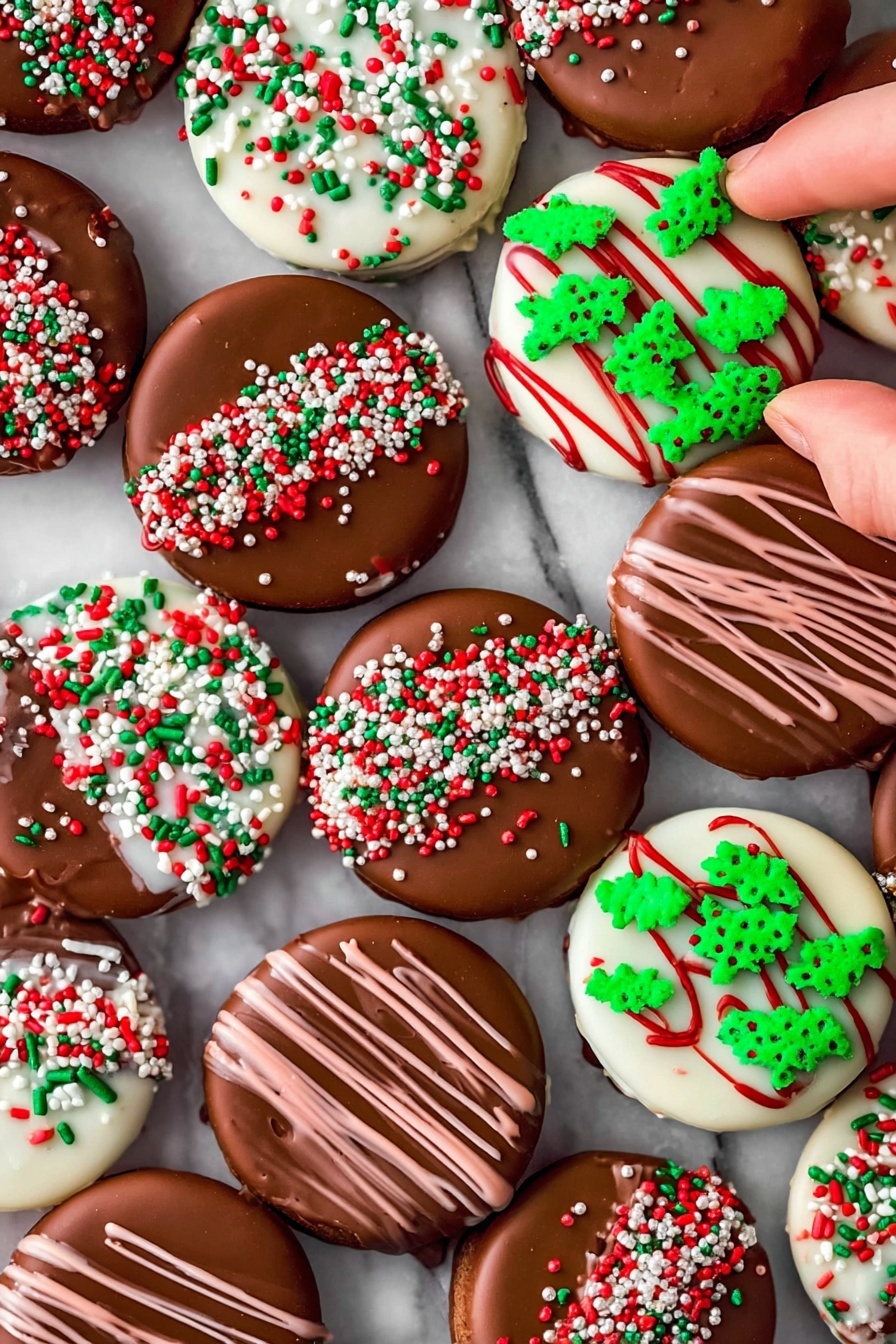
Festive Chocolate Covered Oreos Recipe
If you’re looking for an easy, show-stopping holiday treat that wows both kids and adults alike, then you’re going to love this Festive Chocolate Covered Oreos Recipe. These cookies are rich, chocolatey, and decked out in colorful sprinkles – perfect for gift-giving, cookie exchanges, or just treating yourself after a hectic holiday day. I first made these last Christmas, and honestly, they were gone faster than Santa’s cookies! Stick with me, and I’ll share all my tips so your batch turns out just as fantastic.
Why This Recipe Works
- Perfect Chocolate Texture: Using Ghirardelli melting wafers ensures smooth melting and glossy finishes that coat Oreos beautifully.
- Festive Flexibility: You can keep it simple with milk chocolate or double-dip with white chocolate for visual flair and flavor variety.
- Fun to Personalize: Sprinkles and food coloring let you dress these up to match any holiday theme or party vibe.
- Long-Lasting Treats: They store well, making them perfect for prepping ahead and gift-giving without compromise on taste.

Ingredients & Why They Work
The ingredients are simple yet thoughtfully chosen to get the best results without fuss. From classic Oreos to premium melting wafers, each element plays a role in making these chocolate covered cookies look and taste like they came from a bakery.
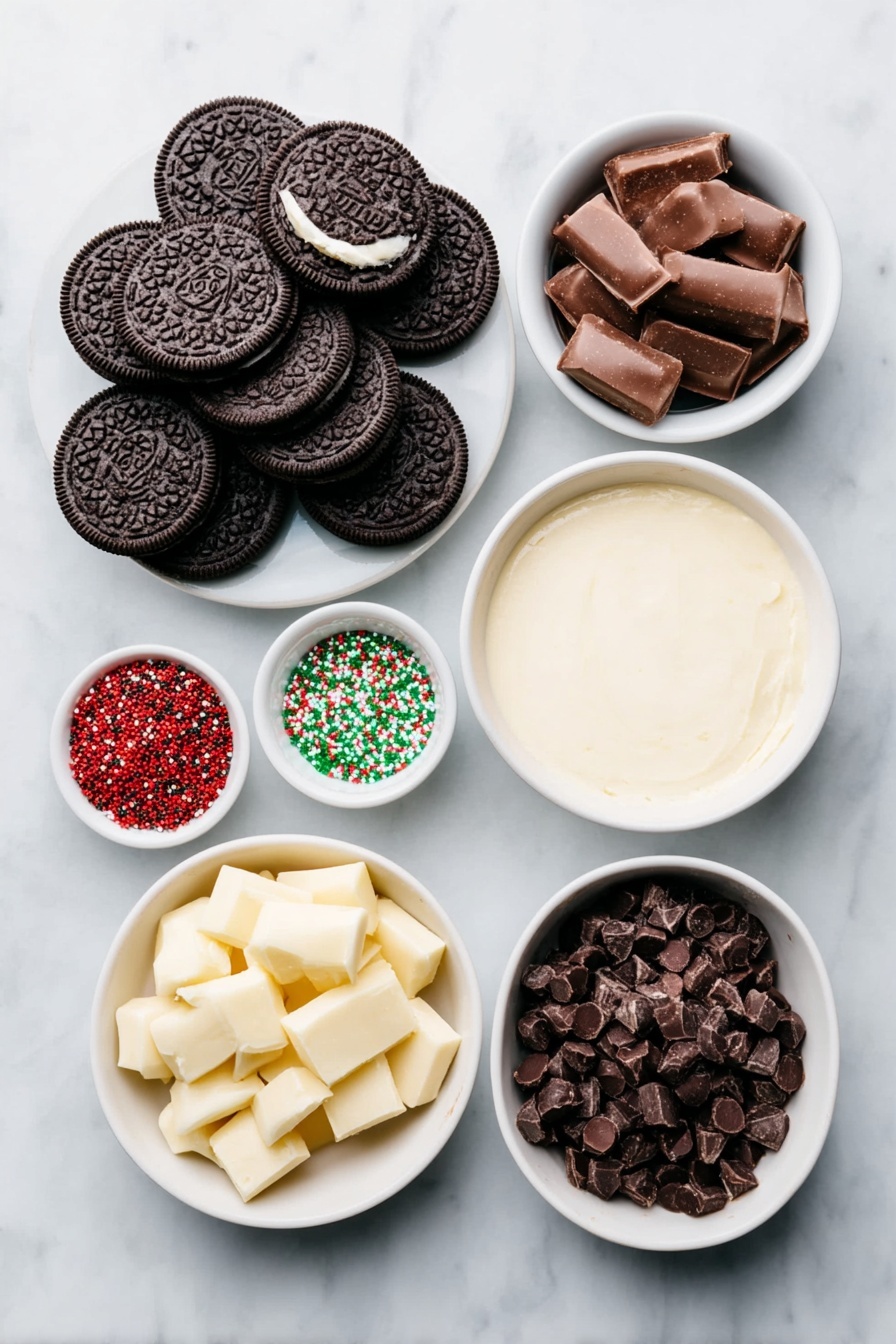
- Oreos: I love using mint Oreos for a festive twist, but you can totally go with regular or Double Stuf for extra creamy center goodness.
- Milk Chocolate Melting Wafers: These melt smoothly, stay fluid longer, and give your cookies a shiny coating—trust me, it makes all the difference.
- White Chocolate Melting Wafers: Optional but awesome for double-dipping or decorating with colored drizzles.
- Christmas Sprinkles: Add instant festive cheer and texture—pick your favorites from stars, snowflakes, or colorful nonpareils.
- Red & Green Food Coloring: Use this in the white chocolate melts to pipe cute designs or drizzle colorful accents.
Tweak to Your Taste
One of the best things about making this Festive Chocolate Covered Oreos Recipe is how customizable it is. Over the years, I’ve enjoyed tweaking it for different holidays and taste preferences — and now I encourage you to make it your own!
- Mint Oreo Swap: I usually use mint Oreos since I love the holiday vibe they add, but regular Oreos let the chocolate really shine and are always a crowd-pleaser.
- Chocolate Choices: Feel free to experiment with dark chocolate melts for a richer flavor or even add a pinch of sea salt over the dipped cookies to cut through the sweetness – I tried this last year and it was incredible!
- Double Dipping: For a fun look, dip half the cookie in milk chocolate and the other half in colored white chocolate—this really impresses guests.
- Sprinkles Galore: Don’t hesitate to mix and match sprinkle types and colors to match your party theme or gift box style.
Step-by-Step: How I Make Festive Chocolate Covered Oreos Recipe
Step 1: Melt That Chocolate Like a Pro
Start by melting your milk chocolate wafers in a microwave-safe bowl. I like to do 30-second bursts, stirring well each time so the chocolate doesn’t burn and stays silky smooth. If you’re planning the double-dip, melt your white chocolate wafers separately the same way. Trust me, using good quality melting wafers like Ghirardelli makes this step a breeze – no lumps, no seizing.
Step 2: Dip and Decorate Your Oreos
Lay a piece of wax paper under a wire rack to catch drips, then grab an Oreo and gently dip it into the melted milk chocolate using a fork. Let the excess drip off between the fork’s tines, then place the cookie on your rack. If you’re double dipping, wait until the milk chocolate sets — I usually let them sit for about 20-30 minutes — then dip half the cookie in the white chocolate for that classic two-tone look.
Step 3: Sprinkle On The Holiday Cheer
While the chocolate is still wet, sprinkle on your favorite Christmas sprinkles. Don’t wait too long here – once the chocolate starts to firm up, sprinkles won’t stick. If you want to pipe colored accents, tint your melted white chocolate with red or green food coloring, transfer to small plastic bags, snip the tip, and gently drizzle or zigzag designs on top.
Step 4: Let Them Set (Patience is a Virtue!)
Allow your dipped and decorated Oreos to set fully at room temperature for about an hour. I know it’s tempting to pop them in the fridge, but quick chilling dulls the chocolate’s shine — I’ve learned the hard way that patience gives you that beautiful glossy finish we all want.
Pro Tips for Making Festive Chocolate Covered Oreos Recipe
- Controlled Melting: Don’t rush with the microwave; melt in short intervals and stir often for perfectly smooth chocolate.
- Use a Fork for Dipping: The fork lets chocolate drain evenly so your cookies aren’t heavy or dripping everywhere.
- Double Dipping Timing: Make sure the first chocolate coat is totally set before dunking the second for clean, pretty layers.
- Skip the Fridge: Setting chocolate at room temp keeps it glossy; chilling dulls the finish, which you’ll want to avoid for holiday presentation.
How to Serve Festive Chocolate Covered Oreos Recipe
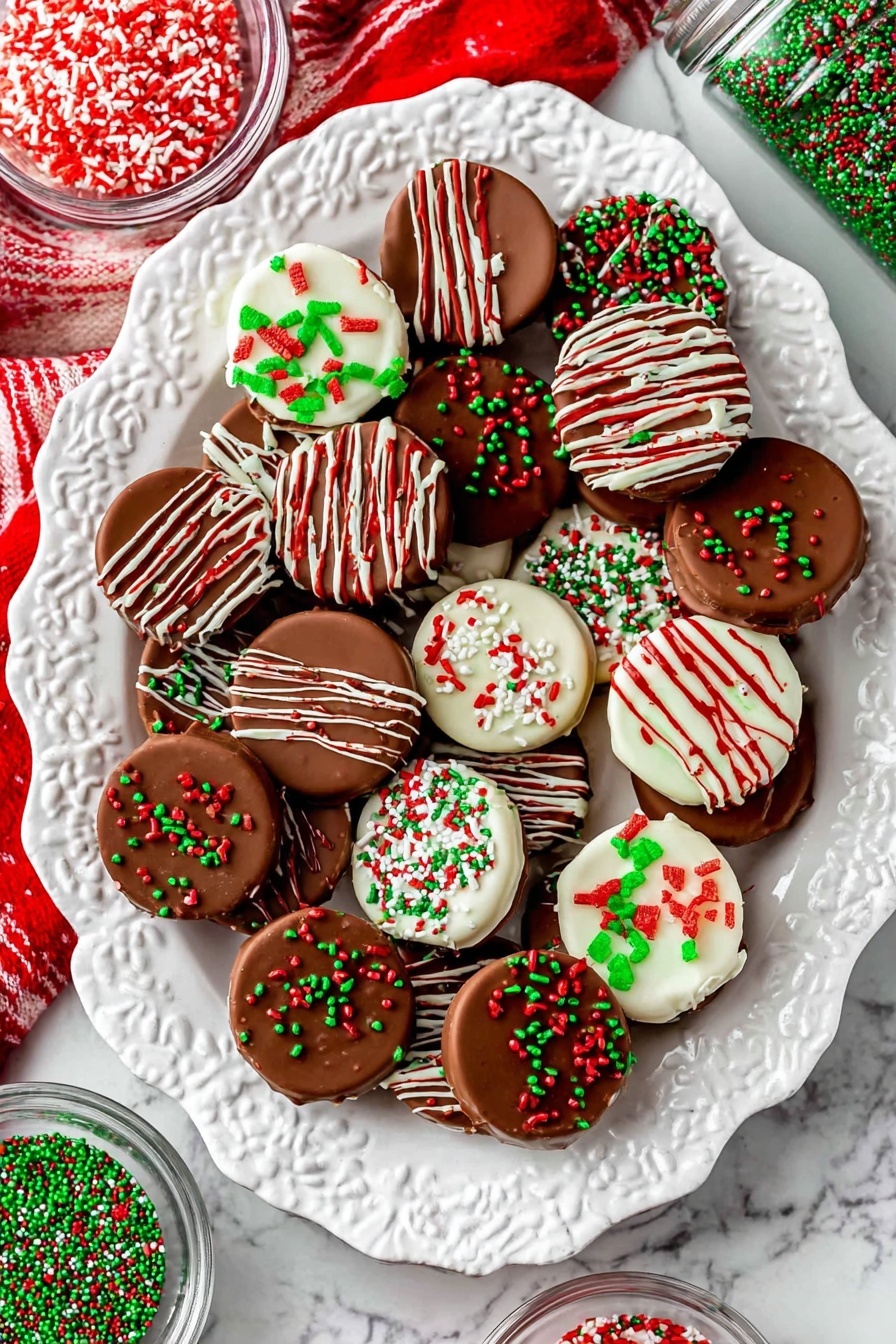
Garnishes
I love adding a mix of Christmas sprinkles – little stars, candy cane bits, and red-white-green nonpareils – to add a bit of texture and festive charm. Sometimes I pipe on little snowflake shapes with the colored white chocolate for an extra “wow” factor. These small touches make a big impression at parties.
Side Dishes
These chocolate covered Oreos are the perfect sweet companion to hot chocolate with marshmallows or a festive coffee bar. When serving at gatherings, I like to pair them with lighter cookies or fruit platters so guests have a variety of textures and flavors.
Creative Ways to Present
Try stacking them in a clear glass jar wrapped with a festive ribbon — it makes a perfect edible gift. For cookie exchanges, I arrange them on holiday-themed platters sprinkled with fake snow or pine needles for that authentic Christmas vibe. I’ve even tied small bundles of three with twine and gifted them as party favors.
Make Ahead and Storage
Storing Leftovers
I like to keep mine in an airtight container at room temperature when possible – they stay fresh and the chocolate keeps its shine for about 2 weeks. If you’re making a big batch ahead of time, storing in the fridge is fine too, just know the chocolate will lose a bit of its gloss but will still taste fantastic.
Freezing
Freezing these cookies is totally doable and they’ll last up to 6 months in a freezer-safe container. I usually separate layers with parchment paper so they don’t stick. When you’re ready to eat, thaw them at room temperature so the chocolate gently softens and gets back to its perfect texture.
Reheating
Chocolate covered Oreos don’t really need reheating, but if you prefer slightly softer chocolate, just let them sit out for 10-15 minutes at room temp. Avoid microwaving—they can melt unevenly or lose their shine quickly.
FAQs
-
Can I use regular chocolate chips instead of melting wafers for this Festive Chocolate Covered Oreos Recipe?
You can, but I don’t recommend it especially for the white chocolate part. Regular chocolate chips often don’t melt as smoothly and can seize, turning grainy or clumpy. Melting wafers like Ghirardelli are formulated to melt evenly without extra effort, making your dipping job so much easier.
-
How do I prevent the chocolate from dulling when setting the Oreos?
Setting the chocolate at room temperature instead of refrigerating helps keep it glossy and beautiful. Rapid cooling in the fridge causes the chocolate’s surface to dull and become matte. Though refrigeration is okay for storage, for final presentation, patience with room temp setting is best.
-
Can I prepare these cookies ahead of time for a party?
Absolutely! These Festive Chocolate Covered Oreos store well in airtight containers for up to 2 weeks at room temperature or longer in the fridge or freezer. This makes them perfect to prepare several days in advance, freeing up time on the party day.
-
What’s the best way to dip the Oreos so they don’t break?
Use a gentle hand and a sturdy fork when dipping, letting the excess chocolate drip off completely before placing the cookies to set. Avoid submerging for too long to prevent softening the cookie edges. Also, cooling the dipped Oreos slowly at room temp reduces breakage chances.
Final Thoughts
Honestly, this Festive Chocolate Covered Oreos Recipe is one of those holiday treats that never disappoints. It’s simple enough for even last-minute baking sessions but elegant enough to impress at any gathering. I treasure the joy on my family’s faces when they bite into these cookies, and I’m sure you’ll love gifting and sharing them just as much. So grab your Oreos and chocolate, and let’s get dipping – these beauties are waiting to bring that extra sparkle to your holiday celebrations!
Print
Festive Chocolate Covered Oreos Recipe
- Prep Time: 15 minutes
- Cook Time: 0 minutes
- Total Time: 1 hour 15 minutes
- Yield: 36 servings
- Category: Dessert
- Method: No-Cook
- Cuisine: American
- Diet: Vegetarian
Description
Delicious Christmas Chocolate Covered Oreos are an easy and festive treat perfect for holiday celebrations. Dip Oreos in smooth melted milk chocolate, optionally double-dip with white chocolate, and decorate with colorful Christmas sprinkles and food coloring for a festive touch. These treats are easy to make and keep well for weeks.
Ingredients
Cookies
- 1 (15-ounce) package Oreos (mint, regular, or Double Stuf)
Chocolate Coating
- 1 (10-ounce) package Ghirardelli milk chocolate melts
- 1 (10-ounce) package Ghirardelli white chocolate melts (optional for double dipping)
Decorations
- Assorted Christmas sprinkles, as desired
- Red food coloring, optional
- Green food coloring, optional
Instructions
- Melt Milk Chocolate: In a medium microwave-safe bowl, melt the Ghirardelli milk chocolate melts according to package instructions until smooth.
- Prepare White Chocolate (If Double-Dipping): In a separate medium microwave-safe bowl, melt the Ghirardelli white chocolate melts following the package directions. Add red and/or green food coloring as desired to tint the white chocolate.
- Dip Oreos in Milk Chocolate: Place wax paper under a wire rack. Using a fork, dip each Oreo into the melted milk chocolate, letting the excess drip off between the fork’s tines. Gently place the coated Oreos on the wire rack.
- Double Dip Oreos (Optional): Allow the milk chocolate to fully set. Then pick up each cookie and dip half of the cookie into the melted white chocolate, placing it back on the rack.
- Decorate with Sprinkles: Add Christmas-themed sprinkles before the chocolate sets to adhere them to the coating.
- Optional Drizzle: Transfer colored white chocolate to small plastic bags, cut a corner, and pipe or drizzle over the Oreos for added decoration.
- Let Chocolate Set: Allow the chocolate to fully set at room temperature for about 1 hour. Avoid placing in the fridge to maintain a glossy finish.
Notes
- Use milk chocolate for a traditional taste; semi-sweet works but is less traditional.
- Double-dipping combinations are flexible: fully milk chocolate, fully white chocolate, or any half-and-half combo.
- Chocolate candy melts or melting wafers melt more smoothly and stay melted longer than chocolate chips.
- Avoid white chocolate chips as they are difficult to melt and often seize up.
- Cookies store airtight for 2 weeks at room temperature, 1 month refrigerated, and up to 6 months frozen.
- Refrigeration or freezing may dull the chocolate’s glossy finish but does not affect flavor.
Nutrition
- Serving Size: 1 Oreo
- Calories: 150 kcal
- Sugar: 13 g
- Sodium: 85 mg
- Fat: 9 g
- Saturated Fat: 5 g
- Unsaturated Fat: 3 g
- Trans Fat: 0 g
- Carbohydrates: 17 g
- Fiber: 1 g
- Protein: 1 g
- Cholesterol: 5 mg


