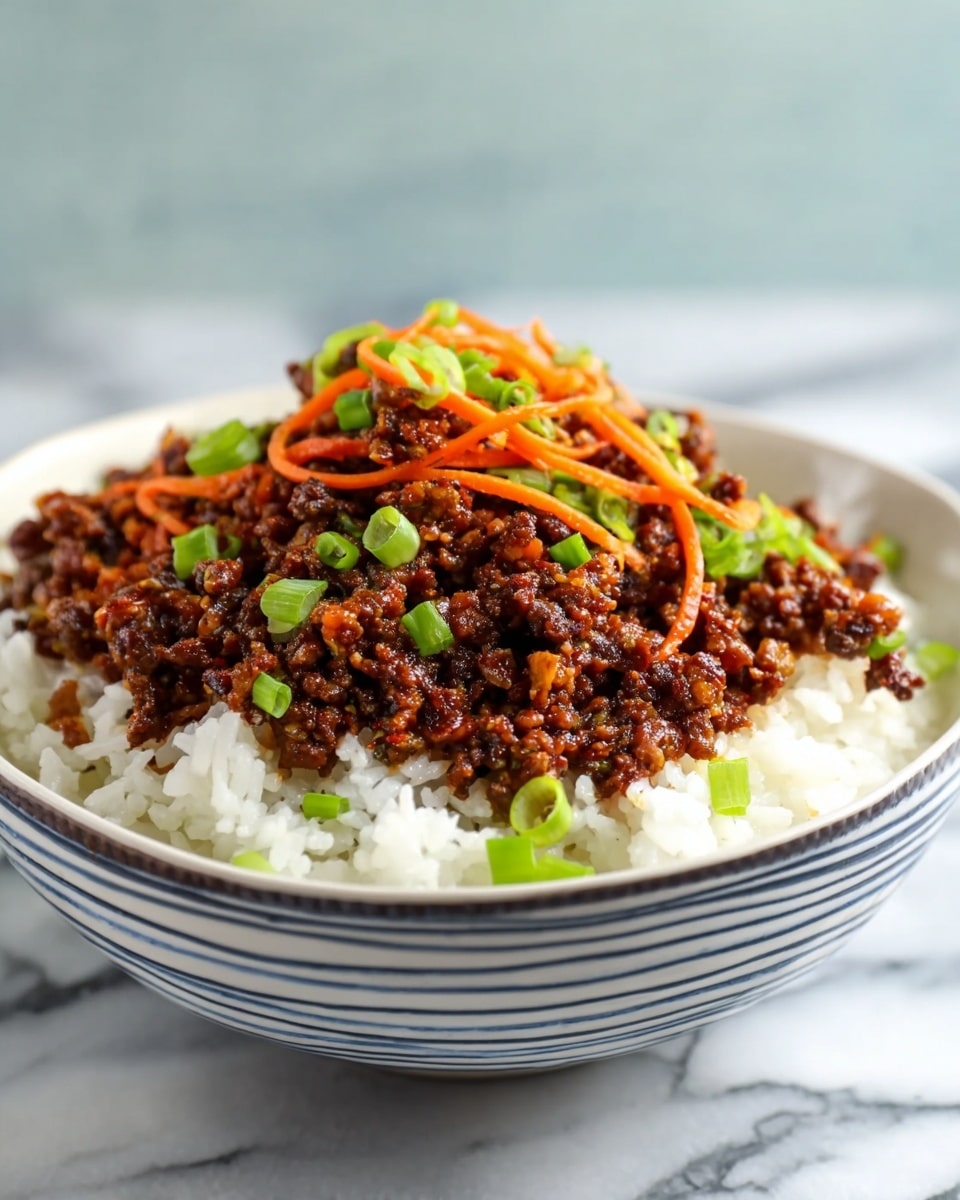
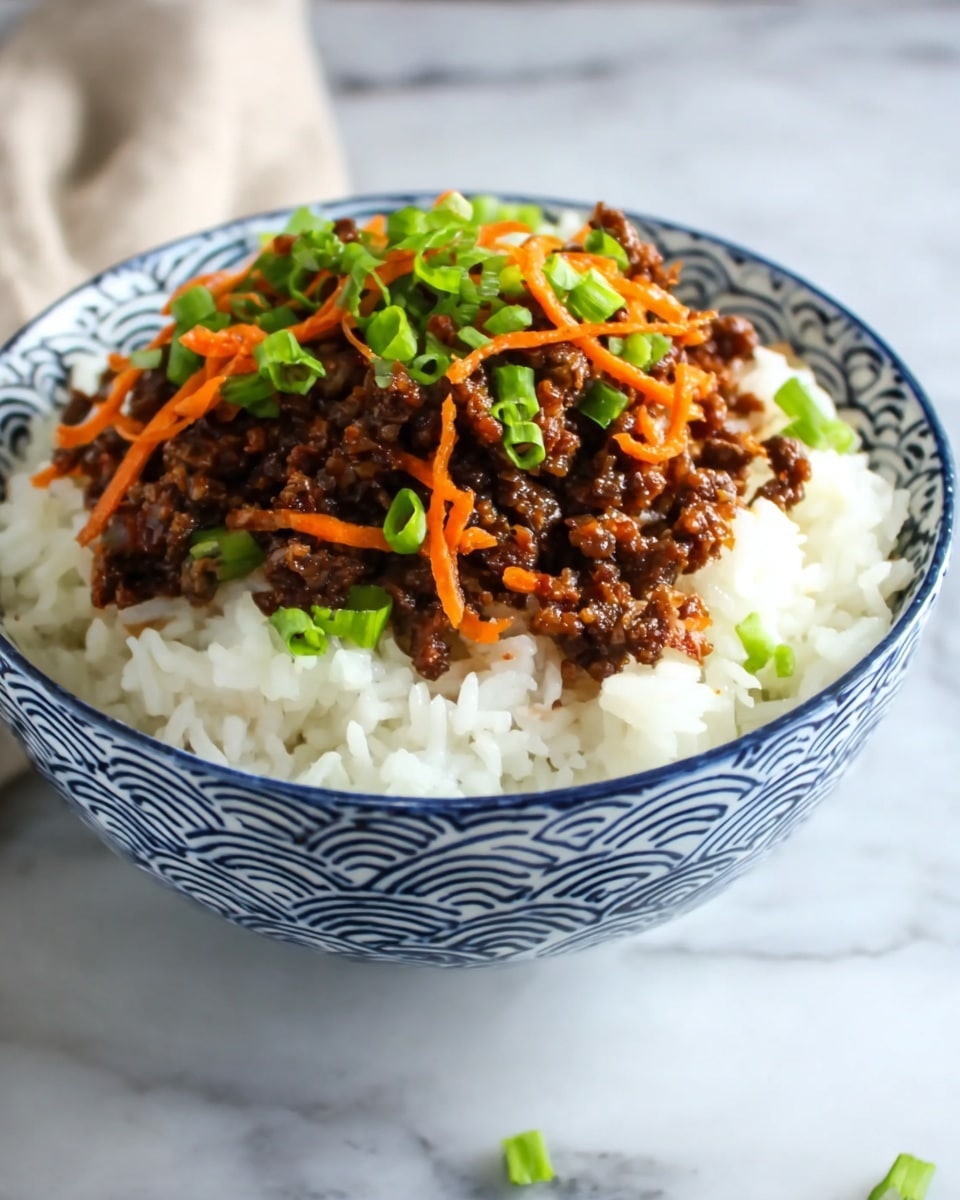
Easy Korean Beef Rice Bowls Recipe
If you’re looking for a quick, flavorful meal that feels like a warm hug at the end of the day, you’re going to love this Easy Korean Beef Rice Bowls Recipe. I often whip this up on busy weeknights because it’s fast, packed with savory-sweet goodness, and scores big with my whole family. Plus, it’s versatile enough to fit into your pantry and fridge staples without fuss.
What makes this Easy Korean Beef Rice Bowls Recipe truly special is how it balances tender ground beef with the perfect hint of garlic and ginger, all rounded out by brown sugar and soy sauce. Whether you’re new to Korean-inspired dishes or a seasoned fan, this recipe works like a charm for casual dinners, lunch meal prep, or whenever you’re craving something comforting yet simple.
Why This Recipe Works
- Quick & Easy: It comes together in about 15 minutes, perfect for busy nights or last-minute meals.
- Simple Ingredients: No complicated sauces or rare ingredients, just everyday pantry staples.
- Great for Meal Prep: Keeps well refrigerated for several days, making lunches or dinners a breeze.
- Flavorful Comfort: Balances salty, sweet, and umami flavors—truly satisfying and crowd-pleasing.

Ingredients & Why They Work
Each ingredient in this Easy Korean Beef Rice Bowls Recipe plays its role perfectly, giving you that unmistakable Korean-inspired flavor with minimal effort. From the lean ground beef to the fresh garlic and ginger, these components create a harmony that’s both rich and bright.
- Cooked rice: I like to use jasmine or long grain rice – it holds up nicely and has a mild flavor that lets the beef shine.
- Sesame oil: Adds a toasted, nutty aroma that’s essential to authentic Korean dishes.
- Lean ground beef: Keeps the dish hearty without too much grease.
- Garlic: Freshly minced garlic gives a vibrant punch, much better than powders here.
- Low sodium soy sauce: Provides the salty umami base without overpowering the dish.
- Minced ginger: Adds brightness and a subtle spicy warmth that balances the brown sugar.
- Brown sugar: Brings the perfect amount of sweetness to marry with the savory flavors.
- Sriracha (optional): For those who love a little heat, it adds a spicy kick that wakes up your palate.
- Carrots (julienne style): Adds a gentle crunch and pop of color, plus you can buy them pre-cut to save time.
- Chopped green onions: Sprinkle on top for fresh, herby notes.
- Toasted sesame seeds: Adds texture and a nutty finish.
- Red pepper flakes (optional): For an extra little heat and authentic Korean flair.
Tweak to Your Taste
I love making the Easy Korean Beef Rice Bowls Recipe my own by turning up or down the heat depending on the mood. You might find that adding extra garlic or swapping brown sugar for honey gives it a nice twist worth trying. Don’t be afraid to experiment!
- Vegetable swap: I sometimes add thinly sliced bell peppers or snap peas for extra crunch and color.
- Heat levels: A drizzle of sriracha or sprinkle of red pepper flakes can easily dial the spice up or down.
- Protein alternatives: Ground turkey or chicken work well if you want a leaner dish.
- Rice options: You can swap out white rice for brown rice or cauliflower rice if you prefer a gluten-free or lower-carb version.
Step-by-Step: How I Make Easy Korean Beef Rice Bowls Recipe
Step 1: Get your rice ready
Start by cooking your rice so it’s nice and fluffy. I usually follow the package directions—if using minute or instant rice, this literally takes just a few minutes. For stovetop or rice cooker, 1 1/3 cups uncooked rice with 2 1/2 cups water works perfectly. While the rice is cooking, you can prep the beef mixture, so timing is smooth.
Step 2: Brown the beef with sesame oil
Heat a large non-stick skillet over medium-high heat and add your sesame oil. Don’t skip this—it gives the beef that signature nutty aroma. Add the lean ground beef and cook it, breaking it apart with your spatula, until it’s nearly cooked through, about 6-10 minutes. You want a good brown sear but not overcooked or dry.
Step 3: Flavor and finish the sauce
Now stir in the finely minced garlic, soy sauce, minced ginger, brown sugar, and if you’re feeling spicy, a little sriracha. Mix everything well so the beef is coated and a flavorful sauce starts to form in the pan. This is where all the magic happens—don’t rush it! Cook for another few minutes to meld the flavors.
Step 4: Add the carrots and serve
Last but not least, toss in your julienned carrots and cook for 2 more minutes until they soften just slightly but still have a crunch. Serve this saucy beef mixture hot over the cooked rice. Finish with a scattering of chopped green onions, toasted sesame seeds, and if you like a little extra heat, a pinch of red pepper flakes. It’s as simple as that!
Pro Tips for Making Easy Korean Beef Rice Bowls Recipe
- Use fresh aromatics: Fresh garlic and ginger make a huge difference in flavor—it’s worth the extra mincing effort!
- Don’t overcook the beef: Cook just until browned but still juicy; it keeps the texture nice and tender.
- Prepare rice first: Having the rice ready before you start cooking the beef helps everything come together quickly without stress.
- Adjust sweetness gradually: Start with brown sugar and taste as you go—sometimes a little less sugar lets the savory flavors shine more.
How to Serve Easy Korean Beef Rice Bowls Recipe
Garnishes
I always finish with chopped green onions—they add a fresh crunch and bright color that brings the bowl to life. Toasted sesame seeds give a nutty texture contrast I adore, and if I’m in the mood for a little heat, a light sprinkle of red pepper flakes seals the deal perfectly.
Side Dishes
This dish pairs wonderfully with quick-pickled cucumbers or a crisp Asian slaw. For extra veggie power, I sometimes add a side of steamed broccoli or kimchi for that authentic Korean touch. Simple miso soup on the side also works beautifully when you want a complete meal.
Creative Ways to Present
For special occasions, I serve the beef in cute individual bowls layered with rice, topped with an over-easy egg, and a drizzle of spicy mayo. It feels elevated but still remains super easy. You can also turn it into lettuce wraps for a fun handheld option that impresses guests and kids alike!
Make Ahead and Storage
Storing Leftovers
I usually store leftover beef and rice separately in airtight containers in the fridge to keep textures fresh. This way, the rice won’t get mushy, and the beef stays flavorful. The leftovers keep well for about 3 days, making easy lunches or dinners during a busy week.
Freezing
If you want to freeze, I recommend freezing just the cooked beef mixture without rice in freezer-safe containers or bags. It freezes well for up to 2 months. When you’re ready to eat, thaw overnight in the fridge for best results.
Reheating
Reheat leftover beef gently in a skillet or microwave until warmed through. If the sauce looks a bit thick, splash in a little water or broth to loosen it up and keep it saucy. For the rice, I like reheating it with a damp paper towel cover in the microwave to avoid drying out.
FAQs
-
Can I use ground turkey instead of ground beef?
Absolutely! Ground turkey is a great lean substitute and works well with the flavors in this recipe. Just be sure to watch the cooking time, since turkey can dry out faster than beef.
-
How spicy is this recipe?
It’s quite mild by default, but you can easily control the heat by adding more or less sriracha and red pepper flakes according to your tolerance and preference.
-
Can I make this recipe gluten-free?
Yes! Use gluten-free tamari instead of soy sauce and make sure your sriracha or any other condiments are gluten-free certified.
-
Is this recipe good for meal prepping?
Definitely. Prepare the rice and beef ahead, store separately in containers, and reheat for easy lunches or dinners during the week.
-
What type of rice is best for this dish?
Jasmine or long-grain white rice works best because it has a fluffy texture that complements the saucy beef nicely, but brown rice is a great hearty option too.
Final Thoughts
This Easy Korean Beef Rice Bowls Recipe has become one of my go-tos when I want a quick, satisfying meal with minimal cleanup and maximum flavor. I love how cozy and approachable it is—like having a little taste of Seoul right in my own kitchen. I hope you try making it soon, and let it become a favorite in your recipe rotation too. Enjoy!
Print
Easy Korean Beef Rice Bowls Recipe
- Prep Time: 5 minutes
- Cook Time: 10 minutes
- Total Time: 15 minutes
- Yield: 4 servings
- Category: Main Course
- Method: Stovetop
- Cuisine: Korean
Description
Easy Korean Beef Rice Bowls featuring tender ground beef simmered in a savory-sweet sauce with garlic, ginger, and soy, served over fluffy rice and topped with fresh carrots, green onions, and toasted sesame seeds for a quick and delicious meal.
Ingredients
Main Ingredients
- 4 cups cooked rice (about 1 1/3 cups uncooked rice or use minute/instant rice)
- 1 teaspoon sesame oil
- 1 pound lean ground beef
- 3 cloves garlic, finely minced or pressed
- 4 tablespoons low sodium soy sauce
- 1 tablespoon minced ginger
- 3 tablespoons brown sugar
- Sriracha, optional
- 1 cup carrots, cut julienne style (can be pre-cut)
Garnishes
- Chopped green onions
- Toasted sesame seeds
- Red pepper flakes, optional
Instructions
- Cook the rice: Prepare the rice according to package directions if using instant or minute rice, or cook 1 1/3 cups uncooked rice with 2 1/2 cups water in a pot or rice cooker until fluffy.
- Heat the skillet: Place a large non-stick skillet over medium-high heat and add 1 teaspoon sesame oil, allowing it to heat for about 1 minute.
- Brown the beef: Add 1 pound lean ground beef to the hot skillet and cook, stirring occasionally, until it is browned and almost fully cooked through, about 10 minutes.
- Add flavorings: Stir in 3 cloves garlic, 4 tablespoons low sodium soy sauce, 1 tablespoon minced ginger, 3 tablespoons brown sugar, and optional sriracha; mix well until a small amount of sauce begins to form.
- Cook the carrots: Add 1 cup julienne-cut carrots to the beef mixture and cook for about 2 minutes until the carrots soften slightly but still retain some crunch.
- Serve and garnish: Spoon the beef mixture over the cooked rice, then top with chopped green onions, toasted sesame seeds, and a sprinkle of red pepper flakes if desired.
Notes
- For make-ahead convenience, prepare the recipe fully and store it in an airtight container in the refrigerator for up to 3 days. Reheat gently in the microwave before serving.
- Use lean ground beef to reduce excess fat and keep the dish lighter.
- If you prefer a spicier bowl, add more sriracha or red pepper flakes to taste.
- Substitute rice with cauliflower rice for a lower-carb option.
- Julienne carrots can be replaced with thinly sliced bell peppers or snap peas for variety.
Nutrition
- Serving Size: 1 serving
- Calories: 450 kcal
- Sugar: 10 g
- Sodium: 600 mg
- Fat: 20 g
- Saturated Fat: 7 g
- Unsaturated Fat: 10 g
- Trans Fat: 0 g
- Carbohydrates: 42 g
- Fiber: 3 g
- Protein: 28 g
- Cholesterol: 80 mg


