
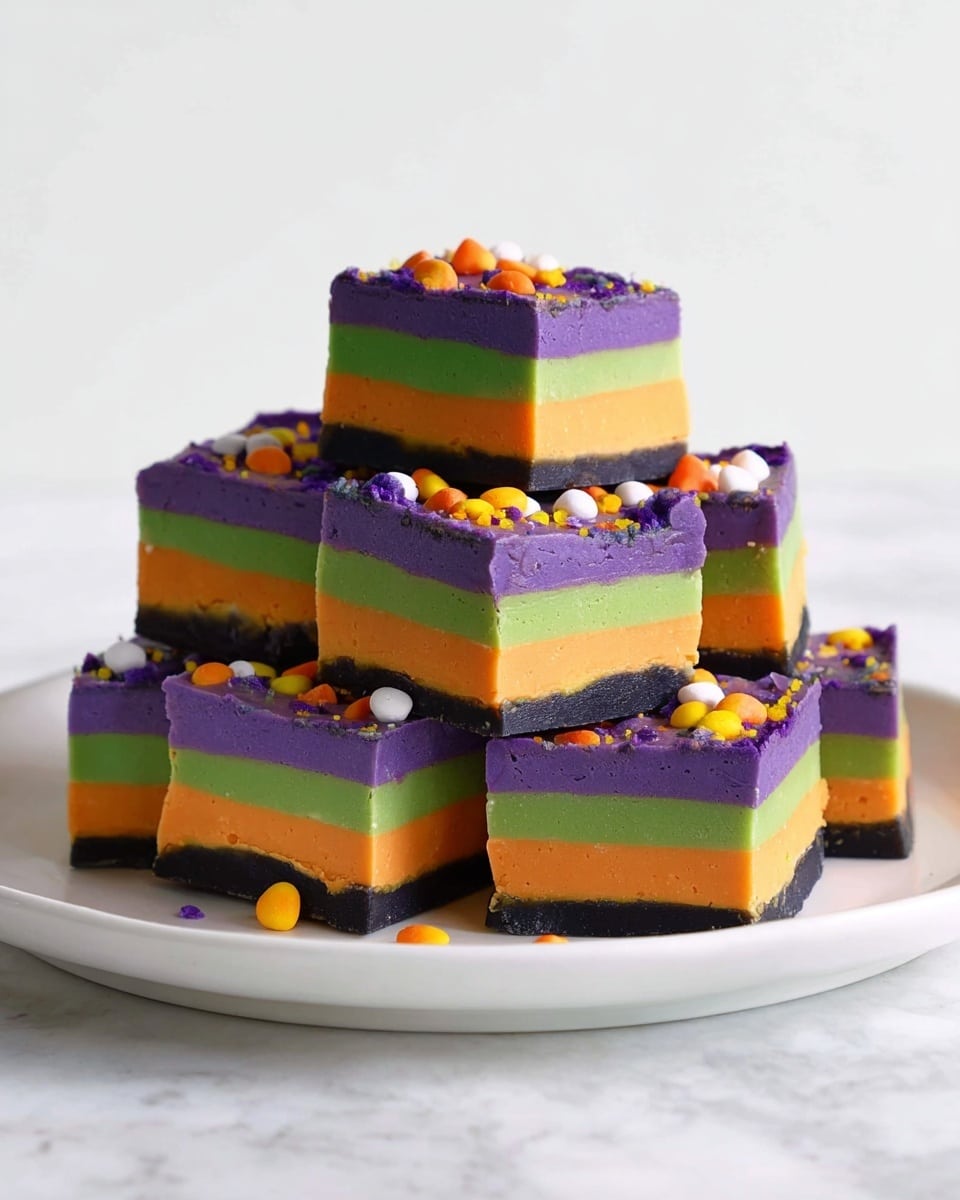
Easy Halloween Fudge Recipe
Hey, if you’re on the hunt for a show-stopping but super simple treat, you’ve got to try this Easy Halloween Fudge Recipe. It’s one of those recipes I turn to when I want something festive, colorful, and ridiculously tasty without dealing with complicated steps. Seriously, the way the white chocolate combines with the sweetened condensed milk creates this irresistibly creamy fudge that you can easily customize with spooky colors and sprinkles. Keep reading and I’ll walk you through everything so you nail this Halloween hit every time!
Why This Recipe Works
- Simple Ingredients: Only a handful of pantry staples come together effortlessly for impressive results.
- Vibrant Colors: Dividing and coloring the fudge creates that fun Halloween vibe everyone loves.
- Customizable Texture: The method makes it easy to keep fudge silky smooth and perfect with a quick zap in the microwave.
- Festive Toppings: Sprinkles or candies add crunch and a playful touch that keeps kids and adults coming back for more.

Ingredients & Why They Work
This Easy Halloween Fudge Recipe uses classic ingredients that blend beautifully for creamy, sweet, and colorful results. I always recommend grabbing high-quality white chocolate because it melts beautifully and tastes great. Plus, the sweetened condensed milk adds just the right sweetness and texture without fuss. The food coloring and sprinkles? That’s where the festive fun comes in!
- White chocolate: Choose good quality chunks or bars for a smooth melt and rich flavor.
- Sweetened condensed milk: It’s the magic that sweetens and binds everything into fudge perfection.
- Food coloring: Gel or paste colors work best to keep the fudge texture silky without thinning it.
- Vegetable oil: Helps prevent the chocolate from seizing when you add colors, keeping it glossy.
- Halloween sprinkles or candies: Adds color, crunch, and that fun holiday spirit everyone adores.
Tweak to Your Taste
What I love about this Easy Halloween Fudge Recipe is how easily you can make it your own. Whether you want to dial up the colors, add a different mix of festive sprinkles, or even swap in almond extract for a twist, this recipe is a perfect canvas. You can totally make it gluten-free or nut-free and it still shines.
- Variation: Once, I stirred in mini chocolate chips into the purple fudge – it added a delightful surprise with every bite.
- Dietary tweak: Using dairy-free white chocolate lets you whip this up for vegan friends without losing flavor.
- Seasonal change: Swap Halloween colors for red, green, and white to make this your go-to Christmas fudge too.
Step-by-Step: How I Make Easy Halloween Fudge Recipe
Step 1: Prep Your Pan and Ingredients
Start by lining an 8×8-inch baking tin with baking paper. This little prep step saves you so much hassle when it comes to removing your fudge later — trust me, I’ve been there with fudge stuck to every surface! Then, break your white chocolate into chunks so it melts evenly.
Step 2: Melt Chocolate and Condensed Milk
Place the chocolate and sweetened condensed milk in a saucepan over low heat. Stir gently and patiently — this part needs a gentle touch so your chocolate doesn’t burn or seize. You’re aiming for a thick, glossy mixture that’s completely smooth. If you rush this, you’ll end up with lumps and a grainy texture, so low and slow is the way to go.
Step 3: Divide and Color Your Fudge
Once melted, divide the fudge mixture evenly into four bowls. Now the fun part: add your Halloween food coloring (black, orange, green, and purple). Add one teaspoon of vegetable oil to each bowl too — this helps keep the chocolate from seizing when you mix in the colors, which I learned the hard way after one panicked batch!
Step 4: Layer and Add Sprinkles
Spread each colored fudge layer into your lined tin, one by one. If the fudge starts thickening and becomes tricky to spread, pop it in the microwave for 10-20 seconds to soften it up again — this little trick saved me countless times. After layering, sprinkle generously with Halloween-themed cake sprinkles or candies. It adds that perfect festive crunch and cuteness.
Step 5: Chill and Cut
Refrigerate your fudge for at least 4 hours, or until fully firm. Once set, carefully lift it out of the tin using those baking paper edges and cut into squares. I love wrapping individual pieces in clear wax paper to hand out during Halloween parties — so much easier (and mess-free) for sharing!
Pro Tips for Making Easy Halloween Fudge Recipe
- Patience While Melting: Keep the heat low and stir slowly to avoid burning your chocolate – fudge can be sensitive!
- Use Gel Food Coloring: It’s more concentrated and won’t thin your fudge like liquid colors.
- Microwave in Short Bursts: Heat the fudge 10-20 seconds max if it thickens mid-spread – better safe than overheated.
- Line Your Tin Well: Trust me, lining with baking paper means you’ll lift out the fudge easily without cracks or broken edges.
How to Serve Easy Halloween Fudge Recipe
Garnishes
I swear by festive Halloween sprinkles — I like the spooky mix that combines tiny pumpkins, ghosts, and candy corn shapes. It adds both color and texture without overwhelming the fudge’s creamy goodness. Sometimes I’ll sprinkle edible glitter over the top for a little magical shimmer, especially for kids’ parties.
Side Dishes
This fudge is rich and sweet, so I like pairing it with something light and crisp like fresh apple slices or a cup of cinnamon-spiced apple cider as the perfect fall complement. If you’re serving adults, a small glass of dessert wine or coffee really balances the sweetness.
Creative Ways to Present
One year, I layered the fudge colors in a clear glass dish on a Halloween-themed platter and surrounded it with mini candy pumpkins and fake spider webs for a dramatic party centerpiece. Another time, I made small bite-size fudge balls rolled in crushed cookies or candy, then popped onto lollipop sticks for easy grab-and-go treats. So fun!
Make Ahead and Storage
Storing Leftovers
I store leftover fudge in an airtight container in the fridge. It keeps well for up to two weeks, and honestly, sometimes it tastes even better after a few days once the flavors settle. Just make sure the container is sealed tightly to avoid fridge odors sneaking in.
Freezing
Freezing fudge has worked well for me when I made a big batch. I wrap individual squares in wax paper, then place them in a freezer-safe container. When thawed in the fridge overnight, the fudge retains its creamy texture without drying out — perfect for prepping ahead of big Halloween gatherings.
Reheating
If your fudge hardens too much in the fridge, just let it sit at room temp for 10-15 minutes before serving to soften slightly. Avoid microwaving leftovers as heat can alter the texture and cause the chocolate to separate. Patience is key here to keep it luscious!
FAQs
-
Can I use dark or milk chocolate instead of white chocolate in this Easy Halloween Fudge Recipe?
You can switch out white chocolate for dark or milk chocolate, but be aware it will change the flavor profile and color of the fudge significantly. White chocolate has a neutral base that works perfectly with vibrant food coloring, whereas dark or milk chocolate colors will be muted or brownish. Also, adjust sweetness accordingly since dark chocolate is less sweet.
-
My fudge looks grainy after melting the chocolate—what went wrong?
This usually happens if the heat was too high or the chocolate got overheated. Chocolate is sensitive and can seize or separate quickly. Always melt on low heat and stir gently. Adding a small amount of vegetable oil (as in the recipe) helps keep it smooth when adding food coloring as well.
-
Can I make the fudge vegan or dairy-free?
Yes! Use a dairy-free white chocolate alternative and swap sweetened condensed milk with a vegan condensed milk product (available in some stores or homemade from coconut milk). This will slightly alter the flavor, but you’ll still get delicious and creamy results.
-
How long does this fudge last at room temperature?
Due to the sweetened condensed milk and chocolate, it’s best kept refrigerated and eaten within two weeks. At room temperature, fudge can get soft and spoil faster depending on your climate; I suggest storing it in the fridge to keep the texture and freshness.
-
What can I use to line the baking tin if I don’t have baking paper?
If you don’t have baking paper, try greasing the tin well with butter or vegetable oil. You can also use aluminum foil, greased on the shiny side, but baking paper is definitely the easiest for lifting your fudge out without cracks.
Final Thoughts
This Easy Halloween Fudge Recipe holds a special place in my heart because it combines festive fun with simplicity — something anyone can whip up quickly, even last minute. I love how the colors brighten the kitchen and the rich, creamy texture wins raves every time. Give it a try this spooky season and watch how it becomes an instant classic with your friends and family. You’ll feel like a fudge-making wizard in no time!
Print
Easy Halloween Fudge Recipe
- Prep Time: 15 minutes
- Cook Time: 10 minutes
- Total Time: 4 hours 25 minutes
- Yield: 16 servings
- Category: Dessert
- Method: Stovetop
- Cuisine: American
Description
This Easy Halloween Fudge recipe is a fun and festive treat featuring smooth white chocolate fudge tinted in vibrant Halloween colors and topped with spooky sprinkles. Perfect for holiday celebrations, this no-bake fudge comes together quickly on the stovetop and sets in the fridge for a rich, creamy delight.
Ingredients
Main Ingredients
- 450 g white chocolate (16 oz)
- 397 g sweetened condensed milk (14 oz)
- 1 teaspoon vegetable oil
- 2-3 tablespoons Halloween cake sprinkles or candies (such as Cake Decor spooky mix sprinkles)
Food Coloring
- Black food coloring
- Orange food coloring
- Green food coloring
- Purple food coloring
Instructions
- Prepare the pan: Line an 8×8-inch baking tin with baking paper to prevent sticking.
- Melt the chocolate: Break the white chocolate into chunks and place it with the sweetened condensed milk into a saucepan. Warm over low heat on the stove, stirring gently until the chocolate is fully melted and the mixture is thick and glossy.
- Divide and color the fudge: Transfer the fudge mixture equally into 4 separate bowls. Add black food coloring to one bowl, orange to another, green to the third, and purple to the last. Add a few drops of vegetable oil to each bowl to keep the chocolate smooth and prevent seizing. Stir each bowl until the color is evenly distributed.
- Layer the fudge: Pour each colored fudge mixture into the prepared tin one layer at a time. If the fudge starts to thicken while working, gently warm it in the microwave for 10-20 seconds to restore smoothness before spreading.
- Add the sprinkles and chill: Sprinkle the Halloween cake decorations evenly over the top of the fudge. Refrigerate the fudge for 4 hours or until it is firm and set.
- Serve: Remove the fudge from the tin using the baking paper, cut into squares, and enjoy your festive Halloween treat!
Notes
- Store leftover fudge in an airtight container in the refrigerator for up to 2 weeks.
- If the fudge thickens too much while layering, always warm gently to keep it spreadable without overheating.
- You can substitute vegetable oil with a mild-tasting oil like light olive oil if preferred.
- Use good quality white chocolate for a smoother, creamier texture.
- Feel free to customize the sprinkles based on your holiday theme or preferences.
Nutrition
- Serving Size: 1 square (approx. 30 g)
- Calories: 160 kcal
- Sugar: 25 g
- Sodium: 40 mg
- Fat: 7 g
- Saturated Fat: 4 g
- Unsaturated Fat: 2 g
- Trans Fat: 0 g
- Carbohydrates: 23 g
- Fiber: 0 g
- Protein: 1 g
- Cholesterol: 10 mg


