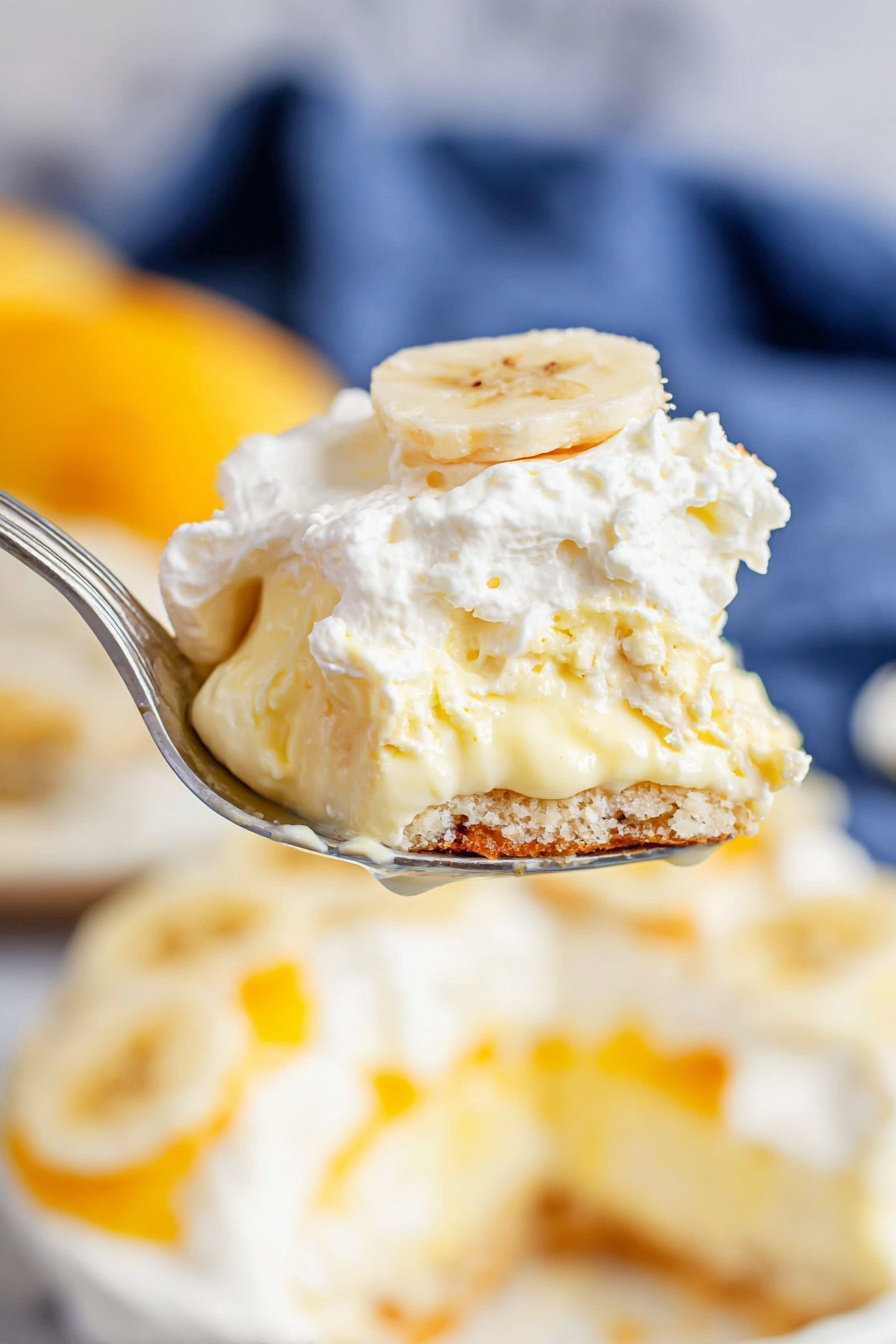
Easy Banana Pudding Recipe
If you’re craving a dessert that whispers comfort with every bite, I’ve got just the thing for you. This Easy Banana Pudding Recipe has been a beloved staple in my kitchen for years, and trust me—it’s fan-freaking-tastic. Creamy, sweet, and just the right amount of banana goodness layered with those iconic Nilla wafers, it’s a dessert that feels like a warm hug after a long day. Stick around, and I’ll walk you through my favorite way to make this classic treat come alive, plus some handy tips to make sure yours turns out perfect every single time.
Why This Recipe Works
- Creamy Texture: The combination of cream cheese and instant pudding mix creates the perfect silky, rich base every time.
- Balanced Sweetness: Sweetened condensed milk brings just the right amount of sweetness without overpowering the bananas.
- Easy Layers: Quick layering with Nilla wafers and fresh bananas means minimal fuss for maximum flavor.
- Chill Time Perfection: Letting it rest in the fridge softens wafers and melds the flavors, making the pudding irresistible.

Ingredients & Why They Work
Each ingredient in this Easy Banana Pudding Recipe plays a key role in balancing flavor and texture, so it’s great to use fresh bananas and the right kind of pudding mix. I’ll share a few shopping tips to help you grab exactly what you need without guesswork.

- Cream Cheese: Softened to room temp for smooth blending—don’t skip this or you’ll get lumps.
- Sweetened Condensed Milk: Adds sweetness and creamy density; make sure it’s sweetened, not evaporated milk.
- Instant Vanilla Pudding Mix: Must be instant (not cook-and-serve) so it sets quickly and maintains that perfect pudding texture.
- Milk (2% or higher): Helps create that luscious pudding base without being too watery—whole milk or 2% works best.
- Vanilla Extract: Enhances flavor and complements the bananas with gentle warmth.
- Whipped Topping (Cool Whip): Gives lightness to the pudding; just make sure to thaw it fully.
- Nilla Wafers: Classic crispness that softens to cake-like perfection during chilling—buy fresh for best taste.
- Bananas: The star of the show, ripe but firm bananas bring fresh, natural sweetness—use 5 to 7 depending on size and your banana love.
Tweak to Your Taste
Now, I’m all about making recipes my own, and this banana pudding is no exception. You can easily dress it up or down depending on what you’ve got on hand or how you like your flavors. Feel free to experiment a bit—you might even discover a new favorite twist!
- Banana Cream Pudding Swap: I sometimes swap the vanilla pudding mix with banana cream pudding powder for an even more intense banana vibe—super tasty!
- Banana Extract Addition: If you want a deeper banana punch without extra slices, add a teaspoon of banana extract along with the vanilla.
- Gluten-Free Alternative: Swap Nilla wafers for gluten-free vanilla cookies to keep it friendly for gluten-sensitive friends.
- Extra Fruity Layers: Try adding thinly sliced strawberries or raspberries for a pop of color and flavor that surprisingly pairs well.
Step-by-Step: How I Make Easy Banana Pudding Recipe
Step 1: Whip Up That Dreamy Pudding Base
Start by beating softened cream cheese in a large bowl with an electric mixer on medium speed until it’s smooth and fluffy—this is crucial to avoid lumps that can ruin the texture. Then, pour in the sweetened condensed milk, instant vanilla pudding mix, milk, and vanilla extract. Mix everything together thoroughly until you can’t see the pudding mix powder anymore. Last but not least, gently fold in half of the thawed whipped topping—that lightens the mixture and makes the pudding so dreamy. If you don’t have a mixer, a whisk works, but it’ll take a bit more elbow grease.
Step 2: Layer Like You Mean It
Grab a trifle bowl, a large glass bowl, or a simple 9×13-inch baking dish. Start with a layer of Nilla wafers — about one-third of the box to cover the base. Then add a single layer of your sliced bananas, making sure to spread them evenly so every bite has a bit of banana. Spoon one-third of that luscious pudding on top, enough to cover the bananas and wafers well. Repeat this layering process two more times until you’ve used up your wafers, bananas, and pudding. Trust me, layering makes a huge difference in both presentation and flavor.
Step 3: Top It and Chill It
Finish with the remaining whipped topping spread across the top—you want it nice and even for that classic look and creaminess on top. Cover the dish with plastic wrap and pop it into the fridge for at least 1 to 2 hours. This chill time lets the wafers soften to a cake-like texture and thickens the pudding so it’s not runny. I usually prep this in the morning so it’s perfect by dinner or dessert later in the day!
Pro Tips for Making Easy Banana Pudding Recipe
- Room Temp Cream Cheese is Key: If you forget to soften your cream cheese, zap it in the microwave for 10-15 seconds, but watch closely—you don’t want it melting or clumpy.
- Instant Pudding Only: This isn’t the time for cook-and-serve pudding mix; instant is a must for that perfect, scoopable texture.
- Bananas on the Firmer Side: Use bananas that are ripe but still firm; too ripe and your pudding might get mushy or brown quickly.
- Chill Long Enough: Don’t rush the fridge time! The pudding thickens and flavors meld best after a solid couple of hours.
How to Serve Easy Banana Pudding Recipe

Garnishes
I love topping my banana pudding with a little crushed Nilla wafers or some toasted pecans for crunch. If I’m feeling fancy, a few chocolate shavings or a sprinkle of cinnamon adds a nice twist. Fresh banana slices on top right before serving also give that extra “wow” factor.
Side Dishes
This pudding is usually the star on its own, but it pairs beautifully with simple sides like a fresh berry salad or a scoop of vanilla ice cream for those who want a chilled, creamy companion. For lunch or dinner sides, I often keep it light—maybe a crisp green salad or grilled chicken—so the pudding gets all the attention.
Creative Ways to Present
For special gatherings, I’ve layered this banana pudding in individual mason jars—the perfect size for personal desserts. Add a dollop of whipped cream, a wafer on the side, and a small banana fan on top for an eye-catching presentation that always earns compliments.
Make Ahead and Storage
Storing Leftovers
Store leftovers covered tightly with plastic wrap or an airtight lid in the fridge. It’ll keep beautifully for up to 3 days. Just keep in mind the bananas might brown a bit on top—that’s normal, and you can slice fresh bananas over before serving again to refresh the look.
Freezing
I’ve tried freezing banana pudding before, but I found the texture changes quite a bit—bananas get mushy and the pudding can separate. So, I’d recommend eating it fresh or storing in the fridge instead for the best experience.
Reheating
This pudding is best served cold, so reheating isn’t really ideal. If leftovers have chilled too long and feel icy, just let it sit at room temperature for 15-20 minutes before serving to take the chill off.
FAQs
-
Can I make this Easy Banana Pudding Recipe dairy-free?
Absolutely! You can substitute the cream cheese and whipped topping with dairy-free versions (like vegan cream cheese and coconut whipped cream). Use a dairy-free instant pudding mix or make your own pudding base with cornstarch and plant milk. Just keep an eye on texture—it might be slightly different, but still delicious.
-
Why won’t my banana pudding set properly?
Most often, it’s because the wrong pudding mix was used. Make sure you use instant pudding mix—not cook-and-serve. Also, double-check you’re using sweetened condensed milk, which contributes to the creaminess and helps everything set.
-
Can I prepare this Easy Banana Pudding Recipe the night before?
Yes! In fact, making it the night before improves the flavor and texture as the wafers soften perfectly. Just be sure to cover it well and refrigerate so the bananas stay fresh.
-
What’s the best way to keep bananas from browning in the pudding?
Using slightly underripe bananas helps. You can also drizzle a tiny bit of lemon juice over banana slices before layering to keep them bright. But some browning is natural over time, so fresh banana slices added just before serving work best.
Final Thoughts
This Easy Banana Pudding Recipe reminds me of lazy Sunday afternoons and family gatherings where everyone sneaks bites before the meal’s even over. It’s simple, nostalgic, and downright irresistible. I hope you have as much fun making it as I do—you’ll love how quickly it comes together and how it brightens any occasion with that creamy, fruity goodness. Go ahead, grab those bananas and wafers, and treat yourself—you deserve it!
Print
Easy Banana Pudding Recipe
- Prep Time: 25 minutes
- Cook Time: 0 minutes
- Total Time: 25 minutes
- Yield: 12 servings
- Category: Dessert
- Method: No-Cook
- Cuisine: American
Description
A creamy and delicious banana pudding made with cream cheese, sweetened condensed milk, instant vanilla pudding, and layers of Nilla wafers and fresh bananas, topped with whipped topping for a perfect dessert.
Ingredients
Main Ingredients
- 8 ounce block cream cheese, softened to room temperature
- 14 ounce can sweetened condensed milk
- 5 ounce package INSTANT vanilla pudding mix
- 3 cups milk (2% or higher)
- 2 teaspoons vanilla extract
- 8 ounce tub whipped topping (COOL WHIP), thawed (divided use)
- 11 ounce box Nilla wafers (divided use)
- 5-7 bananas, peeled and sliced (divided use)
Instructions
- Beat Cream Cheese: In a large bowl, beat the cream cheese with an electric mixer on medium speed until smooth and fluffy, ensuring there are no lumps.
- Add Pudding Ingredients: Add the sweetened condensed milk, instant vanilla pudding mix, milk, and vanilla extract to the bowl. Mix everything together until well combined and smooth.
- Incorporate Whipped Topping: Gently stir in half of the whipped topping to the pudding mixture, folding it until fully incorporated.
- Layer Ingredients: In a trifle dish, large bowl, or 9×13-inch baking dish, place one-third of the Nilla wafers in a single layer on the bottom.
- Add Banana Layer: Arrange a single layer of the sliced bananas evenly over the wafers.
- Pour Pudding: Pour one-third of the pudding mixture over the bananas to cover them completely.
- Repeat Layers: Repeat the layering process two more times with the remaining wafers, bananas, and pudding mixture.
- Top with Whipped Topping: Spread the remaining whipped topping evenly over the top layer of pudding for a creamy finish.
- Chill: Cover the dish with plastic wrap and refrigerate for at least one to two hours to allow the pudding to thicken and the wafers to soften.
- Serve: After chilling, serve the banana pudding cold for the best flavor and texture.
Notes
- Use INSTANT pudding mix only, not Cook and Serve, to ensure proper setting.
- Make sure to use sweetened condensed milk, not evaporated milk, for sweetness and texture.
- You can substitute banana cream pudding flavor for the vanilla pudding or use banana extract instead of vanilla extract.
- The cream cheese must be at room temperature to avoid lumps and ensure a smooth mixture.
- Banana quantity can vary based on size and preference; 5-7 bananas is recommended for a good banana-to-pudding ratio.
Nutrition
- Serving Size: 1 cup
- Calories: 320 kcal
- Sugar: 30 g
- Sodium: 180 mg
- Fat: 15 g
- Saturated Fat: 9 g
- Unsaturated Fat: 5 g
- Trans Fat: 0 g
- Carbohydrates: 40 g
- Fiber: 2 g
- Protein: 4 g
- Cholesterol: 40 mg

