
Dulce de Leche Cheesecake Bars Recipe
If you’re craving something indulgent yet easy to share, you’re going to love this Dulce de Leche Cheesecake Bars Recipe. Imagine a buttery graham cracker crust layered with silky, creamy cheesecake infused with rich, caramel-like dulce de leche — and topped with a luscious dulce de leche drizzle sprinkled with a kiss of sea salt. It’s my go-to for gatherings and cozy nights when I want a dessert that feels fancy but actually comes together without stress. Trust me, once you make these bars, they’ll become a fast favorite in your dessert rotation!
Why This Recipe Works
- Balanced Flavors: The sweetness of dulce de leche pairs perfectly with the slight tang of cream cheese for a harmonious taste.
- Perfect Texture: A crisp, golden crust supports a smooth, creamy filling with just the right “set” without cracking.
- Simple Steps with Big Impact: This recipe skips complicated techniques but delivers wow-worthy results every time.
- Flexibility: You can make your own dulce de leche or use store-bought, and tweak the bars to your liking.

Ingredients & Why They Work
The ingredients here are straightforward but chosen to create the ideal texture and flavor combination for my Dulce de Leche Cheesecake Bars Recipe. Using room temperature cream cheese and eggs is key to a smooth batter, and don’t skip the cinnamon in the crust — it adds a subtle warmth that elevates the whole bar.

- Graham Crackers: Opt for finely ground crumbs to avoid a gritty crust texture; I usually blitz mine in a food processor for even crumbs.
- Sugar: Used in both crust and filling for sweetness; standard granulated sugar works perfectly here.
- Ground Cinnamon: Just a pinch to infuse warmth without overpowering the dulce de leche.
- Melted Butter: Provides richness and helps bind the crust firmly; use unsalted so you control the saltiness.
- Cream Cheese: Use full-fat and bring it to room temperature for a creamy, smooth filling; it’s the heart of the cheesecake.
- Eggs: Also room temperature to help the filling set without cracking and ensure even blending.
- Dulce de Leche: The star ingredient — I’ve tried both store-bought and homemade and both shine; just make sure it’s stirred well before measuring.
- Vanilla Extract: Adds depth and rounds out the flavors.
- Heavy Whipping Cream: Thins the dulce de leche for the topping to make it pourable but still rich.
- Fleur de Sel: A sprinkle of this finishing salt on top enhances the dulce de leche’s sweetness and adds a nice contrast.
Tweak to Your Taste
I like to keep this recipe pretty classic since the dulce de leche gives such a wonderful flavor all on its own, but you can absolutely make it your own. Over the years, I’ve played with a few variations that I want you to know about so you can choose what feels best for your kitchen and crowd.
- Adding Nuts: I’ve sprinkled chopped pecans or toasted almonds on top before chilling — it adds a lovely crunch that contrasts with the creamy texture.
- A Hint of Coffee: Stirring a teaspoon of instant espresso powder into the filling can deepen the flavor if you like a subtle mocha vibe.
- Gluten-Free Crust: Swap graham crackers for gluten-free cookies or almond flour for a crust that suits dietary needs without sacrificing taste.
- Use Homemade Dulce de Leche: I sometimes make my own by simmering sweetened condensed milk — it feels extra special and fresh.
Step-by-Step: How I Make Dulce de Leche Cheesecake Bars Recipe
Step 1: Prep and Bake the Crust
First things first, preheat your oven to 350°F (175°C). Grab a 13×9 inch pan and spray it with nonstick spray—or for extra ease, line it with foil and spray that. Mixing your graham cracker crumbs, sugar, and cinnamon in a bowl, you’ll add the melted butter last and stir until everything looks evenly coated. Press this mixture firmly and evenly into your pan’s bottom—using the back of a tablespoon or a small glass works wonders here to really compact it. Pop it in the oven for about 10 minutes until it’s a light golden color. Let it cool completely; this step prevents a soggy crust once you pour your filling.
Step 2: Blend a Lusciously Smooth Filling
While the crust cools, it’s filling time! I like to use a food processor for the super smooth texture, but a stand or hand mixer works too—just be sure your cream cheese and eggs are at room temp so the batter blends smoothly without lumps. Blend the cream cheese and sugar until creamy, then add the dulce de leche and blend until fully incorporated. Next, add eggs one at a time, blending briefly after each addition so they fully mix but don’t overwork the batter. Finish with vanilla. This filling tastes like dessert heaven already; don’t be tempted to lick the spoon just yet!
Step 3: Bake to Perfection
Pour dollops of the filling over your cooled crust, then gently nudge and spread it into an even layer. Bake for about 38 minutes. This part is tricky — the edges should puff and have tiny cracks, but the center needs just a bit of a jiggle and should feel slightly firm when you gently press it with a fingertip. Overbaking will crack your bars and dry them out, and underbaking means they won’t set properly. After baking, transfer the pan to a rack and cool completely before moving on.
Step 4: Make and Pour the Topping
The topping is the cherry on top—well, technically the dulce de leche drizzle on top! Combine your remaining dulce de leche with 3 tablespoons of heavy cream in a microwave-safe bowl. Heat in 10-second bursts, stirring after each, until it’s smooth enough to pour (some lumps are normal and don’t bother me). If it’s too thick, add cream by the teaspoon until perfect. Pour this luscious mixture evenly over your chilled, fully cooled cheesecake layer. While the topping won’t firm up like a ganache, it sets nicely after about an hour in the fridge and tastes amazing with a sprinkle of fleur de sel to balance sweetness.
Step 5: Chill, Slice, and Serve
After your bars have chilled at least an hour to let that topping set, slice them into 4 strips lengthwise and then crosswise into 6 pieces, giving you 24 perfect bars. The fleur de sel on top adds that little savory surprise with every bite—if you love balancing sweet and salty, don’t skip it. Pro tip: cut them ahead of time if presentation matters; the topping sometimes looks a tiny bit lumpy, but once sliced and served, nobody notices.
Pro Tips for Making Dulce de Leche Cheesecake Bars Recipe
- Bring Ingredients to Room Temperature: This prevents lumps and ensures the filling blends smoothly every time.
- Don’t Overbake: Check the center gently at 35 minutes—remember it will continue setting as it cools and chills.
- Use Nonstick Spray or Foil Liner: This makes removing your bars effortless and keeps the crust crisp.
- Be Patient While Cooling: Let the bars cool fully before adding the topping or slicing to avoid a sticky mess.
How to Serve Dulce de Leche Cheesecake Bars Recipe

Garnishes
I usually keep garnishes simple since the bars themselves are so rich, but those little flakes of fleur de sel on top are non-negotiable for me—they elevate the sweetness perfectly. If I’m feeling fancy for a party, a light dusting of cocoa powder or a few toasted coconut flakes add a nice touch. Fresh berries on the side also provide a bright contrast to the richness.
Side Dishes
If I’m serving these cheesecake bars after dinner, I like pairing them with a strong cup of coffee or espresso to balance the sweetness. They also go really well with a simple fruit salad or a scoop of vanilla ice cream for extra indulgence. Trust me, these bars don’t need anything heavy alongside them because they’re already so flavorful.
Creative Ways to Present
For birthdays or special occasions, I love arranging these bars on a tiered dessert stand with little paper cupcake liners underneath. It makes serving easy and looks charming on the table. Another trick I’ve used is drizzling a bit of melted chocolate or caramel over the bars just before serving for a dramatic finish. They also work well cut into smaller bite-sized pieces for a dessert buffet.
Make Ahead and Storage
Storing Leftovers
These bars keep beautifully in an airtight container in the fridge for up to 5 days. I usually cover the pan tightly with plastic wrap if I’m leaving them in the baking dish, or transfer them to a large container. The flavors actually develop more after a day, so if you can wait, it’s worth it.
Freezing
I’ve frozen these cheesecake bars successfully wrapped tightly in plastic and foil, placed inside a zip-top bag. When frozen, they last up to 3 months. To thaw, move them to the fridge overnight and then unwrap before serving. Just note the topping may lose some of its silky smooth texture after freezing, but the bars are still delicious!
Reheating
Since these are best served chilled, I don’t recommend reheating. If you want them softer, leave the bars out at room temperature for 15–20 minutes before serving. This brings out the flavor and makes slicing easier without melting the topping.
FAQs
-
Can I make the Dulce de Leche Cheesecake Bars Recipe without a food processor?
Absolutely! While a food processor helps achieve an ultra-smooth filling quickly, you can use a stand mixer or hand mixer instead. Just be sure your cream cheese is fully softened at room temperature to avoid lumps.
-
What is the best way to make homemade dulce de leche for this recipe?
One popular method is to simmer a can of sweetened condensed milk in a water bath for about 2–3 hours until it caramelizes and thickens. Be sure to keep the can fully submerged and cool before opening. Homemade dulce de leche has a fresh flavor that pairs wonderfully in this recipe.
-
Why sprinkle fleur de sel on the top?
The fleur de sel adds a delicate salty crunch that perfectly balances the creamy sweetness of the dulce de leche. It’s the small detail that makes these bars taste extraordinary and keeps each bite exciting.
-
Can I make these bars gluten-free?
Yes! Simply substitute the graham crackers with gluten-free cookies or use almond flour for the crust. Adjust the butter amount accordingly for binding, and you’ll have an equally delicious gluten-free version.
Final Thoughts
Honestly, this Dulce de Leche Cheesecake Bars Recipe is close to my heart because it strikes that perfect balance between indulgent and approachable. It’s one of those desserts I love making for friends and family because it feels special, but is surprisingly simple to whip up. If you haven’t tried making cheesecake bars with dulce de leche before, I urge you to give this recipe a go—you’ll see how a few simple ingredients and steps turn into bites of caramel-cheesecake bliss. And once you’ve nailed it, watch them disappear fast at any gathering!
Print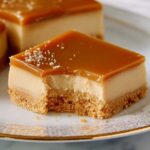
Dulce de Leche Cheesecake Bars Recipe
- Prep Time: 20 minutes
- Cook Time: 48 minutes
- Total Time: 1 hour 30 minutes
- Yield: 24 bars
- Category: Dessert
- Method: Baking
- Cuisine: American
Description
These Dulce de Leche Cheesecake Bars combine a buttery graham cracker crust with a rich, creamy dulce de leche-infused cream cheese filling, topped with a smooth dulce de leche glaze and a sprinkle of fleur de sel for a perfect balance of sweet and salty.
Ingredients
Crust:
- 2 1/4 cups finely ground graham crackers (from about 17 crackers)
- 2 tablespoons sugar
- 1/2 teaspoon ground cinnamon
- 10 tablespoons melted butter (1 1/4 sticks)
- Nonstick spray for pan
Filling:
- 3 eight-ounce packages cream cheese, room temperature
- 1 cup sugar
- 3 large eggs, room temperature
- 1/2 cup Dulce de Leche, room temperature
- 2 teaspoons vanilla extract
Topping & Finishing:
- About 2/3 cup Dulce de Leche (remainder of can)
- 3 or more tablespoons heavy whipping cream
- Fleur de Sel for sprinkling
Instructions
- Prepare crust: Preheat oven to 350°F. Coat a 13 x 9 x 2-inch metal baking pan (or glass pan) with nonstick spray, optionally lining it with foil for easier removal. Mix graham cracker crumbs, sugar, and cinnamon in a medium bowl. Add melted butter and stir until the crumbs are evenly coated. Press the mixture evenly into the bottom of the pan and bake until light golden, about 10 minutes. Cool completely on a rack.
- Make filling: Using a food processor or mixer, blend cream cheese and sugar until smooth and creamy, about 1 minute, scraping down sides as needed. Add 1/2 cup dulce de leche and blend until incorporated. Add eggs one at a time, processing for 3 to 5 seconds after each addition. Add vanilla extract and process for about 10 seconds to combine.
- Bake filling: Spread the batter evenly over the cooled crust. Bake at 350°F until the edges are puffed and slightly cracked and the center is just set but still slightly firm to the touch, about 38 minutes. Remove from oven and cool completely on a rack.
- Prepare topping: In a microwave-safe bowl, mix about 2/3 cup dulce de leche with 3 tablespoons heavy cream. Microwave for 10 seconds, then stir gently. Continue microwaving in 10-second intervals, stirring between, until the mixture is melted and pourable. Add more cream by teaspoonfuls if too thick.
- Finish cheesecake: Pour the dulce de leche glaze evenly over the cooled cheesecake. Refrigerate until chilled, about 1 hour. The topping will remain soft and not firm.
- Serve: Cut the cheesecake lengthwise into 4 strips and then crosswise into 6 strips, forming 24 bars. Sprinkle with fleur de sel just before serving.
Notes
- Nonstick spray and lining the pan with foil help with easy removal of bars.
- The dulce de leche topping may have small lumps, which are hardly noticeable once cut; this is normal.
- Use room temperature ingredients for smooth blending and even baking.
- Adjust cream quantity when melting dulce de leche to get desired pourable consistency.
- Store bars refrigerated and serve chilled for best texture.
Nutrition
- Serving Size: 1 bar
- Calories: 320 kcal
- Sugar: 24 g
- Sodium: 220 mg
- Fat: 22 g
- Saturated Fat: 13 g
- Unsaturated Fat: 7 g
- Trans Fat: 0.5 g
- Carbohydrates: 27 g
- Fiber: 1 g
- Protein: 5 g
- Cholesterol: 90 mg

