
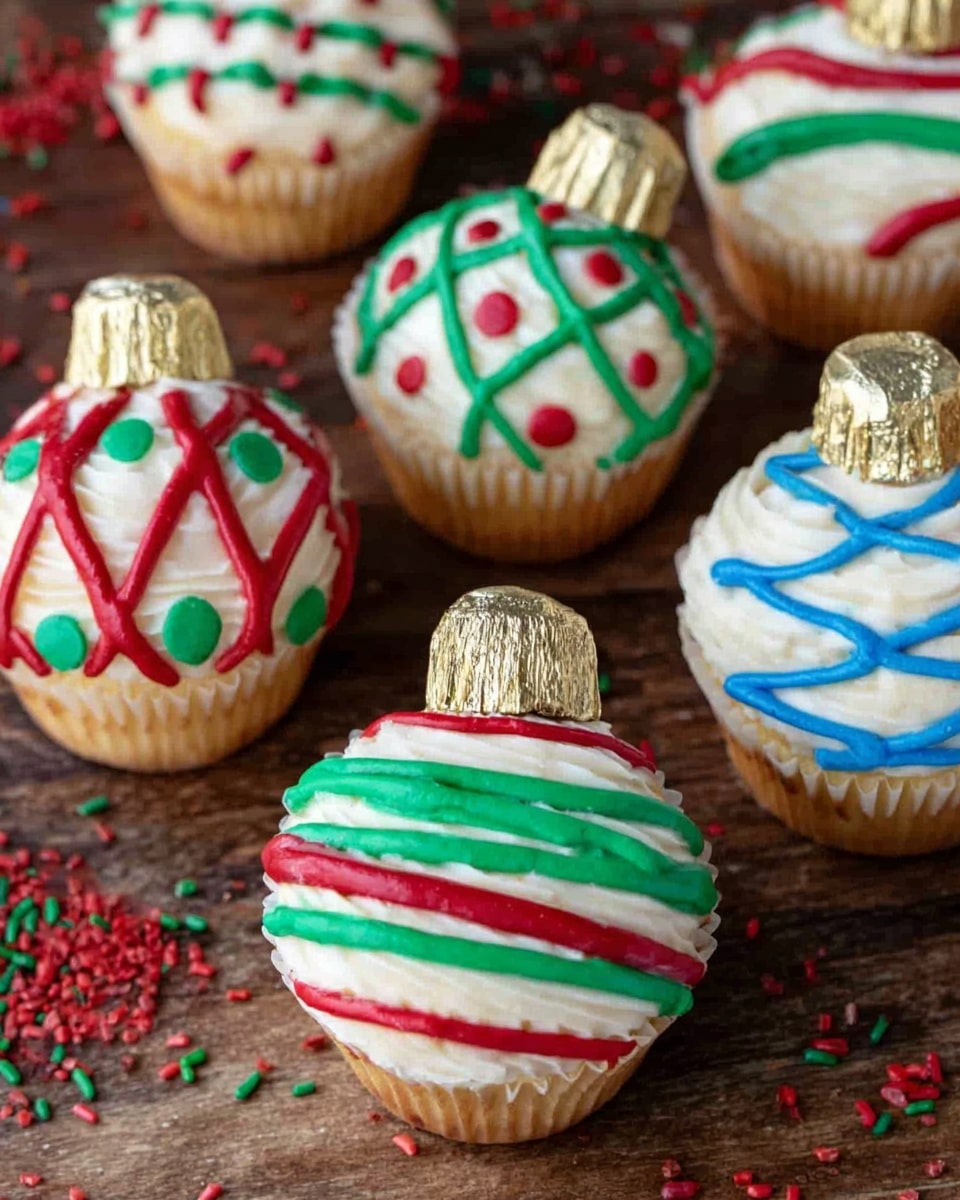
Cupcake Ornaments with Reese’s Miniature Cups Recipe
Hey friend, if you’re looking to make your holiday treats stand out this year, you’ve just gotta try my Cupcake Ornaments with Reese’s Miniature Cups Recipe. Trust me, these festive little cupcakes not only taste divine but also double as adorable decorations for your party table (or tree!). I first made these last Christmas, and everyone couldn’t stop asking for the recipe. So, stick with me, and I’ll guide you through making these sweet, colorful cupcake ornaments that are as fun to make as they are to eat.
Why This Recipe Works
- Deliciously Easy Frosting: The simple combo of powdered sugar, butter, and evaporated milk whips up the perfect creamy canvas for decorating.
- Playful & Festive Presentation: Using Reese’s miniature cups as ornament tops makes these cupcakes visually irresistible and holiday-appropriate.
- Customizable Colors: With just a bit of food coloring or icing pens, you can easily coordinate to any holiday theme or party color scheme.
- Family-Friendly Fun: These cupcakes double as a craft project, so kids love helping to pipe and decorate—making memories as you bake.

Ingredients & Why They Work
All the ingredients in this Cupcake Ornaments with Reese’s Miniature Cups Recipe come together beautifully to create a balance of sweetness, texture, and those iconic flavors we love. Plus, the frosting is adaptable, which means you can tweak the consistency as you go.
- Cupcakes: Whether homemade or store-bought, the cupcake is your base—soft and slightly sweet, perfect for holding frosting and the Reese’s cup.
- Reese’s Miniature Cups: The star here! These add chocolatey peanut butter goodness and act as the cute ornament topper.
- Powdered Sugar: Gives the frosting that silky smooth sweetness essential for decorating.
- Butter: Adds richness and helps keep the frosting creamy and easy to pipe.
- Evaporated Milk: Controls the frosting’s texture—too thick or thin? Just adjust with a little more milk or sugar.
- Vanilla Extract: Brings a warm, inviting flavor that makes the frosting extra tasty.
- Icing Pens or Food Coloring: These bring color and fun details, making your cupcakes look like real ornaments on the tree.
Tweak to Your Taste
One of my favorite parts about this Cupcake Ornaments with Reese’s Miniature Cups Recipe is how you can easily make it your own. I like to switch up the color combinations based on the holiday or even add a splash of peppermint extract to the frosting for an extra festive kick.
- Variation: If you prefer a less sweet treat, reduce the powdered sugar in the frosting slightly and add a pinch of salt to balance the flavor.
- Dietary Mods: For a dairy-free version, substitute vegan butter and use coconut milk instead of evaporated milk.
- Seasonal Changes: Swap out the red and green colors for pastel shades to make these cupcakes perfect for Easter or a spring party.
Step-by-Step: How I Make Cupcake Ornaments with Reese’s Miniature Cups Recipe
Step 1: Whip Up That Dreamy Frosting
Start by combining your powdered sugar, butter, evaporated milk, and vanilla extract in a bowl. Beat it on medium speed until you get a fluffy, smooth frosting. This part is super important—if your frosting feels too runny, add a little more powdered sugar, and if it’s too thick, splash in a touch more evaporated milk. Your frosting should be nice enough to hold shape but still spread easily.
Step 2: Divide and Dye
Pour about ¾ cup of your frosting into two small bowls—one for red and one for green (or your colors of choice). Use a few drops of food coloring to tint the frosting. You want bold, vibrant colors here to make those ornament details pop on your cupcakes.
Step 3: Frost the Cupcakes with White Base
Use the remaining white frosting to generously frost the tops of your cupcakes. I like to dollop and then smooth it with a small spatula or the back of a spoon so there’s a nice, clean canvas for decorating.
Step 4: Time to Decorate Like an Ornament Artist
Fit the colored frostings into piping bags or ziplock bags with a tiny hole cut in the corner. Pipe festive ornament designs onto each cupcake—curlicues, stripes, dots, whatever your heart desires! This is where your creativity shines, so have fun with it.
Step 5: Place the Reese’s Miniature Cups
Finish each cupcake by nestling a Reese’s miniature cup right on top inside the cupcake liner. To make them extra cute and realistic, I sometimes shape a paperclip into a little fishhook and pop it into the Reese’s cup like it’s hanging from a tree branch. My niece loved this little extra touch!
Pro Tips for Making Cupcake Ornaments with Reese’s Miniature Cups Recipe
- Frosting Consistency Matters: Always test your frosting with a small spoon before piping—too runny frosting will spread and lose shape.
- Use Piping Bags for Precision: Ziplock bags work well, but a small round piping tip gives much better control for intricate ornament designs.
- Prep Your Decorations Ahead: Mix and color your frosting before frosting cupcakes for smoother, quicker decorating sessions.
- Keep Cupcakes Cool: Store frosted cupcakes in a cool spot to prevent melting—especially important if your house is warm during decorating.
How to Serve Cupcake Ornaments with Reese’s Miniature Cups Recipe
Garnishes
I love adding a little edible glitter or colored sprinkles as extra sparkle on top of these cupcake ornaments—it’s like giving your cupcakes a holiday glow. Some crushed peppermint candies dusted over the frosting add a refreshing crunch too.
Side Dishes
Since these cupcakes are already rich and indulgent, I usually pair them with something light and fresh—like a crisp fruit salad or a simple bowl of mixed berries. It balances out all that sweetness nicely.
Creative Ways to Present
One year, I arranged these cupcake ornaments on a large festive platter lined with evergreen sprigs and mini candy canes—everyone thought they were actual tree ornaments! Another time, I stacked them like a little cupcake tree for the table centerpiece. These small presentation details make a big impression.
Make Ahead and Storage
Storing Leftovers
I like to keep leftover cupcake ornaments in an airtight container in the fridge, especially because of the frosting and Reese’s cups. They stay fresh for about 3-4 days, but honestly, they rarely hang around that long in my house!
Freezing
Freezing decorated cupcakes can be tricky because the frosting might lose texture. If you want to freeze them, I recommend freezing the plain cupcakes first, then defrosting and decorating fresh before serving for the best look and taste.
Reheating
Since these are cupcakes, reheating isn’t necessary or recommended, especially with delicate frosting and chocolate. Just bring them to room temperature before serving to get the best flavor and texture.
FAQs
-
Can I use a different candy instead of Reese’s miniature cups?
Absolutely! While Reese’s miniature cups add that perfect peanut butter-chocolate combo, you can substitute with mini peanut butter cups, chocolate truffles, or even small gumdrops for a different flavor and look. Just make sure the candy fits snugly on the cupcake.
-
How do I make the frosting thicker if it’s too runny?
If your frosting feels too thin after mixing, slowly add powdered sugar one tablespoon at a time until it reaches a piping consistency. It’s better to go slow because adding too much sugar can make the frosting dry and crumbly.
-
Can kids help with this recipe?
Definitely! Kids will love helping with mixing the frosting, coloring it, and especially decorating the cupcakes. Just be ready for some creative messes—it’s all part of the fun.
-
How long do these cupcake ornaments keep their fresh look?
For the best presentation, serve these cupcakes within a day or two of decorating. The frosting can soften and the Reese’s cups may start to lose firmness if left out too long.
Final Thoughts
I hope you enjoy making these Cupcake Ornaments with Reese’s Miniature Cups Recipe as much as I do. They bring such a festive, joyful vibe to the kitchen and party table, and honestly, they’re a game-changer for holiday baking. So grab your frosting bags, get those Reese’s ready, and let’s spread some sweet holiday cheer—one adorable cupcake at a time!
Print
Cupcake Ornaments with Reese’s Miniature Cups Recipe
- Prep Time: 30 minutes
- Cook Time: 0 minutes
- Total Time: 30 minutes
- Yield: 24 cupcakes
- Category: Dessert
- Method: No-Cook
- Cuisine: American
Description
These festive cupcake ornaments are a delightful holiday treat featuring classic cupcakes topped with smooth, colorful frosting and Reese’s miniature cups to resemble Christmas ornaments. Perfect for holiday parties or as a fun baking activity with kids, these cupcakes combine fluffy frosting with vibrant designs for a charming presentation.
Ingredients
Cupcakes
- 24 cupcakes, baked in cupcake liners
- 24 Reese’s miniature cups
Frosting
- 5 cups powdered sugar
- 5 tablespoons butter
- 5 tablespoons evaporated milk
- 1 1/2 teaspoons vanilla extract
- Red, blue, and green icing pens (or color your own homemade frosting)
Instructions
- Prepare the frosting: Combine the powdered sugar, butter, evaporated milk, and vanilla extract in a mixing bowl and beat on medium speed until the frosting is smooth and fluffy. Adjust the consistency by adding more powdered sugar to thicken or more evaporated milk to thin as needed.
- Separate frosting for coloring: Place about 3/4 cup of frosting into two small bowls. Add a few drops of red food coloring into one bowl and a few drops of green food coloring into the other. Mix until the desired colors are achieved.
- Frost the cupcakes: Use the remaining 1 1/2 cups of white frosting to frost the tops of all 24 cupcakes evenly.
- Prepare piping bags: Transfer the red and green colored frosting into separate piping bags or ziplock bags with a small hole cut in one corner for decorating.
- Decorate cupcakes: Pipe ornament designs onto the frosted cupcakes using the red and green frosting colors. Get creative with patterns and festive shapes.
- Finish with Reese’s cups: Place one Reese’s miniature cup inside each cupcake liner on top of the frosting to resemble the ornament cap. For an extra touch, twist a paper clip into a small fish hook shape and stick it into the Reese’s cup to mimic an ornament hanger.
Notes
- If frosting is too runny, chill it for a few minutes to firm up before decorating.
- You can substitute regular milk for evaporated milk if needed.
- Use gel food coloring for more vibrant frosting colors without altering consistency significantly.
- Decorate cupcakes immediately after frosting to prevent the frosting from drying out.
- For a dairy-free version, substitute the butter with a vegan margarine and check that the powdered sugar is vegan-friendly.
Nutrition
- Serving Size: 1 cupcake
- Calories: 250 kcal
- Sugar: 30 g
- Sodium: 120 mg
- Fat: 10 g
- Saturated Fat: 6 g
- Unsaturated Fat: 3 g
- Trans Fat: 0 g
- Carbohydrates: 35 g
- Fiber: 1 g
- Protein: 2 g
- Cholesterol: 20 mg

