Croissant Bread Loaf Recipe
If you’ve ever dreamed of biting into a buttery, flaky breakfast treat that you can slice and share like bread, then you’re going to absolutely adore this Croissant Bread Loaf Recipe. It’s the perfect marriage of croissant layers and the convenience of a loaf, making it ideal for breakfast, brunch, or even a fancy snack. Trust me, once you make this, you’ll wonder why you haven’t tried it sooner. Ready to dive into buttery, laminated dough bliss? Let me walk you through every buttery step!
Why This Recipe Works
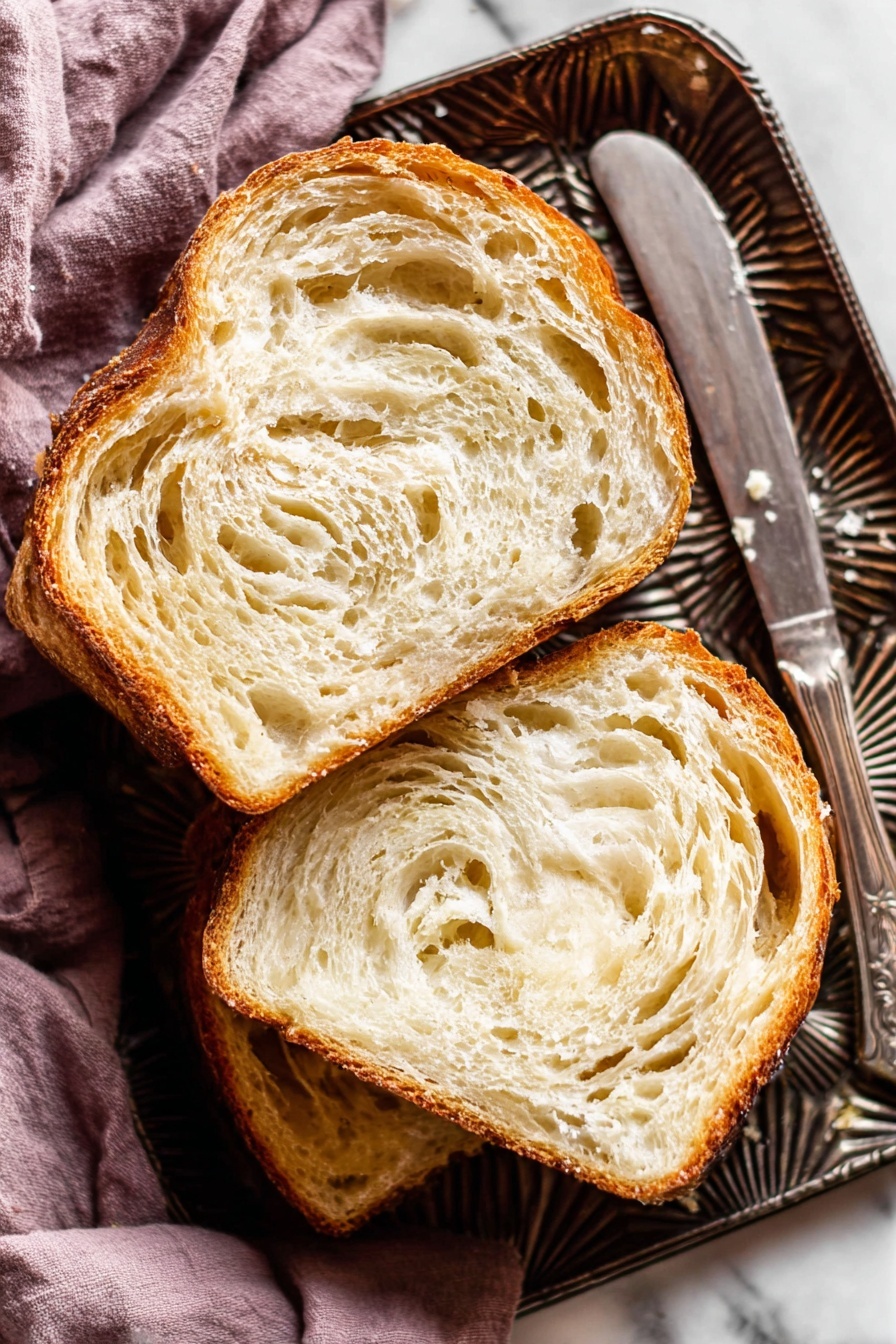
- Buttery Lamination: The triple folds of salted butter create those signature tender, flaky layers you expect from croissants—but in loaf form.
- Soft Yet Structured Dough: A well-kneaded dough that balances stretchiness and slight tackiness ensures a beautifully risen loaf.
- Slow, Chill Resting Periods: Chilling the dough between folds relaxes gluten and keeps the butter from melting, so your layers stay distinct.
- Perfect Baking Technique: Brushing with egg wash and gently tenting the loaf guards against over-browning while baking the inside perfectly.

Ingredients & Why They Work
The ingredients in this croissant bread loaf come together to make a dough that’s rich, tender, and flaky. Each component plays a part in creating the luxurious texture — and trust me, sourcing good quality butter and fresh yeast will step up your loaf to the next level.

- Whole Milk: Warmed gently to activate the yeast without killing it, providing fat and moisture for richness.
- Yeast (Instant or Active Dry): The magic grower that gives your dough lift and airy texture.
- Granulated Sugar: Feeds the yeast and adds subtle sweetness to balance the buttery layers.
- Salt: Enhances flavor and keeps yeast activity in check so the dough rises just right.
- Butter (Softened and Salted for Lamination): The star of the show creating flaky layers—make sure your lamination butter is pliable but not melting.
- All-Purpose Flour: The sturdy base providing structure without being too tough or too fragile.
- Egg (for Wash): Gives the finished loaf that shiny, golden-brown crust you can’t resist.
Tweak to Your Taste
One of the things I love about this Croissant Bread Loaf Recipe is how adaptable it is! You can keep it classic or customize it just the way you like — a little cinnamon, some chocolate chips, or even a savory twist with herbs and cheese. Don’t be shy to make it yours!
- Cinnamon Sugar Variation: Sprinkling cinnamon sugar before rolling the dough gave mine a lovely sweet-spiced touch that was absolutely addictive during brunch.
- Chocolate Chip Addition: I sprinkled mini chocolate chips on the dough before rolling, creating melty pockets of chocolate—perfect for chocoholics.
- Savory Twist: Tried finely chopped fresh herbs with grated sharp cheddar inside once—it was an unexpected hit for a light dinner with soup.
Step-by-Step: How I Make Croissant Bread Loaf Recipe
Step 1: Activate the Yeast and Mix the Dough
Begin by whisking together the warmed milk, yeast, and sugar. You’ll want it to get nice and foamy in about 5 minutes — this little bubble party means the yeast is alive and kicking! After that, add salt, the softened butter, and two cups of flour to the bowl. Beat at medium speed and don’t worry if you still see chunks of butter; that’s part of the process! Gradually add the remaining flour and keep mixing on low until you get a soft dough that pulls away from the sides.
Step 2: Knead Until Silky Smooth
I usually use my stand mixer with a dough hook for about 5 more minutes here, but don’t worry—kneading by hand on a floured surface works beautifully, too. You want the dough to be soft but springy when poked—if you try a windowpane test by stretching a small piece until it’s thin enough to see light through without tearing, you’ll know you nailed it. It takes a little practice, but you’ll get the hang of it.
Step 3: Let the Dough Rise Warm and Cozy
Transfer your dough to a lightly oiled bowl, cover it, and let it rest somewhere warm for about 1.5 to 2 hours until it nearly doubles in size. This is when your kitchen will start smelling like a bakery—my favorite part. Don’t rush this step; patience pays off big time.
Step 4: Chill and Prepare for the Butter Magic
After punching down the dough, gently stretch it into a rectangle and pop it into the fridge for 20 minutes to rest. Meanwhile, slice your salted butter so it’s ready for laminating. This chilling step keeps everything relaxed and your butter at the perfect consistency, which is key for those layers.
Step 5: The Three Laminations
Here’s where the magic happens. Spread butter along the center third of your dough, fold it over like a business letter, then roll it out and fold it again. You’ll do this folding and chilling cycle three times total—chill for 20 minutes between each. It sounds fancy but just think of it as a little dough workout mixed with some waiting time. If the dough resists, give it a quick rest before rolling again. Lamination creates those perfect buttery layers, so don’t skip or rush this step.
Step 6: Shape into Rolls and Final Rise
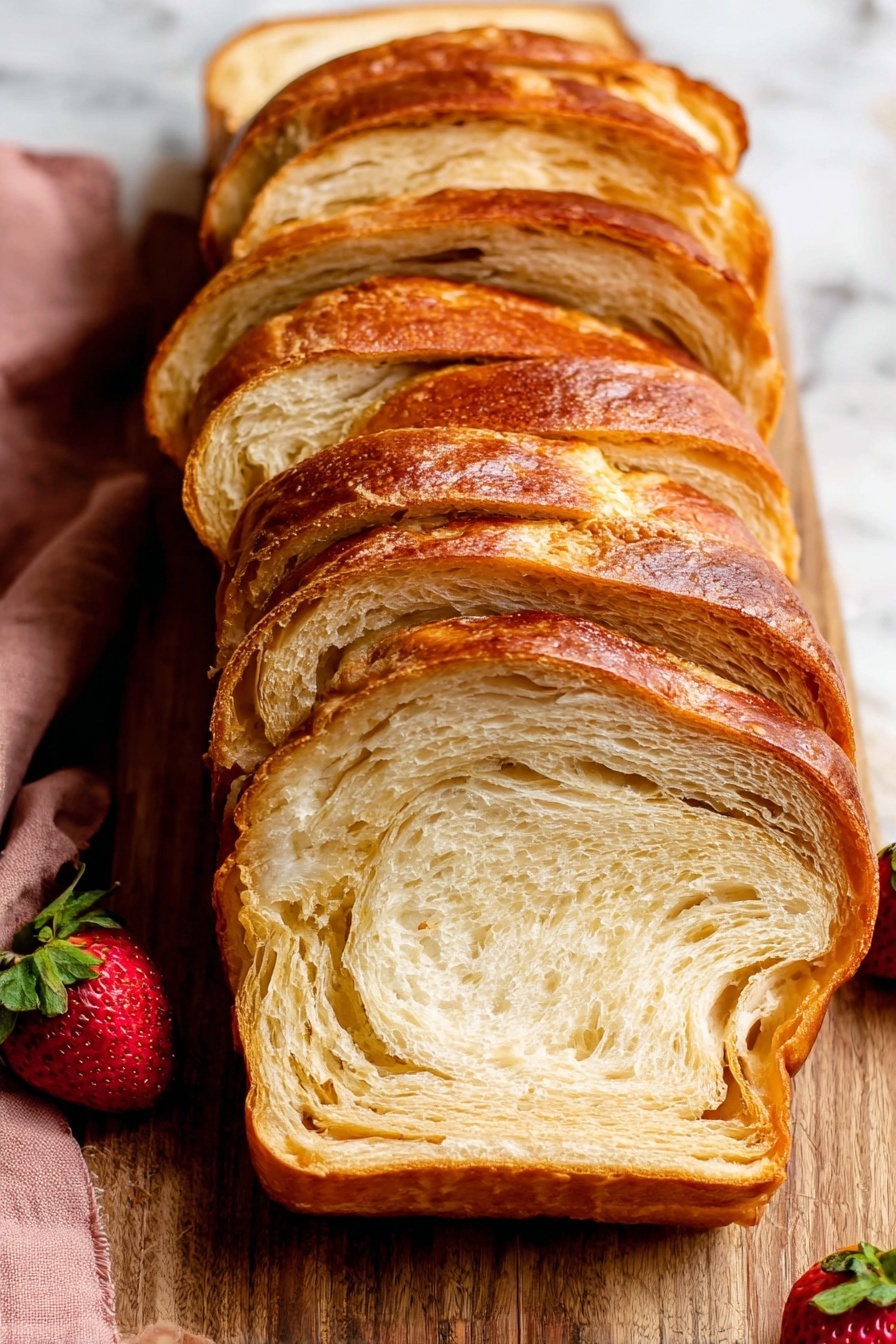
After the last fold and roll, cut your dough log into five even pieces and nestle them into a greased loaf pan. Cover them up and let them rise one last time for about 45 to 60 minutes until they look plump and puffy. This final rise gets the layers nicely puffed before baking.
Step 7: Brush, Bake, and Enjoy
Whisk together your egg wash and brush it generously over the top for that beautiful golden finish. Bake at 350°F (177°C) for an hour, tenting with foil halfway through to prevent scorching. You’ll know it’s done when the internal temp hits about 195°F (90°C). Cool it in the pan for half an hour before unmolding, then let the loaf cool more on a wire rack. I promise, waiting to slice will be worth it—your bread slices best when cool and settled.
Pro Tips for Making Croissant Bread Loaf Recipe
- Get Your Butter Temperature Just Right: Aim for lamination butter around 60°F (15°C)—too soft and it melts, too cold and it cracks the dough.
- Don’t Skip Resting in the Fridge: The resting times between folds relax the dough and keep everything manageable during rolling.
- Use a Silicone Baking Mat: I keep my dough on this when rolling to prevent sliding, making lamination easier and less messy.
- Patience with Rising: Let your dough fully rise rather than rushing—your loaf will reward you with better texture and flavor.
How to Serve Croissant Bread Loaf Recipe
Garnishes
I love to serve this loaf simply sliced with a pat of good butter or a thin spread of honey. Sometimes I add a light dusting of powdered sugar for a touch of sweetness when serving for brunch. A sprinkle of flaky sea salt on top before baking can also add a delightful savory contrast to the buttery layers.
Side Dishes
This croissant bread pairs beautifully with fresh fruit salads, creamy scrambled eggs, or a side of smoked salmon and cream cheese for a more indulgent spread. I also love it alongside a cup of rich coffee or freshly brewed tea, making for a cozy morning.
Creative Ways to Present
For special occasions, I’ve turned the sliced croissant loaf into mini French toast stacks topped with berries and whipped cream, or assembled layered bread puddings with custard soaking the slices overnight. You can also slice it thick and make gourmet grilled cheese sandwiches that impress every time.
Make Ahead and Storage
Storing Leftovers
After baking, I store leftover croissant bread loosely covered at room temperature for up to three days. If you plan to keep it longer, wrap it tightly and pop it in the fridge where it keeps fresh for about a week, though the texture is best on day one.
Freezing
This bread freezes beautifully—wrap whole or sliced portions tightly in plastic wrap and then foil to prevent freezer burn. It lasts up to three months frozen. I like to thaw it overnight in the fridge for the best texture.
Reheating
To reheat slices, I gently toast them or warm in a 300°F oven wrapped in foil for about 10 minutes. Avoid microwaving directly as it softens the flaky layers, but if you’re in a pinch, zap for just 10 seconds and finish with a quick toast.
FAQs
-
Can I make the Croissant Bread Loaf Recipe without a stand mixer?
Absolutely! You can mix and knead the dough by hand using a large mixing bowl and a sturdy wooden spoon or silicone spatula. It might take a bit more elbow grease during the kneading step, but it’s totally doable—and often very satisfying. Just make sure to knead for at least 5 minutes on a lightly floured surface until the dough is soft and elastic.
-
What’s the best way to tell if my dough is kneaded enough?
The windowpane test is my go-to: stretch a small piece of dough gently until you see it thin enough to let light through without tearing. If it tears easily, knead a bit longer. Also, poke the dough and see if it springs back slowly—that’s a good sign it’s ready for its rise.
-
Can I add fillings like jam or chocolate inside the loaf?
You can! From my experience, dry fillings like cinnamon sugar, chopped nuts, or chocolate chips work best because too much moisture (like jam) can make the loaf soggy and affect baking. If you want to try jam, spread a very thin layer and be prepared for a slightly stickier dough.
-
How do I know when the Croissant Bread Loaf is fully baked?
The most accurate method is an instant-read thermometer: the internal temperature should reach about 195°F (90°C). If you don’t have one, look for a deep golden-brown crust and a hollow sound when tapping the bottom of the pan. Just be patient—the extra baking time really helps set those flaky layers.
Final Thoughts
This Croissant Bread Loaf Recipe is genuinely one of those special finds. It’s perfect for lazy weekend mornings, impressing brunch guests, or gifting to a friend who loves all things buttery and flaky. I love how it combines the comfort of bread with the indulgence of croissants, all in one easy-to-slice loaf. Give it a try—you’ll be amazed at how something so breathtakingly flaky can come from your own kitchen!
Print
Croissant Bread Loaf Recipe
- Prep Time: 4 hours 45 minutes
- Cook Time: 1 hour
- Total Time: 6 hours 30 minutes
- Yield: 1 loaf
- Category: Bread
- Method: Baking
- Cuisine: French
- Diet: Vegetarian
Description
This Croissant Bread loaf combines the flaky, buttery layers of traditional croissants into a convenient, sliceable loaf format. The recipe involves a yeast dough enriched with butter, followed by a careful lamination process to create tender layers. After rising, the dough is shaped into rolls, placed in a loaf pan, and baked until golden brown with a soft, airy crumb reminiscent of croissants.
Ingredients
Dough
- 1 cup whole milk, warmed to about 110°F (43°C)
- 2 and 1/4 teaspoons instant or active dry yeast (1 standard packet)
- 3 Tablespoons granulated sugar
- 1 and 1/4 teaspoons salt
- 3 Tablespoons unsalted or salted butter, softened to room temperature and cut into 3 equal pieces
- 3 cups all-purpose flour (spooned & leveled), plus more as needed and for lamination
Lamination
- 3/4 cup salted butter, slightly softened
Egg Wash
- 1 large egg
- 1 Tablespoon water
Instructions
- Prepare the dough: Whisk the warm milk, yeast, and sugar together in the bowl of your stand mixer fitted with a dough hook. Cover and let sit for about 5 minutes or until foamy. Add salt, butter, and 2 cups of flour. Beat on medium speed for 2 minutes, scraping down the bowl as needed. Add remaining flour and beat on low until a soft dough forms that pulls from the bowl sides.
- Knead the dough: Beat dough in mixer for 5 minutes or knead by hand on a lightly floured surface for 5 minutes until dough is soft but slightly tacky. Add flour in small doses if too sticky.
- 1st rise: Lightly grease a large bowl and place dough inside, turning to coat. Cover and allow to rise in a warm place for 1 hour 30 minutes to 2 hours until nearly doubled.
- Flatten dough: Punch dough down, place on a silicone mat or floured surface, and gently flatten into a 10×14-inch rectangle. Cover and refrigerate for 20 minutes.
- Prepare lamination butter: Slice salted butter into 1/4-inch slices, ensuring it is pliable but not overly soft.
- 1st lamination: Remove dough, place softened butter down the center third, fold sides over butter like a letter, pinch ends to seal. Rotate dough, lightly flour, and roll to a 9×12-inch rectangle. Fold dough edges over like a letter, cover, and refrigerate 20 minutes.
- 2nd & 3rd laminations: Remove dough, rotate, lightly flour, and roll to 9×12 inches. Fold edges over like a letter. Rotate horizontally, roll again to 9×12 inches, fold similarly. Cover and refrigerate 20 minutes.
- Final lamination & shaping: Remove dough, rotate, flour, roll out to 9×12 inches, and fold edges over. Rotate horizontally, roll out again. Roll the dough from a 9-inch side into a log. Cut log into 5 even rolls.
- 2nd rise: Grease a 9×5-inch loaf pan, place rolls seam side down inside. Cover tightly and let rise for 45 to 60 minutes until slightly puffy.
- Preheat oven and apply egg wash: Preheat oven to 350°F (177°C). Whisk egg and water, then brush the risen rolls generously.
- Bake the loaf: Bake for 1 hour, loosely tenting with foil after 25 minutes to prevent over-browning, until an instant-read thermometer reads 195°F (90°C) at the center.
- Cool the bread: Remove loaf pan from oven, cool for 30 minutes in pan on a wire rack. Run a knife around edges, remove from pan, and cool at least 15 more minutes on rack before slicing to avoid crumbling.
Notes
- Overnight Dough: After shaping rolls, cover and refrigerate up to 15 hours. Remove 3 hours before baking and allow to rise 1–2 hours before baking. Alternatively, do the first rise overnight in the refrigerator for up to 12 hours, followed by 2 hours at room temp before continuing.
- Freezing Dough: Freeze shaped dough loaf after final lamination for up to 3 months, thaw in refrigerator at least 3 hours, then let rise 1–2 hours before baking.
- Butter for lamination should be pliable around 60°F (15°C), neither too hard nor greasy soft, to laminate properly.
- Use salted butter for lamination and either salted or unsalted for dough.
- You may add dry fillings like cinnamon sugar, chopped nuts, or chocolate chips before rolling; avoid wet fillings like jam to prevent sogginess.
- Whole milk is preferred; avoid nonfat milk. Lower-fat or non-dairy milk can be substituted.
- Stand mixers with dough hooks simplify kneading but hand kneading with a wooden spoon is effective if needed.
- Do not halve or double the recipe; make dough batch as is and freeze extra bread if desired.
- Use a silicone baking mat for rolling dough to prevent slipping and facilitate lamination.
- Monitor dough stickiness carefully, adding flour sparingly to maintain a soft, slightly tacky dough.
Nutrition
- Serving Size: 1 slice (about 80g)
- Calories: 250 kcal
- Sugar: 5 g
- Sodium: 180 mg
- Fat: 12 g
- Saturated Fat: 7 g
- Unsaturated Fat: 4 g
- Trans Fat: 0 g
- Carbohydrates: 29 g
- Fiber: 1 g
- Protein: 6 g
- Cholesterol: 50 mg


