
Creepy Halloween Spider Cupcakes Recipe
If you’re searching for a show-stopping treat this spooky season, you’re going to love this Creepy Halloween Spider Cupcakes Recipe. It’s got that perfect blend of spooky and sweet, with moist chocolate cupcakes swirled with luscious black buttercream and topped with the cutest (and creepiest) fondant spiders. Trust me, these cupcakes are fan-freaking-tastic and guaranteed to impress your Halloween party guests or make your family smile with delight. Stick around, because I’ll walk you through every step to get these eerie delights just right!
Why This Recipe Works
- Perfectly Moist Cupcakes: The combination of pumpkin puree and butter creates a rich, tender crumb that’s irresistibly soft.
- Deep Chocolate Flavor: Cocoa powder and black cocoa in the buttercream deliver an intense, dark chocolate punch that pairs beautifully with subtle pumpkin spice.
- Eye-Catching Decoration: The fondant spiders with tiny green eyes add that fun and eerie Halloween vibe everyone loves, making these cupcakes a real party centerpiece.
- Adaptable Technique: You’ll find the step-by-step instructions and tips ensure even novice bakers can nail these creepy treats without stress.

Ingredients & Why They Work
The beauty of this Creepy Halloween Spider Cupcakes Recipe lies in balancing flavors and textures, so each ingredient has a job—from moisture to spice to that perfectly dark frosting. Let me break down what works and why it’s worth sourcing quality components to get your cupcakes right.
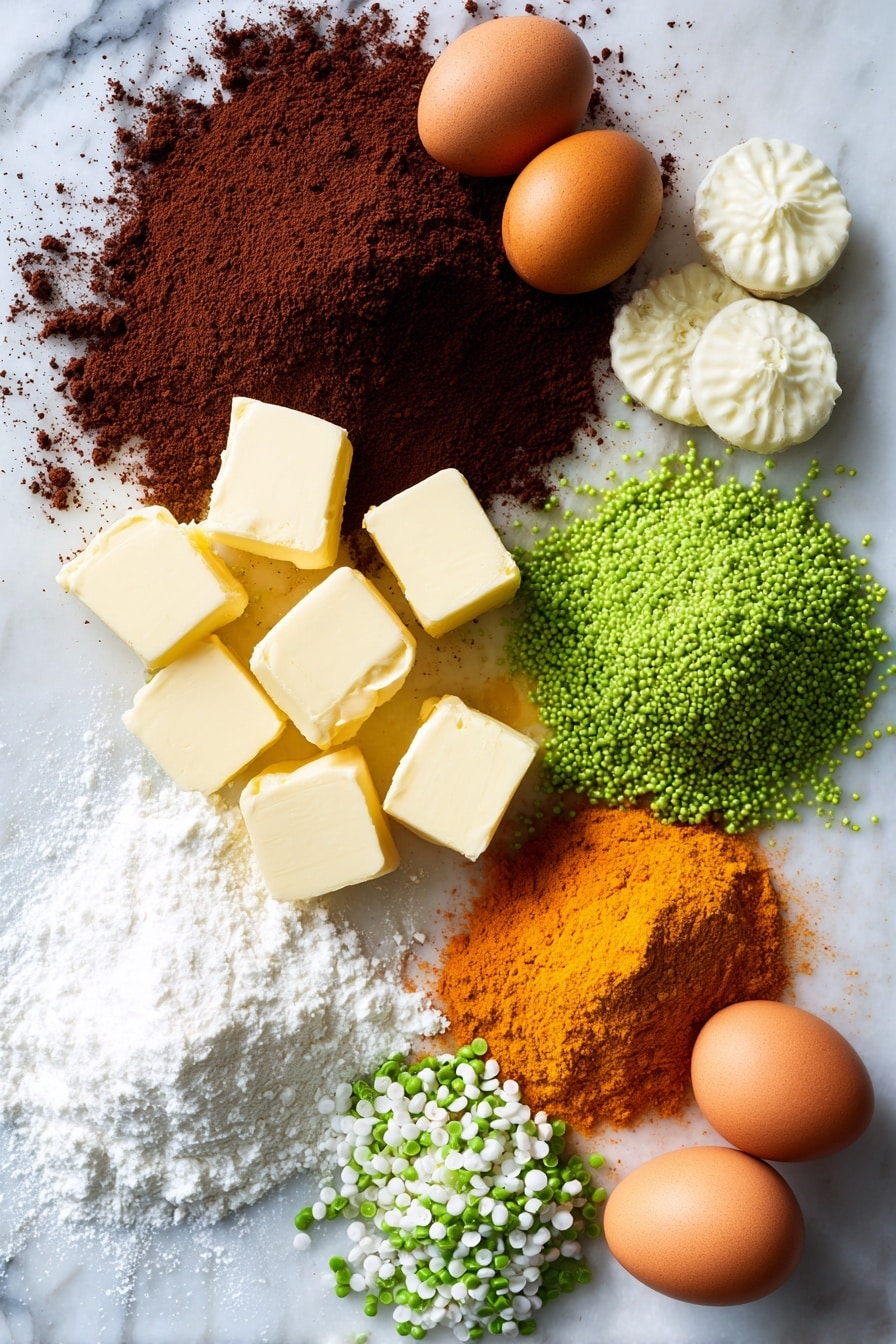
- Self-raising flour: Gives the cupcakes lift and a tender crumb without needing extra leaveners.
- Cocoa powder: Adds rich chocolate flavor, essential for a Halloween dark treat.
- Butter (salted): Provides creaminess and depth while enhancing the chocolate flavor.
- Granulated sugar: Sweetens and also helps with cupcake structure.
- Eggs: Bind ingredients and add richness; beating them properly is key for fluffy cupcakes.
- Pumpkin puree: Moisturizes and adds a subtle seasonal flavor with natural sweetness.
- Milk: Softens batter and balances density.
- Baking powder: Helps cupcakes rise evenly.
- Salt: Balances sweetness and enhances overall flavor.
- Pumpkin pie spice: Brings in warm autumn spices, perfect for Halloween vibes.
- Vanilla extract: Rounds out the flavors beautifully.
- Powdered sugar: Base for smooth, sweet buttercream.
- Black cocoa powder: Turns the frosting an intense charcoal black with rich chocolatey depth.
- Black food coloring: (optional) Deepens frosting color for that creepy black look.
- White fondant: Used to create spiders’ bodies for that perfect spooky decoration.
- Tiny green sprinkles: Transform plain spiders into eerie critters with glowing eyes.
Tweak to Your Taste
I love tinkering with this recipe depending on what I have on hand or the crowd I’m serving. The great thing about the Creepy Halloween Spider Cupcakes Recipe is how flexible it is to make your own tweaks — whether you want to dial up the spice or keep the spiders extra creepy. Here are some variations that I’ve enjoyed:
- Variation: Sometimes, I swap the pumpkin pie spice for cinnamon and nutmeg alone if I want a less assertive spice profile, and my kids still love them.
- Dairy-Free Version: Try using a plant-based butter and almond milk instead of regular butter and milk; just be mindful it may slightly affect texture but still tastes great.
- Extra Gooey: Add a tablespoon of fine espresso powder to the batter to deepen the chocolate flavor—makes the cupcakes taste a bit like a mocha spider web!
Step-by-Step: How I Make Creepy Halloween Spider Cupcakes Recipe
Step 1: Whisk Dry Ingredients for Even Flavor
Start by sifting together your self-raising flour, cocoa powder, pumpkin pie spice, baking powder, and salt. I find it’s helpful to sift because it breaks up any lumps and ensures the spices and leaveners get evenly distributed throughout the batter. This simple step sets the stage for cupcakes that rise beautifully and have consistent flavor.
Step 2: Cream Butter and Sugar to Light and Fluffy
In a separate bowl, beat your butter and sugar together until the mixture is light and fluffy—this takes about 2 minutes on medium speed with my stand mixer. Make sure you scrape down the sides halfway through; I’ve learned the hard way that leaving butter stuck on the sides results in uneven cupcakes.
Step 3: Beat in Eggs and Pumpkin Puree
Add the eggs one at a time, beating well after each addition. Scrape the bowl to ensure everything’s well combined—this step is key for a smooth batter. Then mix in your pumpkin puree; your batter might look a bit curdled at this point, but don’t worry, that’s exactly what it should look like!
Step 4: Fold Dry Ingredients and Milk Carefully
Fold half of the dry ingredients into the wet mix carefully to avoid overmixing—this keeps your cupcakes tender, not tough. Add the milk, then fold in the rest of the flour mixture. Finish by stirring in the vanilla extract, making sure to scrape broadly around the bowl to catch any bits hiding at the bottom.
Step 5: Bake Your Cupcakes Just Right
Scoop the batter into cupcake liners about three-quarters full (I like using a cookie scoop for even sizing). Bake at 175°C (350°F) for 15–18 minutes; stick a toothpick in the center to test doneness—it should come out clean or with only a few crumbs attached. Pop them out of the oven and let them rest briefly before cooling completely on a wire rack, covered loosely with a kitchen towel to stay moist.
Step 6: Whip Up the Black Buttercream
Beat your butter until smooth, then gradually sift in powdered sugar and black cocoa powder, folding first with a spatula to avoid a sugar cloud in your kitchen (been there!). Mix on medium speed until the buttercream looks luxuriously smooth. Add vanilla, then let it rest to deepen the black color. If it’s not dark enough, a few drops of black gel food coloring do the trick—remember, gel colors won’t mess with your frosting’s texture.
Step 7: Pipe and Decorate Those Creepy Spiders
Using a star tip, pipe a ring of reverse stars around each cupcake to create a web-like base. Roll out white fondant thinly and cut small circles to place on each cupcake’s center. Then, with a small round tip, pipe spider bodies and heads on the fondant, add eight legs, and finish by placing tiny green sprinkles for eyes with tweezers. This detail is what gives your cupcakes that genuine creepy-cute effect.
Pro Tips for Making Creepy Halloween Spider Cupcakes Recipe
- Scrape It All Down: Scraping the bowl throughout mixing helps everything blend evenly so you avoid dry pockets or uneven batter consistency.
- Cookie Scoop Secret: Using a cookie scoop for the batter guarantees your cupcakes will be uniform in size, so they bake evenly.
- Fondant Prep: Knead fondant well and dust your surface with a bit of powdered sugar or cornstarch to prevent sticking while rolling and cutting.
- Color Boost: Letting the buttercream rest allows the cocoa to darken naturally—add food color sparingly to avoid changing texture.
How to Serve Creepy Halloween Spider Cupcakes Recipe
Garnishes
I usually stick to the tiny green sprinkles for the spider eyes because they pop perfectly against the black frosting without being overwhelming. Sometimes, I add delicate edible glitter to the black buttercream for a subtle eerie shimmer, but the classic look tends to steal the show every time!
Side Dishes
These cupcakes stand out on their own, but if you’re hosting a Halloween spread, they pair well with a big punch bowl of spiked cider or a rich warm chocolate drink. I also love serving them alongside some candied popcorn or pumpkin spiced cookies for a fun fall-themed dessert table.
Creative Ways to Present
For a party, arrange your creepy spider cupcakes on a platter covered in black lace or fake spider webs for drama. I once placed them on a tiered cake stand decorated with plastic spiders crawling around, which was a huge hit, especially with kids—they couldn’t believe the spiders were edible!
Make Ahead and Storage
Storing Leftovers
Once decorated, store your cupcakes in an airtight container at room temperature if you plan to eat them within 1-2 days. I’ve found that covering them gently with plastic wrap or placing them in a single layer container keeps the fondant decorations intact and the buttercream fresh.
Freezing
You can freeze undecorated cupcakes wrapped tightly in plastic wrap and placed in a freezer-safe bag for up to 2 months. For the frosting and spider decorations, I recommend freezing the buttercream separately or piping just before serving. Fondant doesn’t freeze well and can get soggy when thawed.
Reheating
If you have leftover plain cupcakes, warm one in the microwave for about 10-15 seconds before frosting for a freshly baked feel. Once decorated, I prefer serving them chilled or at room temperature rather than reheating to keep the buttercream’s texture and fondant looking perfect.
FAQs
-
Can I make the cupcakes gluten-free in this Creepy Halloween Spider Cupcakes Recipe?
Absolutely! Replace the self-raising flour with a gluten-free baking blend that already contains leavening agents. Just make sure to test the baking time as it may vary slightly, and keep an eye on moisture levels since gluten-free flours behave differently.
-
How do I prevent the fondant spiders from getting soggy?
Fondant tends to absorb moisture, especially in humid environments. To prevent sogginess, store your cupcakes in a cool, air-conditioned room—not the fridge, because condensation will soften the fondant. Also, don’t decorate the cupcakes too far ahead; doing it the same day of serving is best.
-
What if I don’t have black cocoa powder for the buttercream?
If black cocoa isn’t available, you can use regular unsweetened cocoa powder and add black gel food coloring to deepen the color. Keep in mind black cocoa gives a richer, more intense color and flavor, but regular cocoa plus coloring still works well for great results.
-
Can I make the cupcake batter ahead of time?
It’s best to bake the cupcakes soon after mixing the batter for optimal rise and texture. However, if necessary, you can prep the batter and refrigerate it for up to 24 hours before baking—just let it come to room temperature and give it a gentle stir before scooping.
Final Thoughts
I can’t stress enough how much fun these Creepy Halloween Spider Cupcakes Recipe bring to the kitchen and to any Halloween celebration. Making the spiders yourself adds a creative touch that’s surprisingly easy and satisfying — plus it’s a great way to get kids involved in the baking process. I hope you try this recipe and love it as much as I do; it’s become a seasonal favorite in my house, with everyone eagerly waiting each year to see how spooky the spiders look. Happy baking, and here’s to sweet, creepy fun this Halloween!
Print
Creepy Halloween Spider Cupcakes Recipe
- Prep Time: 20 minutes
- Cook Time: 18 minutes
- Total Time: 1 hour 35 minutes
- Yield: 14 cupcakes
- Category: Dessert
- Method: Baking
- Cuisine: American
Description
These Creepy Halloween Spider Cupcakes are delicious chocolate cupcakes infused with pumpkin puree and topped with spooky black buttercream frosting shaped like spiders, perfect for Halloween celebrations and sure to impress with their festive and creepy charm.
Ingredients
Chocolate Cupcakes
- 180 g self raising flour
- 20 g cocoa powder
- 100 g salted butter
- 200 g granulated sugar
- 2 eggs
- 200 g pumpkin puree
- 100 ml milk
- ½ teaspoon baking powder
- ¼ teaspoon salt
- ½ teaspoon pumpkin pie spice
- 1 teaspoon vanilla extract
Buttercream
- 450 g powdered sugar
- 225 g salted butter
- 2 tablespoon black cocoa powder
- 2 tablespoon milk
- 1 teaspoon vanilla extract
- Black food coloring (optional)
Decoration
- 175 g white fondant
- Tiny green sprinkles (for the spiders’ eyes)
Instructions
- Preheat and prepare pans: Preheat oven to 175°C and line a cupcake pan with muffin liners or cupcake liners.
- Mix dry ingredients: Whisk together self-raising flour, cocoa powder, pumpkin pie spice, baking powder, and salt. Sift the mixture and set aside.
- Cream butter and sugar: In a separate bowl, combine sugar and butter. Beat on medium speed for about 2 minutes until light and fluffy, scraping the sides and bottom halfway through.
- Add eggs: Beat in the eggs one at a time, ensuring they are well incorporated by scraping the bowl’s sides and bottom halfway through mixing.
- Add pumpkin puree: Mix in the pumpkin puree until fully combined. The mixture may curdle slightly, which is normal.
- Incorporate dry ingredients and milk: Gradually fold half of the flour mixture into the wet ingredients without overmixing. Add the milk and fold again, then add the remaining flour mixture. Scrape the bowl to mix thoroughly.
- Add vanilla extract: Stir in the vanilla extract until well blended.
- Fill cupcake liners: Scoop the batter into the prepared liners, filling each about three-quarters full for even rising.
- Bake: Bake for 18 minutes or until a toothpick inserted in the center comes out clean without wet batter.
- Cool cupcakes: Let cupcakes rest in the pan for 1 to 2 minutes, then transfer to a cooling rack to reach room temperature. Cover with a kitchen towel to keep moist.
- Prepare buttercream: Beat butter in a large bowl until smooth and creamy. Sift in powdered sugar and black cocoa powder, mix lightly with a spatula, then beat on medium speed until well combined and creamy. Scrape bowl and beaters as needed.
- Add flavor and color: Beat in vanilla extract. Let frosting rest 10 to 20 minutes for color to intensify. If needed, add black food coloring or a mixture of red, green, and brown gel colors to deepen color, then let rest another 10 to 15 minutes.
- Prepare piping bags: Transfer buttercream to a piping bag fitted with a star tip (#1M). Also prepare two more piping bags with a star tip and a small round tip (#3) if frosting quantity allows.
- Pipe base layer: Using the star-tipped piping bag, pipe reverse star shapes in a circle on top of each cupcake to form the spider web base.
- Prepare fondant circles: Knead fondant until smooth and pliable, roll thin to about ⅛ inch thickness, and cut small circles approximately 2 inches in diameter to cover cupcakes.
- Place fondant on cupcakes: Position each fondant circle in the center of the frosted cupcakes.
- Pipe spider details: Switch the buttercream to the round tip piping bag. Pipe a small circle for the spider’s body, then a smaller circle in front for the head. Pipe four legs on each side.
- Add eyes: Using tweezers, attach two tiny green sprinkles on the spider’s head to create eyes.
Notes
- Scraping the bowl during mixing ensures all ingredients are properly incorporated without unmixed portions.
- Use a cookie scoop or ice cream scoop with a spring release to keep cupcake sizes consistent.
- If using liners larger or smaller than 5 cm diameter and 3.5 cm height, adjust baking times accordingly.
- Cover cupcakes with a kitchen towel during cooling to maintain moisture and prevent drying out.
- Mixing powdered sugar and cocoa with a spatula before using the mixer helps prevent sugar from flying around.
- Gel-based food coloring is preferred for richer color without affecting frosting texture; a mix of red, green, and brown colors can also be used as an alternative to black food coloring.
- If frosting is too much for one piping bag, divide into two and switch bags as needed during decorating.
- Knead fondant well and lightly dust work surface with icing sugar or cornstarch to prevent sticking while rolling.
- Adjust fondant circle size based on cupcake size for best coverage.
- Store cupcakes in an air-conditioned room to keep fondant from turning soggy; avoid refrigeration to prevent condensation.
Nutrition
- Serving Size: 1 cupcake
- Calories: 320 kcal
- Sugar: 27 g
- Sodium: 150 mg
- Fat: 18 g
- Saturated Fat: 11 g
- Unsaturated Fat: 6 g
- Trans Fat: 0 g
- Carbohydrates: 36 g
- Fiber: 3 g
- Protein: 4 g
- Cholesterol: 60 mg

