Coffee Mousse Recipe
If you’re craving a dessert that’s both elegant and insanely delicious, I’ve got you covered with this fan-freaking-tastic Coffee Mousse Recipe. It’s creamy, fluffy, and infused with just the right punch of coffee flavor — perfect for impressing guests or treating yourself on a slow afternoon. Stick around, because I’m going to share all the tips and tricks to help you nail this dessert effortlessly!
Why This Recipe Works
- Balanced Coffee Flavor: Using instant coffee granules dissolved with sugar creates a smooth, rich syrup that infuses the mousse without bitterness.
- Light and Airy Texture: Folding whipped cream carefully into the coffee mixture keeps the mousse fluffy and delicate.
- Reliable Setting: Powdered gelatin gently sets the mousse just enough to hold its shape, without being rubbery or heavy.
- Simple Ingredients, Stunning Dessert: With pantry staples and minimal steps, this recipe is both accessible and impressive.

Ingredients & Why They Work
Each ingredient in this Coffee Mousse Recipe plays an important role, and together they deliver that luscious, creamy coffee experience I know you’ll love. Here’s the scoop on why I rely on each one and a few tips for picking the best versions.
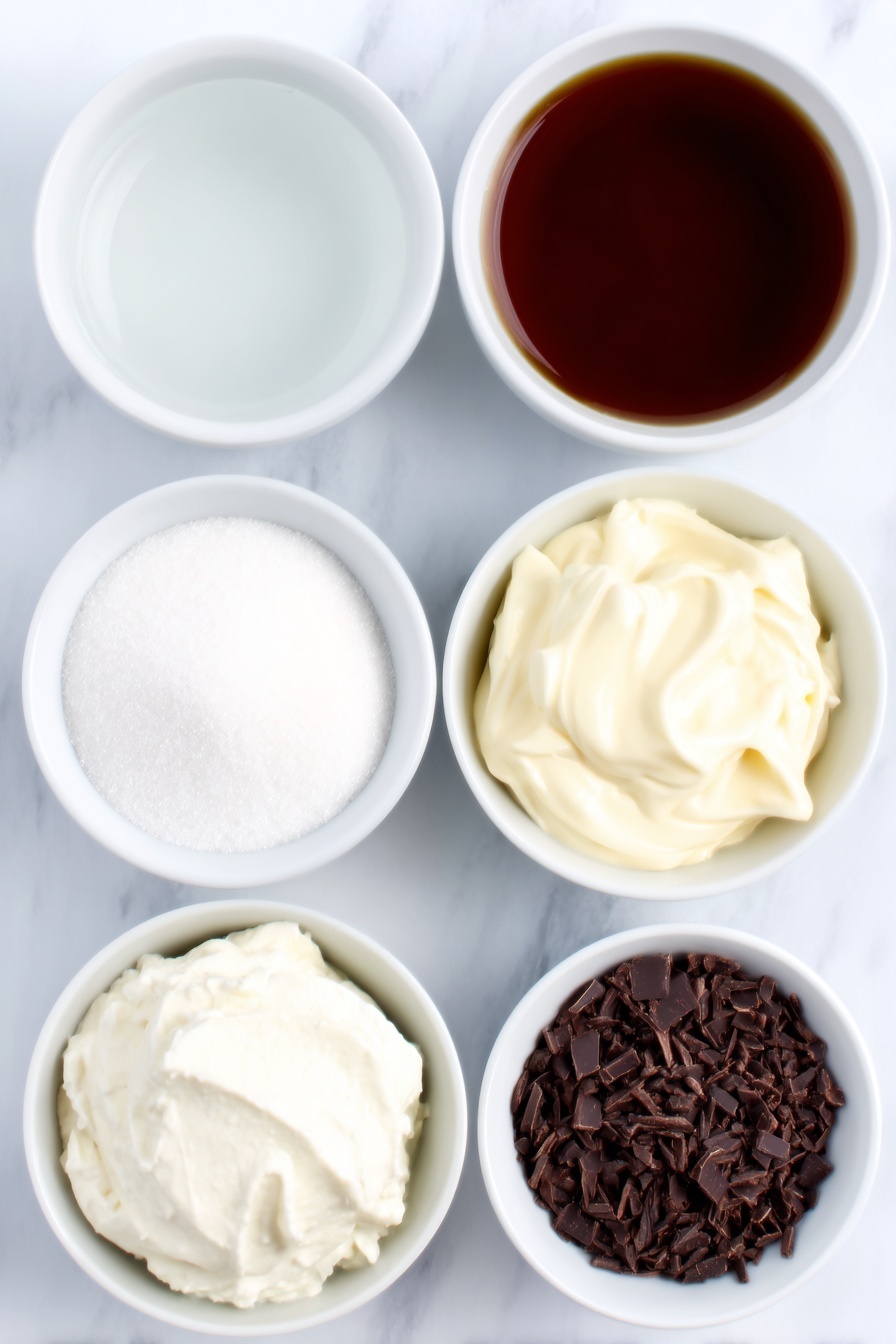
- Instant Coffee Granules: This adds a robust coffee flavor without bitterness, and it dissolves easily when heated — making it perfect for the syrup base.
- Water: Just enough to bloom the gelatin and dissolve the coffee and sugar, creating a smooth syrup.
- Caster or White Granulated Sugar: Sweetens perfectly without adding graininess; caster sugar dissolves quicker, which is helpful here.
- Powdered Gelatine: Essential to gently setting the mousse. Make sure to sprinkle it over water and dissolve fully without boiling to avoid lumps.
- Vanilla Extract: Adds a warm, mellow layer that balances the coffee’s bitterness beautifully.
- Whipping Cream (Cold): The heart of mousse texture — whipping to the right peak makes the mousse airy and light. Always use cold cream for best results.
- Cocoa or Chocolate Shavings: For garnish, they add a touch of bitterness and visual appeal that make every spoonful feel special.
Tweak to Your Taste
One of the things I love about this Coffee Mousse Recipe is how flexible it is. You can easily dial up the coffee strength or switch up garnishes to suit your mood — personalizing it makes it even better!
- Stronger Coffee Punch: When I’m craving a bolder coffee hit, I bump the instant coffee up to 5 teaspoons or swap the water for freshly brewed strong espresso — it gives it that café-quality edge.
- Dairy-Free Version: For friends who avoid dairy, I’ve had success using coconut cream whipped to firm peaks, though the flavor shifts subtly—still delicious if you enjoy a tropical twist.
- Extra Flavor Twists: Adding a splash of coffee liqueur or a pinch of cinnamon to the coffee syrup before chilling can add a fun, grown-up nuance.
- Sweetness Level: Feel free to adjust sugar quantities to your liking — I usually keep it balanced but sometimes cut down a little if serving with very sweet garnishes.
Step-by-Step: How I Make Coffee Mousse Recipe
Step 1: Bloom the Gelatine Gently
Start by pouring your water into a saucepan over low heat and sprinkle the powdered gelatine evenly across the surface. I find using a rubber spatula to gently rub the gelatin against the pan’s side helps it dissolve faster. Keep that heat low and stir constantly; you want it fully dissolved, but never boiling — boiling can kill the gelatine’s setting power and create lumps. This is your base for a smooth, stable mousse.
Step 2: Dissolve Coffee and Sugar
Into that warm gelatine-water mix, sprinkle in your instant coffee granules and sugar. Stir it carefully over low heat until the sugar has completely dissolved, and the coffee granules have vanished into a rich syrup. Again, watch the heat — you don’t want this to boil. When it’s ready, your mixture should be thick and shiny, like a syrup that’s hugged all the coffee goodness.
Step 3: Cool the Coffee Syrup
Transfer this beautiful coffee syrup to a large mixing bowl and pop it in the fridge for about 15-20 minutes, or until it’s cool but not quite set. This cooling step is crucial — if it’s still warm, it’ll melt your whipped cream when you combine them and mess with the mousse texture.
Step 4: Whip the Cream to Firm Peaks
While the syrup chills, pour your cold whipping cream into a clean, chilled bowl. Using an electric mixer or balloon whisk, whip that cream to firm peaks. This means when you lift the whisk, peaks will hold their shape but won’t be stiff or grainy — I find this texture balances beautifully with the coffee to create light mousiness without heaviness.
Step 5: Combine and Fold Gently
Stir the vanilla extract into your cooled coffee syrup. Then, add about a quarter of the whipped cream straight into the syrup and stir briskly — this loosens the syrup for easier folding. Now, add the rest of the whipped cream in batches, folding gently after each addition. Use a spatula to scoop from the bottom, and fold over the top to keep all the whipped air inside — this is the secret to a mousse that’s fluffy and not dense. Stop folding once everything is combined and the mixture holds a soft peak.
Step 6: Chill and Serve with Style
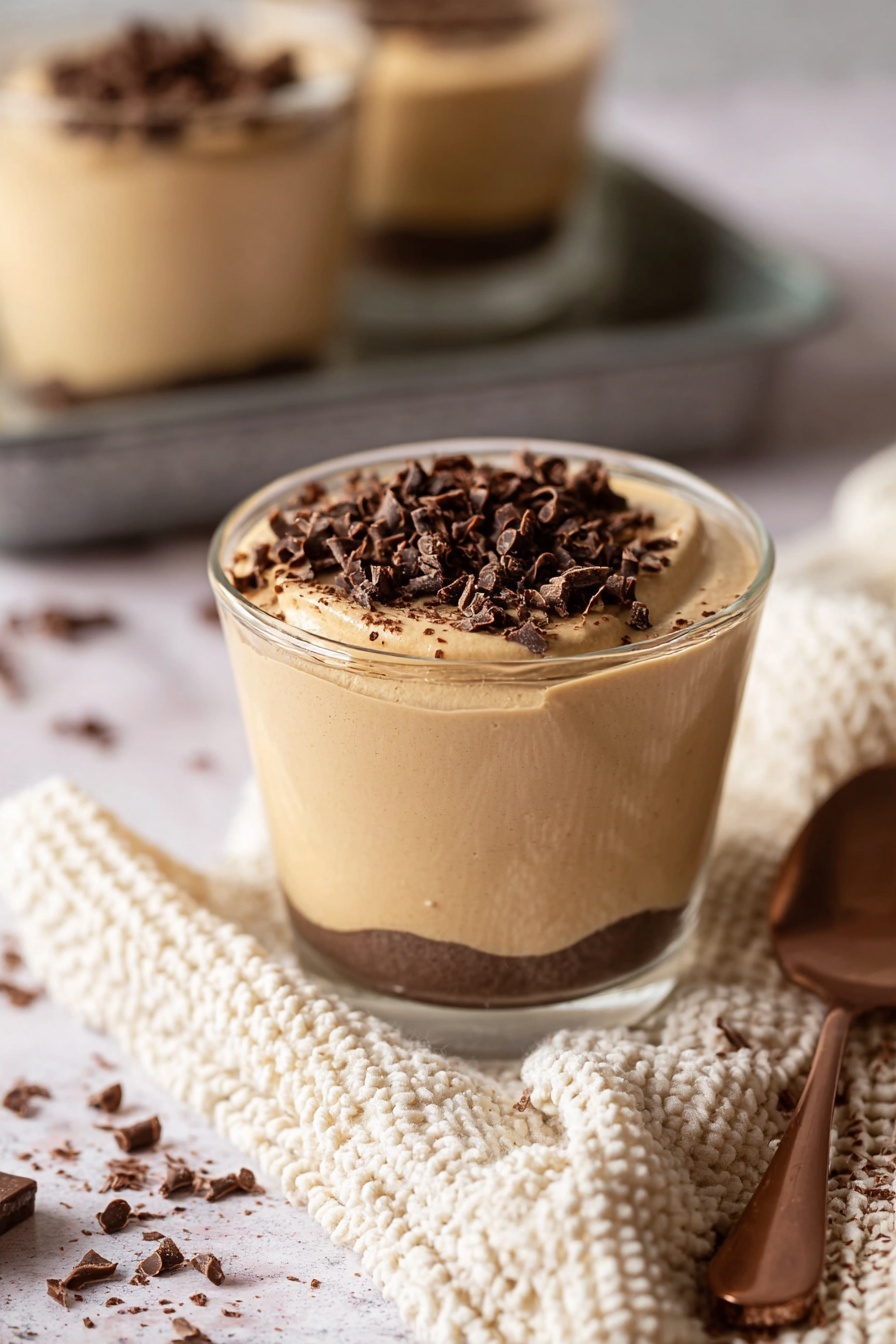
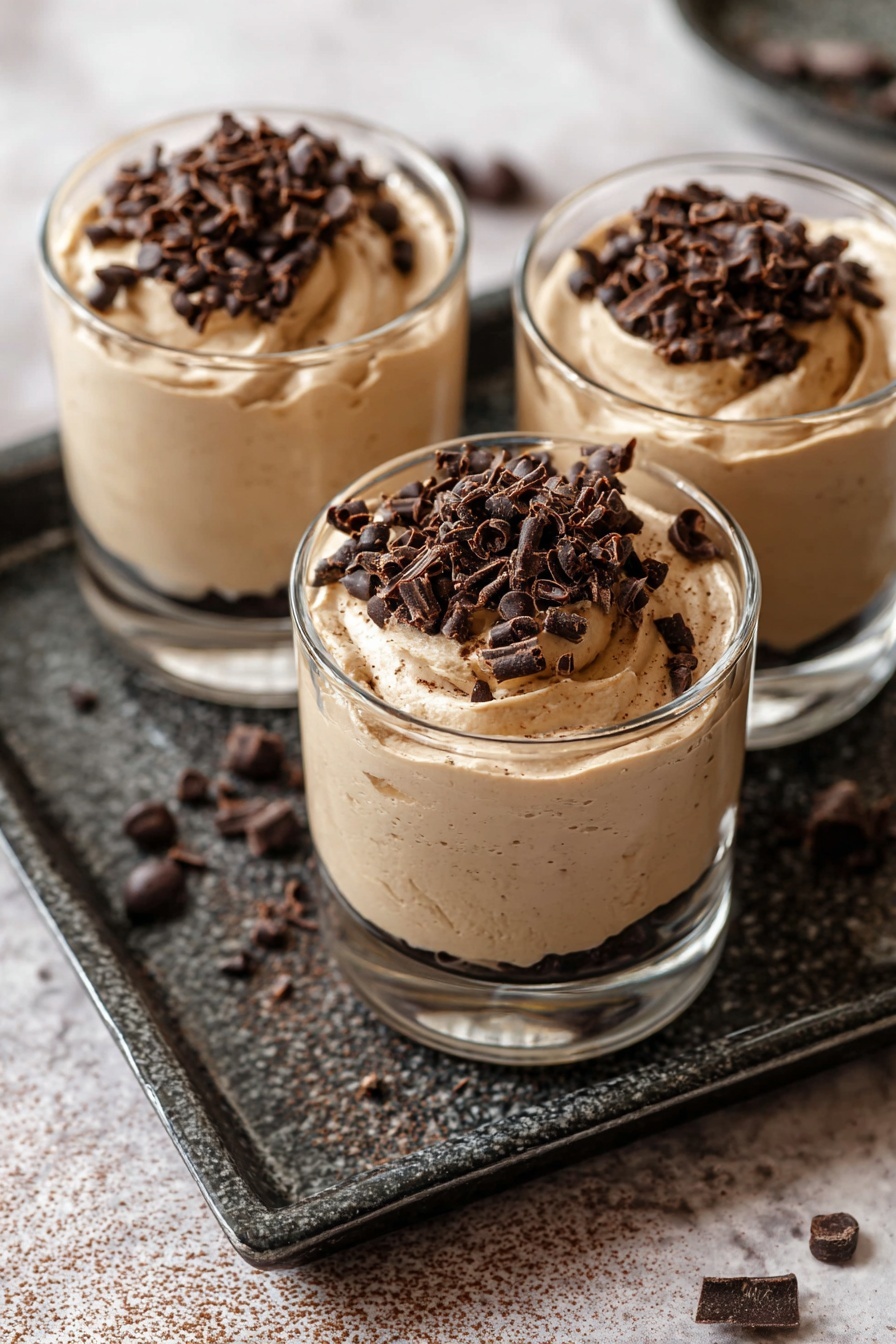
Divide your mousse evenly into pretty dessert glasses or bowls, cover, and chill for at least 2 hours or overnight. Before serving, I love dusting the top with cocoa powder or sprinkling flaky chocolate shavings for that final wow factor. It’s simple but elevates the dessert to something absolutely special.
Pro Tips for Making Coffee Mousse Recipe
- Don’t Rush the Cooling: Make sure the coffee syrup is cool but not set before folding in the cream — warmth here will kill those fluffy peaks.
- Fold, Don’t Stir: Stirring knocks out air, which results in a dense mousse rather than a light one; folding is your best friend.
- Use Cold Equipment: Chilling your mixing bowl and whisk ahead of time helps the cream whip faster and hold its structure better.
- Avoid Overwhipping: Whipped cream can quickly turn grainy if overworked — stop when peaks just hold their shape to keep silky texture.
How to Serve Coffee Mousse Recipe
Garnishes
I love finishing this mousse with a generous sprinkle of dark chocolate shavings or a light dusting of unsweetened cocoa powder — it gives the perfect bittersweet contrast and makes every bite a little celebration. Sometimes I toss in a few espresso beans on top too, especially when serving to coffee lovers. Fresh mint leaves add a lovely pop of color and brightness if you want something fresh.
Side Dishes
If you want to turn this into a full dessert spread, I recommend pairing it with buttery biscotti or almond cookies that complement the coffee flavor and add a crunchy texture contrast. A scoop of vanilla bean ice cream or fresh berries on the side can also be a fantastic, refreshing touch.
Creative Ways to Present
For special occasions, I like serving the mousse layered in tall glasses with alternating layers of crushed chocolate cookie crumbs or caramel sauce swirls. It adds dimension and a stunning presentation. You could also pipe the mousse using a decorative tip for a more elegant finish — it always impresses guests and feels fancy without extra fuss.
Make Ahead and Storage
Storing Leftovers
I usually keep any leftover coffee mousse covered tightly in the fridge for up to 3 days. It’s important to cover it well with plastic wrap or an airtight lid so it doesn’t pick up fridge odors or dry out. The texture holds beautifully, and the flavors actually meld more after a day or two, which is a nice bonus.
Freezing
Freezing coffee mousse is a bit tricky because the whipped cream base can lose its airy texture once thawed. I’ve tried freezing small portions in airtight containers, but I recommend eating it fresh or refrigerated for best texture. If you do freeze it, thaw it slowly in the fridge overnight before serving.
Reheating
Since this dessert is best served chilled, I don’t heat it. However, if you want to warm your mousse slightly, let it sit out for 10-15 minutes at room temperature — this softens it gently without melting it. Avoid microwave reheating, as it ruins the texture and flavor.
FAQs
-
Can I use brewed coffee instead of instant coffee granules?
Absolutely! You can substitute the instant coffee and water with about ¼ cup of strong brewed espresso or coffee. Just skip the water in the recipe and adjust sweetness to taste, because brewed coffee tends to be more diluted than granules.
-
What’s the best way to avoid grainy whipped cream?
Make sure your cream and mixing equipment are cold before whipping, and stop whipping as soon as firm peaks form. Overwhipping causes the fat to separate, making the cream grainy and buttery.
-
Can I make this coffee mousse recipe ahead of time?
Yes! In fact, making it a day ahead lets the flavors meld and the mousse set perfectly. Just keep it refrigerated in a covered container or dessert glasses, and garnish right before serving.
-
How do I know if my gelatin is fully dissolved?
When you stir the gelatin in warm water, it should disappear completely without any clumps or grainy bits visible. The mixture should be smooth and syrupy — if you see lumps, keep stirring gently over low heat, but don’t boil.
-
Can I skip the gelatin?
Gelatin is key to achieving that light yet set mousse texture — without it, your dessert might be more like whipped coffee cream that won’t hold shape. For a vegetarian alternative, you might try agar-agar, but the texture will differ slightly.
Final Thoughts
This Coffee Mousse Recipe holds a special place in my heart as a quick yet elegant way to enjoy coffee in dessert form without fuss. Whether you’re making it for yourself on a leisurely weekend or to wow friends at your next dinner party, it’s one of those recipes that reliably delivers creamy, dreamy coffee flavor with zero stress. I can’t wait for you to try it—trust me, once you taste it, you’ll have a new favorite up your sleeve!
Print
Coffee Mousse Recipe
- Prep Time: 10 minutes
- Cook Time: 5 minutes
- Total Time: 2 hours 30 minutes
- Yield: 6 servings
- Category: Dessert
- Method: Stovetop
- Cuisine: French-inspired
- Diet: Vegetarian
Description
This creamy Coffee Mousse recipe combines rich instant coffee with whipped cream and gelatine to create a light, airy dessert perfect for coffee lovers. Chilled to set and topped with cocoa or chocolate shavings, it’s a delightful treat that’s easy to prepare and impressive to serve.
Ingredients
Main Ingredients
- 1 tablespoon instant coffee granules (4 tsp)
- ¼ cup water
- ¾ cup caster sugar or white granulated sugar
- ½ teaspoon powdered gelatine
- 1 teaspoon vanilla extract
- 1 ½ cups whipping cream, cold
- Cocoa or chocolate shavings to serve
Instructions
- Dissolve Gelatine: Place the water into a medium saucepan over low heat and sprinkle the gelatine on top. Stir constantly with a rubber spatula until the gelatine fully dissolves, taking care not to let the mixture boil.
- Add Coffee and Sugar: Add the instant coffee granules and sugar to the dissolved gelatine mixture, stirring continuously until the sugar dissolves completely. Avoid boiling the mixture.
- Cool Coffee Syrup: Transfer the coffee mixture to a large mixing bowl and refrigerate for 15-20 minutes, until it is cooler than room temperature and has thickened into a syrup but not set.
- Whip Cream: In a separate large bowl, pour the cold whipping cream and beat with an electric mixer to firm peaks. Be careful not to overwhip; the peaks should just hold their shape without becoming grainy.
- Add Vanilla: Stir the vanilla extract into the cooled coffee syrup.
- Combine Cream and Coffee Syrup: Add one quarter of the whipped cream to the coffee syrup and stir to loosen the consistency.
- Fold Remaining Cream: Add another quarter of the whipped cream and gently fold using a lifting and folding motion to retain airiness. Repeat folding with the remaining cream until the mixture is light, fluffy, and holds its shape.
- Chill Mousse: Divide the mousse evenly into dessert glasses or bowls, then chill for at least 2 hours or overnight to set.
- Serve: Sprinkle the set mousse with cocoa powder or chocolate shavings before serving for an elegant finish.
Notes
- Tablespoons used are standard Australian 20ml tablespoons (4 teaspoons). Verify your tablespoon size when measuring.
- For stronger coffee flavor, increase coffee granules up to 5-6 teaspoons or substitute with ¼ cup strong espresso and omit the water.
- Ensure gelatine is fully dissolved without boiling to avoid grainy texture.
- Do not overwhip the cream to prevent graininess; the mousse should remain light and airy.
- Nutrition information provided is approximate.
Nutrition
- Serving Size: 1 serving
- Calories: 280 kcal
- Sugar: 28 g
- Sodium: 60 mg
- Fat: 18 g
- Saturated Fat: 11 g
- Unsaturated Fat: 6 g
- Trans Fat: 0 g
- Carbohydrates: 25 g
- Fiber: 1 g
- Protein: 3 g
- Cholesterol: 70 mg


