
Coconut Chocolate Bars Recipe
If you’re craving a treat that blends rich chocolate, luscious coconut, and a buttery base, you’re going to love this Coconut Chocolate Bars Recipe. I stumbled upon this recipe a while back and it quickly became a staple for get-togethers and a sweet pick-me-up on a quiet afternoon. It’s the kind of dessert that’s straightforward to make, yet feels like a special indulgence. Stick with me here — by the end, you’ll be whipping these bars up and sharing them like the kitchen pro you are.
Why This Recipe Works
- Perfect Texture Balance: The graham cracker crust gives a sturdy yet crumbly base that holds the gooey coconut-chocolate topping beautifully.
- Simple Ingredients: You probably have everything on hand, making it a no-fuss dessert to throw together last-minute.
- Sweet & Nutty Flavor: The combination of coconut flakes, semi-sweet chocolate, and walnuts adds layers of flavor and texture that keep every bite interesting.
- Reliable Baking Times: The two-stage baking ensures the crust is crisp without drying the topping out, so your bars come out just right every time.

Ingredients & Why They Work
The ingredients in this Coconut Chocolate Bars Recipe come together in a way that’s equal parts satisfying and accessible. Each element plays its part: a buttery crust as the foundation, a luscious chocolate-coconut-walnut topping, and that magical condensed milk to hold it all together.

- Graham Crackers: Crushed finely, they add a slightly sweet, crispy texture to the base that’s better than plain flour alone.
- Flour: Helps bind the crust ingredients together for that perfect crumbly texture without falling apart.
- Salt: Just a pinch enhances the sweetness and balances the flavors.
- Unsalted Butter: Melting it makes mixing easy and gives the crust that rich, tender bite.
- Brown Sugar: Adds caramel undertones and moisture to the crust that plain white sugar can’t match.
- Baking Powder: Gives just a little lift to the crust so it’s not too dense.
- Coconut Flakes: I prefer unsweetened to balance the sweetness but sweetened works if you want extra coconut flavor.
- Semi-Sweet Chocolate Chips: The perfect sweet spot between bitter and sweet chocolate, melting into gooey pockets.
- Condensed Milk: This lends incredible richness and sweetness, acting as glue for the topping mixture.
- Chopped Walnuts: Adds crunch and a nutty contrast to the soft, chewy texture of the coconut and chocolate.
Tweak to Your Taste
I love to mess around with this Coconut Chocolate Bars Recipe depending on my mood or what’s in my pantry. Feel free to make it your own—these bars are forgiving and adapt well to tweaks.
- Nut-Free Variation: I’ve swapped walnuts for sunflower seeds before, and it worked surprisingly well for guests with allergies.
- Extra Chocolatey: Sometimes I sprinkle extra chocolate chips on top before the final bake — because, why not?
- Toasted Coconut Flavor: Toasting the coconut flakes lightly before mixing them in adds a deeper, nutty flavor that’s irresistible.
- Texture Swap: If you want softer bars, cut back slightly on the baking time at the start to keep the crust more tender.
Step-by-Step: How I Make Coconut Chocolate Bars Recipe
Step 1: Crush and Combine the Crust Ingredients
I start by crushing the graham crackers to an even, fine texture using my food processor—it really makes mixing with the flour and sugar smoother. If you don’t have a processor, a sturdy plastic bag and rolling pin work just fine. Next, I whisk together the flour, baking powder, salt, and brown sugar right in a large bowl, then pour in melted butter. I use my hands to mix it all until it feels like soft, crumbly sand—moist enough to stick but not wet. This gets pressed into the pan, so don’t skip making sure it’s evenly combined.
Step 2: Press and Bake the Crust
I line an 11×16-inch baking sheet with parchment paper (trust me, it makes cleanup easier!) and press this crumbly crust evenly across the surface. Use your hands to really press it down, creating a firm base—this prevents crumbling later. Bake at 350°F for about 10 minutes until it’s just set and lightly golden. You want it baked but not too crisp at this stage because it’ll bake more with the topping.
Step 3: Prepare the Coconut-Chocolate Topping
While the crust is baking, I combine the coconut flakes, chocolate chips, and chopped walnuts in a big bowl. Then I drizzle the condensed milk over and stir gently until everything is nicely coated. This sticky, sweet mixture is what gives these bars their gooey, irresistible texture.
Step 4: Spread Topping and Bake Again
Once the crust is ready, I spread the topping evenly over it, smoothing with the back of a spoon so every corner is covered. Back into the oven it goes for another 20 minutes at 350°F. Keep an eye on it near the end—the edges should be golden and bubbly, but the topping will still look soft and luscious.
Step 5: Cool and Slice
This part is tricky—I know it’s tempting to dig in right away, but let the bars cool to room temperature before cutting. This waiting game lets the topping set slightly, which means cleaner cuts and less gooey mess on your fingers. I usually chill mine for about an hour on the countertop, then slice them into 40 bite-size bars. They’re perfect for sharing (or not!).
Pro Tips for Making Coconut Chocolate Bars Recipe
- Food Processor for Crust: Crushing the graham crackers finely in a food processor ensures the crust binds well and doesn’t end up lumpy.
- Even Layering: Be patient when spreading the topping—an even layer prevents some bars from being overly thick or too thin.
- Parchment Paper Magic: Line your pan with parchment paper for easy removal and clean edges on your bars.
- Cool Completely Before Cutting: Resist the urge to slice while hot to avoid gooey mess and uneven pieces.
How to Serve Coconut Chocolate Bars Recipe

Garnishes
I like to dust mine with a little powdered sugar or even sprinkle some extra toasted coconut flakes on top for a pretty finish. If I’m feeling fancy, a drizzle of melted dark chocolate soon after baking adds that wow factor and sharp contrast to the sweetness.
Side Dishes
These bars pair perfectly with a cup of strong coffee or a cold glass of milk—simple and satisfying. At family gatherings, I’ve served them alongside fresh fruit to balance all that sweetness and add a refreshing note.
Creative Ways to Present
When I’ve brought these bars to parties, I like to cut them into small squares and arrange them on a tiered dessert platter with other treats for visual appeal. For holiday gatherings, I’ve wrapped individual bars in parchment with twine, turning them into cute edible gifts that everyone loves.
Make Ahead and Storage
Storing Leftovers
After they’ve cooled, I store these bars in an airtight container at room temperature for up to 3 days. They stay moist and chewy but firm enough to hold shape. For humid climates, refrigeration helps avoid sogginess, though I always bring them back to room temp before serving.
Freezing
I’ve successfully frozen these bars by wrapping individual pieces tightly in plastic wrap and placing them in a freezer bag. They freeze nicely for up to 2 months. When ready, thaw them in the fridge overnight and bring them back to room temperature before enjoying.
Reheating
If you like your bars a bit warm and melty, pop them in the microwave for 10-15 seconds—just enough to soften the chocolate without making it oily. Oven reheating at 300°F for 5-7 minutes on parchment works well too, especially if you want to refresh the crispness of the crust.
FAQs
-
Can I use sweetened shredded coconut instead of flakes?
Yes, you can! Sweetened shredded coconut will make your bars a bit sweeter and denser in texture. If you want to keep the sweetness balanced, consider reducing the brown sugar slightly in the crust. Both versions create delicious results.
-
Is it okay to substitute walnuts with other nuts?
Absolutely! Pecans, almonds, or even macadamia nuts make great alternatives. Just chop them roughly to keep a good texture contrast, and feel free to toast nuts beforehand for more flavor.
-
Can I make these bars gluten-free?
You sure can! Swap the flour for a gluten-free all-purpose blend and make sure your graham crackers are gluten-free as well. The texture might tweak slightly but they’ll still be fantastic.
-
Why does my topping sometimes become too runny?
This usually happens if the condensed milk ratio is off or the bars are underbaked during the second stage. Make sure to follow the ingredient amounts carefully and bake until the topping is bubbly and golden around the edges.
Final Thoughts
This Coconut Chocolate Bars Recipe truly holds a special spot in my recipe box because it brings together simple ingredients in a way that feels like a celebration every time. Whether you’re baking for friends, a holiday, or just because, these bars won’t disappoint. Give it a try—I’m confident these sticky, chewy, nutty bars will become a favorite in your home just like they did in mine. And don’t forget, baking’s always better when shared!
Print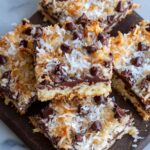
Coconut Chocolate Bars Recipe
- Prep Time: 20 minutes
- Cook Time: 30 minutes
- Total Time: 50 minutes
- Yield: 40 bars
- Category: Dessert
- Method: Baking
- Cuisine: American
Description
Deliciously rich and chewy Magic Coconut Bars featuring a buttery graham cracker crust topped with a gooey coconut, chocolate, walnut, and condensed milk mixture, baked to perfection for a delightful treat perfect for any occasion.
Ingredients
Crust
- 2 cup graham cracker crushed
- 1/2 cup flour
- 1 tsp salt
- 14 tbsp unsalted butter melted
- 2/3 cup brown sugar
- 1 tsp baking powder
Topping
- 3 cup coconut flakes
- 2 cup semi sweet chocolate chips
- 24 oz condensed milk
- 2/3 cup chopped walnuts
Instructions
- Prepare the crust: Crush the graham crackers using a food processor or blender until fine. In a large bowl, combine the crushed graham crackers, flour, baking powder, salt, and brown sugar. Add the melted butter and mix thoroughly until you achieve a soft, crumbly dough.
- Bake the crust: Line a baking sheet sized approximately 11×16 inches with parchment paper. Spread the dough evenly in a thin layer on the lined sheet, pressing down firmly with your hands to create a compact crust layer. Bake in a preheated oven at 350 °F for 10 minutes.
- Prepare the topping: While the crust bakes, combine the coconut flakes, semi-sweet chocolate chips, and chopped walnuts in a bowl. Drizzle the condensed milk over the mixture and stir well to evenly coat and combine all ingredients.
- Assemble and bake: Remove the crust from the oven and evenly spread the topping mixture over it. Return the pan to the oven and bake for an additional 20 minutes at 350 °F until the topping is set and slightly golden.
- Cool and serve: Take the bars out of the oven and allow them to cool to room temperature on a wire rack. After cooling, cut into approximately 40 bars of your preferred size and serve.
Notes
- Ensure the butter is fully melted for even mixing in the crust.
- Press down the crust firmly to avoid crumbly bars after baking.
- Use parchment paper for easy removal and cleanup.
- Let bars cool completely to achieve clean cuts and prevent sticking.
- Store bars in an airtight container to maintain freshness for up to one week.
- Walnuts can be substituted with pecans or omitted for nut-free versions.
Nutrition
- Serving Size: 1 bar
- Calories: 210 kcal
- Sugar: 18 g
- Sodium: 90 mg
- Fat: 12 g
- Saturated Fat: 7 g
- Unsaturated Fat: 4 g
- Trans Fat: 0 g
- Carbohydrates: 25 g
- Fiber: 2 g
- Protein: 3 g
- Cholesterol: 25 mg
