
Christmas Brownie Layer Bars Recipe
If you’re hunting for a treat that combines rich chocolate, crunchy nuts, and festive pops of color, you’re going to love this one. I’m excited to share my favorite Christmas Brownie Layer Bars Recipe — it’s a delicious, show-stopping dessert perfect for the holidays that people can’t stop talking about once they try it. Trust me, these bars will quickly become your go-to when you want to impress friends or satisfy your own sweet tooth!
Why This Recipe Works
- Layered Texture: Combining fudge-like brownie base with crunchy nuts and sweet coconut creates an irresistible mix of textures.
- Balanced Sweetness: The sweetened condensed milk drizzle adds creamy richness without overwhelming the chocolate.
- Festive Appearance: Holiday M&Ms and sprinkles not only add bursts of color but also make these bars perfect for gift-giving or parties.
- Easy Prep: No complicated techniques here – mostly mixing, layering, and chilling with foolproof timing.

Ingredients & Why They Work
What I love about this Christmas Brownie Layer Bars Recipe is how each ingredient plays its part perfectly, making this dessert both delicious and fun. When shopping, pick quality chocolate and fresh nuts for that extra oomph.

- Semi-sweet chocolate chips: Melts beautifully creating a rich, fudgy brownie base and adds bursts of chocolate in the topping.
- Salted butter: Keeps the sweetness balanced and intensifies the chocolate flavor.
- Granulated sugar: Sweetens the batter evenly without making it cloying.
- Eggs and egg yolk: Give the bars structure while keeping them moist and tender.
- All-purpose flour: The perfect binder; don’t over mix or your bars will be tough.
- Vanilla extract: Adds warmth and depth to the chocolate.
- Nuts (optional): Adds crunch and a nutty flavor that complements the chocolate and coconut.
- Mini and regular holiday M&Ms: Make the bars festive and add a chewy-sweet texture variation.
- Sweetened flaked coconut: Brings a sweet, chewy texture that pairs well with nuts and chocolate.
- Sweetened condensed milk: Pours creamy sweetness over the top that sets into a lightly sticky glaze.
- Holiday sprinkles: For that final festive flair that brightens every bite.
Tweak to Your Taste
I love playing around with this Christmas Brownie Layer Bars Recipe depending on what we have or what I’m craving. You can make it your own by swapping out some toppings or adjusting the mix-ins.
- Nut-free version: I once made these without nuts for a friend with allergies; the texture was still fantastic thanks to the coconut and M&Ms.
- Dark chocolate swap: Using dark chocolate chips adds a richer, slightly more bittersweet flavor that balances the sweet layers nicely.
- Extra gooey: Try adding a drizzle of caramel over the condensed milk layer for a decadent twist.
- Seasonal toppings: Swap in white chocolate chips and peppermint candies for a cool, minty holiday vibe.
Step-by-Step: How I Make Christmas Brownie Layer Bars Recipe
Step 1: Melt Together Butter and Chocolate
Start by placing your salted butter and semi-sweet chocolate chips in a microwave-safe bowl. Microwave for 30 seconds, stir, then keep heating in 30-second bursts until smooth and shiny. I like using my spatula to stir continuously because it helps avoid overheating and getting grainy chocolate.
Step 2: Mix In Sugar, Vanilla, and Eggs
Once your chocolate mixture is cooled slightly, whisk in the sugar first, then vanilla extract and eggs. This sequence ensures the eggs don’t scramble from hot chocolate. The batter should come together beautifully creamy and glossy.
Step 3: Add Flour and Pour Into Pan
Gently fold in the flour just until everything is combined — don’t overmix! When ready, pour the batter into your lined 9-inch pan and spread evenly. The pan preparation is key here to make sure your bars lift out cleanly later.
Step 4: Bake the Brownie Base
Bake at 350°F (175°C) for about 20 minutes until the brownie jiggles slightly on top but is mostly set. This partial bake is crucial because the toppings need to bake on top without overcooking the base.
Step 5: Add the Toppings and Bake Again
Remove the pan from the oven, then layer nuts, half the chocolate chips, half the M&Ms, and all the shredded coconut. Pour the sweetened condensed milk evenly over, gently spreading it out. Sprinkle on the remaining chocolate chips, M&Ms, and festive sprinkles.
Pop it back in the oven for another 25 minutes, keeping an eye to tent with foil if the topping browns too fast. The edges should turn golden and the center will set but still be slightly soft.
Step 6: Cool Completely and Slice
Patience is key here — cool your bars fully before cutting to get those clean squares. I like using a sharp knife and wiping it between cuts. This keeps each piece looking just as festive as the whole pan!
Pro Tips for Making Christmas Brownie Layer Bars Recipe
- Microwave in Short Bursts: Avoid overheating your chocolate to prevent it from seizing; stir often.
- Don’t Overmix Flour: Folding just until combined keeps your bars tender and fudgy instead of cakey.
- Layering Order Matters: Spread nuts and chocolates first before adding the coconut and condensed milk for even baking.
- Cooling Time is a Must: Cutting bars too soon can make them crumble—let them cool completely for perfect slices.
How to Serve Christmas Brownie Layer Bars Recipe

Garnishes
I’m a sucker for adding a little extra sparkle when I serve these bars. Freshly dusting with powdered sugar or adding a handful of extra holiday sprinkles right before serving amps up the festive look. Sometimes a dollop of whipped cream on the side is just the cozy touch I want.
Side Dishes
Perfect around the holidays alongside your favorite hot drinks—think rich hot cocoa with marshmallows or a peppermint-spiked coffee. These bars also pair beautifully with creamy vanilla ice cream if you’re serving them as part of a dessert spread.
Creative Ways to Present
I’ve wrapped these bars individually in parchment paper tied with a red ribbon for gifting—instant happiness wrapped in a cute package! Another idea I love is stacking them like little towers on a festive platter garlanded with holly or small pinecones for that extra holiday cheer.
Make Ahead and Storage
Storing Leftovers
I keep my leftover Christmas Brownie Layer Bars in an airtight container at room temperature—it keeps them fresh and soft for about a week. To avoid them sticking together, I cut parchment sheets to place between layers, which makes grabbing just one at a time so easy.
Freezing
For longer storage, I freeze individual bars wrapped tightly in plastic wrap and foil. This way, each piece stays fresh for up to three months, letting me enjoy holiday cheer any time. When I’m ready, I thaw them on the counter for around an hour—it’s like freshly made!
Reheating
If you want that gooey, warm feeling, I pop bars in the microwave for 10-15 seconds. Warmed up like this, the chocolate melts slightly, and the condensed milk glaze becomes dreamy without losing its texture.
FAQs
-
Can I make the Christmas Brownie Layer Bars Recipe nut-free?
Absolutely! Just skip the nuts or replace them with another crunchy topping like crushed pretzels or sunflower seeds. The bars will still have great texture and flavor thanks to the coconut and M&Ms.
-
How long do these bars keep fresh?
Stored in an airtight container at room temperature, they stay fresh for about one week. Refrigerating them extends freshness up to two weeks, but I recommend bringing them to room temperature before serving for best taste.
-
Can I use dark chocolate instead of semi-sweet?
Yes! Dark chocolate provides a slightly more intense flavor and less sweetness, which balances wonderfully with the sweet condensed milk and festive toppings.
-
Do I need to line the pan with foil or parchment?
Either works well. I prefer foil because it’s sturdy and makes lifting out the bars in one piece easy. Just don’t forget to spray it with non-stick spray to prevent sticking.
-
Can I prepare these bars ahead of time?
Yes! You can bake them a day or two ahead and store them cooled in an airtight container. For longer make-ahead, freeze individual bars and thaw before serving.
Final Thoughts
This Christmas Brownie Layer Bars Recipe is truly one of those treats that feels like a warm holiday hug. I love how easy it is to bake yet impressively festive and delicious. Whether you’re baking for a crowd or just treating yourself, these bars bring that perfect balance of fun and chocolatey goodness. I can’t wait for you to try it—I promise it’ll be your new holiday favorite!
Print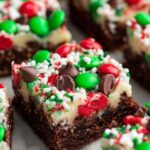
Christmas Brownie Layer Bars Recipe
- Prep Time: 15 minutes
- Cook Time: 45 minutes
- Total Time: 1 hour
- Yield: 9 bars
- Category: Dessert
- Method: Baking
- Cuisine: American
Description
These Christmas Magic Layer Brownie Bars combine rich semi-sweet chocolate brownies with festive toppings including nuts, holiday M&Ms, shredded coconut, sweetened condensed milk, and colorful sprinkles for a deliciously decadent holiday treat perfect for sharing.
Ingredients
Brownie Layer:
- 1½ cups semi-sweet chocolate chips
- ½ cup salted butter (1 stick)
- 1 cup granulated sugar
- 2 large eggs
- 1 large egg yolk
- 1 cup all-purpose flour
- ½ teaspoon vanilla extract
Toppings Layer:
- ¾ cup nuts (optional, divided)
- ¼ cup mini holiday M&Ms (divided)
- ¾ cup regular holiday M&Ms (divided)
- ½ cup semi-sweet chocolate chips (divided)
- 1 cup sweetened flaked coconut
- ¾ cup sweetened condensed milk (from a 14 ounce can)
- ¼ cup holiday sprinkles
Instructions
- Preheat Oven and Prepare Pan: Preheat oven to 350 degrees F. Line a 9-inch baking pan with foil or parchment paper and spray with nonstick cooking spray to prevent sticking.
- Melt Chocolate and Butter: Place butter and semi-sweet chocolate chips in a large microwave-safe bowl. Microwave on high for 30 seconds, then stir. Continue microwaving and stirring in 30-second intervals until melted and smooth.
- Mix Brownie Batter: Beat in granulated sugar followed by vanilla extract and eggs until well combined. Stir in all-purpose flour until just combined, being careful not to overmix.
- Bake Brownie Base: Pour batter into the prepared pan and bake for 20 minutes. The brownies will jiggle slightly but should be set on top.
- Add Toppings Layer: Remove pan from oven and layer nuts, half of the chocolate chips, half of the M&Ms, and all of the shredded coconut evenly over the baked brownie base.
- Pour Condensed Milk: Evenly pour sweetened condensed milk over the toppings. Gently spread to distribute it evenly.
- Finish Topping: Sprinkle remaining chocolate chips, remaining M&Ms, and holiday sprinkles on top of the condensed milk layer.
- Bake Again: Return to the oven and bake for an additional 25 minutes, or until edges are golden and the middle is set and starting to brown. If top browns too fast, loosely tent with foil.
- Cool and Serve: Let the brownies cool completely in the pan before slicing into squares with a sharp knife.
- Store Properly: Store the brownie bars in a tightly sealed container at room temperature for up to one week.
Notes
- Refrigerate: Store in an airtight container at room temperature for up to one week, or refrigerate for up to two weeks with parchment paper between layers to prevent sticking.
- Freeze: Remove brownies from pan, wrap in plastic wrap then aluminum foil, and freeze up to three months. Individual squares can also be wrapped and frozen for easy treats. Thaw at room temperature for about one hour before serving.
- If the topping browns too quickly during the second bake, tent the pan loosely with foil to prevent burning while allowing the center to set.
- Optional nuts can be omitted or substituted with pecans, walnuts, or almonds to suit preferences.
Nutrition
- Serving Size: 1 bar
- Calories: 420 kcal
- Sugar: 38 g
- Sodium: 150 mg
- Fat: 22 g
- Saturated Fat: 12 g
- Unsaturated Fat: 9 g
- Trans Fat: 0 g
- Carbohydrates: 50 g
- Fiber: 2 g
- Protein: 5 g
- Cholesterol: 85 mg

