
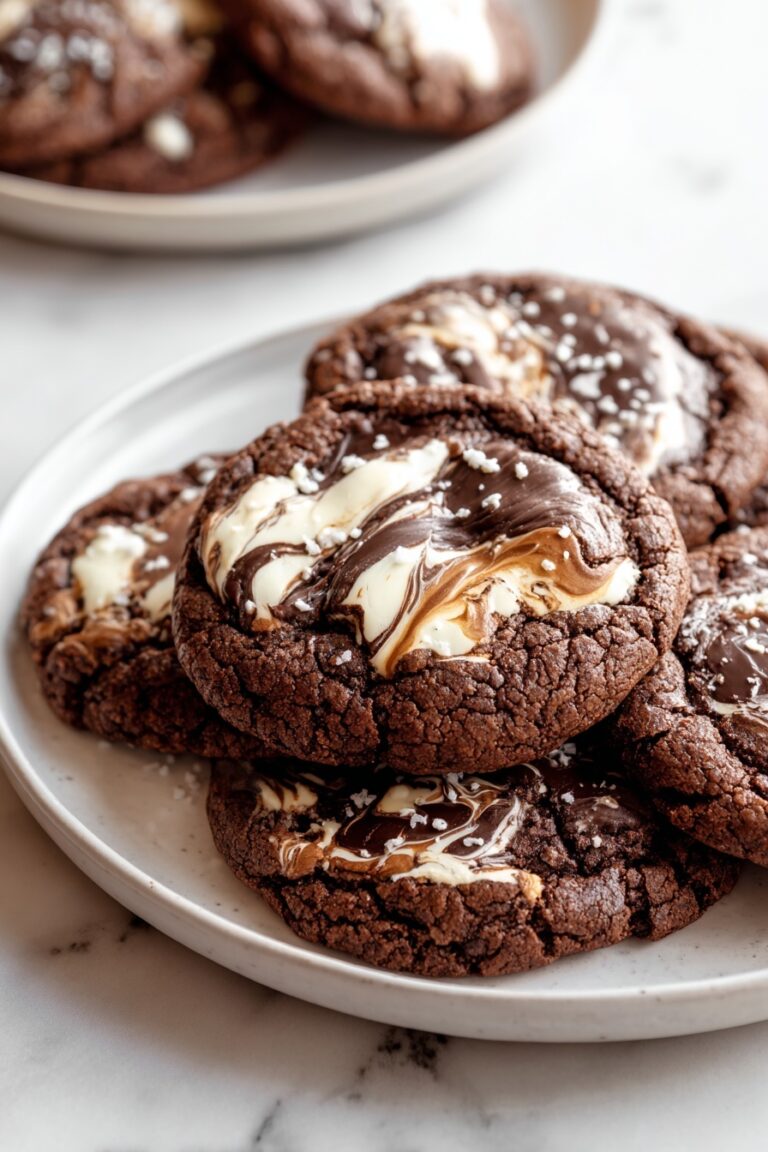
Chocolate Swirl Buns Recipe
If you’re craving a treat that’s both comfy and irresistibly chocolatey, you’re going to adore this Chocolate Swirl Buns Recipe. These buns are soft, buttery, and boast that gorgeous, rich swirl of bittersweet chocolate that just melts in your mouth. Whether it’s for a weekend brunch or a cozy afternoon snack with coffee, I promise this recipe will become one of your favorites. Plus, it’s easier than you might expect—I’ll walk you through every step!
Why This Recipe Works
- Perfect Dough Texture: The balance of yeast, milk, and butter creates a soft, elastic dough that rises beautifully without being sticky.
- Decadent Chocolate Filling: Combining bittersweet chocolate with cocoa, butter, powdered sugar, and oil gives a creamy spread that layers into those dreamy swirls.
- Simple Twisting Technique: The way you cut and twist the dough creates those pretty swirled buns that look fancy but come together with ease.
- Customizable Sweetness: You can tweak the filling or dough slightly to match your preference, making this recipe truly your own.

Ingredients & Why They Work
Each ingredient in this Chocolate Swirl Buns Recipe plays a key role in achieving that perfect bite—fluffy dough meets luscious chocolate filling. Let me share some little tips I’ve learned about picking and using them.
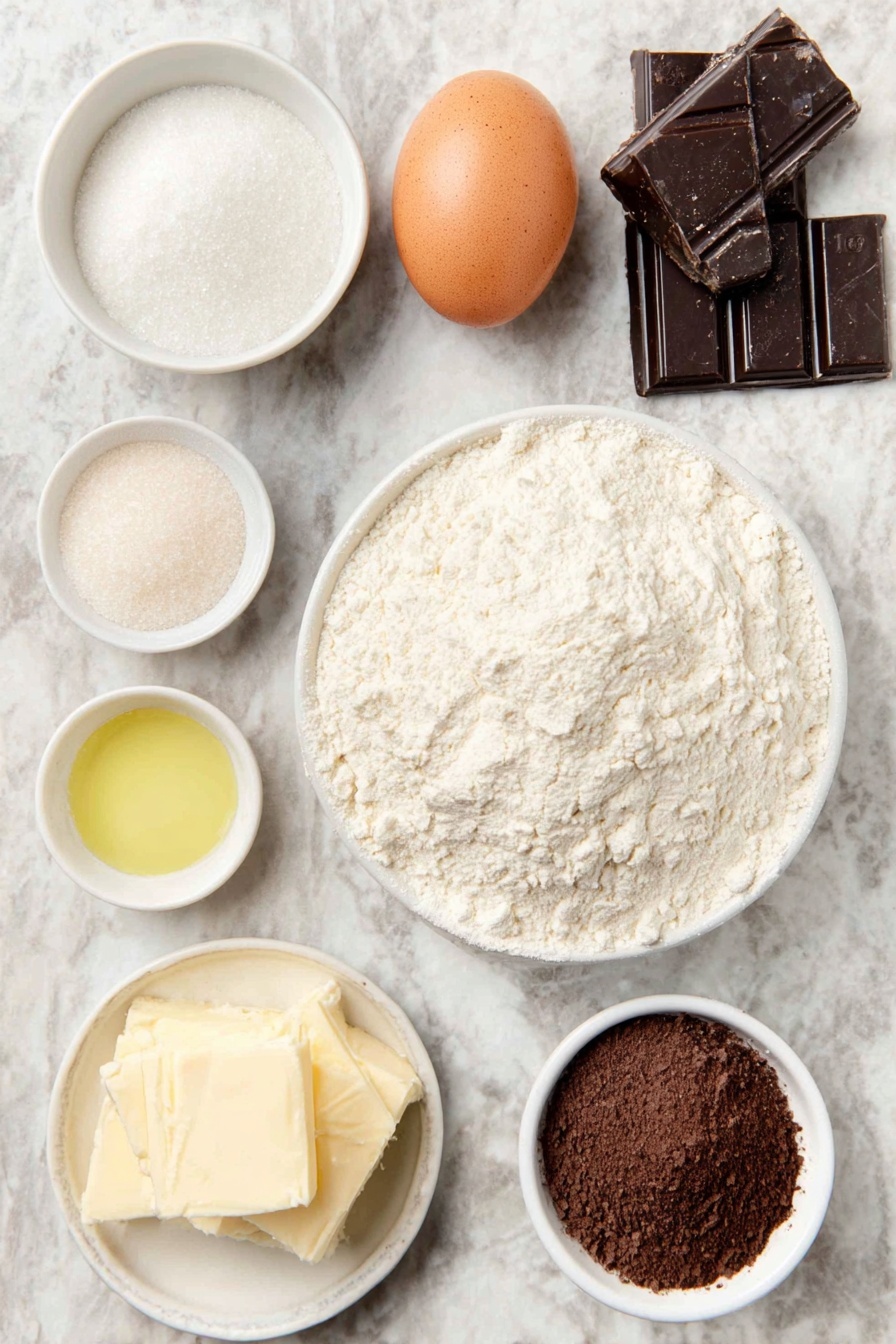
- Warm milk: Using milk warmed to just the right temperature wakes the yeast up without killing it—think cozy bath water, not hot tub.
- Sugar: Besides sweetening, it feeds the yeast to help your dough rise nicely.
- Fresh yeast: I love fresh yeast for this recipe—it really gives a yield that’s fluffy yet tender. If you only have dry yeast, use the equivalent amount and activate it well.
- Egg: Adds richness and helps thread the dough together.
- Melted butter: Softens the dough and gives it that melt-in-your-mouth texture.
- Flour: Provides structure—go for bread flour if you want an extra chewy texture.
- Salt: A small pinch balances the sweetness and enhances flavor.
- Bittersweet chocolate: This is the star of the filling! I find bittersweet hits the perfect tone—rich but not too sugary.
- Butter (for filling): Combines with chocolate to give the filling a smooth, spreadable consistency.
- Cocoa powder: Boosts that deep chocolate flavor without weighing it down.
- Powdered sugar: Sweetens the filling and dissolves easily, keeping it smooth.
- Oil: Helps keep the filling moist and shiny.
- Egg (for wash): Gives an irresistible golden glaze once baked.
Tweak to Your Taste
One of my favorite things about this Chocolate Swirl Buns Recipe is how easily it adapts. I often switch up the filling or add a sprinkle of nuts inside for extra crunch. Don’t hesitate to make it truly yours!
- Nutty twist: Adding chopped toasted hazelnuts or walnuts inside the filling adds delightful crunch and depth—I’ve tried it, and it’s a game-changer.
- Spiced up: A dash of cinnamon or a pinch of chili powder in the filling can warm things up nicely if you want a slight kick.
- Vegan variation: Swap the milk with almond or oat milk and the butter with coconut oil or vegan butter; it still tastes fantastic.
Step-by-Step: How I Make Chocolate Swirl Buns Recipe
Step 1: Wake Up the Yeast
Begin by mixing warm milk and sugar in a large bowl—make sure it’s pleasantly warm, not hot, to keep your yeast happy. Sprinkle in the fresh yeast and let it sit about 5 to 10 minutes. You’ll know it’s working when it gets bubbly and frothy on top—like little clouds of promise. If nothing happens, your yeast may be old, so try again with fresh yeast.
Step 2: Make the Dough That Dreams Are Made Of
Next up, stir in the egg, melted butter, and salt. Gradually add flour—around 4 ¼ to 4 ⅓ cups—starting slow so you don’t overdo it. Knead the dough on a floured surface or with a stand mixer until it’s soft and elastic—about 8-10 minutes. It might seem sticky in the beginning, but give it time and a little flour here and there. Once smooth, pop it back in the bowl, cover with a clean towel or plastic wrap, and let it rise in a warm spot for about an hour or until it doubles in size.
Step 3: Dreamy Chocolate Filling Prep
While the dough is relaxing, melt the bittersweet chocolate and butter together gently, either in the microwave in short bursts or over a double boiler (my favorite way to avoid scorch). Switch off the heat, then stir in cocoa powder, powdered sugar, and oil until you get a silky smooth chocolate spread. Let it cool enough so it’s spreadable but not hard—warm fillings can tear the dough in the next step.
Step 4: Roll, Spread, and Fold with Love
Divide your dough into two parts. Roll each out into a large rectangle, dusting the surface and dough with flour often—that’s key to preventing sticking or tearing. Spread half of the chocolate filling on one rectangle, leaving a small border free. Fold the dough carefully in half, then gently roll it out again to even things out.
Next, spread more filling on half of this folded dough and fold it again. Trim any messy edges but don’t toss them! I usually save scraps to make smaller, fun-shaped buns—because, honestly, nothing should go to waste.
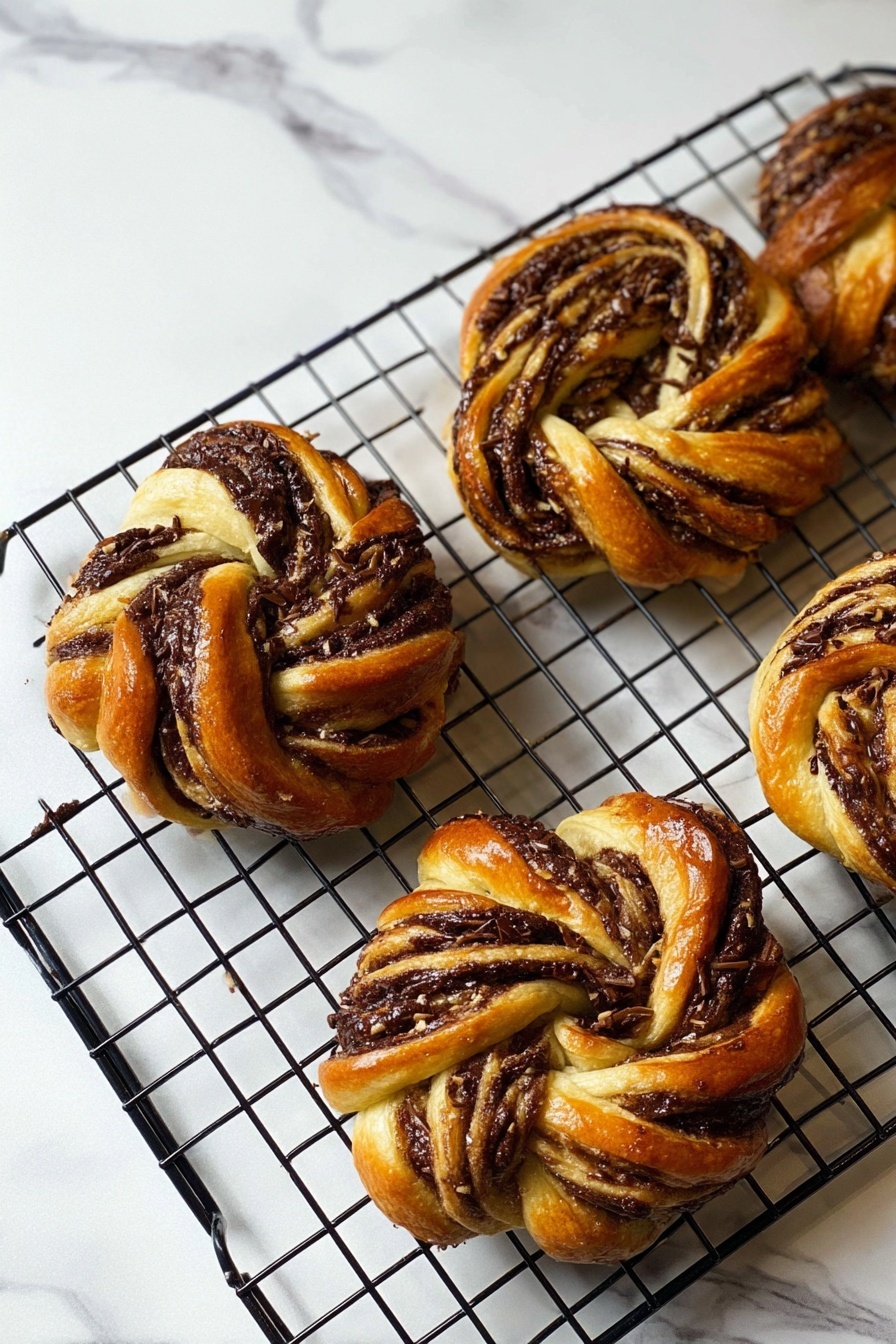
Step 5: Slice, Twist, and Shape
Roll out your folded dough once more tightly, then cut it into strips about four fingers wide. Here’s the fun part: make 3 vertical cuts in the center of each strip—careful not to slice all the way through—to create those beautiful twists. Twist each strip, then roll them into buns. Place your buns on parchment-lined baking sheets, cover, and let them rise for 35 minutes.
Step 6: Bake to Chocolate Perfection
Preheat your oven to 375°F (190°C). Brush the buns generously with beaten egg to get that irresistible glossy golden finish. Bake for 20 to 35 minutes—or until they turn beautifully golden brown and fill your kitchen with that amazing chocolatey aroma. Let them cool just a bit before digging in. Trust me, they’re heavenly warm!
Pro Tips for Making Chocolate Swirl Buns Recipe
- Keep the Dough Floured: I always dust generously while rolling to stop the dough from sticking and tearing—patching holes is no fun and affects the swirl.
- Don’t Skip the Double Fold: Folding twice helps get those beautiful layers; it might feel like extra work but trust me, it’s worth it.
- Watch Your Oven Time: Start checking at 20 minutes since ovens vary; you want golden buns, not burnt edges.
- Save Your Scraps: Don’t throw away leftover dough strips—roll them up with a bit of filling for mini-buns perfect for sampling.
How to Serve Chocolate Swirl Buns Recipe
Garnishes
I like to serve these buns with a light dusting of powdered sugar or a drizzle of melted chocolate for presentation. Sometimes a sprinkle of chopped toasted nuts on top right before baking adds a lovely crunch and looks fancy but feels totally doable.
Side Dishes
Pair your Chocolate Swirl Buns with a cup of coffee, hot chocolate, or even a fresh fruit salad to balance out that rich sweetness. For brunch, they go wonderfully with scrambled eggs or light yogurt.
Creative Ways to Present
For birthdays or special celebrations, I’ve arranged these buns in a circle on a large platter, topped with whipped cream and berries for a brunch centerpiece. You can also make individual buns and wrap them in cellophane for lovely homemade gifts.
Make Ahead and Storage
Storing Leftovers
Once cooled, store your buns in an airtight container at room temperature—they stay soft and fresh for up to 2 days. If you live someplace warm, pop them in the fridge and bring to room temp before eating—they’ll still taste amazing.
Freezing
I’ve frozen these buns successfully by wrapping them tightly in plastic wrap and placing them in freezer bags. When you want a treat, thaw overnight in the fridge or on the counter for a few hours. This way, the chocolate swirl taste is preserved wonderfully.
Reheating
I reheat leftover buns by warming them gently in the oven at 300°F for about 5-7 minutes or pop them in the microwave for 15-20 seconds. This brings back that fresh-baked softness and melty chocolate goodness—like they’re straight from the oven!
FAQs
-
Can I use dry yeast instead of fresh yeast for this Chocolate Swirl Buns Recipe?
Absolutely! If you only have dry yeast, use about one-third of the fresh yeast amount (roughly 8 grams). Dissolve it in warm milk with sugar and allow it to activate until frothy, just like fresh yeast. This swap works just fine.
-
How do I prevent the dough from sticking while rolling and folding?
Keep dusting both your work surface and dough generously with flour. It’s tempting to add too much flour, but a light layer here and there helps you roll without tearing the dough or creating holes in the swirls.
-
Can I make these buns ahead of time and bake later?
You sure can! After shaping the buns, cover and refrigerate them overnight for a slow rise. Then bring them back to room temperature before baking—they develop an even richer flavor this way.
-
What type of chocolate is best for the filling?
I find bittersweet chocolate strikes the perfect balance—rich but not overly sweet. Avoid very sweet milk chocolate, as it can make the filling too sugary and heavy.
-
Can I add nuts or other fillings?
Definitely! Chopped toasted nuts, orange zest, or even a hint of cinnamon can add exciting layers of flavor. I often toss in walnuts to my filling for a crunchy surprise.
Final Thoughts
Honestly, this Chocolate Swirl Buns Recipe holds a special place in my heart because it strikes that cozy balance of being impressively delicious yet totally doable in a standard kitchen. Whenever I bake these buns, the house fills with chocolate aroma that just lifts your spirit. If you decide to give them a go, remember to have fun with the rolling and twisting—the process is part of the joy! You’ll be rewarded with soft, rich buns that feel like a warm hug in every bite. I can’t wait to hear how they turn out for you!
Print
Chocolate Swirl Buns Recipe
- Prep Time: 10 minutes
- Cook Time: 35 minutes
- Total Time: 2 hours
- Yield: 8 servings
- Category: Breakfast
- Method: Baking
- Cuisine: European
- Diet: Vegetarian
Description
Delight in these swirled chocolate buns that combine a soft, fluffy dough with a rich, bittersweet chocolate filling. Perfect for a decadent breakfast or an irresistible snack, these buns are beautifully twisted and baked to golden perfection.
Ingredients
For the Dough
- 1 ⅓ cups warm milk 320 ml
- ⅓ cup sugar 70 g
- 0.9 oz fresh yeast 25 g
- 1 large egg (room temperature)
- ¼ cup melted butter 60 g
- 4 ⅓ cups flour 560 g
- 1 tsp salt 7 g
For the Filling
- 3.5 oz bittersweet chocolate 100 g
- ½ cup butter 100 g
- ¾ cup cocoa powder 75 g
- ¾ cup powdered sugar 75 g
- ¼ cup oil 60 ml
For the Egg Wash
- 1 egg (beaten)
Instructions
- Activate yeast: In a large bowl, mix the warm milk and sugar, then add the fresh yeast. Let it sit for 10 minutes until frothy and bubbly, indicating the yeast is activated.
- Make dough: Add the egg, melted butter, and salt to the yeast mixture. Gradually incorporate the flour, mixing thoroughly to form a soft, elastic dough.
- Knead and rise: Knead the dough well until smooth and elastic. Cover with a towel and let it rise in a warm place for 1 hour until doubled in size.
- Prepare filling: Melt bittersweet chocolate and butter together using a microwave or double boiler. Remove from heat and stir in cocoa powder, powdered sugar, and oil until smooth. Allow to cool slightly.
- Shape dough rectangles: Divide the risen dough into two equal parts and roll each into a large rectangle on a floured surface.
- Layer filling and fold: Spread half of the chocolate filling onto one rectangle leaving a border, fold the dough in half, then roll gently. Spread more filling on half of the folded dough and fold again. Trim excess dough from imperfect edges and save for smaller buns.
- Roll and cut: Keep flouring the surface and dough to avoid sticking or tearing. Roll out the dough tightly, then cut into strips about four fingers wide. Make three vertical cuts in the center of each strip without cutting all the way through the edges.
- Twist and form buns: Twist each strip and roll it to create a twisted bun shape. Continue with all strips and place the buns on a parchment-lined baking sheet. Cover and let rise for 35 minutes.
- Bake buns: Preheat oven to 375°F (190°C). Brush buns with beaten egg for a shiny crust and bake for 35 minutes until golden brown and cooked through.
- Cool and serve: Allow buns to cool slightly on a rack before serving. Enjoy them warm for the best chocolate experience.
Notes
- Use room temperature ingredients to help the dough rise properly.
- Keep flour handy when rolling and shaping to prevent sticking and tearing.
- Trimmed dough pieces can be rolled into smaller buns to avoid waste.
- Ensure not to cut the strips completely through to maintain the twisted structure.
- Baking time may vary slightly depending on your oven, watch for golden color as an indicator.
Nutrition
- Serving Size: 1 bun
- Calories: 310 kcal
- Sugar: 18 g
- Sodium: 150 mg
- Fat: 16 g
- Saturated Fat: 9 g
- Unsaturated Fat: 6 g
- Trans Fat: 0 g
- Carbohydrates: 38 g
- Fiber: 4 g
- Protein: 6 g
- Cholesterol: 55 mg


