
Chocolate Lava Cakes Recipe
If you’ve been craving that irresistible, melt-in-your-mouth dessert that will wow your family and friends, then you’re in the right place. My Chocolate Lava Cakes Recipe is not only easy to whip up, but it guarantees that gooey, molten center that makes this dessert an unforgettable treat. I’m talking about silky chocolate oozing out as you cut into these little cakes – trust me, it’s absolute magic and you’re going to love making it repeatedly once you see how simple and delicious it is!
Why This Recipe Works
- Perfect Melted Center: The balance between baking time and temperature creates that signature molten lava inside.
- Simple Ingredients: You only need a handful of everyday pantry staples for extraordinary flavors.
- Easy Technique: No fancy equipment or complicated steps, making it accessible for cooks of all levels.
- Customizable Touch: Options like adding instant coffee to enhance the chocolate depth make it uniquely yours.

Ingredients & Why They Work
The magic behind these chocolate lava cakes lies in the quality and harmony of ingredients. Each component plays a role in creating that rich, tender cake with the molten center. When shopping, try to pick premium chocolate and fresh eggs – they truly make a difference!

- Unsalted Butter: Gives richness and helps create that smooth, glossy texture in your batter.
- Premium Semisweet or Dark Chocolate: Using a quality chocolate bar (I love Ghirardelli 60%) ensures an intense, deep chocolate flavor with a smooth melting consistency.
- Instant Coffee (Optional): This simply amps up the chocolate’s flavor without making it taste like coffee – such a clever trick!
- Vanilla Extract (Optional): Adds warmth and complexity to the flavor profile.
- Salt: Balances the sweetness and enhances all the chocolatey goodness.
- Eggs and Egg Yolks: Critical for structure while keeping the cake délicately tender and moist.
- Light Brown Sugar: Adds subtle caramel notes and moistness; it’s all about that flavor depth.
- All Purpose Flour: Gives body to the cake without weighing down the middle, keeping the lava flow just right.
Tweak to Your Taste
I’ve played around with this Chocolate Lava Cakes Recipe over the years, and I love encouraging you to make it your own. Whether it’s swapping chocolate types or adding a splash of something special, these tweaks will help you put your personal spin on the classic.
- Chocolate Variety: Using different chocolates – try bittersweet or milk chocolate for different intensities and sweetness levels; I personally stick to dark for that rich punch.
- Adding Liquor: A tablespoon of coffee liqueur or bourbon can add an exciting depth if you’re feeling fancy.
- Dairy-Free Option: Substitute butter with coconut oil and try vegan chocolate for a dairy-free version that still melts beautifully.
- Nutty Surprise: A sprinkle of chopped toasted nuts inside adds crunchy texture – not traditional, but super tasty!
Step-by-Step: How I Make Chocolate Lava Cakes Recipe
Step 1: Prep the Ramekins and Oven
I start by preheating my oven to 450°F (235°C). This high heat is key for that quick bake time that sets the outer cake but leaves the center molten. I grease four 6-ounce ramekins really well, both the bottom and sides, with baking spray or butter and a dusting of flour. This step is crucial to make sure your lava cakes slide right out without a hitch. If you don’t have ramekins, a jumbo muffin tin works great too — just keep an eye on the bake time!
Step 2: Melt Butter and Chocolate
Next, I combine the chopped chocolate and butter in a microwave-safe bowl. I heat it in 20-second bursts, stirring thoroughly after each to avoid burning. Sometimes, I get impatient and stir too soon – pro tip: be patient with the stirring, because smoothness here sets the tone for a glossy batter and luscious cake.
Step 3: Mix in Flavor Boosters and Eggs
Once melted and silky, I stir in instant coffee and vanilla extract if I’m using them, adding that pinch of salt too. Meanwhile, in a separate bowl, I whisk together eggs, egg yolks, and brown sugar vigorously for about 15 seconds – this bit aerates everything and helps the cakes rise just enough. Then, I pour the egg mixture into the chocolate mixture and stir until it feels like one smooth, unified batter.
Step 4: Fold in Flour and Portion the Batter
Carefully I sift the flour over the batter to keep lumps out, then gently fold it in just until combined. Over-stirring could mean losing that delicate texture we’re after, so I always stop as soon as the flour disappears. Then, I evenly divide the batter into the prepared ramekins. I find using a small ladle or large spoon works best to fill them evenly.
Step 5: Bake and Cool
I bake ramekins for 9-11 minutes, watching for set edges with a slightly jiggly center that springs back lightly when touched. It’s the trickiest part—underbake a little and you get the perfect molten center; overbake and it’s all cakey, no lava! Let them cool 5 minutes before running a knife around the edges and gently inverting onto plates. Heads up—the “lava” inside is molten hot, so give it a few more minutes before digging in.
Pro Tips for Making Chocolate Lava Cakes Recipe
- Room Temperature Eggs: Make sure eggs and yolks are at room temp to blend seamlessly and give that perfect rise.
- Don’t Skip the Instant Coffee: Adding coffee powder subtly intensifies the chocolate — it’s my secret ingredient!
- Watch the Bake Time Closely: The difference of a minute or two can mean cakey vs. lava — keep an eye on those edges.
- Prep Ramekins Well: Thoroughly greasing and a light dusting of flour helps with clean removal every time, avoiding frustration.
How to Serve Chocolate Lava Cakes Recipe

Garnishes
I like to keep it classic with a light dusting of powdered sugar or a scoop of vanilla bean ice cream to balance that warm molten chocolate. For a fresh twist, a handful of raspberries or a sprig of mint really brightens the plate and adds color.
Side Dishes
Alongside these, I sometimes serve fresh berries or a simple berry coulis for a tart contrast. A strong cup of espresso or a creamy cappuccino pairs beautifully as a beverage, bringing the whole dessert experience together.
Creative Ways to Present
For dinner parties or special occasions, I like to plate these lava cakes on pretty dessert plates, drizzle with a raspberry or caramel sauce, and scatter edible flowers or gold leaf flakes for that wow factor. You can also try layering a couple together with whipped cream between for a fun, unique presentation that gets lots of “oohs” and “aahs.”
Make Ahead and Storage
Storing Leftovers
If you happen to have any leftovers (though that rarely happens!), I suggest keeping them in airtight containers in the fridge for up to 2 days. Just remember, they’re best enjoyed warm and fresh, so leftovers are a rare treat in my book!
Freezing
I have frozen unbaked batter in ramekins gobbets before, and it works fine – just thaw overnight in the fridge and bake as usual. However, freezing baked lava cakes tends to disappoint the texture and gooey center, so I don’t recommend freezing once baked.
Reheating
To warm leftovers, I gently reheat the lava cakes in a 300°F (150°C) oven for about 5-7 minutes, keeping an eye on them so they don’t overcook. Avoid microwaving as it can dry out the outer cake and toughen the center.
FAQs
-
Can I use chocolate chips instead of a chocolate bar in this Chocolate Lava Cakes Recipe?
You can use semisweet chocolate chips, but in my experience, the lava center isn’t quite as smooth or luscious compared to using a premium chocolate bar like Ghirardelli. The chips contain stabilizers that can affect melting and texture, so for best results, go with high-quality chocolate bars.
-
What if I don’t have ramekins to bake these lava cakes?
No worries! A jumbo muffin tin is a great substitute. The cakes will be a bit smaller, so reduce the baking time to about 6-7 minutes. Just be sure to grease the muffin cups well to avoid sticking.
-
How do I know when my lava cakes are perfectly baked?
Look for edges that are set and look cakey, while the centers will still be slightly jiggly and spring back lightly when touched. Overbaking will result in a fully cooked center, missing out on that delicious molten lava effect.
-
Can I prepare the batter ahead of time?
Absolutely! You can make the batter up to 3 days in advance. Just keep it in an airtight container in the fridge, bring to room temperature before baking, and enjoy fresh lava cakes anytime you want.
Final Thoughts
This Chocolate Lava Cakes Recipe holds a special place in my heart – it’s the go-to dessert whenever I want to impress without stress. Every time I serve these, the smiles, the “wow” moments, and the sticky fingers are well worth the effort. If you’re ready for a chocolate dessert that feels fancy but is surprisingly easy, give this recipe a try. I’m confident it’ll become a favorite in your kitchen just like it did in mine.
Print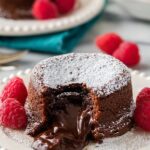
Chocolate Lava Cakes Recipe
- Prep Time: 20 minutes
- Cook Time: 11 minutes
- Total Time: 31 minutes
- Yield: 4 servings
- Category: Dessert
- Method: Baking
- Cuisine: American
Description
Decadent chocolate lava cakes with a molten center, made from premium semisweet chocolate and butter, perfect for a romantic dessert or special occasion treat. These individual cakes are rich and fudgy with a warm, gooey chocolate core, enhanced by optional coffee and vanilla for extra flavor.
Ingredients
Chocolate Mixture
- ½ cup (113 g) unsalted butter, cut into 8 pieces
- 6 oz (170 g) premium semisweet or dark chocolate bar, coarsely chopped
- ½ teaspoon instant coffee (optional)
- ½ teaspoon vanilla extract (optional)
- ¼ teaspoon salt
Egg Mixture
- 2 large eggs
- 2 large egg yolks, room temperature
- ⅓ cup (66 g) light brown sugar, firmly packed
Dry Ingredient
- ¼ cup (32 g) all purpose flour
Instructions
- Preheat and Prepare Ramekins: Preheat your oven to 450F (235C). Grease the bottom and sides of four 3 ½ inch diameter ramekins with baking spray or butter and lightly flour them. Place ramekins on a baking sheet and set aside.
- Melt Chocolate and Butter: Combine the chopped chocolate and butter in a microwave-safe bowl. Heat in 20 second increments, stirring thoroughly between each, until the mixture is smooth and fully melted.
- Add Flavorings and Salt: Stir in the instant coffee, vanilla extract if using, and salt into the melted chocolate and butter mixture until well incorporated.
- Whisk Eggs and Sugar: In a separate bowl, vigorously whisk the eggs, egg yolks, and light brown sugar for about 15 seconds until fully combined and foamy on top.
- Combine Egg Mixture with Chocolate: Pour the egg and sugar mixture into the chocolate mixture and stir until smooth and well combined.
- Add Flour: Sift the flour over the chocolate mixture and stir gently until completely incorporated with no lumps.
- Fill Ramekins and Bake: Evenly divide the batter among the prepared ramekins. Bake in the preheated oven for 11 minutes until the edges look set and cakey and the centers spring back slightly but remain jiggly.
- Cool and Invert: Allow the cakes to cool for 5 minutes before running a knife around the edges to loosen. Carefully invert the ramekins onto plates using oven mitts as they will be hot.
- Serve: Serve the lava cakes warm with optional powdered sugar dusting or a scoop of vanilla ice cream. Wait an additional 5 minutes if needed to let the molten center cool slightly before eating.
Notes
- Using premium chocolate bars rather than chips provides a richer molten center and better texture.
- The instant coffee enhances the chocolate flavor without imparting a coffee taste.
- If you don’t have ramekins, use a 6-count jumbo muffin tin; bake for 7 minutes and you will yield 6 cakes.
- Prepare the batter up to 3 days in advance; store in an airtight container refrigerated and bring to room temperature before baking.
- While baked cakes can be stored or frozen, they are best enjoyed warm and fresh from the oven to preserve the molten texture.
Nutrition
- Serving Size: 1 cake
- Calories: 380 kcal
- Sugar: 30 g
- Sodium: 150 mg
- Fat: 26 g
- Saturated Fat: 15 g
- Unsaturated Fat: 10 g
- Trans Fat: 0 g
- Carbohydrates: 32 g
- Fiber: 3 g
- Protein: 6 g
- Cholesterol: 150 mg

