
Cheesy Artichoke Bruschetta Recipe
If you love savory, cheesy bites with a bit of tangy zing, you’re in for a treat with this Cheesy Artichoke Bruschetta Recipe. It’s one of those appetizers that never fails to get compliments at my gatherings—and trust me, I’ve made it a dozen times with friends clamoring for the recipe. The creamy artichoke filling, melted mozzarella, and crispy baguette base come together in perfect harmony. I can’t wait to share all the tips and tricks that make this recipe foolproof and absolutely delicious!
Why This Recipe Works
- Creamy, Cozy Filling: The blend of cream cheese, mayonnaise, and cheeses creates a luscious, smooth texture that melts perfectly under the broiler.
- Balanced Flavors: Artichokes add just enough tang to cut through the richness, with garlic salt bringing a savory punch.
- Simple Yet Stunning: Minimal ingredients, maximum wow factor—easy for weeknights or entertaining.
- Crowd-Friendly: You can make it ahead, it reheats well, and it appeals to almost everyone thanks to its cheesy goodness.

Ingredients & Why They Work
This Cheesy Artichoke Bruschetta Recipe combines creaminess, tang, and crunch in a way that always impresses. Each ingredient plays a role, whether it’s adding depth, texture, or just pure melty goodness. Here are a few pointers for picking the best stuff at the store:
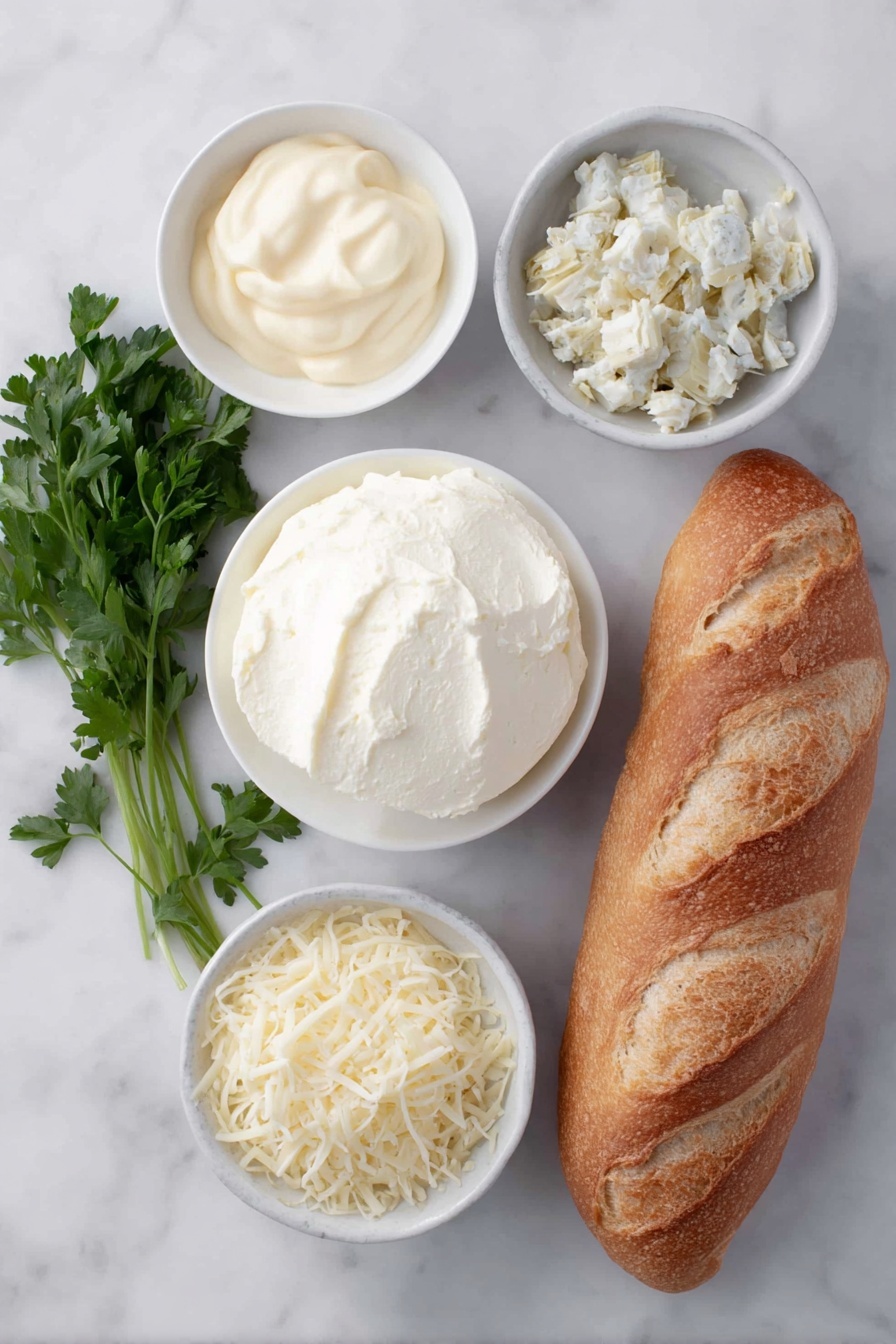
- Cream cheese: Look for full-fat and softened for the creamiest base—you want it smooth enough to whip easily with the mayo and cheese.
- Mayonnaise: Adds moisture and richness. I usually use regular mayo, but feel free to substitute with a light or avocado mayo for a twist.
- Artichoke hearts: Drained well and chopped; fresh-packed in water or brine works best—not the marinated kind, which can overpower the mix.
- Parmesan cheese: Freshly grated is ideal for flavor, but pre-grated is fine too—just avoid “shaker” cheese, which tends to be dry.
- Mozzarella cheese: Shredded low-moisture mozzarella melts beautifully, creating that golden, bubbly top you want.
- Garlic salt: Gives that savory, garlicky kick without needing extra seasoning. You could use garlic powder plus salt separately if you prefer.
- French baguette: A crusty baguette sliced thinly at an angle lets you get the perfect ratio of bread to topping and helps crisp it up just right.
- Fresh parsley or paprika (optional): A beautiful garnish that adds color and a fresh or smoky note at the end.
Tweak to Your Taste
One thing I love about this Cheesy Artichoke Bruschetta Recipe is just how easy it is to tweak to suit your mood or pantry. I often mix things up depending on who I’m serving or the occasion, so don’t hesitate to put your own spin on it!
- Variation: Sometimes I add a sprinkle of crushed red pepper or a dash of hot sauce into the mixture for a little heat. It’s a personal fave that adds a subtle kick without stealing the show.
- Dietary swap: To make it lighter, swap mayo for Greek yogurt — it adds a nice tang and keeps the creaminess intact.
- Seasonal twist: In summer, I add chopped sun-dried tomatoes or fresh basil for a Mediterranean vibe that’s bright and fresh.
- Vegan option: I’ve tried dairy-free cream cheese and vegan cheese blends with success; just keep an eye on melting times and texture.
Step-by-Step: How I Make Cheesy Artichoke Bruschetta Recipe
Step 1: Whip Up That Creamy Artichoke Mixture
Start by beating the softened cream cheese in a large bowl until it’s perfectly smooth—no lumps allowed here! Then mix in the mayo and your chopped artichoke hearts. I like to use an electric mixer because it saves time and really blends everything evenly. Next, add your Parmesan, shredded mozzarella, and garlic salt, and beat at high speed until the mixture is silky and combined. The key is getting it smooth so it’ll spread nicely on each baguette slice.
Step 2: Prep Your Bread for the Perfect Crunch
Slice your baguette on the diagonal into thin slices, about a third of an inch thick. This angle helps maximize the surface area for that glorious cheesy topping. If the slices are too thick, they can get soggy underneath; too thin and they might burn before the topping is melted. Arrange your slices on a baking sheet so they’re ready for the next step.
Step 3: Top and Broil to Golden Perfection
Dollop a generous scoop of your artichoke mixture onto each slice, spreading it right to the edges. This not only looks great but also helps protect the edges of the bread from burning. Slide the tray under the broiler on high and keep a close eye—after about 2 to 3 minutes, you’ll see the topping start to bubble and turn golden brown. Don’t walk away during broiling because it can go from perfect to burnt in a blink.
Step 4: Garnish & Serve While Hot
Once your bruschetta comes out of the oven, I like to sprinkle fresh minced parsley on top for a burst of color and fresh flavor. Sometimes I use a light dusting of smoky paprika instead, which adds a subtle warmth. Serve these warm and watch everyone dig in—it’s always a crowd-pleaser!
Pro Tips for Making Cheesy Artichoke Bruschetta Recipe
- Don’t Skip Softening the Cream Cheese: If it’s too cold, you’ll end up with lumps that won’t blend nicely—take it out ahead of time or microwave in 10-second bursts.
- Drain and Chop Artichokes Well: Excess water can make the topping runny and soggy; press them dry with a paper towel before chopping.
- Watch the Broiler Like a Hawk: It only takes a couple minutes to crisp up the topping and toast the bread—too long and they’ll burn fast!
- Spread Topping to Edges: This little trick helps protect the bread edges from charring and ensures every bite is cheesy goodness.
How to Serve Cheesy Artichoke Bruschetta Recipe

Garnishes
I always keep fresh parsley on hand for a bright, herbaceous finish that wakes up the rich flavors. If you want something a bit more vibrant, smoked paprika adds a beautiful color and just a hint of smoky flavor that pairs surprisingly well. For parties, a sprinkle of finely chopped chives or even a few red pepper flakes can be fun too.
Side Dishes
This bruschetta makes a wonderful appetizer or snack, but I’ve also served it with a crisp green salad or a bowl of tomato soup for a cozy lunch or light dinner. It’s great alongside a charcuterie board, too, where guests can assemble their own combinations of meats, cheeses, and chutneys.
Creative Ways to Present
For parties, I like serving the Cheesy Artichoke Bruschetta on a wooden board with colorful garnishes like edible flowers or microgreens sprinkled on top. Another fun idea is to use mini baguette rounds for bite-sized finger food—perfect for mingling. I even once shaped the mixture into little balls and baked them in mini muffin tins for “cheesy artichoke bites”—a fun twist that vanished fast!
Make Ahead and Storage
Storing Leftovers
After enjoying what you can fresh, store any leftover topping and toasted bread separately. I put the mixture in an airtight container in the fridge—it keeps for up to 3 days without losing flavor. Toasted baguette slices are best eaten the same day but can be kept in a sealed bag for a day or two before they get soft.
Freezing
I haven’t frozen the assembled bruschetta because the bread gets soggy, but the artichoke mixture freezes beautifully. I portion it into freezer-safe containers and thaw overnight in the fridge when I want a quick appetizer fix. Just reheat gently in the oven or microwave before spreading onto freshly toasted bread.
Reheating
To reheat the bruschetta leftovers, spread the artichoke mixture on fresh baguette slices and pop them under the broiler for a couple minutes until bubbly and warmed through. This keeps the bread nice and crisp and the topping perfectly melted—way better than microwaving directly on already-toasted bread.
FAQs
-
Can I make this Cheesy Artichoke Bruschetta Recipe ahead of time?
Absolutely! You can prepare the artichoke cheese mixture a day ahead and keep it chilled in an airtight container. When you’re ready, just toast the bread slices and broil the topped bruschetta right before serving to keep everything fresh and crispy.
-
What if I don’t have a broiler? Can I bake the bruschetta instead?
Yes! If you don’t have a broiler, you can bake the topped baguette slices at 375°F for about 8 to 10 minutes. Keep an eye on them so the cheese melts completely and the edges turn golden without drying out.
-
Is it possible to turn this recipe into a dip?
Definitely! Simply spread the artichoke mixture into a small baking dish and bake at 350°F for 25-30 minutes until bubbly and golden on top. Serve warm with baguette slices, crackers, or chips for a crowd-pleasing dip variation.
-
Can I use fresh artichokes instead of canned?
Fresh artichokes are delicious but require more prep—boil or steam, trim, and chop before using. It can work, but canned artichoke hearts are convenient and provide consistent flavor and texture for this recipe.
-
What’s the best bread to use for this Cheesy Artichoke Bruschetta Recipe?
A crusty French baguette sliced on the diagonal works best—it crisps up nicely under the broiler without getting soggy. Avoid dense or overly soft breads, as they won’t hold up as well to the topping and heat.
Final Thoughts
This Cheesy Artichoke Bruschetta Recipe is one of my go-to appetizers whenever I want something that feels special but doesn’t require hours of kitchen time. It’s creamy, cheesy, and just the right mix of savory and tangy—with that crispy bread delivering the perfect crunch. If you try it once, you’ll find yourself making it again and again—for family dinners, friends’ get-togethers, or even just a cozy snack at home. I really hope you love it as much as I do—happy cooking!
Print
Cheesy Artichoke Bruschetta Recipe
- Prep Time: 10 minutes
- Cook Time: 3 minutes
- Total Time: 13 minutes
- Yield: 12 servings
- Category: Appetizer
- Method: Baking
- Cuisine: Italian
- Diet: Vegetarian
Description
This creamy and savory Artichoke Bruschetta combines a rich mixture of cream cheese, mayonnaise, artichoke hearts, and cheeses spread generously on toasted baguette slices. Broiled to bubbly perfection with a hint of golden brown, it’s a delightful appetizer perfect for gatherings or an elegant snack.
Ingredients
Artichoke Mixture
- 1 (8-ounce) package cream cheese, softened
- 1 cup mayonnaise
- 1 can (14-ounce) artichoke hearts, drained and chopped
- 1 cup grated Parmesan cheese
- 1 cup shredded mozzarella cheese
- 1 teaspoon garlic salt
Bread and Garnishes
- French baguette loaf, cut at an angle into ⅓-inch slices
- Fresh minced parsley or paprika, for garnish (optional)
Instructions
- Prepare the mixture: In a large bowl, use an electric mixer to beat cream cheese until smooth. Blend in mayonnaise and chopped artichoke hearts. Mix in Parmesan, mozzarella, and garlic salt and beat at high speed until the mixture is smooth and well combined.
- Preheat broiler: Set your oven broiler to high heat to get ready for toasting the bruschetta.
- Assemble bruschetta: Dollop a generous amount of the artichoke mixture on each baguette slice, spreading it all the way to the edges to prevent burning. Arrange all slices on a baking sheet.
- Broil: Place the baking sheet under the broiler for 2 to 3 minutes, or until the topping is bubbly and just starting to turn golden brown. Watch carefully to avoid burning.
- Garnish and serve: Remove from the oven and garnish with fresh minced parsley or a light sprinkling of paprika if desired. Serve immediately while hot.
Notes
- This recipe uses artichoke hearts packed in water or brine, not marinated varieties, for best flavor and texture.
- For serving as an artichoke dip instead of bruschetta, spread the mixture in a pie plate or similar baking dish and bake at 350°F for 25 to 30 minutes until hot and bubbly.
- To brown the top of the dip, you can broil it for an additional 2 to 3 minutes after baking.
- Serve Artichoke Dip with baguette slices, assorted crackers, or tortilla chips for variety.
Nutrition
- Serving Size: 1 slice
- Calories: 190 kcal
- Sugar: 1 g
- Sodium: 320 mg
- Fat: 16 g
- Saturated Fat: 7 g
- Unsaturated Fat: 7 g
- Trans Fat: 0 g
- Carbohydrates: 8 g
- Fiber: 1 g
- Protein: 5 g
- Cholesterol: 30 mg


