
Brownie Oreo Cheesecake Bars Recipe
If you love combining rich, fudgy brownies with creamy cheesecake and a little Oreo crunch, then you’re going to fall head over heels for this Brownie Oreo Cheesecake Bars Recipe. It’s one of those desserts that looks impressive but is actually super simple to make—and trust me, every bite tastes like a little slice of heaven. I’ve made these bars for family gatherings and casual weeknight treats, and they always disappear fast. Stick with me, and I’ll walk you through all the tips and tricks to get this just right!
Why This Recipe Works
- Perfect Layering: The fudgy brownie base pairs with a velvety cheesecake middle and an Oreo topping for a delightful contrast in textures.
- Partial Baking Technique: Baking the brownie layer halfway before adding cheesecake ensures the bars hold their structure without overbaking.
- Simple Ingredients: Using a boxed brownie mix keeps things quick, while fresh cream cheese and sour cream add that luscious cheesecake creaminess.
- Chocolate Ganache Finish: The silky ganache ties it all together, giving the bars a professional flair and extra decadence.

Ingredients & Why They Work
Every ingredient in this Brownie Oreo Cheesecake Bars Recipe plays a role in building layers of flavor and texture that complement each other beautifully. Using a brownie mix keeps the process stress-free, while the Oreos add crunch and a nostalgic twist. Plus, the ganache finish brings that rich, shiny chocolate touch that makes these bars irresistible.

- Brownie Mix: Picking a good quality boxed mix saves time without sacrificing that fudgy, chocolaty base you’re craving.
- Oreos: Dividing these up—half inside the batter and half on top—gives a perfect balance of crunch and chocolate-cookie flavor throughout.
- Cream Cheese: The star of the cheesecake layer, softened cream cheese ensures a smooth and creamy filling without lumps.
- Egg: Helps set the cheesecake layer but keeps it soft and luscious when baked properly.
- Vanilla Extract: Just a splash enhances the flavor complexity of the cheesecake without overpowering other elements.
- Granulated Sugar: Sweetens the cheesecake layer while helping with that classic tangy balance.
- Sour Cream: Adds extra creaminess and a subtle tang that brightens the cheesecake and prevents it from being too dense.
- Chocolate Chips: Melting these with heavy cream creates the silky ganache topping that wraps it all up.
- Heavy Whipping Cream: Mixed with chocolate chips for smooth ganache; a must for that glossy, rich finish.
Tweak to Your Taste
I’ve played around with this recipe a bit and what’s fun is how easy it is to make it your own. Whether you want to ramp up the chocolate or get a little crafty with the Oreo types, there’s room to customize while still keeping the classic vibe.
- Variation: I’ve swapped the classic Oreos for mint-flavored ones during the holidays—it adds a fresh twist that guests always ask about!
- Dietary Adaptation: For a gluten-free twist, try a gluten-free brownie mix and gluten-free sandwich cookies—you’ll still get the same layered goodness.
- Extra Cocoa: If you want more intense chocolate flavor, toss in a tablespoon of espresso powder into the brownie batter—it really amps up the depth.
Step-by-Step: How I Make Brownie Oreo Cheesecake Bars Recipe
Step 1: Bake the Brownie Layer
Start by preheating your oven to 350°F. I always line my 8×8-inch pan with parchment—trust me, it’s a game-changer for removing the bars later without any sticky disasters! Prepare your brownie mix as the box directs. Pour the batter into your pan and then sprinkle half of the chopped Oreos evenly on top, pressing them gently into the batter so they stick as it bakes. Bake for about 18-20 minutes—you’re aiming for a set but still soft texture because it will cook more once you add the cheesecake layer. Let it cool a bit while you mix up the cheesecake.
Step 2: Make the Cheesecake Layer
Grab a large mixing bowl and soften your cream cheese before you begin (room temperature really is key here). Beat it with a hand or stand mixer until it’s totally smooth, no lumps! Next, add your sugar, egg, and vanilla extract. Whip it together until well combined. Then stir in the sour cream for that perfect creamy texture. Pour this lush filling over your brownie base, smoothing it out with a spatula. Bake for 25-30 minutes until the edges look firm but the center still jiggles slightly—this ensures a creamy cheesecake that’ll set nicely once chilled.
Step 3: Add the Ganache and Toppings
After your bars have cooled at room temperature for about 30 minutes, pop them into the fridge for at least an hour. Meanwhile, heat the chocolate chips and heavy cream together over low heat or in 30-second bursts in the microwave until luscious and velvety smooth. Spread this chocolate ganache evenly over the chilled cheesecake layer. Sprinkle the remaining chopped Oreos on top, pressing lightly so they stick. Let everything chill for at least two more hours, but I love making these a day ahead and storing overnight—it really lets the flavors meld and the bars set perfectly.
Pro Tips for Making Brownie Oreo Cheesecake Bars Recipe
- Softened Cream Cheese: Make sure your cream cheese is fully softened to avoid lumps and get that silky cheesecake layer.
- Don’t Overbake: Watch the cheesecake carefully—your center should still have a slight jiggle to keep it creamy once chilled.
- Parchment Paper Lining: This saved me more than once from scrambling with spatulas when cutting bars—highly recommend!
- Ganache Consistency: Stir ganache well and spread while slightly warm for a glossy, smooth finish without streaks.
How to Serve Brownie Oreo Cheesecake Bars Recipe

Garnishes
I usually keep it simple here—just a few extra Oreo crumbs or even a light dusting of powdered sugar. Sometimes, I like adding a dollop of whipped cream on the side for a lighter touch. Fresh berries also add a nice pop of color and acidity that balances all the richness.
Side Dishes
These bars are rich enough to shine on their own, but if you’re serving at a party, a scoop of vanilla ice cream or a small cup of fresh fruit salad pairs beautifully. A hot cup of coffee or milk also rounds out the experience perfectly!
Creative Ways to Present
For special occasions, I like arranging the bars on a pretty platter with whole Oreos standing upright around the edges for an eye-catching Oreo-themed display. You can also drizzle white chocolate over the ganache or add edible gold flakes for a touch of glam—perfect for a birthday or holiday dessert table.
Make Ahead and Storage
Storing Leftovers
Store these bars covered tightly in the fridge—usually in the same baking pan wrapped with plastic wrap or in an airtight container. They’ll stay fresh and flavorful for up to 5 days, though my family usually finishes them before then!
Freezing
I’ve frozen these bars wrapped tightly in plastic and foil for up to 2 months. To thaw, leave them in the fridge overnight. The texture holds up surprisingly well, and they taste almost like freshly made when thawed.
Reheating
Honestly, I prefer these bars cold or at room temperature, but if you want a warm bite, a few seconds in the microwave do the trick—just be careful not to overheat or the cheesecake might get rubbery.
FAQs
-
Can I make Brownie Oreo Cheesecake Bars Recipe from scratch without a boxed brownie mix?
Absolutely! If you prefer homemade brownies, just prepare your favorite brownie batter and follow the same layering instructions. Just be sure the brownie base is partially baked before adding the cheesecake layer to maintain proper texture.
-
Why do I need to partially bake the brownie layer first?
Partial baking prevents the brownies from overcooking once you add and bake the cheesecake layer. This technique helps keep the bottom layer fudgy and the cheesecake perfectly creamy.
-
Can I use different cookies instead of Oreos?
Yes! Feel free to experiment with your favorite sandwich cookies or even chocolate chip cookies for a fun variation. Just keep in mind that Oreos add an iconic chocolate-vanilla crunch that balances the rich cheesecake beautifully.
-
How do I know when the cheesecake layer is done?
Look for firm edges and a center that still jiggles slightly when you gently shake the pan. The residual heat will finish baking it as it cools, resulting in a creamy but set cheesecake.
Final Thoughts
Making these Brownie Oreo Cheesecake Bars feels like a little celebration every time I slice into them. The combination of textures and flavors just hits every sweet spot, and I love how easy they are to prepare—perfect for impressing guests or treating yourself on a quiet evening. Give this recipe a try, and I bet you’ll see why I keep going back to it when I want a delicious, comforting dessert with that little extra Oreo magic. You’re going to love every bite!
Print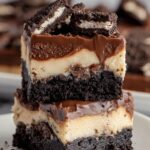
Brownie Oreo Cheesecake Bars Recipe
- Prep Time: 15 minutes
- Cook Time: 1 hour
- Total Time: 1 hour 15 minutes plus 3 hours chilling
- Yield: 16 bars
- Category: Dessert
- Method: Baking
- Cuisine: American
Description
Delicious Brownie Cheesecake Bars combine rich, fudgy brownies with creamy cheesecake and a luscious chocolate ganache topping sprinkled with Oreo cookies. Perfect for dessert lovers looking for a decadent treat that’s easy to make and sure to impress.
Ingredients
Brownie Base
- 1 box brownie mix for 9×13 pan
- 11 Oreos, chopped
Cheesecake Layer
- 8 ounces cream cheese, softened
- 1 large egg
- 1 teaspoon vanilla extract
- 1/4 cup granulated sugar
- 2 tablespoons sour cream
Ganache & Toppings
- 1/4 cup chocolate chips
- 1/4 cup heavy whipping cream
- 11 Oreos, chopped
Instructions
- Preheat and Prepare Pan: Preheat your oven to 350 degrees Fahrenheit. Line an 8×8-inch baking dish with parchment paper or spray with cooking spray for easy cleanup.
- Prepare Brownie Batter: Prepare the brownie mix according to package instructions. Pour the batter into the prepared pan and press half of the chopped Oreos (11 pieces) into the brownie batter.
- Bake Brownie Layer: Bake the brownie base until the top is set but still soft, approximately 20-25 minutes. This is a partial bake as the bars will bake again with the cheesecake layer. Let it cool slightly.
- Make Cheesecake Mixture: In a large bowl, beat the softened cream cheese until smooth. Add sugar, egg, and vanilla extract and beat until fully combined. Mix in the sour cream until creamy and lump-free.
- Add Cheesecake Layer: Pour the cheesecake mixture over the partially baked brownie base and spread evenly with a spatula.
- Bake Again: Return the pan to the oven and bake for 25-30 minutes or until the edges are set and the center has slight jiggle. Remove and let cool at room temperature for 30 minutes.
- Chill Bars: Place the bars in the refrigerator and chill for at least 1 hour to firm up the cheesecake layer.
- Prepare Ganache: Heat chocolate chips and heavy whipping cream in a small saucepan or microwave-safe bowl until warm. Stir until smooth and glossy.
- Apply Ganache and Toppings: Spread the ganache evenly over the chilled cheesecake layer. Sprinkle the remaining chopped Oreos (11 pieces) over the top, pressing lightly to adhere.
- Final Chill: Chill the bars for an additional 2 hours or preferably overnight, until fully set before serving.
Notes
- Ensure cream cheese is softened for a smooth cheesecake layer without lumps.
- Use an 8×8-inch pan to keep the bar thickness correct; a larger pan will result in thinner bars.
- Partially baking the brownie layer helps prevent overbaking once the cheesecake layer is added.
- For easier slicing, chill the bars thoroughly before cutting.
- Substitute Oreos for gluten-free cookies if needed, but this will affect the final taste and texture.
Nutrition
- Serving Size: 1 bar
- Calories: 320 kcal
- Sugar: 26 g
- Sodium: 210 mg
- Fat: 20 g
- Saturated Fat: 12 g
- Unsaturated Fat: 6 g
- Trans Fat: 0 g
- Carbohydrates: 34 g
- Fiber: 1 g
- Protein: 4 g
- Cholesterol: 60 mg
