Batter-Fried Chicken (Easy & Extra-Crispy) Recipe
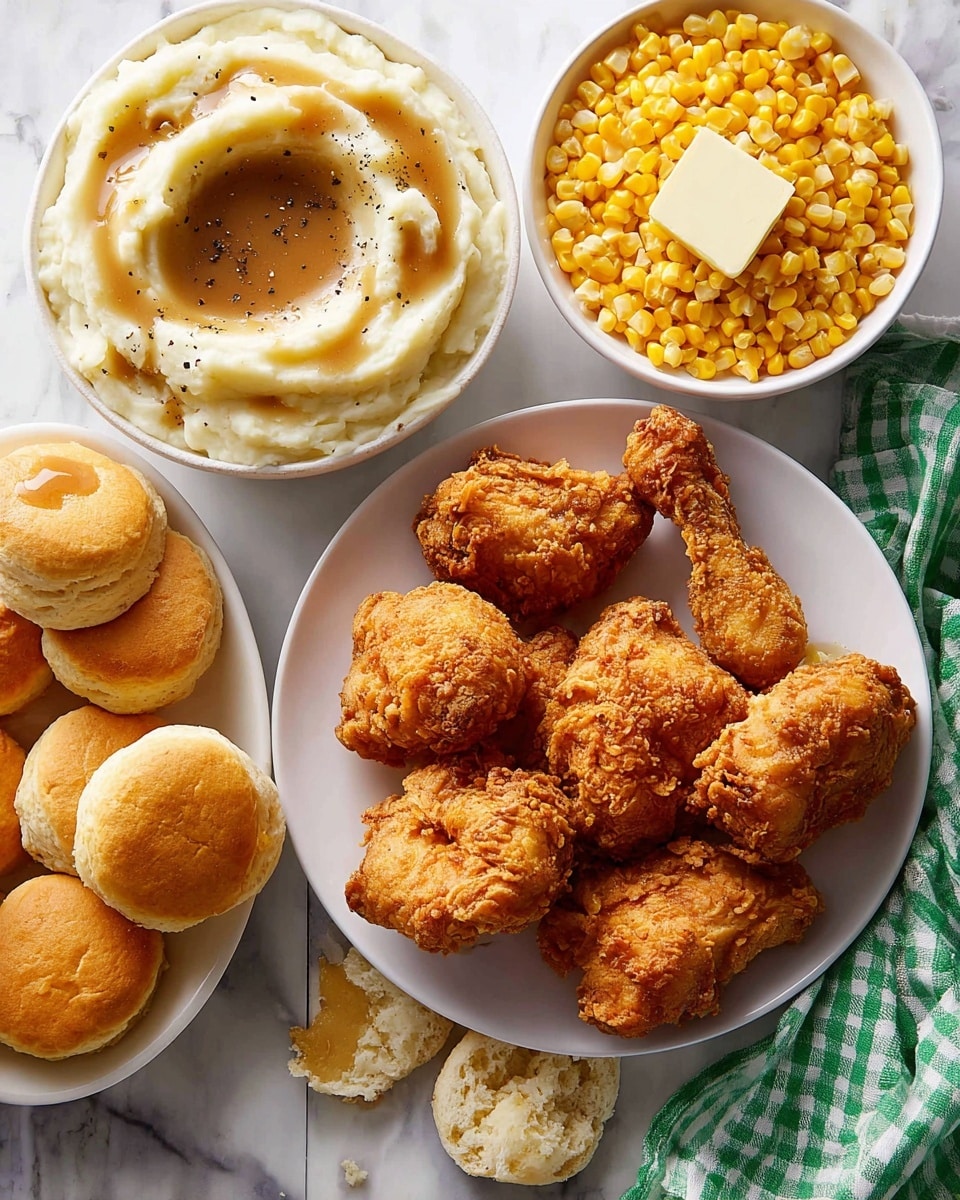
When I think of comfort food done right, this Batter-Fried Chicken (Easy & Extra-Crispy) Recipe immediately comes to mind. It’s one of those dishes that never fails to impress — the kind of fried chicken that’s perfectly crispy on the outside yet juicy and tender inside. Whether you’re feeding a crowd or craving a cozy solo night in, this recipe makes it easy to nail the perfect crunch every time without fuss.
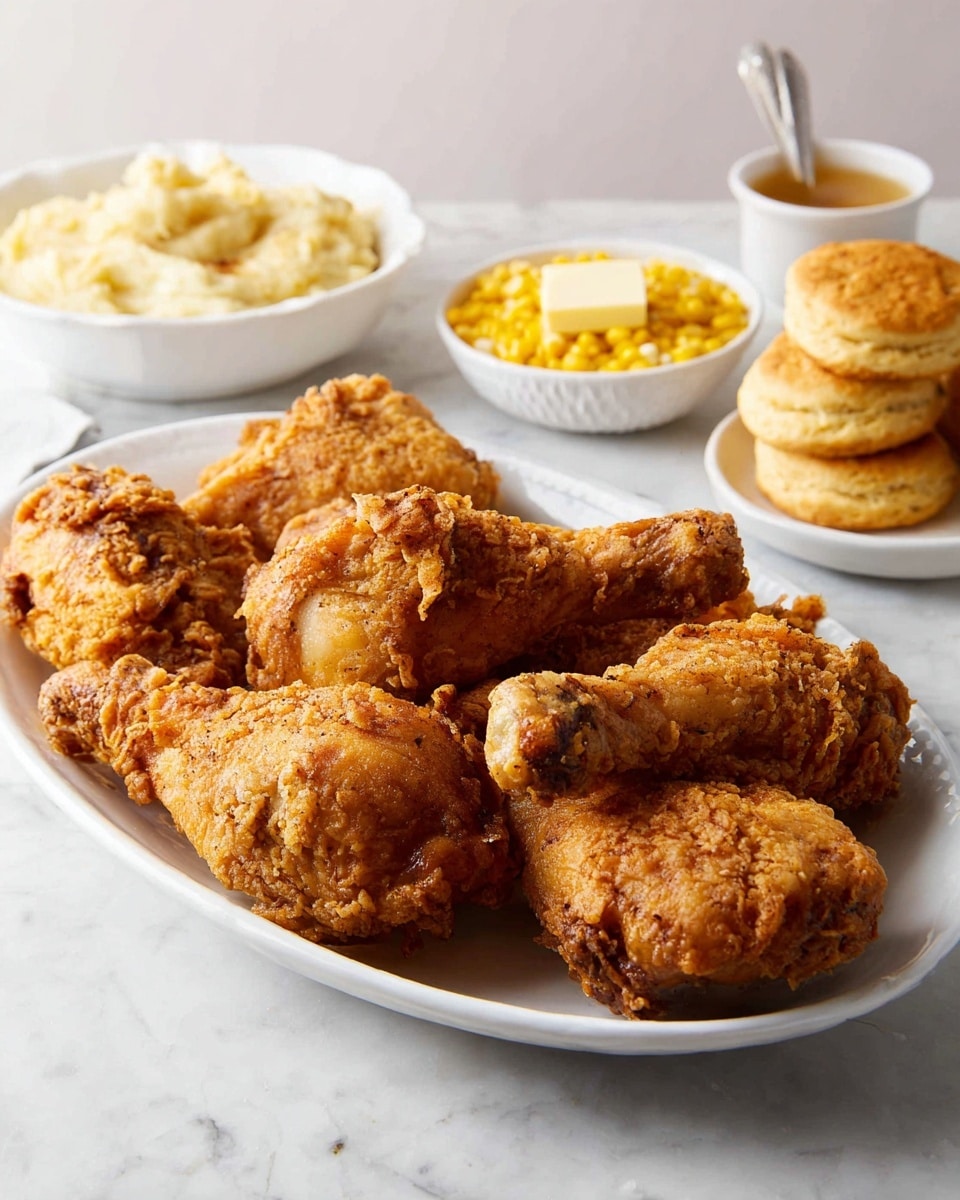
I love making this Batter-Fried Chicken (Easy & Extra-Crispy) Recipe for weekend dinners or anytime I want a classic restaurant-quality fried chicken at home. The secret lies in that ultra-crisp batter that clings just right, plus a simple brine that keeps the chicken moist and flavorful. Once you try this method, you’ll find yourself reaching for it again and again.
Why This Recipe Works
- Perfectly Crispy Batter: The blend of all-purpose flour and cornstarch creates a light, extra-crispy coating every time.
- Tender Juicy Chicken: Brining the chicken overnight helps lock in moisture and flavor for juicy results.
- Balanced Spices: A subtle mix of black pepper, paprika, and cayenne adds just enough kick without overpowering.
- Manageable Prep: The batter and brine can be made ahead, making for easier cooking on your fried chicken day.

Ingredients & Why They Work
Every ingredient in this Batter-Fried Chicken (Easy & Extra-Crispy) Recipe plays a key role in crafting that iconic crispy crust and juicy chicken. From the salty-sweet brine to the dual-flour batter mix, each element is carefully chosen to deliver foolproof flavor and texture.
- Chicken pieces (bone-in, skin-on): Bone-in pieces lock in moisture and skin crisps up nicely with the batter.
- Kosher salt: Essential for the brine to flavor and tenderize the meat deeply.
- Granulated sugar: Adds balance in the brine, preventing meat from drying out.
- All-purpose flour: Forms the backbone of the crispy batter crust.
- Cornstarch: Creates extra crunch and lightness in the batter, preventing toughness.
- Freshly ground black pepper: Adds warming heat and depth to the coating.
- Paprika and cayenne pepper: Bring subtle smokiness and a hint of spice for complexity.
- Baking powder: Lightens the batter, making it puff up crisp in hot oil.
- Cold water: Keeps the batter light and easy to coat chicken pieces evenly.
- Vegetable or peanut oil: Neutral oils with high smoke points ideal for frying crisp chicken.
Tweak to Your Taste
I like to keep the classic flavors here, but this Batter-Fried Chicken (Easy & Extra-Crispy) Recipe is super forgiving and flexible. You can easily personalize it by adjusting spices or trying different cuts of chicken based on your preference.
- Spice it up: When I’m in the mood for a spicy kick, I bump up the cayenne pepper and even add a dash of smoked paprika for a smoky heat that’s irresistible.
- Herb boost: Adding finely chopped fresh herbs like thyme or rosemary into the batter can infuse a fragrant twist that’s surprisingly delightful.
- Gluten-free option: I’ve swapped all-purpose flour for a gluten-free blend with great success — just make sure your cornstarch is gluten-free too.
- Smaller pieces: For quick weeknight dinners, cutting chicken into bite-sized nuggets speeds up frying time without losing that crispy texture.
Step-by-Step: How I Make Batter-Fried Chicken (Easy & Extra-Crispy) Recipe
Step 1: Brine the Chicken for Juiciness
Start by whisking together cold water, kosher salt, and sugar until fully dissolved — I use a big bowl so the chicken pieces can swim freely. Add your bone-in, skin-on chicken pieces, cover the bowl, and pop it in the fridge for about 60 minutes. This step is key for juicy chicken, and I’ve found that no matter the coating, a good brine keeps everything tender and flavorful inside.
Step 2: Whisk Up the Crispy Batter
While the chicken’s brining, combine all-purpose flour, cornstarch, black pepper, paprika, cayenne, baking powder, and salt in a bowl. Pour in cold water and whisk everything until smooth—refrigerate the batter so it holds a cool temperature, which helps it cling better to your chicken later. If it looks too thick after resting, don’t hesitate to thin it with a splash of cold water, just like pancake batter.
Step 3: Dry and Dip, Then Fry Like a Pro
After the brine, pat each chicken piece completely dry with paper towels—this is the moment your batter sticks properly so don’t rush it! Heat your oil to about 350°F (176°C) and get a wire rack ready for draining. Dip a few pieces at a time into the batter, letting excess drip off before slipping them carefully into the hot oil. Fry while actively monitoring oil temperature, keeping it between 300°F and 325°F for gentle cooking without burning, turning pieces occasionally until golden brown and cooked through (160°F for white meat, 175°F for dark).
Step 4: Drain and Repeat
Set your perfectly fried chicken on a wire rack lined baking sheet to drain excess oil and keep the crust crisp. Bring your oil back up to temperature before frying the next batch to ensure that beautiful crunch stays consistent. Soon you’ll have a plate full of irresistibly crispy, juicy pieces ready to devour!
Pro Tips for Making Batter-Fried Chicken (Easy & Extra-Crispy) Recipe
- Pat Chicken Thoroughly Dry: This ensures the batter sticks well and prevents soggy spots in the crust.
- Maintain Oil Temperature: Use a thermometer and adjust heat frequently to keep the oil between 300°F-325°F for even cooking.
- Don’t Crowd the Pan: Fry in batches to avoid lowering the oil temperature and sticking chicken pieces together.
- Rest Batter in the Fridge: Letting the batter chill helps it develop the perfect light, bubbly texture for that extra-crispy finish.
How to Serve Batter-Fried Chicken (Easy & Extra-Crispy) Recipe
Garnishes
I usually sprinkle a little flaky sea salt over the hot chicken right after frying to enhance the crust’s flavor. Sometimes I add a fresh squeeze of lemon for a bright contrast, which really lifts the savoriness. A sprinkle of chopped parsley or chives adds a lovely pop of color and freshness when serving.
Side Dishes
This fried chicken pairs wonderfully with classic sides I love—creamy mashed potatoes, tangy coleslaw, and some buttery corn on the cob. For a lighter meal, I serve it with a crisp green salad dressed with a lemon vinaigrette. On comfy nights, pairing with macaroni and cheese is always a hit with family and friends.
Creative Ways to Present
For special occasions, I like plating the chicken pieces with homemade honey butter drizzle and a sprinkle of smoked paprika for extra oomph. Serving it family-style with vintage crates or baskets lined with kraft paper brings casual charm to the table. I’ve also tried single servings in mini cast-iron skillets which make a fun and rustic presentation that guests adore.
Make Ahead and Storage
Storing Leftovers
I let any leftover fried chicken cool completely, then store the pieces in an airtight container lined with paper towels to soak up excess moisture. In my experience, it keeps well in the fridge for up to 3 days without losing too much crispiness.
Freezing
I’ve successfully frozen leftover fried chicken by first flash-freezing the pieces on a baking sheet, then transferring them to a freezer bag. This method prevents them from sticking together. For best flavor and texture, I try to use frozen chicken within 1 to 2 months.
Reheating
To bring back that crispy goodness, I reheat leftover fried chicken in a preheated oven at 375°F (190°C) on a wire rack over a baking sheet for about 15–20 minutes. This helps the crust stay crunchy while warming the meat evenly without drying it out.
FAQs
-
Can I use boneless chicken for this Batter-Fried Chicken (Easy & Extra-Crispy) Recipe?
Absolutely! Boneless chicken works well too, especially chicken thighs or breasts cut into strips or nuggets. Just reduce the frying time since boneless pieces cook faster—keep an eye on them to avoid overcooking.
-
Why do I need both flour and cornstarch in the batter?
The combination of all-purpose flour and cornstarch is the ultimate secret to a crispy, light crust. Flour provides structure, while cornstarch keeps the coating crisp and prevents it from getting gummy or heavy after frying.
-
Can I prepare the batter ahead of time?
Yes, you can make the batter in advance and keep it in the fridge while the chicken brines. Just give it a good whisk before coating the chicken, and add a little cold water if it’s thickened too much.
-
How do I know when the chicken is fully cooked?
Use a meat thermometer to check internal temperature—160°F (71°C) for white meat like breasts and 175°F (79°C) for dark meat pieces like thighs and drumsticks. The chicken should also have a golden brown crust and no pink inside.
Final Thoughts
This Batter-Fried Chicken (Easy & Extra-Crispy) Recipe holds a special place in my kitchen because it brings together everything I want from fried chicken: crunch, juiciness, and that satisfying flavor punch. It’s perfect for sharing with loved ones or enjoying as a treat on your own. Give it a try—you’ll find it’s easier than you think, with results that always make me smile. I can’t wait to hear how you make it your own!
Print
Batter-Fried Chicken (Easy & Extra-Crispy) Recipe
- Prep Time: 30 minutes
- Cook Time: 30 minutes
- Total Time: 1 hour 30 minutes
- Yield: 6 servings
- Category: Main Course
- Method: Frying
- Cuisine: American
- Diet: Low Lactose
Description
This recipe for batter-fried chicken delivers an easy and extra-crispy coating with juicy tender meat inside. The chicken is brined to enhance flavor and moisture, then dipped in a seasoned batter made from a mix of all-purpose flour and cornstarch for the perfect light, crispy crust. Fried until golden brown and cooked through, this chicken is ideal served hot or at room temperature.
Ingredients
For the fried chicken brine
- 1 quart cold water
- 1/4 cup kosher salt
- 1/4 cup granulated sugar
- 4 pounds bone-in, skin-on chicken pieces (breasts halved crosswise, leg quarters separated into thighs and drumsticks)
For the fried chicken batter
- 1 cup all-purpose flour
- 1 cup cornstarch
- 5 teaspoons freshly ground black pepper
- 1 teaspoon paprika
- 1/2 teaspoon cayenne pepper
- 2 teaspoons baking powder
- 1 teaspoon kosher salt
- 1 3/4 cups cold water
- 3 quarts vegetable oil or peanut oil for frying
Instructions
- Make the chicken brine: In a large bowl, whisk the cold water with kosher salt and granulated sugar until dissolved. Add the chicken pieces, cover, and refrigerate for 60 minutes to brine.
- Make the fried chicken batter: While the chicken brines, whisk together the all-purpose flour, cornstarch, black pepper, paprika, cayenne pepper, baking powder, and kosher salt in a large bowl. Pour in cold water and whisk until smooth. Cover and refrigerate the batter while the chicken is brining.
- Heat the oil and prepare for frying: Heat the vegetable oil in a large Dutch oven or deep pot over medium-high heat until it reaches 350°F. Place a wire rack over a rimmed baking sheet for draining the fried chicken.
- Dry the chicken and prepare batter: Discard the brine and thoroughly pat the chicken pieces dry with paper towels. Whisk the batter to recombine, thinning it with cold water one tablespoon at a time if it’s too thick until it reaches pancake batter consistency.
- Fry the chicken in batches: Dip half the chicken pieces into the batter, allowing excess to drip back into the bowl, then carefully place them in the hot oil. Maintain oil temperature between 300°F and 325°F, adjusting heat as needed. Fry until chicken is deep golden brown and reaches 160°F for white meat or 175°F for dark meat, about 12 to 25 minutes depending on piece size.
- Drain and finish frying remaining chicken: Transfer fried chicken to the wire rack to drain. Bring the oil temperature back to 350°F before frying the remaining batch of chicken pieces following the same method.
- Serve: Serve the fried chicken hot, warm, at room temperature, or even cold if there are leftovers. Enjoy immediately for best texture and flavor.
Notes
- If the batter becomes too thick after resting in the refrigerator, whisk in cold water one tablespoon at a time until it reaches pancake batter consistency.
- Pat chicken pieces completely dry after brining to ensure the batter sticks properly and creates a crispy crust.
- Do not substitute the all-purpose flour and cornstarch combination, as it is essential for a light and crispy coating.
- Avoid overcrowding the frying pot; cook chicken in batches to prevent pieces from sticking together.
- Allow the oil to return to 350°F between batches to maintain a crisp coating and avoid soggy crust.
- This recipe is dairy-free. To make it gluten-free, substitute regular flour with gluten-free all-purpose flour in the batter.
Nutrition
- Serving Size: 1 serving
- Calories: 450 kcal
- Sugar: 3 g
- Sodium: 700 mg
- Fat: 25 g
- Saturated Fat: 4.5 g
- Unsaturated Fat: 20 g
- Trans Fat: 0 g
- Carbohydrates: 30 g
- Fiber: 1 g
- Protein: 35 g
- Cholesterol: 110 mg
