
Pan Fried Chicken Strips Recipe
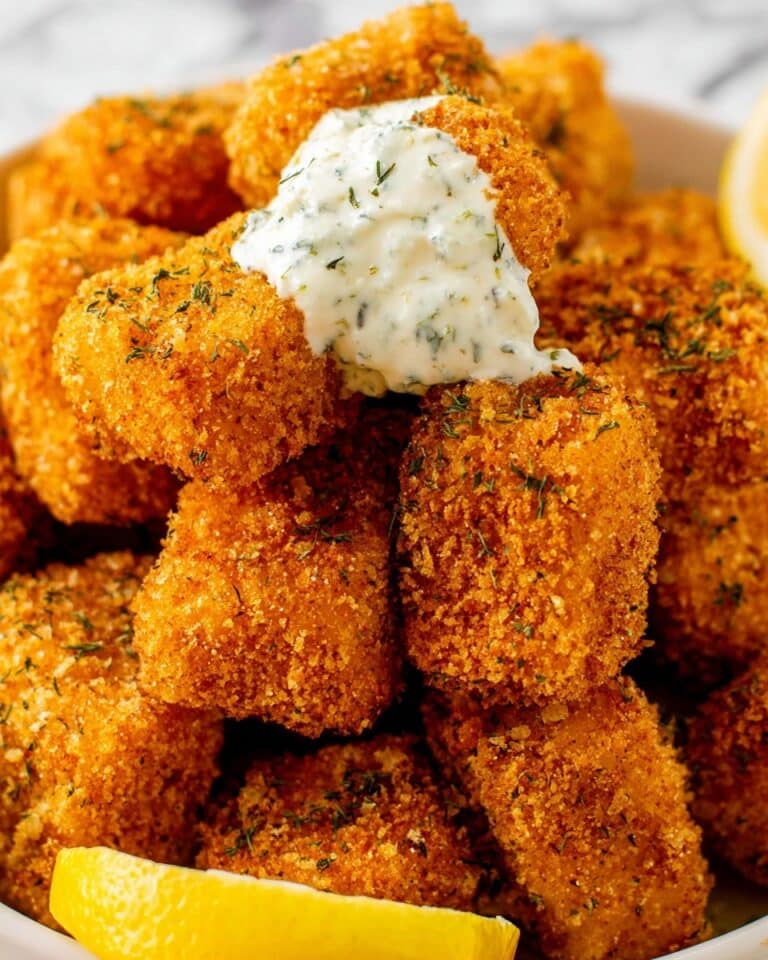
I’m excited to share this Pan Fried Chicken Strips Recipe with you—it’s one of those dishes that always brings smiles to the table. The crunchy, golden coating paired with juicy, tender chicken inside is just irresistible. Whether you’re cooking for a casual weeknight dinner or a crowd-pleasing appetizer, these chicken strips deliver that perfect balance of comfort and flavor.
What I love most is how straightforward this Pan Fried Chicken Strips Recipe is. You don’t need fancy ingredients or complicated techniques, just a little patience and some simple pantry staples. Plus, it’s a recipe that’s super easy to tweak to your taste or make ahead, which makes it a great go-to when you want something satisfying without a fuss.
Why This Recipe Works
- Perfectly Crispy Coating: The double dredge in seasoned flour and egg creates that crave-worthy crunch every time.
- Simple Ingredients: No obscure spices or ingredients needed, making it easy to whip up anytime.
- Juicy Inside: The careful cooking temperature and timing guarantees tender chicken that doesn’t dry out.
- Versatile & Quick: Ready in about 25 minutes—perfect for busy evenings or last-minute guests.

Ingredients & Why They Work
The ingredients in this Pan Fried Chicken Strips Recipe work beautifully together by layering flavor and texture without overwhelming the chicken. Freshly ground pepper and paprika add subtle warmth, while the garlic and onion powders bring savoriness that pairs perfectly with the golden crust.
- Flour: Acts as the base for the crispy coating, helping the spices adhere and create that crunch we all love.
- Kosher salt: Essential for seasoning—don’t underestimate salt’s power to enhance flavors.
- Garlic powder: Delivers a mild, deep savory note without overpowering the chicken.
- Onion powder: Adds natural sweetness and earthiness to the crust.
- Freshly ground pepper: Gives a gentle heat and complexity—always grind fresh when you can.
- Paprika: Adds a hint of smokiness and beautiful color to your coating.
- Egg: The binding agent to help the seasoned flour stick better and form that crispy shell.
- Chicken breasts: I recommend fresh, boneless breasts for even cooking and ease of slicing.
- Cooking oil (canola preferred): Canola oil has a high smoke point and neutral flavor, perfect for pan-frying without burning or bitter taste.
Tweak to Your Taste
I’m all about making recipes your own, and this Pan Fried Chicken Strips Recipe is no exception. I often switch up the seasoning a bit depending on what I have, or add a little heat if I’m craving something spicy. Don’t hesitate to experiment—you might find a new favorite twist!
- Spicy Variation: I’ve added a pinch of cayenne or chili powder before for a kick that paired wonderfully with a cooling ranch dip.
- Herb-Infused Crust: Sometimes, I mix in dried oregano or thyme with the flour for a subtle Mediterranean vibe.
- Gluten-Free Option: Swap the all-purpose flour for a gluten-free blend that fries well, but be mindful of texture—it might not be as crispy.
- Buttermilk Soak: If you have time, marinating your strips in buttermilk before dredging adds a lovely tang and makes the chicken extra tender.
Step-by-Step: How I Make Pan Fried Chicken Strips Recipe
Step 1: Preparing Your Chicken and Coating
Start by cutting the chicken breasts into even strips—about finger-width works best for uniform cooking. Mix all your dry seasonings into the flour in a shallow dish so everything is evenly distributed. Crack the egg into a bowl and beat it lightly with a fork; this will help your seasoned flour stick perfectly. I like to do one final roll in the flour after the egg dip to get that extra crispy layer—it’s a little trick I’ve learned and makes a big difference.
Step 2: Heating the Oil Just Right
Heat your oil in a 12-inch cast iron skillet over medium heat until it reaches 350°F. Using a candy thermometer really helps here—you want hot oil that’s not smoking, so your chicken cooks quickly without absorbing too much grease. When the temperature’s right, you’re halfway there to that beautiful golden crust.
Step 3: Frying the Strips
Place the strips gently in the oil, being careful not to overcrowd the pan, as that drops the temperature. Cook each side for about 4 minutes, turning carefully with tongs or a fork. The internal temperature should reach 160°F—juicy and safe. Patience here pays off; rushing might leave you with undercooked or overly greasy strips.
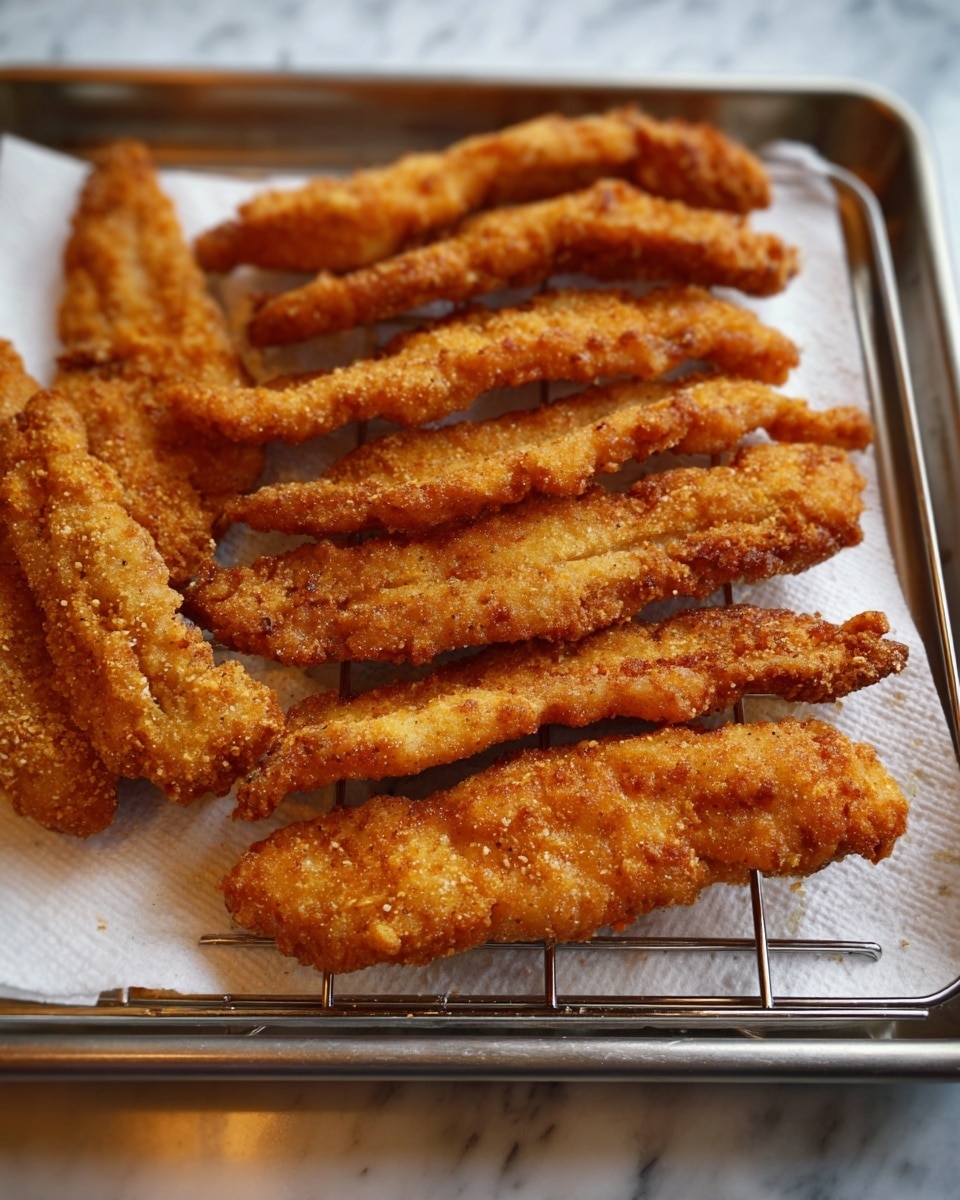
Step 4: Draining and Serving
Transfer the cooked strips onto a cooling rack placed over a baking sheet lined with paper towels—this helps drain off excess oil while keeping them crispy. If you’re not serving right away, pop them in a warm oven to keep that crispiness intact. I usually serve immediately because, honestly, they’re best fresh!
Pro Tips for Making Pan Fried Chicken Strips Recipe
- Consistent Strip Size: Cutting chicken into similar-sized strips ensures even cooking and avoids some pieces being dry while others are underdone.
- Oil Temperature Is Key: Using a candy thermometer to monitor heat prevents greasy results and keeps the coating crisp.
- Don’t Overcrowd the Pan: Give your chicken space—too many in the skillet causes steaming instead of frying.
- Rest Before Serving: Let the strips sit briefly on a cooling rack to drain excess oil but serve while still warm to enjoy the crunch.
How to Serve Pan Fried Chicken Strips Recipe
Garnishes
I love sprinkling a bit of chopped fresh parsley or chives on top for a pop of color and freshness—it brightens the dish nicely. Sometimes I add a little wedge of lemon on the side for squeezing over the strips, especially if I’ve gone a bit spicy with the seasoning.
Side Dishes
My go-to sides include classic coleslaw for crunch and tang, oven-roasted potatoes, or even a simple mixed green salad. For something heartier, creamy mac and cheese pairs like a dream with these crispy chicken strips.
Creative Ways to Present
For parties, I’ve served these strips with a variety of dipping sauces arranged in little bowls—think honey mustard, spicy mayo, or BBQ sauce. I’ve also turned them into sliders with mini buns and toppings for a fun finger food appetizer that everyone loved.
Make Ahead and Storage
Storing Leftovers
I usually store leftover chicken strips in an airtight container lined with paper towels in the fridge. The paper towels help absorb excess moisture, keeping them from getting soggy. They last well for up to 3 days, but they’re best reheated quickly for maximum crispiness.
Freezing
If I want to freeze, I lay the cooled strips on a baking sheet in a single layer and freeze until solid, then transfer to a zip-top bag. This method prevents them from sticking together. Frozen strips will keep well for up to 2 months.
Reheating
To reheat, I prefer the oven or air fryer—set at 350°F for about 8-10 minutes—to bring back that lovely crunch without drying out the chicken. Avoid microwaving if you want to keep the crispy texture intact.
FAQs
-
Can I use chicken thighs instead of breasts for this Pan Fried Chicken Strips Recipe?
Absolutely! Chicken thighs are a bit more forgiving as they tend to stay juicier, even if slightly overcooked. Just slice them into strips like the breasts and adjust cooking time slightly, as thighs might take a minute or two longer depending on thickness.
-
What oil is best for frying chicken strips?
I recommend oils with a high smoke point such as canola oil, vegetable oil, or peanut oil. Canola oil is great because it has a neutral flavor and is widely available, making it ideal for this Pan Fried Chicken Strips Recipe.
-
How do I know when the chicken strips are done frying?
The best way is to use a food thermometer—the internal temperature should reach 160°F. If you don’t have one, check that the juices run clear and the coating is golden brown and crisp. Avoid cutting into the strips too early to keep them juicy.
-
Can I bake these chicken strips instead of frying?
You can bake them, but the texture will be different—less crispy and more like a light crust. For best results, bake on a wire rack at 425°F and flip halfway through. However, pan frying remains my favorite because of how golden and crunchy it gets.
-
How do I prevent the chicken strips from getting greasy?
Maintaining the oil at the right temperature (around 350°F) is crucial—too low, and the strips soak up oil; too high, and they risk burning outside before cooking inside. Also, don’t overcrowd the pan; fry in batches if needed, and drain the cooked strips on a rack to keep them nice and crispy.
Final Thoughts
This Pan Fried Chicken Strips Recipe has become such a staple in my kitchen because it’s both reliable and deeply satisfying. It’s the kind of dish that never fails to make people happy around the table—and you’ll feel like a kitchen rockstar whipping it up with so little effort. Give it a try—you might just find yourself making these crispy, juicy strips your new favorite comfort food too!
Print
Pan Fried Chicken Strips Recipe
- Prep Time: 15 minutes
- Cook Time: 10 minutes
- Total Time: 25 minutes
- Yield: 4 servings
- Category: Main Course
- Method: Frying
- Cuisine: American
Description
Crispy and flavorful pan-fried chicken strips seasoned with a blend of garlic, onion, paprika, and black pepper, perfectly coated in flour and egg for a golden crunchy crust. Ideal as a quick and satisfying main dish or snack.
Ingredients
Breading
- 2/3 cup flour
- 2 teaspoons kosher salt
- 1 1/2 teaspoons garlic powder
- 1 1/2 teaspoons onion powder
- 3/4 teaspoon freshly ground pepper
- 3/4 teaspoon paprika
Chicken and Coating
- 1 egg
- 2 chicken breasts
Cooking
- 1 cup cooking oil (non GMO canola oil recommended)
Instructions
- Heat Oil: Heat the cooking oil in a 12-inch cast iron skillet over medium heat until it reaches 350 degrees Fahrenheit, using a candy thermometer to check the temperature.
- Prepare Breading Mixture and Egg: In a shallow dish, combine flour, kosher salt, garlic powder, onion powder, freshly ground pepper, and paprika; whisk together to blend evenly. Crack the egg into a small bowl and beat with a fork.
- Cut Chicken and Coat: Slice the chicken breasts into strips. Roll each chicken strip lightly in the seasoned flour mixture, then dip into the beaten egg, and return to the seasoned flour again, ensuring each strip is well coated. For extra crispiness, roll each strip once more in the flour mixture before frying.
- Fry Chicken Strips: Carefully place the coated chicken strips into the hot oil. Fry for 4 minutes on one side, then flip using tongs or a fork. Cook for an additional 3 to 4 minutes until the internal temperature of the chicken reaches 160 degrees Fahrenheit and the breading is golden brown.
- Drain and Serve: Place a cooling rack on a baking sheet lined with paper towels. Transfer the fried chicken strips to the cooling rack to drain excess oil. Serve immediately or keep warm in the oven until ready to eat.
Notes
- For crispier chicken strips, ensure oil temperature stays steady at 350°F during frying.
- If doubling the recipe, increase the flour and add more eggs to maintain proper coating consistency.
- Use a candy or instant-read thermometer for accurate oil and chicken temperature measurement.
- Non GMO canola oil is recommended for a neutral flavor and high smoke point, but vegetable or peanut oil can be substituted.
- Let fried strips rest briefly on a cooling rack instead of paper towels alone to prevent sogginess.
Nutrition
- Serving Size: 1 serving
- Calories: 350 kcal
- Sugar: 1 g
- Sodium: 700 mg
- Fat: 20 g
- Saturated Fat: 3.5 g
- Unsaturated Fat: 15 g
- Trans Fat: 0 g
- Carbohydrates: 20 g
- Fiber: 1 g
- Protein: 28 g
- Cholesterol: 110 mg
